Using SingleStore as a Kafka Producer
Previously, we learned to ingest data from a Kafka cluster using SingleStore pipelines. Today, we'll see how to push data from SingleStore to a Kafka cluster.
Join the DZone community and get the full member experience.
Join For FreeAbstract
In a previous article series, we looked at how SingleStore Pipelines could be used to ingest data from a Kafka cluster running on the Confluent Cloud. We can also push data from SingleStore to a Kafka cluster. This is very easy to achieve and, in this article, we'll see how.
Introduction
SingleStore Pipelines are a compelling feature that can ingest data at scale. However, there may be situations where we would like to push data from SingleStore to an external source. Let's see how we can do this with Apache Kafka™. For ease of use, we'll develop mainly in the cloud using the SingleStore Managed Service and the Developer Duck plan on CloudKarafka.
To begin with, we need to create a free Managed Service account on the SingleStore website, and sign-up for a free Developer Duck plan on the CloudKarafka website. At the time of writing:
- The Managed Service account from SingleStore comes with $500 of Credits. This is more than adequate for the case study described in this article.
- The Developer Duck plan from CloudKarafka is for testing and development using a multi-tenant Kafka server on a shared cluster. It enables the creation of a maximum of 5 topics, 10 MB of data per topic, and a maximum of 28 days retention period. This is sufficient for our demo example.
Create the Database Table
In our SingleStore Managed Service account, let's use the SQL Editor to create a new database. Call this timeseries_db, as follows:
CREATE DATABASE IF NOT EXISTS timeseries_db;We'll also create a table and some tick data, as follows:
USE timeseries_db;

CREATE TABLE tick (
     ts DATETIME(6) SERIES TIMESTAMP,
     symbol VARCHAR(5),
     price NUMERIC(18, 4)
);

INSERT INTO tick VALUES
('2020-02-18 10:55:36.179760', 'ABC', 100.00),
('2020-02-18 10:57:26.179761', 'ABC', 101.00),
('2020-02-18 10:58:43.530284', 'XYZ', 102.20),
('2020-02-18 10:58:55.523455', 'LMNO', 88.20),
('2020-02-18 10:59:12.953523', 'LMNO', 89.00),
('2020-02-18 10:59:16.178763', 'ABC', 102.50),
('2020-02-18 11:00:56.179769', 'ABC', 102.00),
('2020-02-18 11:00:26.174329', 'XYZ', 102.80),
('2020-02-18 11:01:37.179769', 'ABC', 103.00),
('2020-02-18 11:01:43.311284', 'LMNO', 89.30),
('2020-02-18 11:02:46.179769', 'ABC', 103.00),
('2020-02-18 11:02:59.179769', 'ABC', 102.60),
('2020-02-18 11:02:46.425345', 'XYZ', 103.00),
('2020-02-18 11:02:52.179769', 'XYZ', 102.60),
('2020-02-18 11:02:59.642342', 'LMNO', 88.80),
('2020-02-18 11:03:22.530284', 'LMNO', 87.90),
('2020-02-18 11:03:46.892042', 'ABC', 103.00),
('2020-02-18 11:03:59.179769', 'XYZ', 102.50),
('2020-02-18 11:04:34.928348', 'ABC', 103.30),
('2020-02-18 11:05:40.530284', 'ABC', 103.90),
('2020-02-18 11:05:43.492844', 'LMNO', 87.00),
('2020-02-18 11:05:49.523425', 'XYZ', 101.00),
('2020-02-18 11:05:51.623424', 'ABC', 105.00),
('2020-02-18 11:06:13.179769', 'XYZ', 100.50),
('2020-02-18 11:06:33.948284', 'LMNO', 86.50),
('2020-02-18 11:07:22.892042', 'ABC', 104.70),
('2020-02-18 11:08:07.152453', 'XYZ',  99.40),
('2020-02-18 11:08:43.530284', 'LMNO', 87.50),
('2020-02-18 11:08:58.742423', 'ABC', 104.00);
We can check that the table was loaded correctly using:
SELECT * FROM tick;Configure CloudKarafka
First, we need to log in to our CloudKarafka account.
We'll select Create New Instance, as shown in Figure 1.
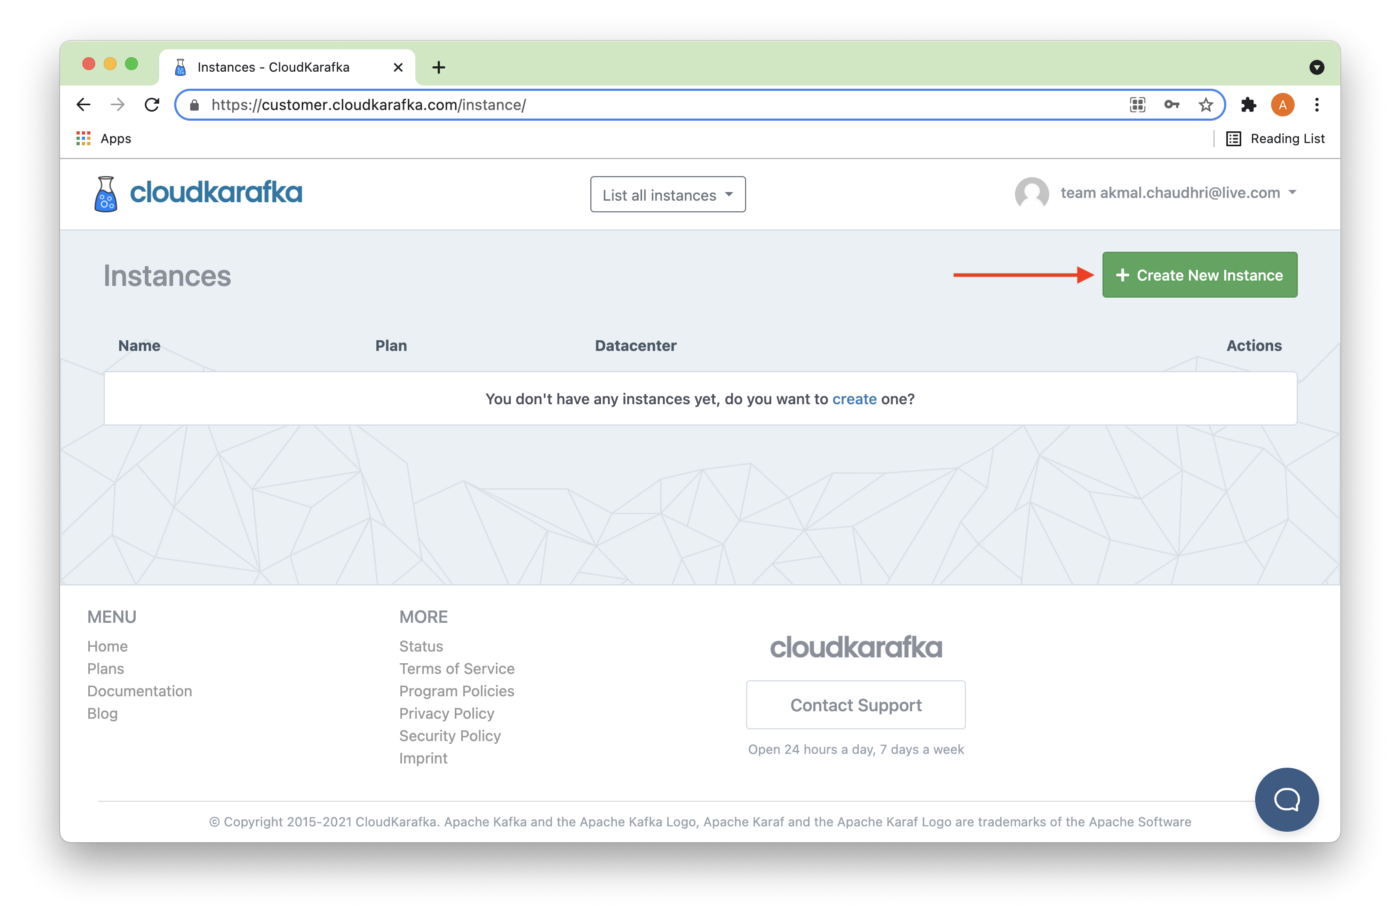
Figure 1. Create New Instance.
On the Create New Instance page, we'll enter a Name (1) and then Select Region (2), as shown in Figure 2.
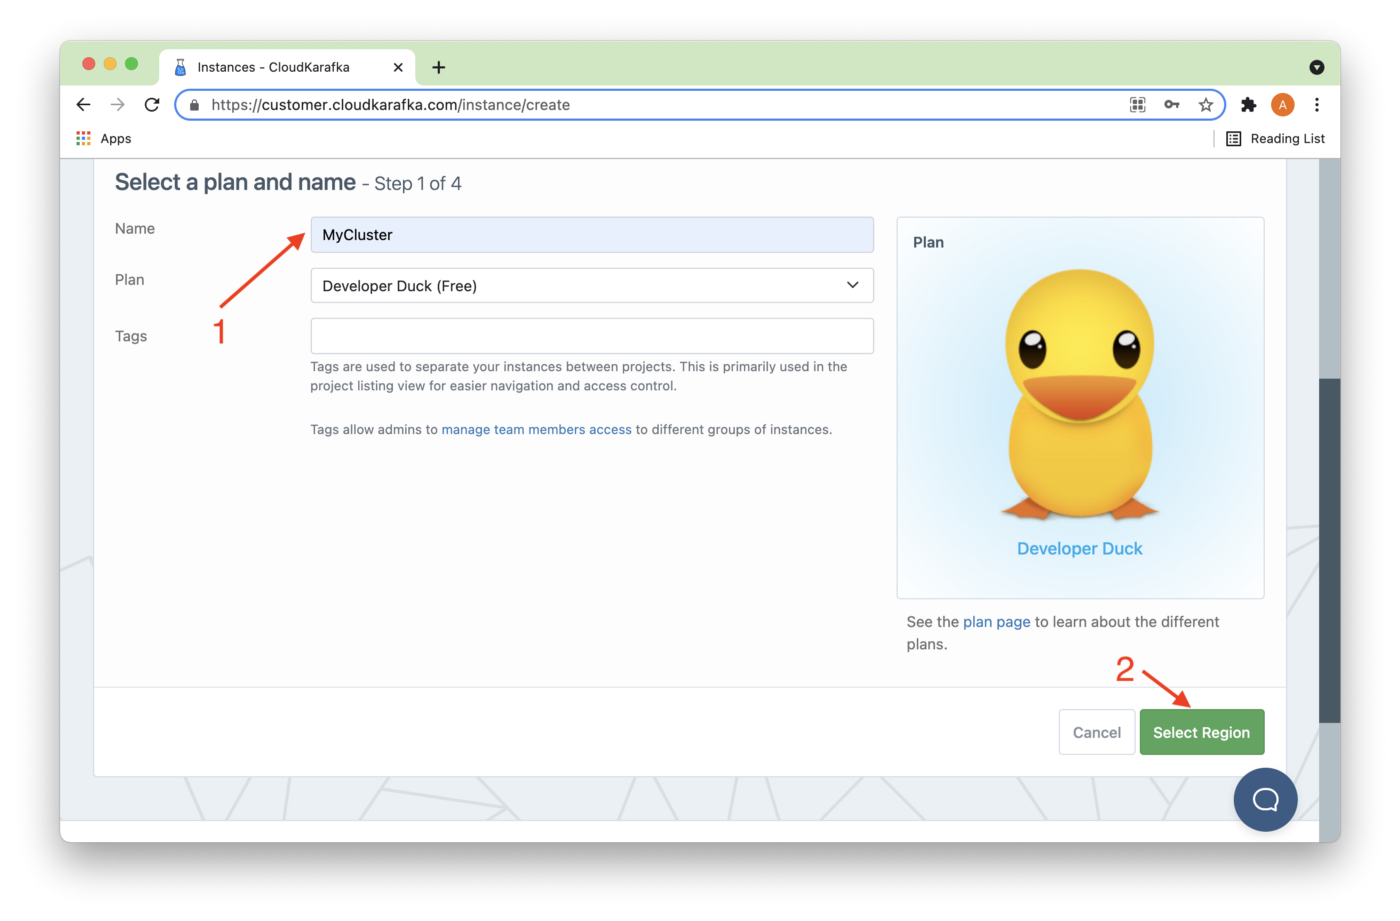
Figure 2. Add Name and Select Region.
In Figure 3, we'll choose a Datacenter (1). Several data center options are available. Then we'll click Review (2).
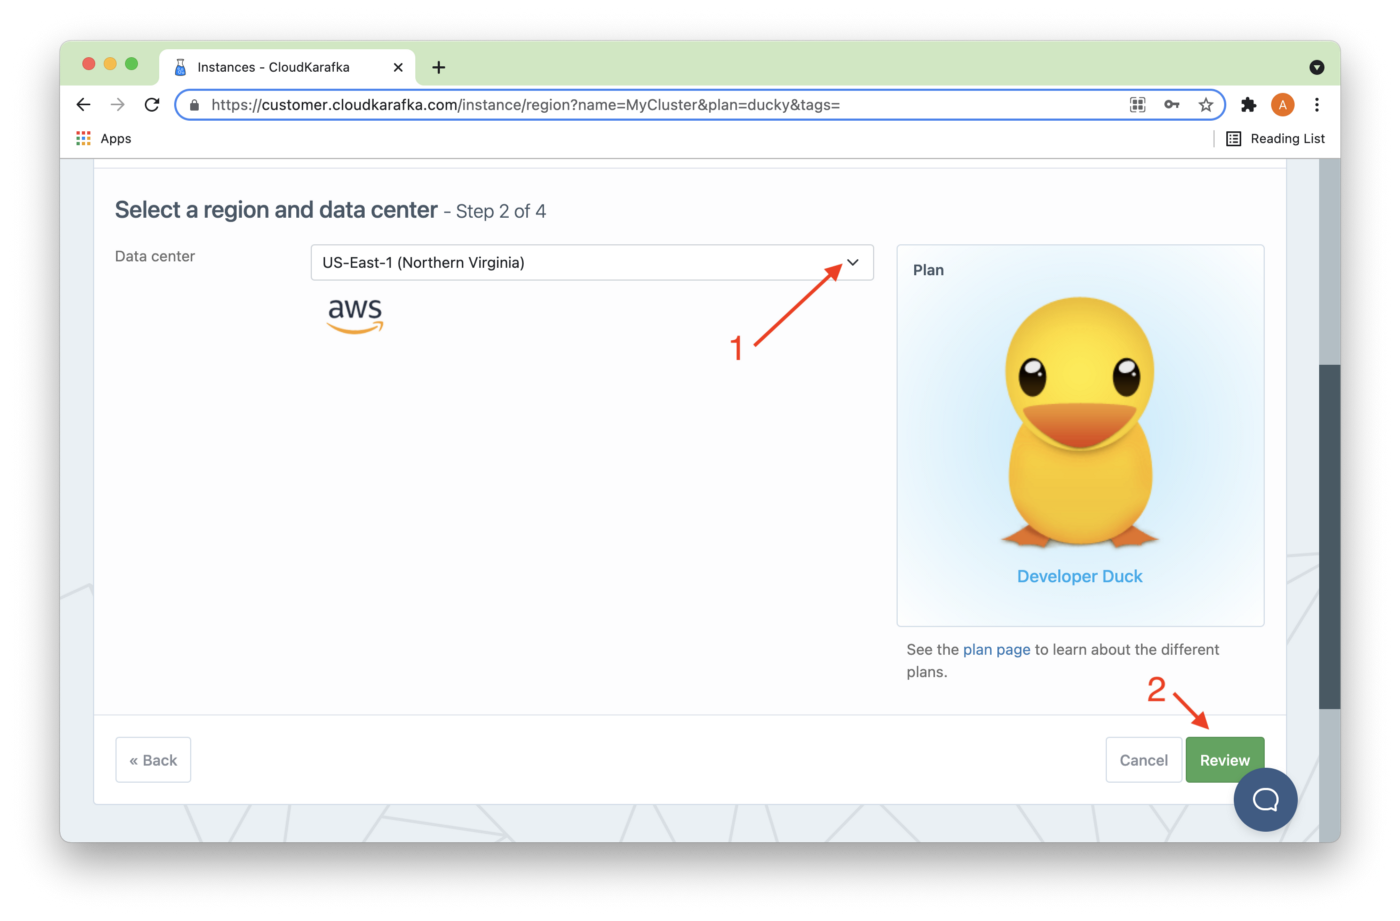
Figure 3. Datacenter and Review.
Next, we'll click Create Instance, as shown in Figure 4.
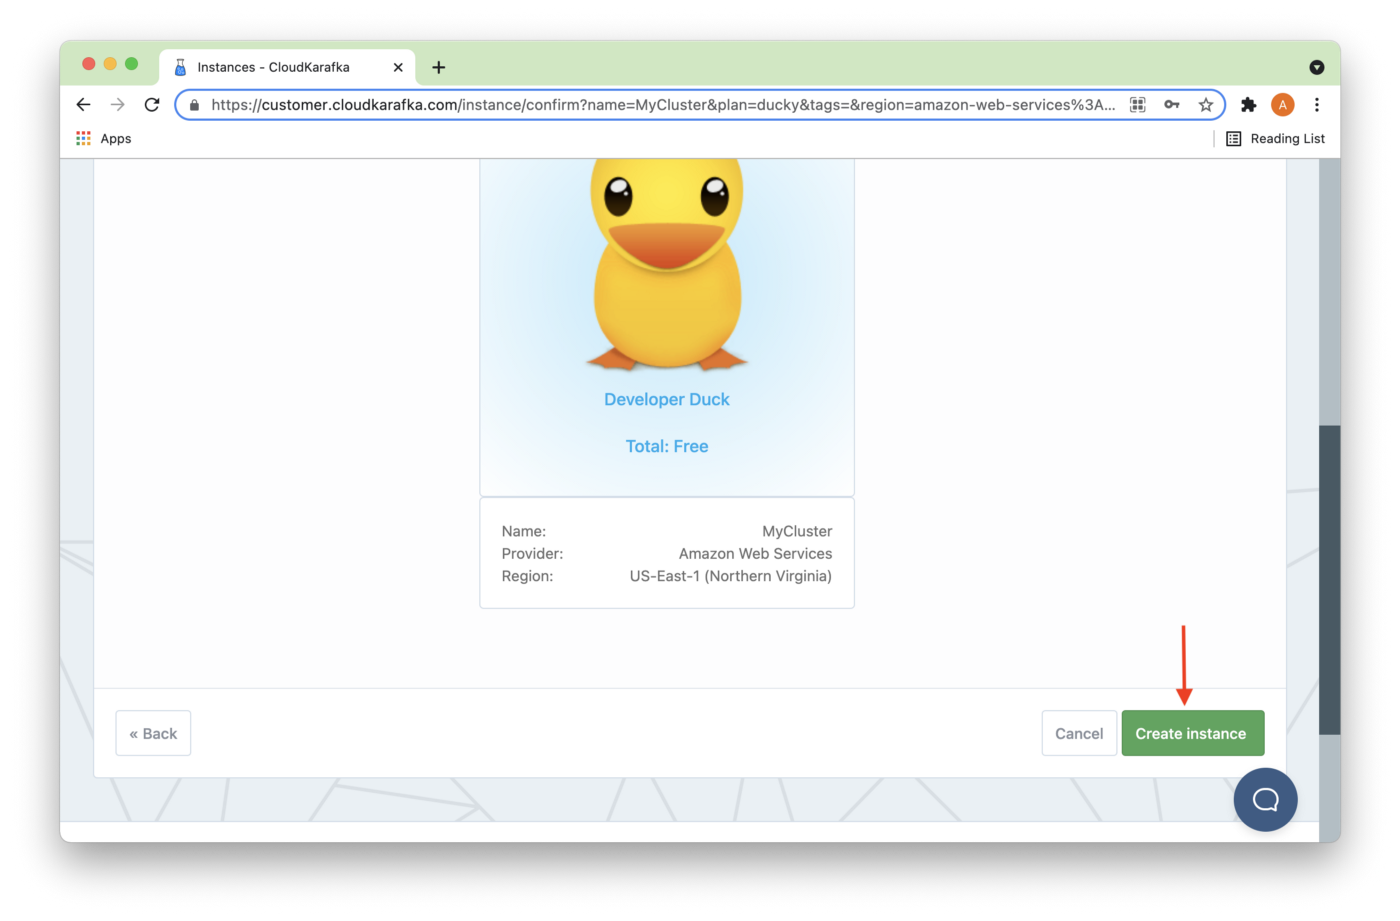
Figure 4. Create Instance.
The new instance should be visible on the Instances page, as shown in Figure 5. The name is a hyperlink, and we'll click it.
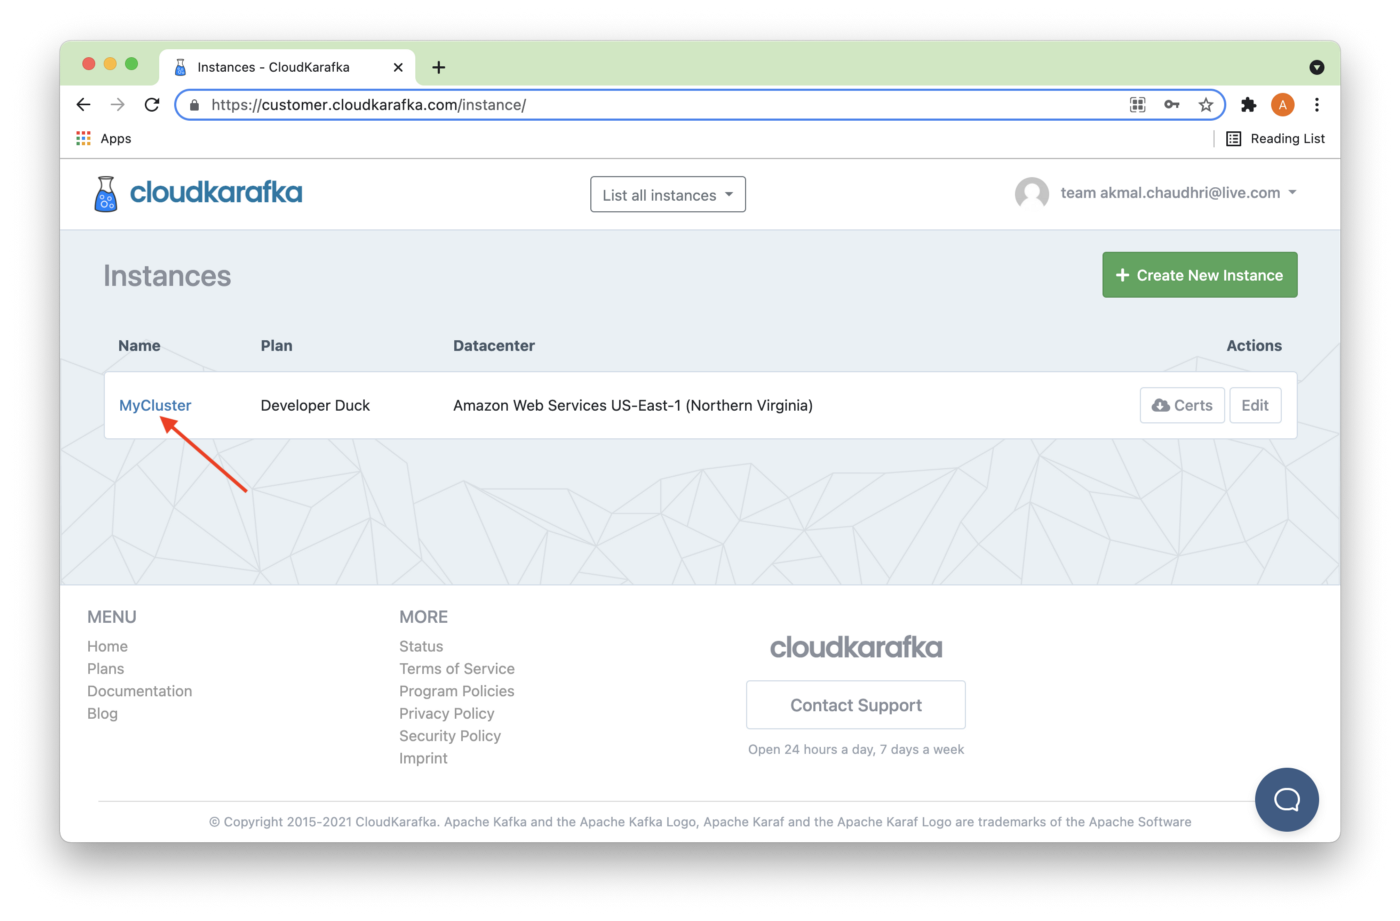
Figure 5. Instances.
We can see the Connection details (1) on the next page, as shown in Figure 6. Selecting Download (2) will also save these details in a local text file. Keep this file safe if you download these details.
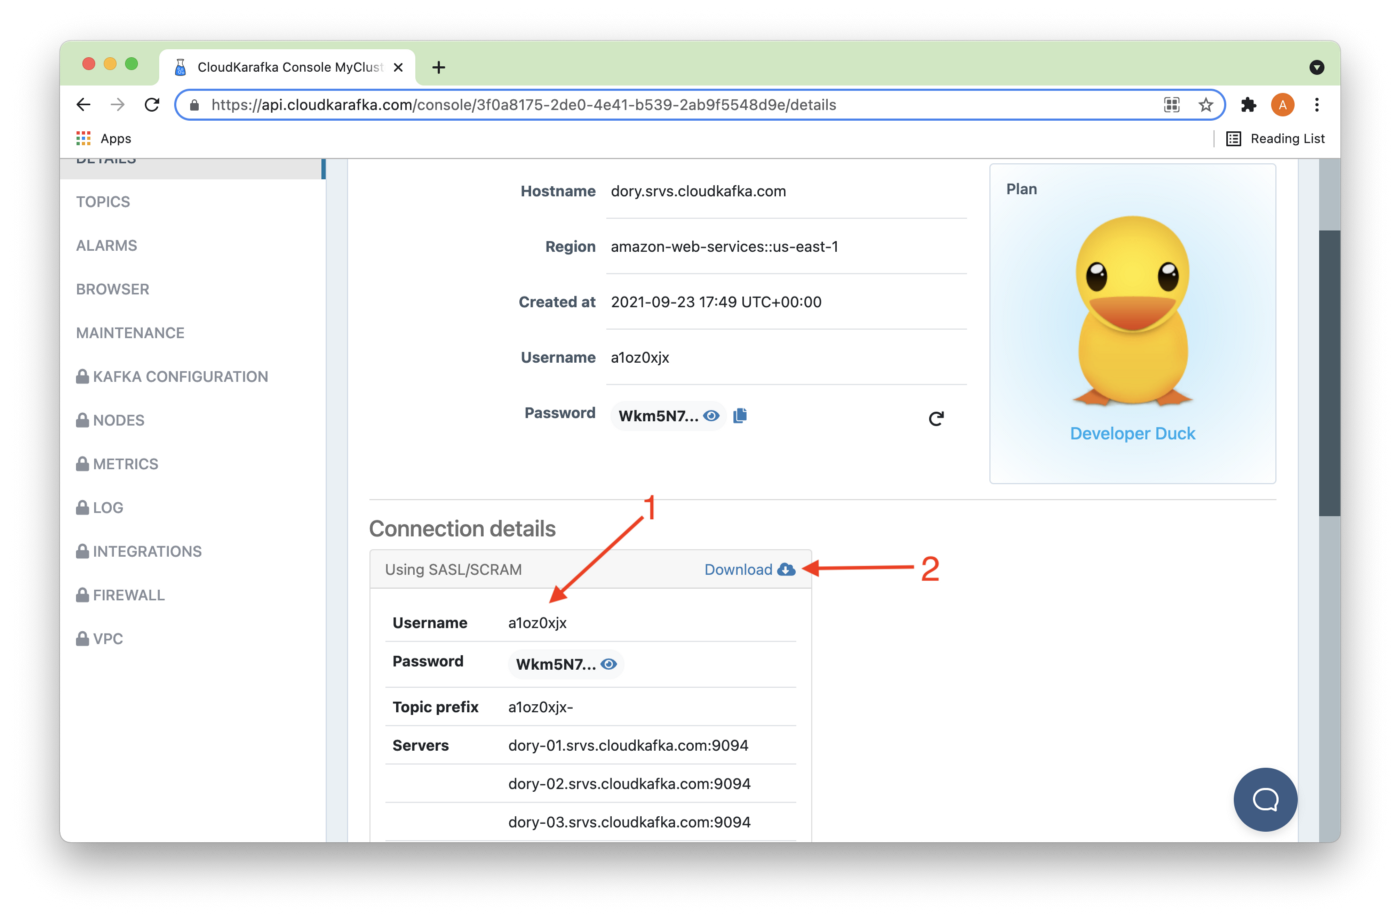
Figure 6. Connection details.
We are now ready to build the code.
Producer-Consumer Java Code
CloudKarafka provides several code examples. Therefore, we can adapt an existing Producer-Consumer example for our use case. A suitable Java code example is available on GitHub. All we need to do is follow the instructions:
git clone https://github.com/CloudKarafka/java-kafka-example
cd java-kafka-example
Now, we need to comment out one line of code in main() in the Java code, as follows:
// c.produce();This is because SingleStore will be the Producer.
Next, we can build the code, as follows:
mvn clean compile assembly:singleWe'll now declare some environment variables:
export CLOUDKARAFKA_BROKERS=broker1:9094,broker2:9094,broker3:9094
export CLOUDKARAFKA_USERNAME=<username>
export CLOUDKARAFKA_PASSWORD=<password>
We'll substitute the actual server values for broker1, broker2 and broker3, which we previously obtained in Figure 6. We'll repeat this for <username> and <password>. Use the values for your cluster.
And now we'll run the Java code, as follows:
java -jar target/kafka-1.0-SNAPSHOT-jar-with-dependencies.jarSince only a Consumer is running, it will wait for data. We'll send some data from SingleStore.
SingleStore Producer
For our use case, we can create a simple Producer in SingleStore as follows:
USE timeseries_db;

SELECT to_json(tick.*)
FROM tick
INTO KAFKA 'broker1:9094,broker2:9094,broker3:9094/<username>-default'
CONFIG '{
   "security.protocol" : "SASL_SSL",
   "sasl.mechanism" : "SCRAM-SHA-256",
   "sasl.username" : "<username>"
   "ssl.ca.location" : "/etc/pki/ca-trust/extracted/pem/tls-ca-bundle.pem"}'
CREDENTIALS '{
   "sasl.password" : "<password>"}';
We'll substitute the actual server values for broker1, broker2 and broker3, which we previously obtained in Figure 6. We'll repeat this for <username> and <password>. Use the values for your cluster.
CloudKarafka provides a default topic name that consists of the <username> followed by a hyphen (-) as the topic prefix, followed by the word default.
The sasl.mechanism is described in the Java code as SCRAM-SHA-256 so we'll use the same value here.
The ssl.ca.location is fixed and provided by SingleStore. It does not need to be modified.
Running the code will send the tick data from SingleStore, and we should see JSON data appear in the output of the Java application.
Summary
In this example, we have seen how SingleStore can be used as a Producer for a Kafka topic. This example complements the previous Pipelines example and demonstrates the ease of integrating with external systems and sharing data from SingleStore.
Published at DZone with permission of Akmal Chaudhri. See the original article here.
Opinions expressed by DZone contributors are their own.

Comments