Creating a Custom List With Java Implementing Iterator.
In this post, we are going to talk about developing a custom data structure and how to create a list using Java.
Join the DZone community and get the full member experience.
Join For FreeIn this post, we are going to talk about developing a custom data structure and how to create a list using Java.
Before we code, we need to understand a few concepts.
List: A list is a data structure which represents a collection or arrangement of data (nodes), and every node has the pointer to the next node, which means the nodes can't be accessed by the index. The below image shows a list with three elements (nodes), and the "First" and "Last" pointers to make possible the access to the list data.

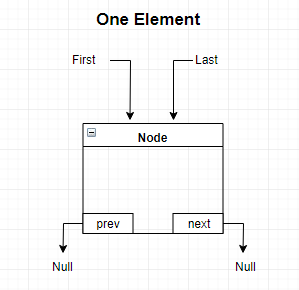
Node: A node is a structure which represents each element in the list. A node has at least one pointer to the next element and a field that contains the specific information or data. In a list with one element the first and last pointer point to the same element.

Next, Prev, First, Last (Pointers): These are pointers which allow access to the nodes in a list.
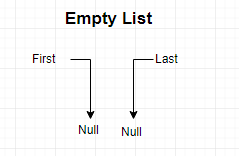
Empty List: A list without elements, the "first" and "last" nodes are null.

Let's Code
First the Node class:
package app;

public class Node <T> {
    private Node next;
    private Node prev;
    private T data;

  //getters and setters omited..
}
In the Node class, the important thing to highlight is the use of generic <T> to pass the data type of the node and make the list reusable.
After that, we need implement the CustomList class:
package app;

import java.util.Iterator;

public class CustomList<T> implements Iterable<Node> {
    private Node first;
    private Node last;

    public CustomList() {
        first = last = null;
    }

    public boolean isEmpty(){
        return first == null;
    }

    public void push(T data) {
        Node tempo = new Node();
        tempo.setData(data);
        tempo.setNext(null);

        if (first == null) {
            tempo.setPrev(null);
            first = last = tempo;
        } else {
            tempo.setPrev(last);
            last.setNext(tempo);
            last = tempo;
        }
    }

    @Override
    public Iterator<Node> iterator() {
        return new ListIterator(first);
    }
}
The CustomList class implements Iterable, which allows us to use "for" with the list.
In the next step, we will create our own implementation of ListIterator:
package app;

import java.util.Iterator;

public class ListIterator implements Iterator<Node> {
    private Node current;

    public ListIterator(Node first) {
        current = first;
    }

    @Override
    public boolean hasNext() {
        return current != null;
    }

    @Override
    public Node next() {
        Node tempo = current;
        current = current.getNext();
        return tempo;
    }
}
It is necessary to pass the first node of the list in the constructor to access the contents of the list using the pointers (next, prev) depending on your needs. We must also overload the next() and hasNext() methods.
Finally, we use our class to store Person and Car:
package app;

public class App {
    public static void main(String[] args) throws Exception {

        CustomList<Person> list1 = new CustomList<>();

        list1.push(new Person("Clark", "Kent", 35));
        list1.push(new Person("Bruce", "Wayne", 40));
        list1.push(new Person("Linda", "Carter", 30));

        for (Node node : list1) {
            System.out.println(node.getData().toString());
        }

        CustomList<Car> list2 = new CustomList<>();
        list2.push(new Car(200, "Car 1"));
        list2.push(new Car(100, "Car 2"));

        for (Node node : list2) {
            System.out.println(node.getData().toString());
        }
    }
}
In the above code, we noticed that we can iterate over the lists with the for structure.
That's all folks, we've implemented our custom List with Java by implementing Iterator.
Opinions expressed by DZone contributors are their own.

Comments