Use Configuration-Based Dependency Injection on TFLearn to Improve Iterative Deep Learning Development Process
Do it!
Join the DZone community and get the full member experience.
Join For Free How deep is your learning?
Introduction
Deep learning has been proven as a key benefit to all aspects of business development. By using the deep learning frameworks, such as TFLearn, a deep learning library featuring a higher-level API for TensorFlow, we can quickly develop and train a model to perform accurate and intuitive cognitive tasks.
To develop a good deep learning model is an iterative process consisting of steps and sub-tasks which require big collaborations from the teams of data scientists, machine learning engineers, and IT deployment support.
This article analyzes the pain points of the interactive deep learning model development process and proposes a solution using configuration-based dependency injection techniques in python to build the neural network classifiers on TFLearn.
With a step-by-step guide of building a sample application, A Smart Customer Retention System, we will see how this proposed solution will simplify the development process and decouple the tasks of data engineering and the model design and training. Furthermore, the model development will be more productive by reducing the development complexity and the dependencies between the teams. The source code of the sample project can be found at GitHub.
Iterative Deep Learning
Developing a deep learning model using TFLearn follows a cycle of stages of iterative sub-processes. Typically, the development is consisting of iterations at different stages that help to build the model to reach the desired cognitive results.
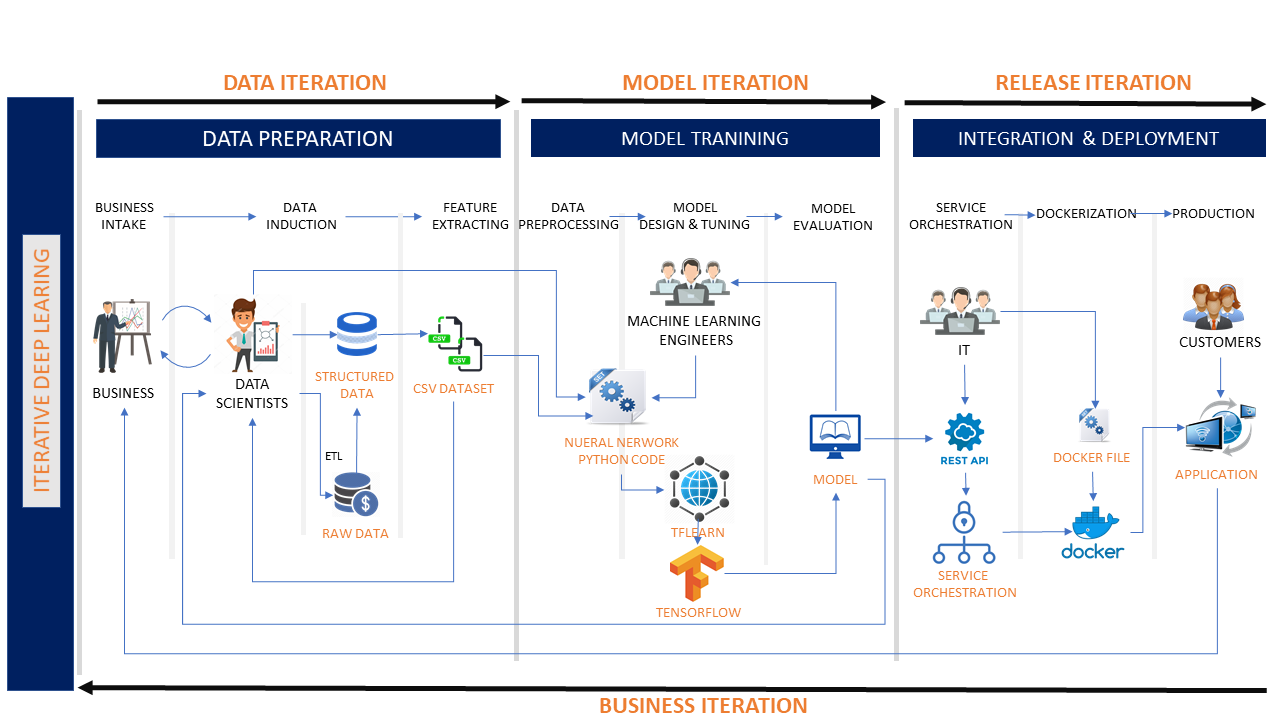
- Data Iteration: A deep learning project starts with data engineering. In this iteration, the data scientists shall:
- Analyze business requirements.
- Obtain the raw data and perform the data transformations.
- Extract the features and create raw datasets.
- Model Iteration: The model design/evaluation iteration starts once the datasets are ready.
- In this iteration, data scientists shall:
- Make datasets available in the desired format.
- Pre-process the datasets.
- In the same iteration, machine learning engineers shall:
- Design the neural network model.
- Train the model using the pre-processed datasets.
- Evaluate the model by checking accuracy and loss.
- If the model behaves poorly, both machine learning engineers data scientists need to evaluate the results, identify the causes, make the fix and then iterate the cycle again.
- In this iteration, data scientists shall:
- Release Iteration: After the model is trained and tested, it becomes the release iteration. In this iteration, the IT development team shall:
- Expose the model as microservices.
- Deploy and publish services.
The above iterative development process has the following disadvantages:
- Tightly coupled: The stages of data engineering, model design, and model training are tightly coupled with strong dependencies. For example, to train a model, the machine learning engineer must know the details of the dataset.
- Poor maintainability: Although TFLearn has reduced the coding efforts in building a deep learning model, the side effect is that multiple teams are working on the same source code which makes the system hard to maintain.
Is there a solution to solve the issues?
Use Configuration-Based Dependency Injection on TFLearn
To improve the development process, let's propose a solution with the following advantages:
- Configuration-based development — By developing the application metadata as the YAML configuration files, each team shall only maintain their configurations files. Configuration-based development removes the dependencies across the teams and the stages.
- Better maintainability — The solution provides pre-built python components as the TFLearn API wrappers for data processing, model instantiation, and result handling. These components are injected into the classifier according to the classifier's dependency configurations.
- Separation of concern — the core python components are maintained by the IT team. Data scientists and machine learning engineers shall solely focus on the data manipulating and model tuning by developing the configuration files.
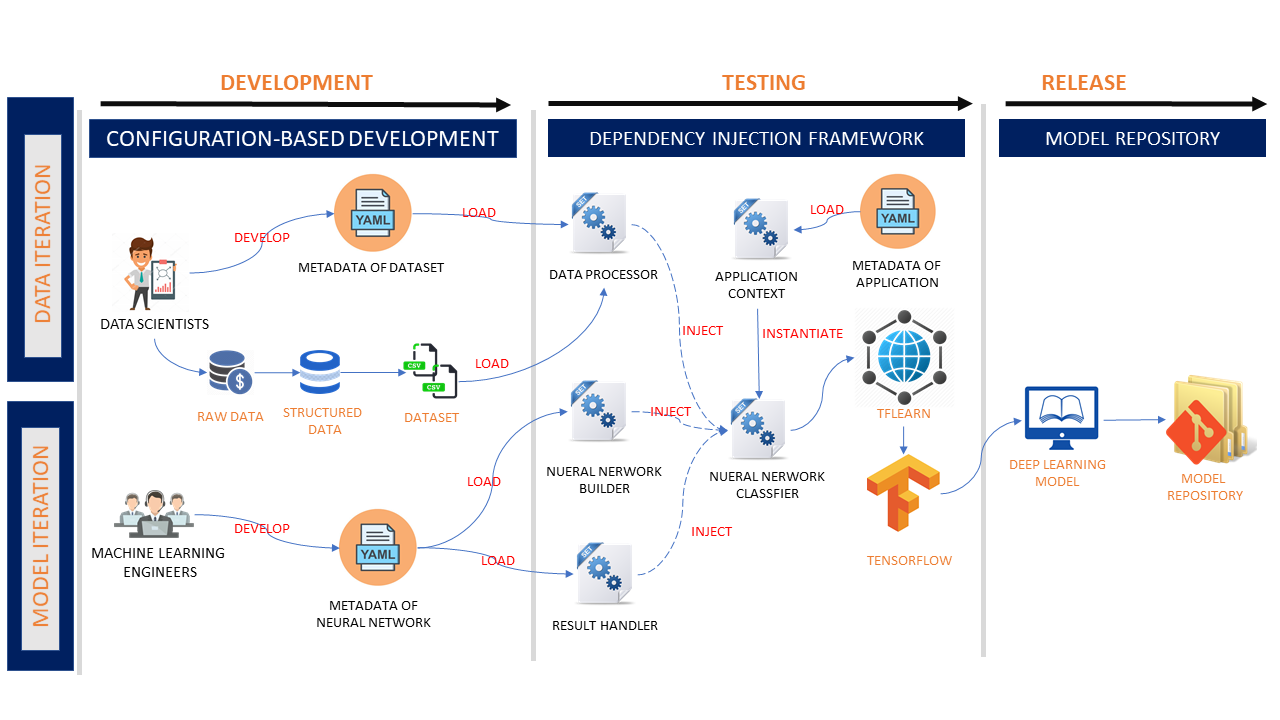
Let’s have an in-depth observation of the architecture and the implementation:
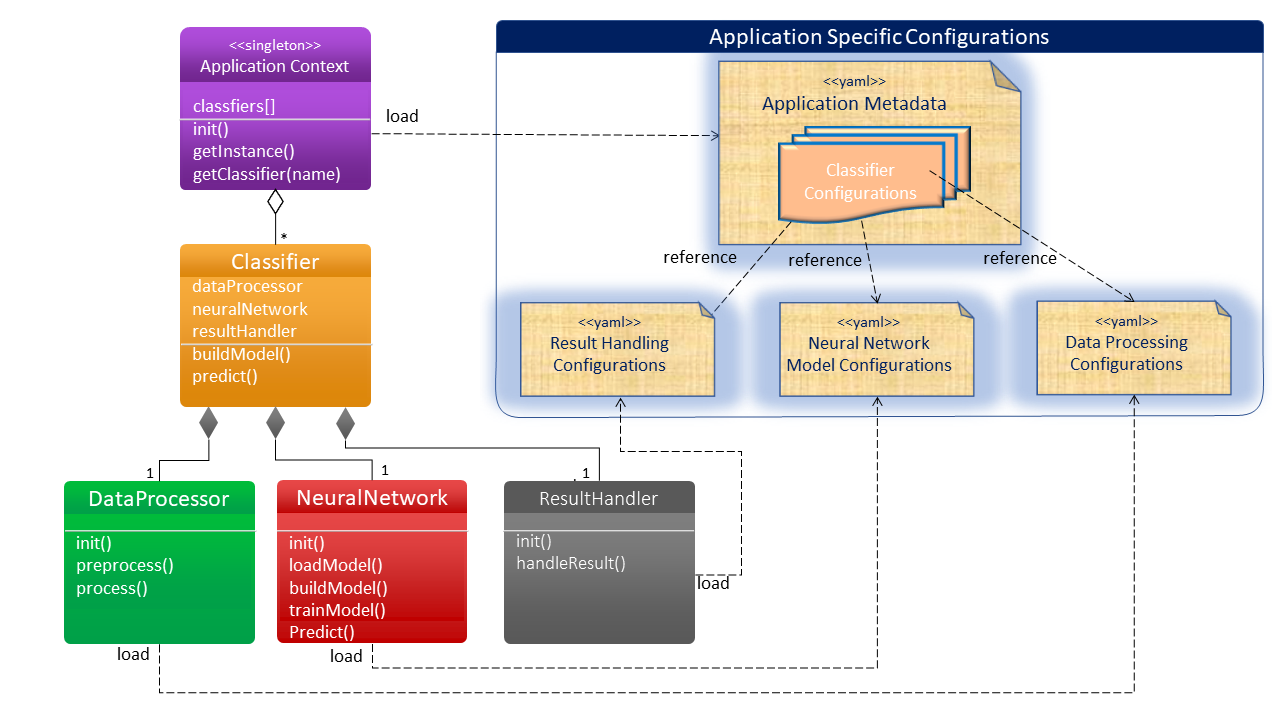
Singleton Application Context
A singleton Application Context object works as a classifier factory. It loads the application metadata and instantiates the classifiers using python reflection techniques.
class ApplicationContext:
    """ This is a singleton class initializing the application and working as a classifier factory. """
    __instance = None
    @staticmethod
    def get_instance(name):
        """ Static method of getting the singleton instance """
        if ApplicationContext.__instance is None:
            ApplicationContext(name)
        return ApplicationContext.__instance
    def __init__(self, name):
        """ Private constructor instantiates a singleton object.
            Create classifier instances using reflection based on configurations.
        """
        if ApplicationContext.__instance is None:
            self.classifier_instances = {}
            with open(name) as f:
                self.classifiers = yaml.safe_load(f)['classifiers']
            for classifier in self.classifiers:
                self.classifier_instances[classifier] = getattr(__import__(self.classifiers[classifier]['module']),
                    self.classifiers[classifier]['class_name'])(
                        classifier, self.classifiers[classifier])
            ApplicationContext.__instance = self
    def get_classifier(self, classifier):
        """ Method to get classifier instance by its name"""
        return self.classifier_instances[classifier]
Classifier
Classifier components are instantiated and maintained by the application context. It provides core functions to train the model and predict the data. A classifier contains three sub-components: a data processor, a neural network model, and a result handler. The required sub-components are injected into the classifier by the classifier configuration.
Below is a sample of classifier:
class CsvDataClassifier:
    """A Classifier providing the prediction for data"""
    def __init__(self, name, conf):
        """ Private constructor:
            instantiate a classifier with the following sub objects by loading the configurations
            a) build data processor
            b) build neural network
            c) build result handler
        """
        self.name = name
        self.conf = conf
        self.data_loader = getattr(__import__(self.conf['data_loader']['module']),
        self.conf['data_loader']['class_name'])(
            self.conf['data_loader']['data_config'])
        self.neural_network = getattr(__import__(self.conf['neural_network']['module']),
        self.conf['neural_network']['class_name'])(name,
            self.conf['neural_network']['dnn_config'])
        self.result_handler = getattr(__import__(self.conf['result_handler']['module']),
            self.conf['result_handler']['class_name'])(self.conf['result_handler']['handler_config'])
    def build_model(self):
        """ Method to build the classifier:
            a) load and process the data
            b) build the neural network model
            c) train the model
        """
        self.data_loader.pre_process()
        self.neural_network.build()
        self.neural_network.train(self.data_loader.rows, self.data_loader.labels, True)
        return 'Classifier model ' + self.name + ' is built successfully.'
    def predict(self, data):
        """ Method to predict by the input data """
        ids = [row[0] for row in data]
        data = self.data_loader.process_data(data)
        results = self.neural_network.predict(data)
        return self.result_handler.handle_result(ids, results)
Data Processor
The data processor performs the data pre-process. It is instantiated from the configurations that are designed by data scientists. As shown below is a CSV data processor.
import yaml
import numpy as np

from tflearn.data_utils import load_csv


class CsvLoader:
    """A data processor for the csv dataset"""
    def __init__(self, conf_file):
        """ Private constructor initializing the csv data loader with configurations"""
        with open(conf_file) as f:
            # use safe_load instead load
            self.data_conf = yaml.safe_load(f)

        self.rows, self.labels = load_csv(self.data_conf['data_file'],
                                          target_column=self.data_conf['target_column'],
                                          categorical_labels=True, n_classes=self.data_conf['n_classes'])

        self.columns_to_ignore = self.data_conf['columns_to_ignore']
        self.conversion_map = self.data_conf['conversion_map']

    def __pre_process_data__(self, rows):
        """private method of csv data pre-processing"""
        if rows is None:
            rows = self.rows
        # Sort by descending id and delete columns
        for column_to_ignore in sorted(self.columns_to_ignore, reverse=True):
            [row.pop(column_to_ignore) for row in rows]
        for i in range(len(rows)):
            # Converting data by converting_map
            for j in range(len(rows[i])):
                if j in self.conversion_map:
                    rows[i][j] = self.conversion_map[j].index(rows[i][j])
        return np.array(rows, dtype=np.float32)

    def pre_process(self):
        """public method of data pre-processing"""
        self.rows = self.__pre_process_data__(None)

    def process_data(self, rows):
        """public method of data processing"""
        return self.__pre_process_data__(rows)
Neural Network Model
The classifier instantiates the neural network model from the configurations of the model hyperparameters that are prepared by machine learning engineers. By consuming the pre-processed dataset from the data processor, the classifier invokes the neural network model component to train the model and persist the model for the data prediction.
import yaml
import tflearn


class DnnModel:
    def __init__(self, name, conf_file):
        with open(conf_file) as f:
            # use safe_load instead load
            self.model_conf = yaml.safe_load(f)
        self.model = None
        self.name = name
        self.path = 'model/' + self.name + '/' + self.name + '.tfmodel'

    def __load__(self):
        self.model.load(self.path)

    def build(self):
        net = tflearn.input_data(shape=self.model_conf['input_layer']['shape'])
        for i in range(len(self.model_conf['hidden_layers'])):
            net = getattr(tflearn, self.model_conf['hidden_layers'][i]['type'])(net, self.model_conf[
                'hidden_layers'][i]['neuron'], activation=self.model_conf['hidden_layers'][i]['activation'])
            if self.model_conf['hidden_layers'][i]['dropout'] is not None:
                net = tflearn.dropout(net, self.model_conf['hidden_layers'][i]['dropout'])

        net = getattr(tflearn, self.model_conf['output_layer']['type'])(net, self.model_conf[
            'output_layer']['neuron'], activation=self.model_conf['output_layer']['activation'])

        net = tflearn.regression(net, optimizer=self.model_conf['regression']['optimizer'],
                                 loss=self.model_conf['regression']['loss'])

        # Define model
        self.model = tflearn.DNN(net)
        return self.model

    def train(self, data, labels, save_model):
        self.model.fit(data, labels, n_epoch=self.model_conf['fit']['n_epoch'],
                       batch_size=self.model_conf['fit']['batch_size'],
                       show_metric=self.model_conf['fit']['show_metric'])
        if save_model:
            self.model.save(self.path)

    def predict(self, data):
        if self.model is None:
            self.build()
            self.__load__()
        return self.model.predict(data)
Result Handler
The result handler is an optional component of a classifier. It translates the classification result in meaningful and human-readable data. The result handler is business-specific.
As shown below is a sample result handler handling the customer churn prediction. It returns the customer's loyalty score and the churn prediction as a Yes or No.
class CustomerChurnHandler:
    class CustomerChurnResult:
        def __init__(self, customer_id, churn, score):
            self.id = customer_id
            self.churn = churn
            self.score = score

    def __init__(self, conf_file):
        self.results = []

    def handle_result(self, ids, data):
        self.results = []
        for i in range(len(data)):
            result = CustomerChurnHandler.CustomerChurnResult(ids[i], 'Yes' if data[i][1] >= 0.5 else 'No', round(data[i][0] * 100, 2))
            self.results.append(result)
        return self.results
Next, let’s look at a sample use case to see how this proposed solution can simplify the model development.
Sample Use Case: A Smart Customer Retention System
The sample Smart Customer Retention use case illustrates how deep learning adds value to a Telecom BSS. In this scenario, a telecom service provider notices an increased cost of the manual efforts of the customer retention process. The business team initiates a strategic project to address the issue by building a system using deep learning.
• The system should be able to predict customer churn to save the cost of the customer management process.
• In case of customer is predicted to be churn, the system should process the customer disconnect automatically.
• In case of customer is predicted to stay, the system should provide the recommendations of the offers to customer retention.
• The retention department will be able to work with the customer by choosing the offer from the recommendations.
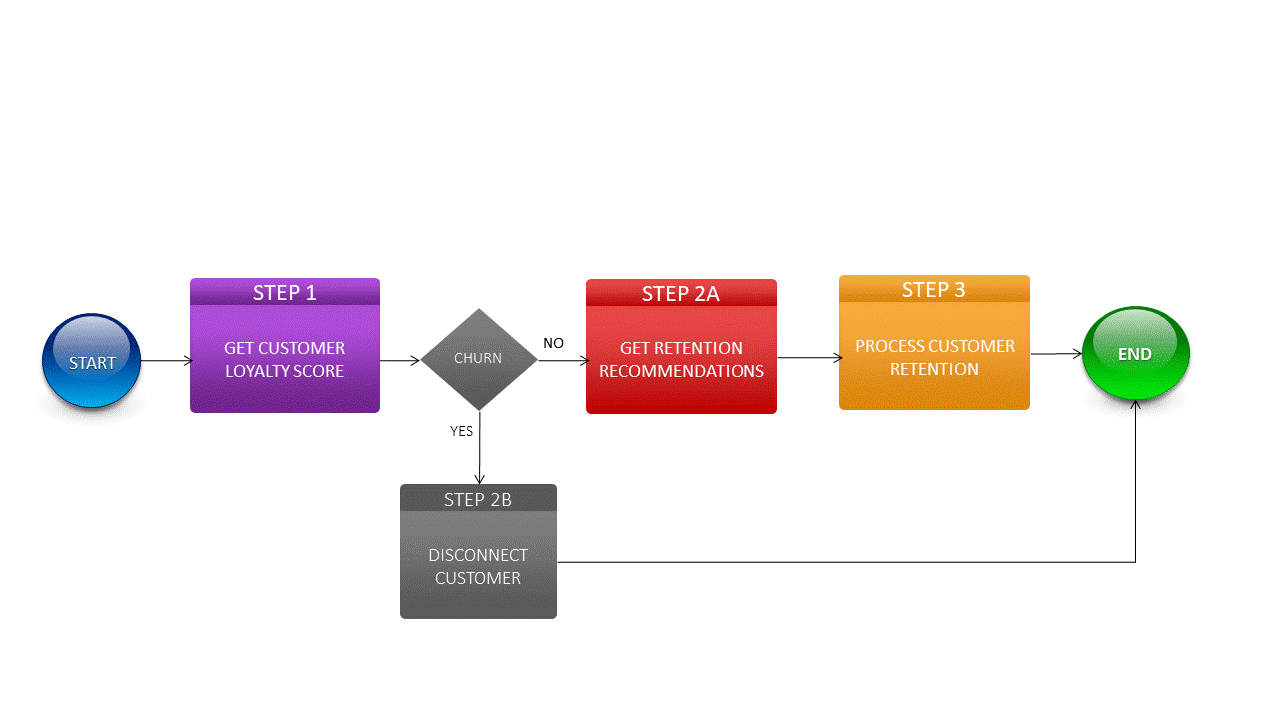
As shown in the diagram above, there are two deep learning classifiers:
- Predict customer churn.
- Recommend a list of retention offers for a customer.
Let's see how to build the above classifiers by writing the configuration files rather than python coding:
Application Metadata
First, we should build application metadata. It defines two classifiers: Customer Churn and Customer Retention. Each classifier contains a set of configurations for the data processor, the neural network model, and the result handler.
#Configuration for classifiers
classifiers:
  customer_churn: #customer churn classifier
    module: data_classifier
    class_name: CsvDataClassifier
    data_loader:
      module: csv_loader
      class_name: CsvLoader
      data_config: conf/customer_churn/data_conf.yaml
    neural_network:
      module: dnn_model
      class_name: DnnModel
      dnn_config: conf/customer_churn/dnn_conf.yaml
    result_handler:
      module: customer_churn_handler
      class_name: CustomerChurnHandler
      handler_config:
  customer_retention: #customer retention recommender
    module: data_classifier
    class_name: CsvDataClassifier
    data_loader:
      module: csv_loader
      class_name: CsvLoader
      data_config: conf/customer_retention/data_conf.yaml
    neural_network:
      module: dnn_model
      class_name: DnnModel
      dnn_config: conf/customer_retention/dnn_conf.yaml
    result_handler:
      module: customer_retention_handler
      class_name: CustomerRetentionHandler
      handler_config: conf/customer_retention/handler_conf.yaml
Data Engineering
Second, data scientists analyze the raw data and prepare the original CSV dataset. Below is a sample dataset of the customer churn:
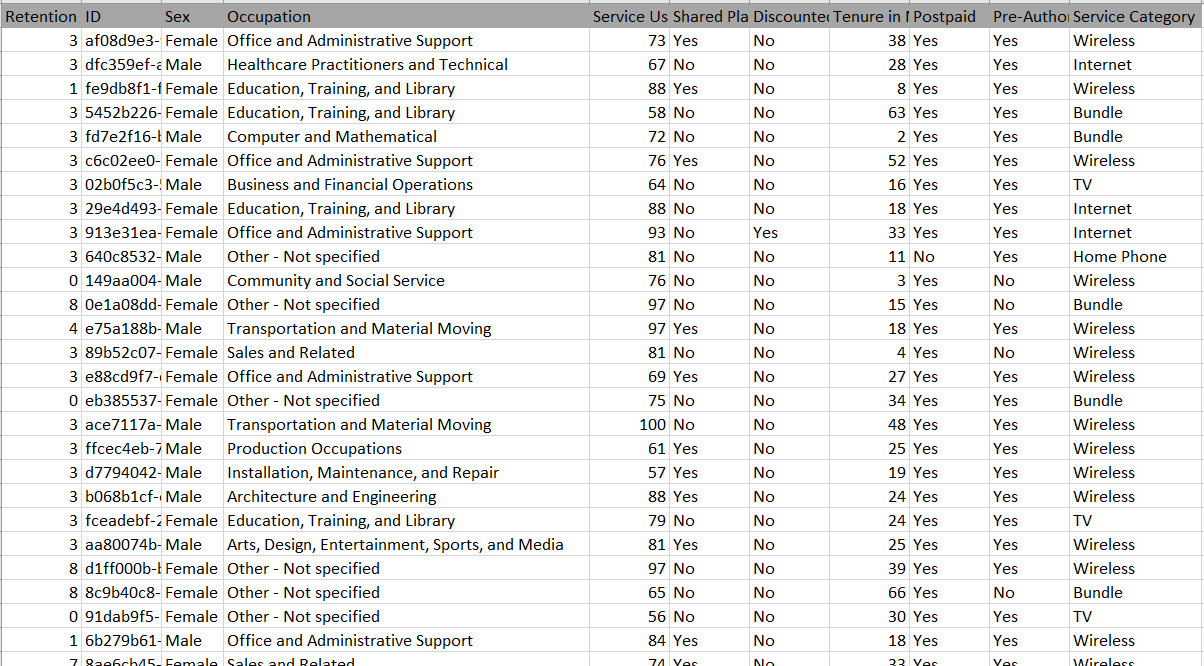
Data scientists shall provide the configurations based on the raw dataset in CSV. The configuration file defines the dataset schema and the rules of data pre-processing.
#dataset processing configurations for customer churn
data_file: data/customer_churn.csv
target_column: 0
n_classes: 2
columns_to_ignore:
  - 0
conversion_map:
  0:
    - 'Female'
    - 'Male'
  1:
    - 'K-12 student'
    - 'Unemployed'
    - 'College/Grad student'
    - 'Food Preparation and Serving Related'
    - 'Personal Care and Service'
    - 'Building and Grounds Cleaning and Maintenance'
    - 'Farming, Fishing, and Forestry'
    - 'Healthcare Support Occupations'
    - 'Self-employed'
    - 'Transportation and Material Moving'
    - 'Office and Administrative Support'
    - 'Production Occupations'
    - 'Sales and Related'
    - 'Retired'
    - 'Protective Service'
    - 'Installation, Maintenance, and Repair'
    - 'Community and Social Service'
    - 'Construction and Extraction'
    - 'Other - Not specified'
    - 'Education, Training, and Library'
    - 'Arts, Design, Entertainment, Sports, and Media'
    - 'Life, Physical, and Social Science'
    - 'Business and Financial Operations'
    - 'Healthcare Practitioners and Technical'
    - 'Architecture and Engineering'
    - 'Computer and Mathematical'
    - 'Legal Occupations'
    - 'Executive/Management'
  3:
    - 'No'
    - 'Yes'
  4:
    - 'No'
    - 'Yes'
  6:
    - 'No'
    - 'Yes'
  7:
    - 'No'
    - 'Yes'
  8:
    - 'Bundle'
    - 'Wireless'
    - 'Internet'
    - 'TV'
    - 'Home Phone'
Model Configuration and Tuning
Now comes the fun part of neural network design. Machine learning engineers will provide the configurations of the neural network model. A typical configuration includes the hyperparameters such as the layers, the number of neurons each layer, the activation function, the learning rate optimization algorithm, and cost function, etc.
The sample below shows the configurations of building a deep neural network of one input layer, three hidden layers, and one output layer.
#Neural network configurations
input_layer:
  shape:
    -
    - 9
hidden_layers:
    - type: 'fully_connected'
      neuron: 32
      activation: 'relu'
      dropout:
    - type: 'fully_connected'
      neuron: 64
      activation: 'relu'
      dropout:
    - type: 'fully_connected'
      neuron: 32
      activation: 'relu'
      dropout:
output_layer:
    type: 'fully_connected'
    neuron: 2
    activation: 'softmax'
regression:
  optimizer: 'adam'
  loss: 'categorical_crossentropy'
fit:
  n_epoch: 10
  batch_size: 16
  show_metric: True
Train the Model
Below is the python code to train the model:
app_context = ApplicationContext.get_instance('conf/application_context.yaml')
app_context.get_classifier('customer_churn').build_model()
The result is shown below:
| Adam | epoch: 010 | loss: 0.46729 - acc: 0.7987 -- iter: 099888/100000
Training Step: 62494  | total loss: 0.45866 | time: 12.523s
| Adam | epoch: 010 | loss: 0.45866 - acc: 0.8063 -- iter: 099904/100000
Training Step: 62495  | total loss: 0.47568 | time: 12.525s
| Adam | epoch: 010 | loss: 0.47568 - acc: 0.8007 -- iter: 099920/100000
Training Step: 62496  | total loss: 0.47255 | time: 12.527s
| Adam | epoch: 010 | loss: 0.47255 - acc: 0.8081 -- iter: 099936/100000
Training Step: 62497  | total loss: 0.45236 | time: 12.529s
| Adam | epoch: 010 | loss: 0.45236 - acc: 0.8041 -- iter: 099952/100000
Training Step: 62498  | total loss: 0.45618 | time: 12.531s
| Adam | epoch: 010 | loss: 0.45618 - acc: 0.8083 -- iter: 099968/100000
Training Step: 62499  | total loss: 0.46965 | time: 12.532s
| Adam | epoch: 010 | loss: 0.46965 - acc: 0.7962 -- iter: 099984/100000
Training Step: 62500  | total loss: 0.46448 | time: 12.533s
| Adam | epoch: 010 | loss: 0.46448 - acc: 0. 8148 -- iter: 100000/100000
Predict Customer’s Churn and Get Loyalty Score
After we trained the model, we can run the customer churn classifier to predict the three customers: Tony, John, and Mary.
tony = ['4d316bef-9856-4ea0-aed0-a53e55fed3db', 'Male', 'K-12 student', 20, 'No', 'Yes', 12, 'No', 'No', 'Wireless']
john = ['4d316bef-9856-4ea0-aed0-a53e55fed3df', 'Male', 'Sales and Related', 75, 'Yes', 'Yes', 26, 'Yes', 'No', 'Wireless']
mary = ['7150ae6c-1120-4eb5-b788-0f822f986fae', 'Female', 'Executive/Management', 90, 'No', 'No', 36, 'Yes', 'Yes', 'Bundle']
result = app_context.get_classifier('customer_churn').predict([tony, john, mary])
print("Customer churn prediction for Tony - churn: {} - score: {}".format(result[0].churn, result[0].score))
print("Customer churn prediction for John - churn: {} - score: {}".format(result[1].churn, result[1].score))
print("Customer churn prediction for Mary - churn: {} - score: {}".format(result[2].churn, result[2].score))
As shown below is the Customer Churn prediction result:
Customer churn prediction for Tony - churn: Yes - score: 1.53
Customer churn prediction for John - churn: No - score: 73.91
Customer churn prediction for Mary - churn: No - score: 99.41
Provide Recommended Offers for Customer Retention
Below is the sample code to run the recommendation engine for customer retention.
tony = ['4d316bef-9856-4ea0-aed0-a53e55fed3db', 'Male', 'K-12 student', 20, 'No', 'Yes', 12, 'No', 'No', 'Wireless']
john = ['4d316bef-9856-4ea0-aed0-a53e55fed3df', 'Male', 'Sales and Related', 75, 'Yes', 'Yes', 26, 'Yes', 'No', 'Wireless']
mary = ['7150ae6c-1120-4eb5-b788-0f822f986fae', 'Female', 'Executive/Management', 90, 'No', 'No', 36, 'Yes', 'Yes', 'Bundle']
result = app_context.get_classifier('customer_retention').predict([tony, john, mary])
print("Top3 retention recommendations for Tony: \n 1: {} \n 2: {}  \n 3: {}".format(
                result[0].recommendations[0],
                result[0].recommendations[1],
                result[0].recommendations[2]))
print("Top3 retention recommendations for John: \n 1: {} \n 2: {}  \n 3: {}".format(
                result[1].recommendations[0],
                result[1].recommendations[1],
                result[1].recommendations[2]))
print("Top3 retention recommendations for Mary: \n 1: {} \n 2: {}  \n 3: {}".format(
                result[2].recommendations[0],
                result[2].recommendations[1],
                result[2].recommendations[2]))
Below is the result of the top three recommended retention offers for each customer:
Top3 retention recommendations for Tony:
 1: Service or Plan Downgrade
 2: Service Discount or Account Credit
 3: Extended Promotion or Price Lock Down

Top3 retention recommendations for John:
 1: Additional Add-on Services
 2: Service Discount or Account Credit
 3: Extended Promotion or Price Lock Down

Top3 retention recommendations for Mary:
 1: Additional Service Usage
 2: Plan Upgrade
 3: Service Quality Upgrade
Conclusion
Although building deep learning models becomes easier by using TFLearn, due to the nature of the iterative development process, multiple teams are involved with coupled tasks. This article introduces a configuration-based dependency injection solution that removes the dependencies between the development stages and eliminates python programming.
By using the proposed solution, each team shall solely focus on provisioning the configurations files. With a sample project on GitHub, we can see how it eases the collaboration and increases productivity with a clearly defined range of responsibilities.
Further Reading
Demystifying AI, Machine Learning, and Deep Learning
10 Open-Source Tools/Frameworks for Artificial Intelligence
Top 10 Machine Learning, Deep Learning, and Data Science Courses for Beginners (Python and R)
Opinions expressed by DZone contributors are their own.

Comments