Mulesoft — Microsoft Dynamics 365 for Operations Connector
In this article, we will learn how to use MuleSoft’s Microsoft Dynamics 365 for Operations Connector to connect to Microsoft Dynamics 365 for Operations.
Join the DZone community and get the full member experience.
Join For FreeThis is the second article in 3 part series. You can read the first article here. In this article, we will learn how to use Mulesoft’s Microsoft Dynamics 365 for Operations Connector (3.6+, for v4 we have a different connector) to connect to Microsoft Dynamics 365 for Operations.
Prerequisite:
We need enterprise license to download Microsoft Dynamics 365 for Operations Connector ("Select" Connector) and here is Anypoint Exchange link to download it. We need to use 1.0.1 version.
Note: Though this version is not listed in Anypoint Exchange, with enterprise license, it works.
Maven dependency details:
<dependency>
<groupId>org.mule.modules</groupId>
<artifactId>microsoft-dynamics365-for-operations</artifactId>
<version>1.0.1</version>
</dependency>
Azure Active Directory (AAD) app Registration:
Follow the same steps from article 1, with a minor change in step 1. Here we select Web app / API for Application type instead of Native.
We have an additional step to set up key (client secret). Follow this link and topic “Register a native application with AAD” — step 10 for setting up the key. Please note, copy the key and store it safely because we cannot get it again.
Configurations in Dynamics 365
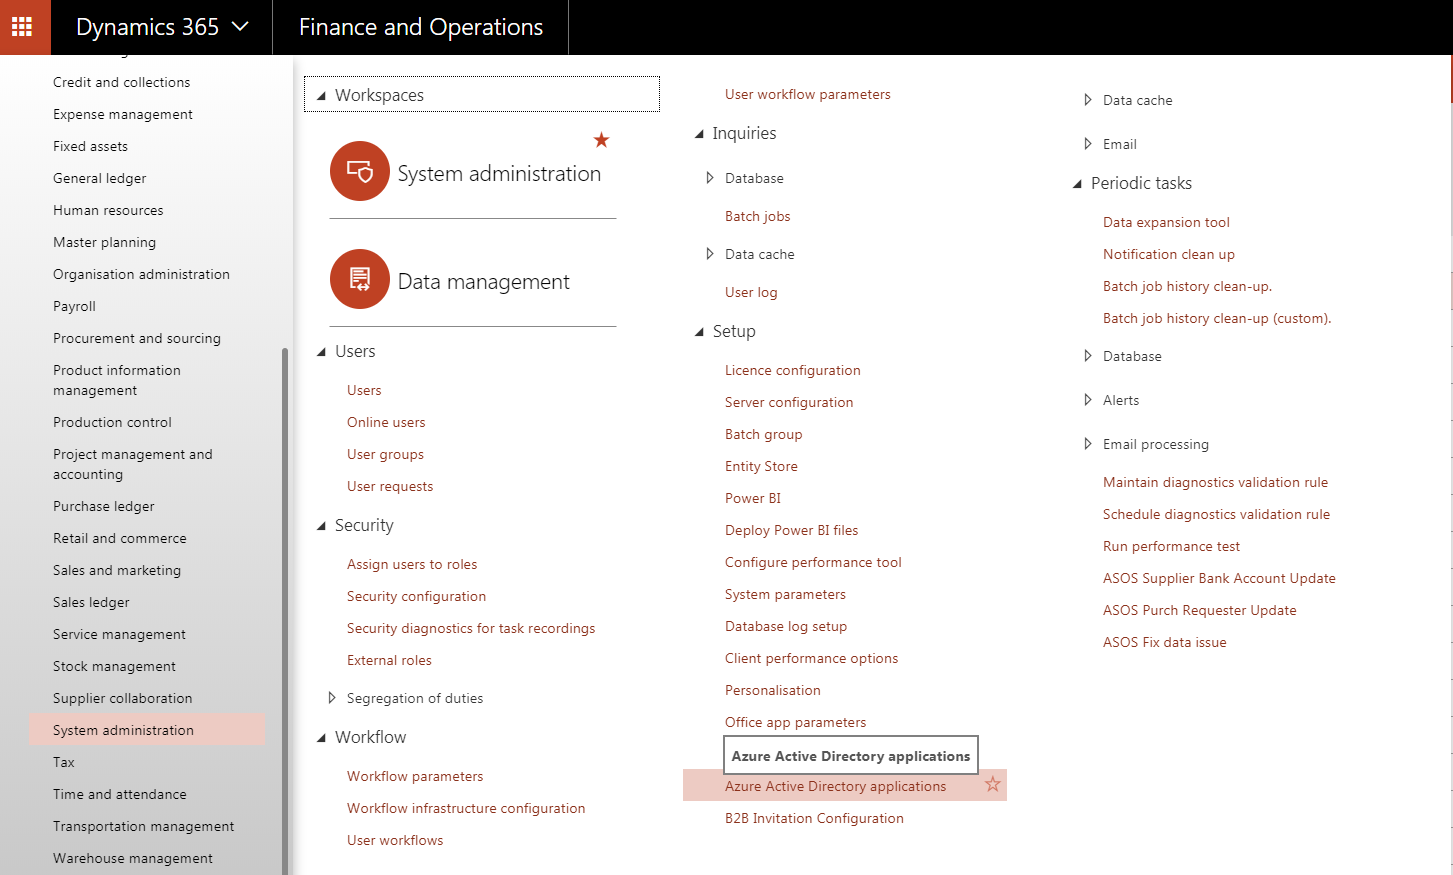
In the left-hand side menu, under the heading “Modules,” scroll down to “System Administration.”
Click “Azure Active Directory” applications link.

Click “New” and set up “Client ID” (From AAD App) and “User ID” (set it up in Active Directory and Dynamics 365 as a User)

Mulesoft's Microsoft Dynamics 365 for Operations Connector:
Connector Configuration
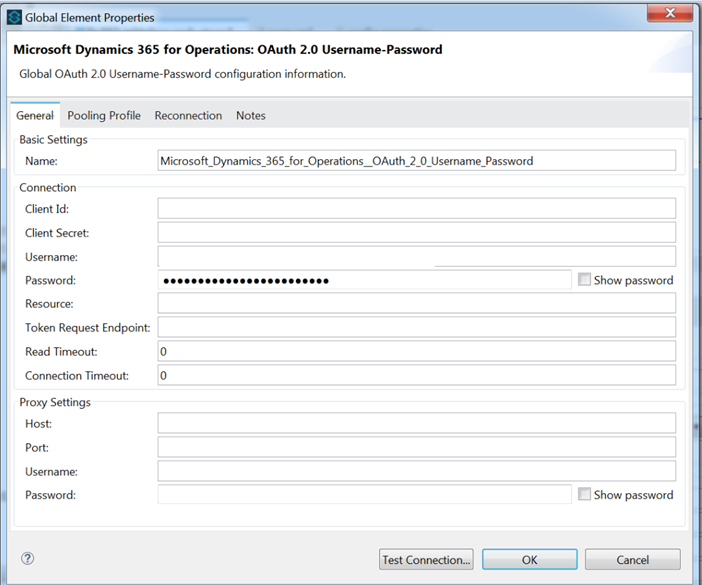
The following values are "required"/"mandatory" for Dynamics 365 for Operations Connector.
(1) Client Id (2) Client Secret (3) Username (4) Password (5) Resource (6) Token Request Endpoint.
Please work with your Platform/DevOps Engineer and Infra Team to get these values.
Client ID and Client Secret comes from AAD App. User Name and Password are to be set up in both Active Directory (AD) and as a valid user with required permissions in Dynamics 365. Resource is Dynamics env URL, like Dev, SIT, Prod. Token Request Endpoint is used to get the access token. It will look something like,
Token Request Endpoint — The token endpoint that is called to get the access token. Example: https://login.windows.net/TENANT_ID/oauth2/token where TENANT_ID (Check article 1) is the Azure Active Directory ID.
Follow this link in the Mulesoft documentation “To Configure for OAuth 2.0 Username-Password” to setup Connector Configurations.

Click “Test Connection” to test connectivity. Look for “Test Connection Successful.”
Follow this link in Mulesoft documentation “To Import Data Recurring Job” and set up “General” Connector settings.
URI Path — “api/connector/enqueue/” — This is standard for import recurring jobs.
Activity ID — is from Dynamics 365. Talk to Dynamics 365 team to get it. Each recurring job has a unique Activity ID.
Entity Name — is from Dynamics 365. Talk to Dynamics 365 team to get it.
File Input — Is the payload that contains the actual CSV/Txt file. #[payload]. Please note, the payload has to be a stream/ByteArray.
Hope you enjoyed this article. Looking forward to your feedback. Stay tuned for article 3.
Opinions expressed by DZone contributors are their own.


Comments