Migrating a Legacy Spring Application to Spring Boot 2
Out with the old, in with Spring Boot 2.
Join the DZone community and get the full member experience.
Join For Free
Recently, we decided to monitor the metrics of legacy Spring applications we were running on our production systems. While searching around, I realized that a nice way to not reinvent the wheel was to integrate my app with the Spring Boot Actuator. By using the actuator, we have many tools like Grafana and Prometheus for easily monitoring our applications. However, in order to integrate such a legacy Spring application with the Spring Boot Actuator, you need to make it Spring-Boot-ready first.
Since Spring Boot 1.5 reached the end of its life at the beginning of August, I decided to move to Spring Boot 2 and start playing with it.
pom.xml
First of all, we should add Spring Boot 2 starters as the parent project in our pom.xml:
<parent>
    <groupId>org.springframework.boot</groupId>
    <artifactId>spring-boot-starter-parent</artifactId>
    <version>2.1.7.RELEASE</version>
    <relativePath/>
</parent>
By adding the above parent project, we can then access all of the Spring Boot 2.1.7 dependencies. So if you get compilation errors regarding your dependency code, you may keep the old versions of your dependencies by keeping the <version> tag in the relevant dependency. On the other hand, if you remove the version tag, you will get Spring Boot's dependencies versions.
Here are the extra Spring Boot dependencies I used:
        <dependency>
            <groupId>org.springframework.boot</groupId>
            <artifactId>spring-boot-starter-security</artifactId>
        </dependency>
        <dependency>
            <groupId>org.springframework.boot</groupId>
            <artifactId>spring-boot-starter-actuator</artifactId>
        </dependency>
        <dependency>
            <groupId>org.springframework.boot</groupId>
            <artifactId>spring-boot-starter-web</artifactId>
        </dependency>
        <dependency>
            <groupId>org.springframework.boot</groupId>
            <artifactId>spring-boot-starter-test</artifactId>
            <scope>test</scope>
        </dependency>
        <dependency>
            <groupId>org.springframework.security</groupId>
            <artifactId>spring-security-web</artifactId>
        </dependency>
        <dependency>
            <groupId>org.springframework.security</groupId>
            <artifactId>spring-security-config</artifactId>
        </dependency>
Main Application Source
Regarding the main application source, here is my old and new code:
Old App.java
package com.company.app;

import org.slf4j.Logger;
import org.slf4j.LoggerFactory;
import com.company.app.Constants;

public final class App {

    private static final Logger LOGGER = LoggerFactory.getLogger(App.class);

    private App() {
    }

    public static void main(String[] args) {
        try {
            SpringApplicationLauncher.launch(Constants.CONTEXT_XML);
        } catch (Exception exception) {
            LOGGER.error("[App] could not launch app.", exception);
        }
    }

}
New App.java
package com.company.app;

import org.slf4j.Logger;
import org.slf4j.LoggerFactory;

import org.springframework.boot.SpringApplication;
import org.springframework.boot.WebApplicationType;
import org.springframework.boot.actuate.autoconfigure.endpoint.EndpointAutoConfiguration;
import org.springframework.boot.actuate.autoconfigure.health.HealthIndicatorAutoConfiguration;
import org.springframework.boot.actuate.autoconfigure.metrics.MetricsAutoConfiguration;
import org.springframework.boot.autoconfigure.EnableAutoConfiguration;
import org.springframework.boot.autoconfigure.SpringBootApplication;
import org.springframework.boot.autoconfigure.data.jpa.JpaRepositoriesAutoConfiguration;
import org.springframework.boot.autoconfigure.jdbc.DataSourceAutoConfiguration;
import org.springframework.boot.autoconfigure.jdbc.DataSourceTransactionManagerAutoConfiguration;
import org.springframework.boot.autoconfigure.jms.JndiConnectionFactoryAutoConfiguration;
import org.springframework.boot.autoconfigure.orm.jpa.HibernateJpaAutoConfiguration;
import org.springframework.boot.autoconfigure.security.SecurityProperties;
import org.springframework.boot.autoconfigure.security.servlet.SecurityAutoConfiguration;
import org.springframework.boot.autoconfigure.security.servlet.SecurityFilterAutoConfiguration;
import org.springframework.boot.builder.SpringApplicationBuilder;
import org.springframework.context.annotation.Import;
import org.springframework.context.annotation.ImportResource;
import com.company.app.Constants;

@SpringBootApplication
@ImportResource({ "classpath*:" + Constants.CONTEXT_XML })
@Import({ EndpointAutoConfiguration.class, HealthIndicatorAutoConfiguration.class, MetricsAutoConfiguration.class, SecurityProperties.class })
@EnableAutoConfiguration(exclude = { JndiConnectionFactoryAutoConfiguration.class, DataSourceAutoConfiguration.class,
        HibernateJpaAutoConfiguration.class, JpaRepositoriesAutoConfiguration.class, DataSourceTransactionManagerAutoConfiguration.class,
        SecurityAutoConfiguration.class, SecurityFilterAutoConfiguration.class })
public class App {

    private static final Logger LOGGER = LoggerFactory.getLogger(App.class);

    public static void main(String[] args) {
        try {
            SpringApplication springApplication = new SpringApplicationBuilder().sources(App.class).web(WebApplicationType.NONE).build();
            springApplication.run(args);
        } catch (Exception exception) {
            LOGGER.error("[App] could not launch app.", exception);
        }
    }

}
As you can see, the @SpringBootApplication annotation is now used and brings all the auto Spring annotations in our application. However, due to several compilation errors I experienced, I disabled some of them, as you can see in exclude option of @EnableAutoConfiguration.
HealthCheck Logic
We should implement the health check logic in a separate class by implementing the HealthIndicator interface.
package com.company.app;

import javax.inject.Inject;
import javax.inject.Named;

import org.slf4j.Logger;
import org.slf4j.LoggerFactory;
import org.springframework.boot.actuate.health.Health;
import org.springframework.boot.actuate.health.HealthIndicator;
import org.springframework.stereotype.Component;

import com.company.app.BrokerConnection;
import com.company.app.Provider;

@Component
public class AppHealthCheck implements HealthIndicator {

    private final Logger logger = LoggerFactory.getLogger(AppHealthCheck.class);

    @Inject
    @Named("brokerConnectionProvider")
    private Provider<BrokerConnection> brokerConnectionProvider;

    @Override
    public Health health() {
        BrokerConnection connection = check();
        if (connection != null) {
            return Health.down().withDetail("Broker Connection is not running ", connection.getName()).build();
        }
        return Health.up().build();
    }

    private BrokerConnection check() {
        for (BrokerConnection connection : brokerConnectionProvider.getAll()) {
            logger.info("Health Checking: broker connection {}.", connection);
            if (!connection.isRunning()) {
                return connection;
            }
        }
        return null;
    }
}
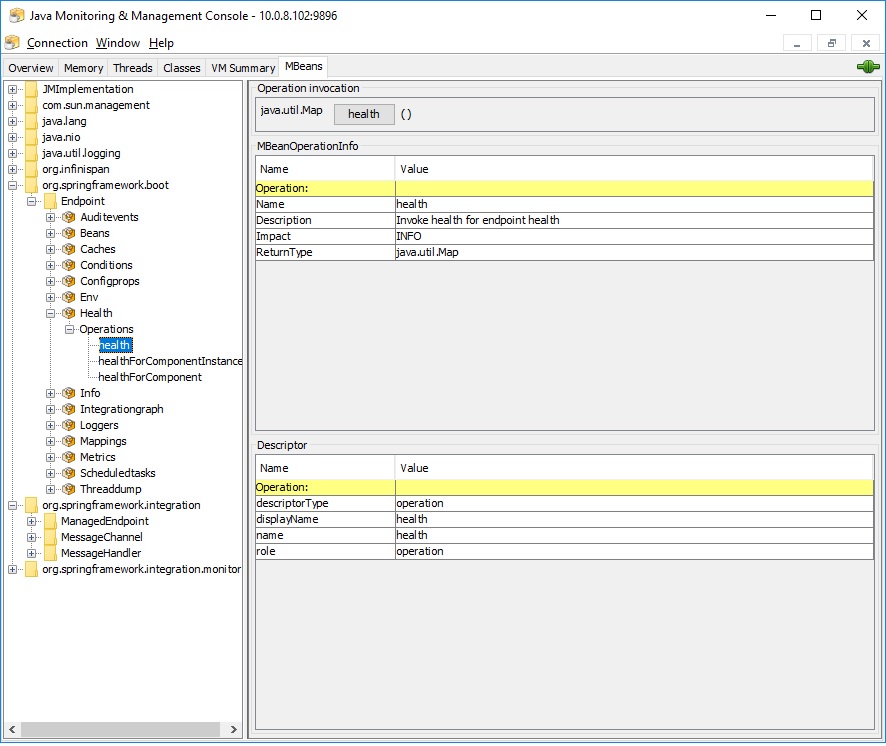
The above code is executed each time a new JMX call is executed the managed Bean: org.springframework.boot.Endpoint.Health.health().

Example Result:
status=UP
details={appHealthCheck={status=UP}, mail={status=UP, details={location=mailserver.domain.local:25}}, diskSpace={status=UP, details={total=124578889728, free=70527569920, threshold=10485760}}, jms={status=UP, details={provider=ActiveMQ}}}
CommandLineRunner
The previous code implemented a custom interface in a separate class in order to hold the run() and shutdown() methods for the application launch. Now, we use the CommandLineRunner functional interface, which implements run(String... args) method instead. Of course, I didn't change the content of this method at all.
Spring Framework Integration Header Interface
My old app was based on Spring Framework 4.xx while Spring Boot 2 uses Spring Framework 5.xx. Therefore, there were complaints of this abstract interfaceimport org.springframework.integration.annotation.Header;
Since it is deprecated in Spring 5, the solution was as simple as to just replace it with import org.springframework.messaging.handler.annotation.Header;
spring.main.allow-bean-definition-overriding=true
If you use Spring XML configurations to define your beans and you have duplicate bean definitions in the code and the XML files you may experience some runtime errors. The above Spring boot java property can be used in your properties configuration file to ignore such cases and your app will continue work as expected.
Maven Placeholders
In our apps, we use in logback.xml configurations Maven references like ${project.version}. Such references should change to @project.version@ in order for Maven resource filtering to resolve during build time and eventually replace them. Same thing can be done in scripts .bat or .sh files with other variables as well (e.g. @project.build.finalName@ ).
Logback
Logback configuration is enabled by using the JVM argument -Dlogging.config=./logback.xml instead of -Dlogback.configurationFile=./logback.xml, which we used in the old application.
Happy migrating!
Further Reading
Opinions expressed by DZone contributors are their own.

Comments