A Practical Guide to Creating a Spring Modulith Project
Spring Modulith simplifies modular app development in Spring Boot and enables well-structured, domain-driven design with seamless Spring ecosystem integration.
Join the DZone community and get the full member experience.
Join For FreeSpring Modulith empowers developers to define logical application modules in their code, facilitating the creation of well-structured, domain-aligned Spring Boot applications.
This approach introduces modular design principles to the Spring Framework, providing a more organized way to develop applications. The General Availability (GA) version was released in August 2023, and the current stable version at the time of writing this article is 1.3.1.
Advantages of the Spring Modulith Framework
- Provides tooling and architecture support to build a Modulith application
- Encourages bounded context where each module encapsulates specific business functionality
- Helps to define clear module boundaries
- Supports direct and event-driven (sync and async) communication between modules
- Integrates seamlessly with other Spring tools and components like Spring Data, Spring Actuator, Spring Security, etc.
- Helps to avoid cyclic dependencies and supports explicit dependencies
- Supports testing modules independently or along with other modules
Setting Up the Spring Modulith Project
Prerequisites
- Knowledge of Spring Boot
- Familiarity with Java programming
- Installed tools: Java SDK, Maven/Gradle, and an IDE (e.g., IntelliJ or Eclipse)
Overview of the Application
The demo application is a Spring Modulith Application that provides User Authentication functionalities like User Registration and Login. It has four modules: Login, UserRegistration, Common, and Notification modules. The application will use H2 DB for persistence.
| Module Name |
Functionality
|
|---|---|
|
Login
|
The Login module handles user login functionality, comprising a LoginController for APIs, LoginService for login operations, LoginEntity representing the DB table, and LoginRepository as the JPA repository.
|
|
UserRegistration
|
The UserRegistration module handles UserRegistration functionality comprising a UserRegistrationController for APIs, UserRegistrationService for user registration operations, UserEntity and UserRegistrationRepository for JPA functionalities.
|
|
Notification
|
Notification module is used to receive the notification event from other modules and send the notification.
|
|
Common
|
Common module exposes functionalities that are common across different modules.
|
Step-by-Step Guide
Step 1
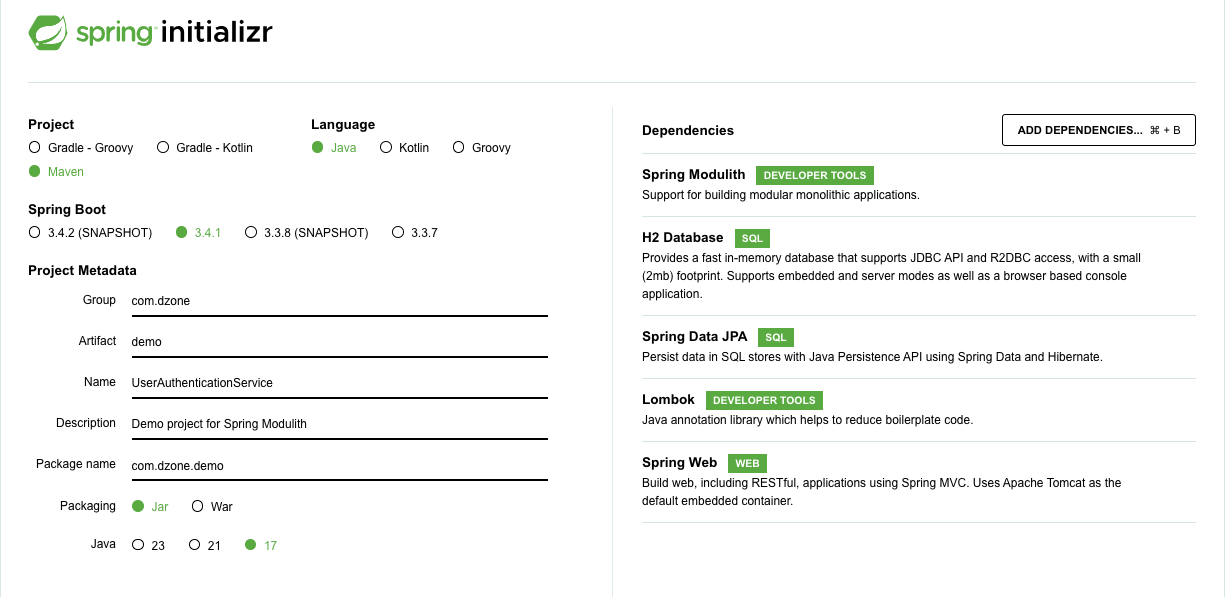
Initializing the project using Spring Initializer.
Use Spring Initializer to set up the project https://start.spring.io/ as shown below.

The following dependencies are added:
|
Dependency
|
Description
|
|---|---|
|
Spring Modulith
|
Contains packages to build modular monolith Application
|
|
H2 Database
|
Demo will be using H2 Db for persistence
|
|
Spring Data JPA
|
Package for Java Persistence API
|
|
Lombok
|
Package helps with boilerplate code, especially generating getters and setters
|
|
Spring Web
|
Package to build Rest APIs
|
Download the file and open it in the IDE of your choice.
Step 2
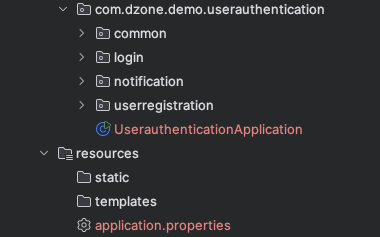
Create the packages for the modules defined. The packages should be defined at the same level as the SpringBoot application.

Figure 2 above shows the structure of the code. Modules common, login, notification, and userregistration are created at the same level as the main class, which loads the Spring Boot application. Spring Modulith identifies them as modules through the package structure.
Step 3
Create the ModularityTest class, which will have test cases to test whether the Modulith application is built in accordance with the Modulith standards. Spring Modulith provides ApplicationModules class that provides verify() method to ascertain whether the application is built in accordance with Spring Modulith constraints. It also provides utilities to create documentation. Thus, Spring Modulith provides a toolkit to check compliance with the Modulith structure and create documentation for the modules.
package com.dzone.demo.userauthentication;


import org.junit.jupiter.api.Test;
import org.springframework.modulith.core.ApplicationModules;
import org.springframework.modulith.docs.Documenter;

public class ModularityTest {

    @Test
    public void applicationModules() {
       ApplicationModules modules = ApplicationModules.of(UserauthenticationApplication.class);
        modules.forEach(System.out::println);
        modules.verify();

    }

    @Test
    void createDocumentation(){
        ApplicationModules modules = ApplicationModules.of(UserauthenticationApplication.class);
        new Documenter(modules).writeDocumentation();
    }
}
Step 4
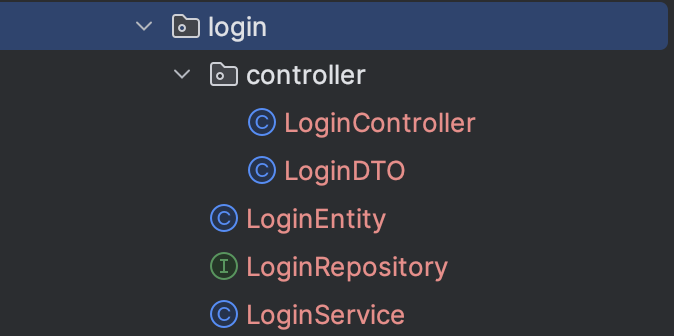
Once the project structure has been created, create the controller, repository, or entities specific to the module. Usually, classes in Spring Boot are defined with a public access modifier. In a Modulith architecture, a module exposes only limited classes that other modules can consume.
In Figure 3 below, only the LoginService class is public. All other classes have a default access modifier so that only classes within the module can access it. This prevents classes from other modules to Autowire it. In the example below, LoginDTO is a class that is not defined at the root level of the module(login) but needs to be accessed by the UserRegistrationModule. In that case, use @NamedInterface annotation to expose the class for other modules to consume. The access modifier should be public.

@NamedInterface("LoginDTO")
public class LoginDTO {
Step 5
Run a modularity test after all the modules have been defined. It produces a result as shown below.
# Common
> Logical name: common
> Base package: com.dzone.demo.userauthentication.common
> Named interfaces:
  + NamedInterface: name=<<UNNAMED>>, types=[]
  + NamedInterface: name=common-events, types=[ c.d.d.u.c.e.UserRegisteredEvent ]
  + NamedInterface: name=common-validator, types=[ c.d.d.u.c.v.EmailValidator ]
> Spring beans:
  o ….util.TimeUtil
  + ….validator.EmailValidator

# Login
> Logical name: login
> Base package: com.dzone.demo.userauthentication.login
> Named interfaces:
  + NamedInterface: name=<<UNNAMED>>, types=[ c.d.d.u.l.LoginEntity, c.d.d.u.l.LoginService ]
  + NamedInterface: name=LoginDTO, types=[ c.d.d.u.l.c.LoginDTO ]
> Spring beans:
  o ….LoginRepository
  + ….LoginService
  o ….controller.LoginController

# Userregistration
> Logical name: userregistration
> Base package: com.dzone.demo.userauthentication.userregistration
> Spring beans:
  o ….controller.UserAuthenticationController
  o ….domain.UserRegistrationRepository
  o ….domain.UserRegistrationService

# Notification
> Logical name: notification
> Base package: com.dzone.demo.userauthentication.notification
> Named interfaces:
  + NamedInterface: name=<<UNNAMED>>, types=[]
  + NamedInterface: name=NotificationService, types=[ c.d.d.u.n.d.NotificationService ]
> Spring beans:
  + ….domain.NotificationService
|
Elements
|
Explanation
|
|---|---|
|
Logical name
|
Name of the module
|
|
Base Package
|
The base package of the module
|
|
Named interfaces
|
It lists all the Named Interfaces as explained above
|
|
Spring beans
|
It lists all the Spring Beans. All classes having @Controller , @Service , @Repository, @Component will be listed in Spring beans section
|
Step 6
Instead of using @NamedInterface at each class level, package-info.java can be used to expose classes in a package. As shown in Figure 4 below, classes inside the validator package are exposed using package-info.java.
@org.springframework.modulith.NamedInterface("common-validator")
package com.dzone.demo.userauthentication.common.validator;
package-info.java can be used to confine access to a module. It can also be used to make a module accessible to all.
The following code snippet at the module level will allow the module to have dependencies with only a set of modules or named interfaces, as shown.
allowedDependencies = {"login::LoginService","login::LoginDTO","common::common-validator","notification::NotificationService","common::common-events"}The following code snippet would make the module and its classes accessible for all other modules.
@org.springframework.modulith.ApplicationModule(
        type = ApplicationModule.Type.OPEN
)
UserRegistrationService in the UserRegistration module can access the functions exposed by LoginService in the Login module by auto-wiring the service. The same is applicable to EmailValidator class in the commons module. Only classes exposed explicitly are accessible by the UserRegistration module.
    private LoginService loginService;
    private UserRegistrationRepository userRegistrationRepository;
    private EmailValidator emailValidator;

    UserRegistrationService(@Autowired LoginService loginService, @Autowired EmailValidator emailValidator, @Autowired UserRegistrationRepository userRegistrationRepository) {
        this.userRegistrationRepository = userRegistrationRepository;
        this.emailValidator = emailValidator;
        this.loginService = loginService;
    }
Thus, the above examples show how to set up, package, and test a Spring Modulith application. The code for the application can be found in the following link.
Conclusion
Spring Modulith is a valuable addition to the Spring ecosystem, providing utilities to build a Modulith application following domain-driven design principles. Being part of the Spring ecosystem enables seamless integration with other Spring modules. A Modulith application serves as an excellent middle ground between Monolith and Microservices architectures, and Spring Modulith offers the necessary toolkit to build a robust and efficient solution.
Opinions expressed by DZone contributors are their own.

Comments