How to Secure Your Git Project Using an Easy Branching Strategy
Learn more about how to safely secure your Git project using a branching strategy.
Join the DZone community and get the full member experience.
Join For FreeIn a larger project with a multi-branching model, how do you manage the branching development model and enforce policies on various branches for a shorter development lifecycle and faster integration of work?
A good branching strategy leads the project source code towards consistent and secured data that is shareable and accessible by all collaborators in a shorter life cycle time.
It is necessary that you design your project model in a flexible way that is well administered for all the member roles and permissions.
There is nothing surprisingly new that I am going to be talking about; there may be git concepts and commands that you are already aware of, but my idea here is to leverage your thought process to make a better choice out of what you already know in Git.
Key takeaways from this article:
- You will gain an understanding of what git workflow might suit your current project code
- Segregate and organize your project code on different parallel running branches based on the type of code they develop.
- Adopt a flexible real-time branching model
- Understand how to and what guidelines to set on the branches using gitlab — a cloud-hosted version control service.
Brief Idea/Outline
Git can act both as a centralized as well as de-centralized Version Control System (VCS) based on your project model. Git Distributed nature, as we know, is developed to facilitate a large number of contributors synchronously collaborating their work. The choice of an ideal git workflow model depends on the count of contributors, permission level hierarchy to the repository and branches, and also whether the chosen architecture model is centralized or de-centralized?
An ideal branching strategy, in practice, should declare a set of guidelines protectingthe branches against read and write permissions and restricting the unauthorized creation, deletion, forced pushes to the branches.
Whether you are maintaining your source code on a Linux Server or on a web-hosted, cloud-based source code control services, create your branches in a structured way and protect them for certain members and actions.
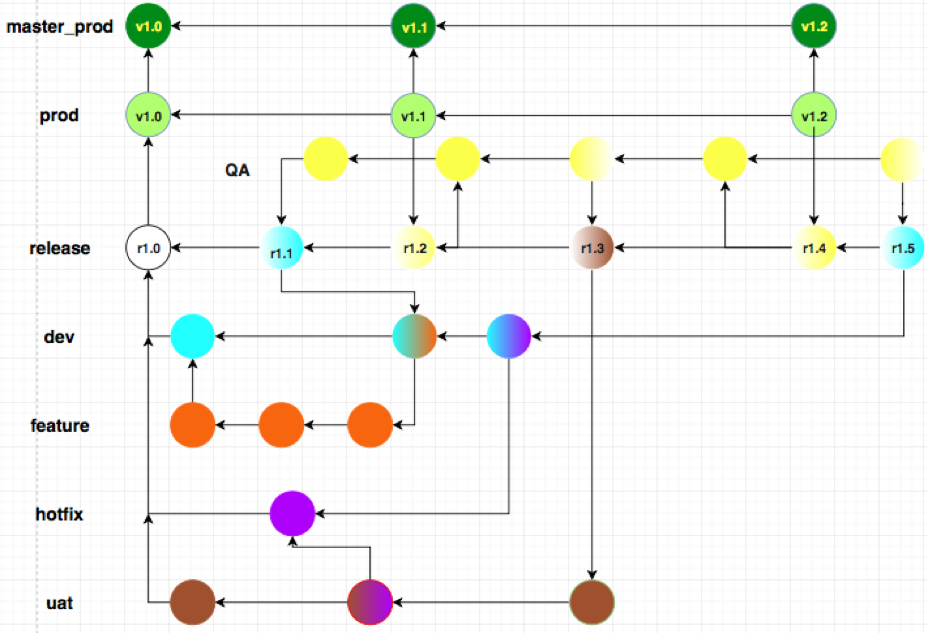
The branching model that I have taken from my previous real-time Airlines billing project is very simple to create and easy to follow. Different teams like the Administration team, Development, Testing, Operations, and the QA team worked together harmoniously contributing to the project source code.

This approach lets you have only stable QA approved commits to be pushed from “release” branch into “prod” branch with the squash merge strategy. “master_prod” only accepts final commits of the source code from the “prod” branch.
Main code development happens on the feature and topic branches.
"master_prod" is the deployment-ready branch. A CD pipeline can be automated on this branch for continuous deployment in a DevOps environment setup.
Prerequisite Knowledge Needed
I assume that you:
- Understand git concepts and commands and know how to develop your project using git workflow
- Understand git branches — create, merge, resolve conflicts and delete
- Know how to add or clone a remote repository to your local project on GitHub or GitLab to publish your work.
- Understand why, when, and how we use git fetch, pull and push to synchronize with the remote repository and coordinate work with the collaborators.
The general thought process would be as follows:
Develop a Branching Model
- Decide on the VCS and the type of model architecture
- Select the git workflow model
- Select a branching strategy
- Create branches and define guidelines
- Define member roles and permissions
- Protect branches on gitlab and maintain branching guidelines
VCS and the Type of Model Architecture
The desired version control architecture depends on your project data, the administration set up, and the size of your team. In a larger project with many collaborators, it is necessary to have a flexible source code management (SCM) setup.
Assuming that you are already in favor of using Git as it is fast, distributed, flexible, has powerful branching and merging feature, as well as keep a good track record of history that lets you fix your mistakes and analyze the code in an organized way; Distributed Version Control System(DVCS) architecture would be your choice.
In a DVCS model, all the machines act as both “nodes” as well as a “hub.” However, in a Centralized Version Control System, each developer only acts as a “node” and the central server acts as a “hub”.
If your team comes from a background of earlier Centralized VCS such as Subversion or CVS or ClearCase the centralized workflow model of Git is most likely to attract you.
Another reason you would want to use Git as a VCS in a larger project is to maintain data integrity; as git would never allow you to overwrite each other’s work.
Each time a developer tries to push the new commits to a central repository that has already accepted commits from other developers since the last time you checked out; your push will be rejected as it won’t be a fast-forward merge. You have to fetch and merge others’ changes and then base your work on that.
This way many developers can work harmoniously contributing each one’s work through in-numerous branches without stepping onto each other's changes.
With this convincing note, we shall go ahead with the choice of a Git Distributed Version Control System(DVCS) for your project. It might be of interest to read git 3-tier architecture workflow to get a quick introduction of git workflow and understand git jargons used.
Select the Git Workflow Model
No matter what git workflow model you follow, a good branching strategy will take you closer to a stable model. Git provides a powerful flexible and stable workflow model to easily collaborate work among a huge team.
Git centralized workflow with a shared repository model provides you the same comfort zone as that of SubVersion, ClearCase or CVS Version Systems, while maintaining the data integrity among various contributors.
A distributed approach in yet larger projects with multiple remote repositories concept can be achieved by setting up an Integration-manager workflow. Here, each developer has to write access to its own public repository whereas read-only access to other’s public repository. The maintainer plays the main role of collaborating (pull and merge) each developer’s work into its own repository and publishing it on the main repository which other developers can then clone from.
If you are working on a huge project with multiple remote repositories, go for a Dictator and Lieutenants Workflow. The collaboration of work is divided among various Lieutenants which owns a certain part of the repository and merge work from certain developers only. A Dictator is assigned to pull and merge changes from all the Lieutenants which ultimately publishes all the collaborated work on to the main repository.
----
NOTE: While selecting a workflow model or a combination of models it is also important for you to consider the real scenario variables that will affect your live workflow.
- Count of contributors –> how to keep changes constantly up-to-date - a pull strategy first before making changes of your own.
- Workflow –> centralized or Distributed? Is the code reviewed before merging, is there a merge request procedure to follow?
- Commit access -> What read and write access should be assigned on what branch?
The Dictator and Lieutenants workflow is going to be an ideal choice for a larger project.
Select a Branching Strategy
The next step is to create different branches and assign roles to each branch. In case you would need a quick brush up on what are git branches and how to create and manage them; refer Git — Module 3: Branching and Merging
Depending upon the type of code development a branch is used for, branches may be briefly classified as:
Stable/Integration or long-running branches – these generally have a clean history with no 3-way merge and have a short user-friendly history. “prod” and “master_prod” are two such stable branches in our project example.
Release branch merges the changed commits from all the feature and hotfix branches into one. This is where the conflicts are verified, reviewed, and resolved. (Refer: git resolve conflict- Point 6. Merge tools (diffmerge): resolving conflict).
Release branch ought to have a non-linear and messy commits history, which makes it easier to list the entire project commit history and analyze how the project developed and which commit was created by whom and what changes were made.Feature branch branches out from the main development branch (“master” branch more commonly). This is used to develop specific code by developers. These are short-lived branch targeting a specific code issue or a fix; such as feedback or even a new feature. Work on the feature branch is merged into the stable branch upon approval. My feature branches are “dev” and “uat”.
Unstable or hotfix branch is short-lived private quick fix branches created to develop and test a bugfix. These are merged into the feature branches and deleted. “hotfix” is such an unstable branch in my project.
Create Branches and Define Guidelines
Case 1: You could either version control your project in Git:
#Change directory to your project folder
Divya1@Divya:my_work $cd development_proj/

#Initialize it to be a Git repository
Divya1@Divya:development_proj $git init .
Output

Case 2: Or Download the project source code from GitHub.
git clone http://github.com/divyabhushan/structuralStrategy.git structuralStrategy

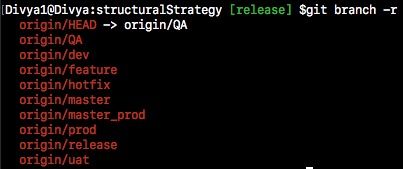
List the branches in this project using the command - git branch -r

Note: These are the remote branches, use the command git checkout branch_name to download local branch copy of these remote branches.
Guidelines:
- "master-prod" branch merge unique commits only from the "prod" branch
- "prod" branch merge "QA" approved commits only from the "release" branch with the squash merge strategy. Each commit in "prod" branch is tagged in the format: v1.0, v1.1 … v1.*
- "release" branch merge unique commits from the branches "dev", "uat" and "QA". Each commit on this branch is tagged in the format: r1.0, r1.1 … r1.*
- "dev" and "uat" branches never merge.
- "hotfix" branch commits are shared among any feature branches such as "dev" and "uat" or any future feature branches.
- Each hotfix or quick-fix branch is private to the feature branches and are dropped (deleted) after the merge.
The code snippet shows how I created my branches:
#Create branch 'prod' from 'master_prod' as a parent branch
#Also checkout current HEAD to 'prod'
Divya1@Divya:structuralStrategy [master_prod] $git checkout -b prod
Switched to a new branch 'prod'

#Create and checkout 'release' branch from 'prod' as a parent branch
Divya1@Divya:structuralStrategy [prod] $git checkout -b release
Switched to a new branch 'release'

#Tag the first commit as r1.0
Divya1@Divya:structuralStrategy [release] $git tag -a r1.0 -m"r1.0: release."

#Create branches 'dev', 'hotfix', and 'uat' from 'release' branch as a parent base
Divya1@Divya:structuralStrategy [release] $git branch dev
Divya1@Divya:structuralStrategy [release] $git branch hotfix
Divya1@Divya:structuralStrategy [release] $git branch uat

#Checkout or jump to 'dev' branch
Divya1@Divya:structuralStrategy [release] $git checkout dev
Switched to branch 'dev'

#Create 'feature' branch from 'dev' as a parent
Divya1@Divya:structuralStrategy [dev] $git branch feature
Member Roles and Permissions
Gitlab is an excellent cloud-based SCM and DevOps tool that provides an additional feature of protecting branches. Host your project on GitLab, which you could either import from GitHub or BitBucket or create a new project and push your source code from your Server machine using remote repository reference.
Gitlab allows you to define users as members with different project-level permissions.
Permissions page on GitLab describes the roles – “Guest”, “Reporter”, “Developer”, “Maintainer” and “Owner” in detail.
Protect Branches on Gitlab and Maintain Branching Guidelines
Step 1: Import Github project into GitLab

Step 2: Protect branches
Protect branches against permissions such as “allowed to merge” and “allowed to push” to the members.
NOTE: This is a private project with a maintainer and a developer; the maintainer has to personally give access to developers or a group as learned in Member role and permissions section.

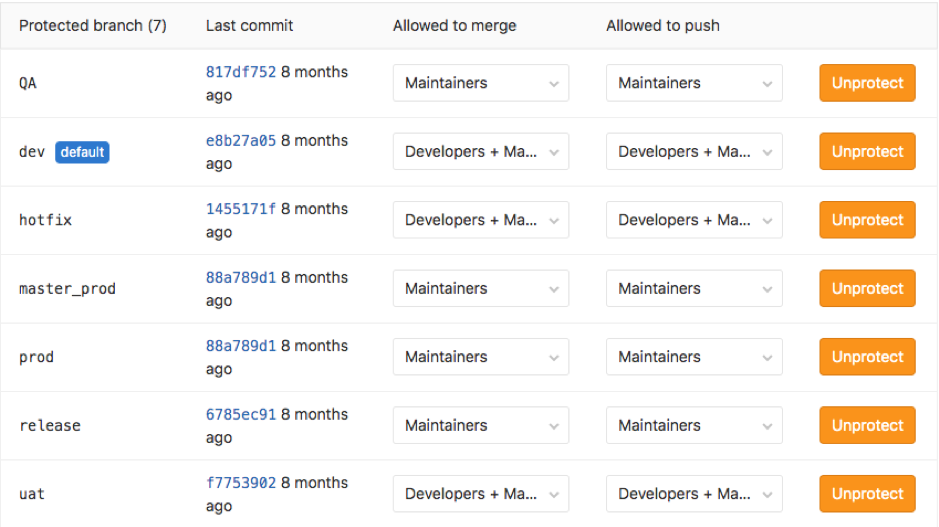
Respecting the same guidelines defined in the above sections, I have protected my branches.
Tip: Protected branches can only be deleted by the owner or maintainer of the project via the GitLab web interface.
The developer will fork the project and clone to his/her local repository. Note, how Developers have "merge" and "push" access only to some feature("dev", "uat" and "hotfix") branches; while stable branches are merged and pushed by Maintainers alone.
This gives a chance to review the merged changes from different developers and allow only tested code to be pushed into the stable branches.
---
FAQ: What if a developer tries to push to a protected branch which is set to accept merge and push request only from a maintainer?
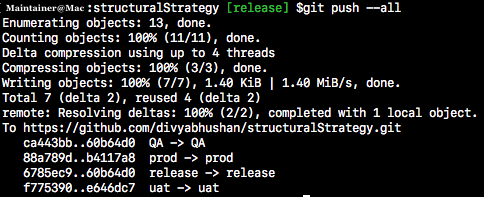
Screenshots below shows how a 'git push' to a protected branch 'release' fails from a Developer's machine while a Maintainer can push to the same 'release' branch.

The code snippet highlights a clear message that says “You are not allowed to push code to protected branches on this project.”

Further Development of the Project
- With this protected branch strategy setup, each developer will have to clone this repository and work in their local working directory. Developers are allowed to create their own private branches and base their work on these existing branches.
- Each developer then pushes his/her feature branch ("dev", "uat", "bug#302", "newFeature" etc...) into the main repository where Maintainer reviews and merge these feature branches into the "release" branch. While merging into the "release" branch maintainer has to resolve the possibilities of conflicts and collaborate with each developer’s work. The "release" branch generally has either a fast-forward or a recursive merge.
- New commits from "release" branch are merged into the "QA" branch, upon a test and review in the QA branch; the QA approved changes/feedbacks are merged back into the "release" branch.
- Only each "QA" approved commit is merged with the "prod" branch. To keep the "prod" branch history clean, short and linear we use the git squash merging strategy, like so -
#r1.4 tag has the QA approved commit on the release branch, merge from this tag.
Divya1@Divya:structuralStrategy[prod] $git merge --squash r1.4
Squash commit -- not updating HEAD
Automatic merge went well; stopped before committing as requested
Check the git status output and manually make a commit as - git commit -m "Merge "uat"+"hotfix" code."
Every commit to 'prod' branch is tagged as a new project version with the command - git tag -a v1.2 -m 'Adding "uat"+"hotfix" branch code.'
5. Move code from “prod” to “master_prod” - 'prod' branch is just merged into the 'master_prod' branch using the normal git merge strategy which will always be a fast-forward merge as there is no development work on the master_prod branch; thus there are no direct commits on this branch and would never proceed ahead of “prod” branch zeroing the chances of any conflicts. Commands used -
Divya1@Divya:t [master_prod] $git merge prodSource code moves ahead in the following order on the branches:
feature (uat, dev, feature, hotfix) -> release -> QA -> release -> prod -> master_prod
"master_prod" branch progress as the final line of development with the tagged project released versions as v1.0 -> v1.1 -> v1.2 and so on...
----
FAQ: Why squash merge technique?
The squash flag will pick up unique commits from the release branch and update the working tree and the Index area without actually making the commits.
NOTE: Remember release branch has merges from all the feature branches which will turn to be a messy and complex history, though easy to track from where the code changes came from. Once the merged changes are reflected in the working directory and the Index, commit them manually after reviewing and you get a single commit with code from all the branches.
This technique merges the new commits from the “release” branch without creating a new merge commit.
Typical Workflow on a Developer's Machine
#1. Clone the project repository
developer@126509cb7d2c:~$ git clone https://gitlab.com/git_divya/structuralStrategy.git

#2. Checkout 'dev'(or 'uat') branch and switch to the branch with the "-b" flag
developer@126509cb7d2c:~/structuralStrategy [release] $ git checkout -b dev
# Add code changes on dev branch
developer@126509cb7d2c:structuralStrategy [dev] $git add . && git commit -m "Adding navigation code"

#3. Create 'feature1' branch from an older project snapshot; say commit id-"62fc03f"
developer@126509cb7d2c:structuralStrategy [dev] $git checkout -b feature1 62fc03f
#Develop the code for feature1 changes, add to index and commit the changes
developer@126509cb7d2c:structuralStrategy [feature1] $git add . && git commit -m "Adding feature1 code functions"

#4. Create 'bugfix_940' branch from an initial project snapshot with the tagid-"r1.0"
developer@126509cb7d2c:structuralStrategy [feature1] $git checkout -b bugfix_940 r1.0
#Write and test the coce and commit to this branch
developer@126509cb7d2c:structuralStrategy [bugfix_940] $git add . && git commit -m "fixed the bug#940"

#5. Checkout 'dev' branch
developer@126509cb7d2c:structuralStrategy [bugfix_940] $git checkout dev
# Merge 'feature1' and 'bugfix_940' branches into dev resolving the conflicts if any
developer@126509cb7d2c:structuralStrategy [dev] $git merge feature1
developer@126509cb7d2c:structuralStrategy [dev] $git merge bugfix_940

#6. Update local 'dev' branch with remote 'dev' branch using 'git pull' command to be in synch
developer@126509cb7d2c:structuralStrategy [dev] $git pull

#7. Push local 'dev' branch merged changes to the Project remote repo
developer@126509cb7d2c:structuralStrategy [dev] $git push
Typical Workflow on a Maintainer's Machine
#1. Clone the project repository
Maintainer@126509cb7d2c:~ $git clone https://gitlab.com/git_divya/structuralStrategy.git

#2. Checkout 'release' branch
Maintainer@126509cb7d2c:structuralStrategy [dev] $git checkout release

#3. Merge 'dev'(or 'uat') branch codes, resolve conflicts if any
Maintainer@126509cb7d2c:structuralStrategy [release] $git commit -m "Merge dev changes"

#4. Tag the latest release code
Maintainer@126509cb7d2c:structuralStrategy [release] $git tag -a r1.6 -m "Tag latest dev changes" HEAD

#5. Send to 'QA' team for approval, merge approved commits into 'release'
Maintainer@126509cb7d2c:structuralStrategy [release] $git merge QA

#6. Update 'dev' branch with latest commits on 'release' branch
Maintainer@126509cb7d2c:structuralStrategy [release] $git checkout dev
Maintainer@126509cb7d2c:structuralStrategy [dev] $git merge release

#7. Maintainer push all new commits to the repository
Maintainer@126509cb7d2c:structuralStrategy [release] $git push --all

Wrapping Up
Git is structured just like a Linux-based filesystem that gives you a varied scope of customizing the way you want it to handle your source code. A flexible git workflow and a branching model strategy are all you need to accommodate a vast project and synchronize among contributors while managing the data.
Hope this article gave you a foundation to lay your work and a structured plan to version control your project source code. If you liked my writing, do check out my other posts for further reading ...
1. Git: Basic-terminologies-explained
2. Docker Vs Virtual machines (VMs)
3. DevOps Interview Questions and Answers
Thank you!
Published at DZone with permission of Divya Bhushan. See the original article here.
Opinions expressed by DZone contributors are their own.

Comments