Generating and Protecting Invoices With Adobe Document Generation and PDF Services
An example of using both Adobe Document Generation as well as Adobe PDF Services to dynamically generate and protect a set of PDF invoices.
Join the DZone community and get the full member experience.
Join For FreeAdobe Document Services platform continues to build and expand what’s available which in itself is a great thing. But things get even more interesting when you start looking at how our various APIs can work together to enable more powerful workflows. In this blog post, I’m going to demonstrate a simple example of that using Adobe Document Generation and PDF Services API together.
Our Demo Scenario
Every month, our company needs to send out invoices. Each invoice goes to a unique company and consists of a series of line items and a total. As these invoices sometimes include sensitive information, we want to protect the document with a unique password so that only the recipient can open it. Altogether this sounds like a somewhat complex process, but let's break it down step by step.
Getting Our Data
In the real world, data can come from any number of places: Internal databases, flat files, remote APIs, and so forth. In order to simplify things a bit for this blog post, we’re going to use a hard-coded file that represents the data we need to generate invoices. Let’s break down what this is going to look like:
- The top level of our data is an array of companies who owe us money. It takes a lot of grit, determination, and passion to generate the awesome cat-based demos we create so we need to make sure we get paid. Those companies owe us!
- Each item in the array will consist of a company name, email address, telephone number, and fax number (haha just kidding it’s 2021).
- Each item in the array will consist of an array of line items for the invoice.
- Each line item will have a description of the charge and a total.
Here’s an example of one record in our data:
{
    "company": {
        "name":"Alpha Company",
        "email":"raymondcamden@gmail.com",
        "phone":"555-555-5555"
    },
    "invoice":[
        {"desc":"Wrote cat demos", "total": 9.00 },
        {"desc":"Wrote more cat demos", "total": 20.50 },
        {"desc":"Debugged demos", "total": 60.00 }
    ]
}
You can find the complete set of data on the supporting GitHub repository for this article. I wrote up three different companies with unique information and invoice details.
Design Our Template
In order to use Document Generation, we need a Word template that will serve as the basis for our invoices. While we can build a beautiful document in Word (well, maybe you can), we can keep things simple for this article. I began with a header area for company information, a place for the invoice details, and a simple footer.

The next step is to start adding the tags so that the Document Generation service can replace them with real data. To make this easier, we can provide sample data in the Word document. If you remember, our data file consisted of an array of data. However, we’re going to be using one company’s information for each template. Therefore I can copy just one item (like in the code example above) and paste it into my Word doc:
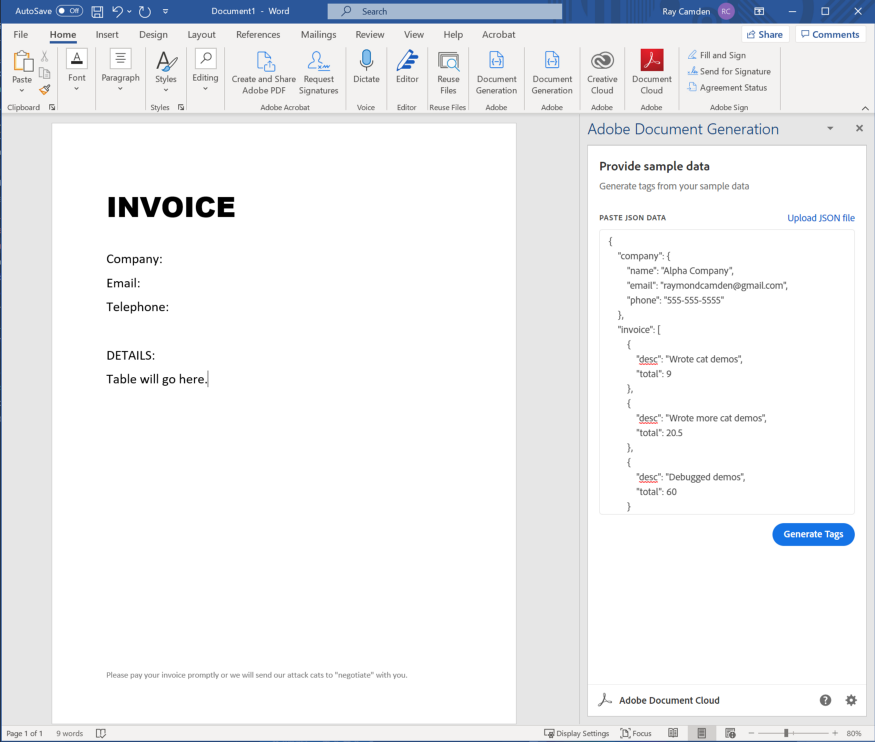
After copying in that data, I can click generate tags:
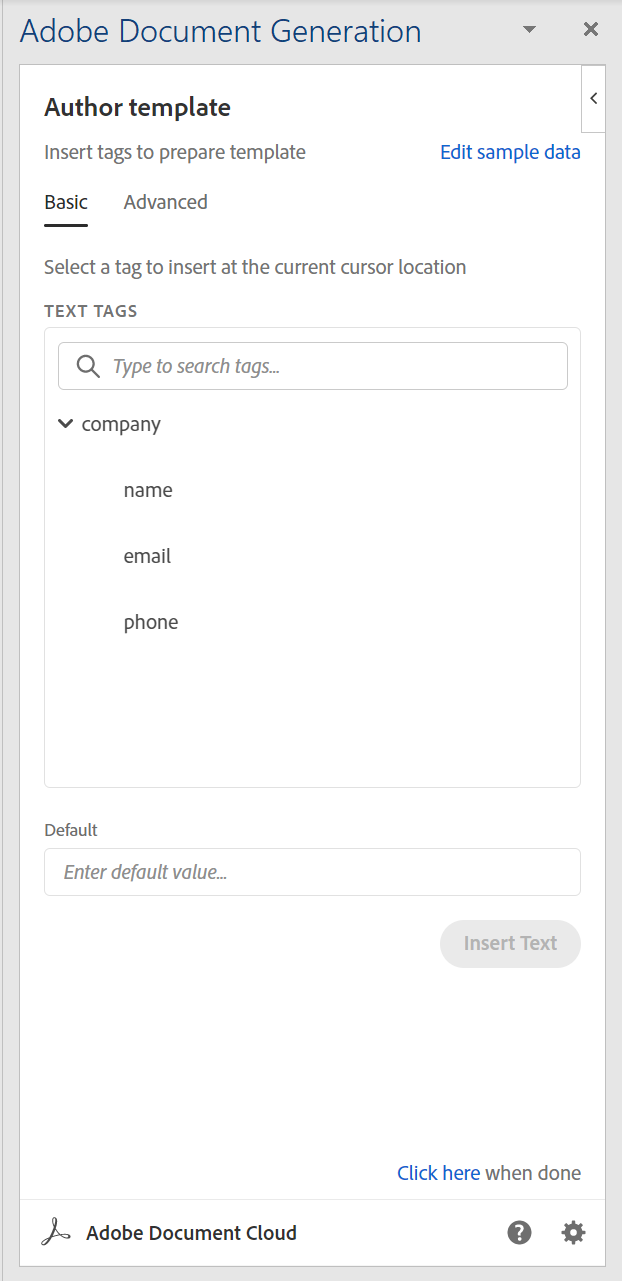
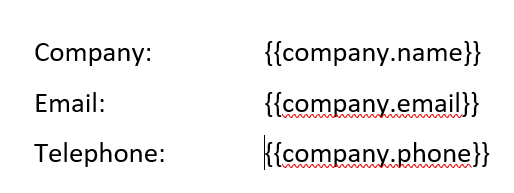
Cool. So now I’ll insert the basic information:
For the invoice, I need to switch to the advanced tab and select tables and lists. What’s cool about the Document Generation Word Add-In is that it knows what part of your data makes sense here, invoice. It’s the only option available in the drop-down. I can then type in the columns I want.
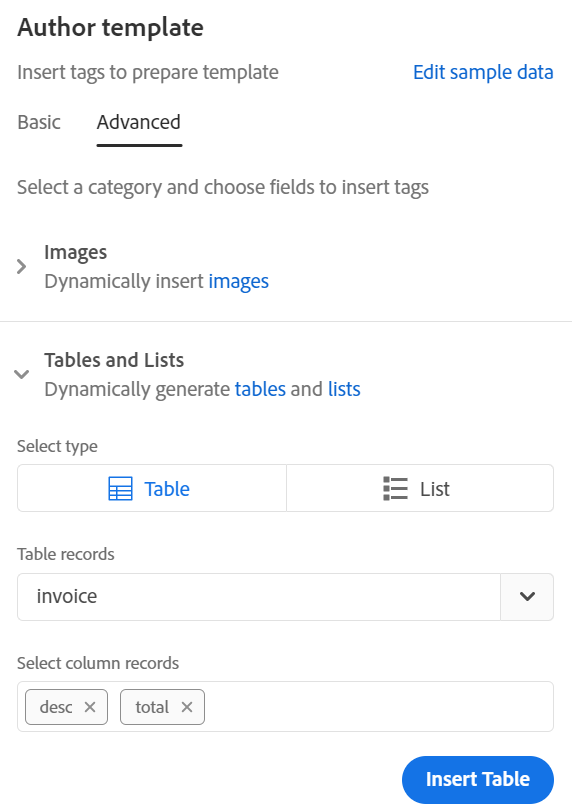
After clicking insert table, I get a basic table inserted into my document:

It’s important to remember that you are free to completely redesign this table. I edited the headers, did some alignment, and added color striping to the table:

I bet you didn’t know Adobe hired me for my design skills, did you? Just to be fancy, we can add a total at the end as well by using this expression:
Total: ${{ $formatNumber($sum(invoice.total), '#,###.00')}}
The $sum(invoice.total) portion creates a sum from the total portion of the invoice array. The $formatNumber function formats the number by adding any necessary commas and two decimal places. (You can read more about this in my formatting tips and tricks article from earlier this year.)
Writing the Code — Part 1
Now that we have both our data and our template, we can start generating PDFs. The first iteration of the script will focus on generating the PDFs using Document Generation. We’ll write it, confirm it works, and then worry about generating the passwords. I’ll share the complete script and then explain each part below.
const PDFServicesSdk = require('@adobe/pdfservices-node-sdk');
const fs = require('fs');
const slug = require('slug')
let input = './invoice.docx';
let data = './data.json';
if(!fs.existsSync(data)) {
    console.error(`Can't find data file ${data}`);
    process.exit(1);
} else data = JSON.parse(fs.readFileSync(data,'utf8'));

(async () => {
    for(d of data) {
        console.log(`Generating invoice for ${d.company.name} ...`);
        // output needs to have a unique filename, we can make this based on company name
        let output = slug(d.company.name) + '.pdf';
        if(fs.existsSync(output)) {
            console.log(`Output destination (${output}) exists - deleting.`);
            fs.unlinkSync(output);
        }
        await generateFromTemplate(input, d, output, './pdftools-api-credentials.json');
        console.log(`Invoice generated: ${output}.`);
    };
})();

async function generateFromTemplate(template, data, dest, creds) {
    return new Promise((resolve, reject) => {
        // Initial setup, create credentials instance.
        const credentials =  PDFToolsSdk.Credentials
        .serviceAccountCredentialsBuilder()
        .fromFile(creds)
        .build();
        // Create an ExecutionContext using credentials.
        const executionContext = PDFToolsSdk.ExecutionContext.create(credentials);
        const documentMerge = PDFToolsSdk.DocumentMerge,
        documentMergeOptions = documentMerge.options;
        //dest determines if Word or PDF
        let format;
        let destExt = dest.split('.').pop().toLowerCase();
        if(destExt === 'docx') format = documentMergeOptions.OutputFormat.DOCX;
        else if(destExt === 'pdf') format = documentMergeOptions.OutputFormat.PDF;
        else throw('Invalid destination extension')
        // Create a new DocumentMerge options instance.
        options = new documentMergeOptions.DocumentMergeOptions(data, format);
        // Create a new operation instance using the options instance.
        const documentMergeOperation = documentMerge.Operation.createNew(options);
        // Set operation input document template from a source file.
        const input = PDFToolsSdk.FileRef.createFromLocalFile(template);
        documentMergeOperation.setInput(input);
        // Execute the operation and Save the result to the specified location.
        documentMergeOperation.execute(executionContext)
        .then(result => result.saveAsFile(dest))
        .then(() => resolve(true))
        .catch(err => {
            if(err instanceof PDFToolsSdk.Error.ServiceApiError
                || err instanceof PDFToolsSdk.Error.ServiceUsageError) {
                console.log('Exception encountered while executing operation', err);
                reject(err);
            } else {
                console.log('Exception encountered while executing operation', err);
                reject(err);
            }
        });
    });
}
From the top, we begin by importing the PDF Tools SDK (soon to be PDF Services SDK) and other libraries we’ll need. Next, we read in the flat file of data for our demo. Again, in a “real” application, this would be a database or API call of some such. Now comes the fun part. For each array item in the array we:
- Generate a unique filename for the output. The
sluglibrary will take a string like "Raymond Camden" and convert it into a more friendly format like "raymond-camden". So "Alpha Company", for example, will become "alpha-company", and we then add the PDF extension. - We take the data for this array execution, which is
d, and pass that plus path of our Word template to a utility function,generateFromTemplate - The
generateFromTemplatefunction simply wraps the call to our SDK to generate a PDF. I say "simply" because my code is a very basic rewrite of the examples from our documentation.
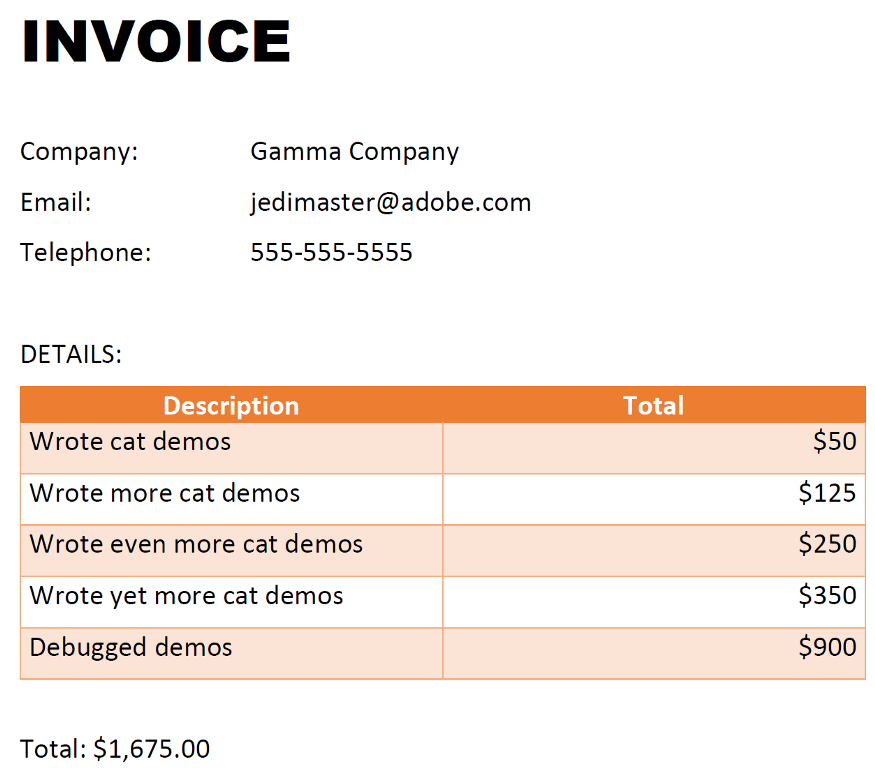
And that’s it. The end result is three PDFs. Here’s gamma-company.pdf:
Writing the Code — Part 2
Now we need to modify the process to assign a password. To create the password, we’re going to use a nifty Node module called threewords. This utility returns random strings consisting of three English words. The result is a bit long for a password, but is a bit easier to remember. Here’s a few examples:
charcoal-verdant-blackberry
cordial-modernized-diver
outlaw-festive-expert
Inside our for loop, we begin by adding this:
//generate a password
let password = threewords.random();
console.log(`Will assign password ${password}.`);
Note that I would not normally output the password to the console, but for the purposes of this demo, it’s handy for testing. Next, let’s create a new file name for the updated PDF. The Node SDK can’t overwrite an existing file so we need to create a new name:
//generate a new filename
let output_protected = output.replace('.pdf', '-protected.pdf');
if(fs.existsSync(output_protected)) {
    console.log(`Output destination (${output_protected}) exists - deleting.`);
    fs.unlinkSync(output_protected);
}
And then finally, we can call a new function to add the protection:
await passwordProtectPDF(output, password, output_protected, './pdftools-api-credentials.json');
console.log(`New protected PDF saved to ${output_protected}.`);
The utility function is nearly identical to the previous one except in the operation it’s doing. As with my previous code, I was able to take our sample code and slightly modify it to turn into a callable function.
async function passwordProtectPDF(inputPDF, password, dest, creds) {

    return new Promise((resolve, reject) => {
        // Initial setup, create credentials instance.
        const credentials =  PDFToolsSdk.Credentials
        .serviceAccountCredentialsBuilder()
        .fromFile(creds)
        .build();
        // Create an ExecutionContext using credentials.
        const executionContext = PDFToolsSdk.ExecutionContext.create(credentials);
        // Build ProtectPDF options by setting a User Password and Encryption
        // Algorithm (used for encrypting the PDF file).
        const protectPDF = PDFToolsSdk.ProtectPDF,
            options = new protectPDF.options.PasswordProtectOptions.Builder()
            .setUserPassword(password)
            .setEncryptionAlgorithm(PDFToolsSdk.ProtectPDF.options.EncryptionAlgorithm.AES_256)
            .build();
        // Create a new operation instance.
        const protectPDFOperation = protectPDF.Operation.createNew(options);
        const input = PDFToolsSdk.FileRef.createFromLocalFile(inputPDF);
        protectPDFOperation.setInput(input);

        // Execute the operation and Save the result to the specified location.
        protectPDFOperation.execute(executionContext)
        .then(result => result.saveAsFile(dest))
        .then(() => resolve(true))
        .catch(err => {
            if(err instanceof PDFToolsSdk.Error.ServiceApiError
                || err instanceof PDFToolsSdk.Error.ServiceUsageError) {
                console.log('Exception encountered while executing operation', err);
                reject(err);
            } else {
                console.log('Exception encountered while executing operation', err);
                reject(err);
            }
        });
    });
}
Writing the Code — Part 3
For the final part of this demo, we need to actually email the PDF to the company. We can use the SendGrid API and their Node SDK for handling the mail. After installing the SDK, I initialized it up top in my script:
const sgMail = require('@sendgrid/mail');sgMail.setApiKey(process.env.SENDGRID_API_KEY);
//email address I'll be sending from
const FROM = 'raymondcamden@gmail.com';
Notice I’m using an environment variable for my SendGrid key. I then modified my loop to create a text message for the mail:
//send the email
let mail = `
Dear ${d.company.name}:
Your invoice is attached. You can open it with the password: ${password}
Have a nice day.
`;
That’s not the most exciting text, but it gets the job done. Finally, I pass everything to a utility function:
await sendMail(d.company.email, FROM, 'Invoice', mail, output_protected);
console.log(`Mail sent to ${d.company.email}.`);
That function just makes use of the SendGrid API:
async function sendMail(to, from, subject, text, attachment) {
    let pdfInBase64 = (fs.readFileSync(attachment)).toString('base64');
    const msg = {
        to,
        from,
        subject,
        text,
        attachments: [
            {
            content: pdfInBase64,
            filename: attachment,
            type:'application/pdf'
            }
        ]
    }
    return new Promise(async (resolve, reject) => {
        try {
            await sgMail.send(msg);
            resolve(true);
        } catch (error) {
            console.error(error);
            if (error.response) {
                console.error(error.response.body)
            }
            reject(error);
        }
    });
}
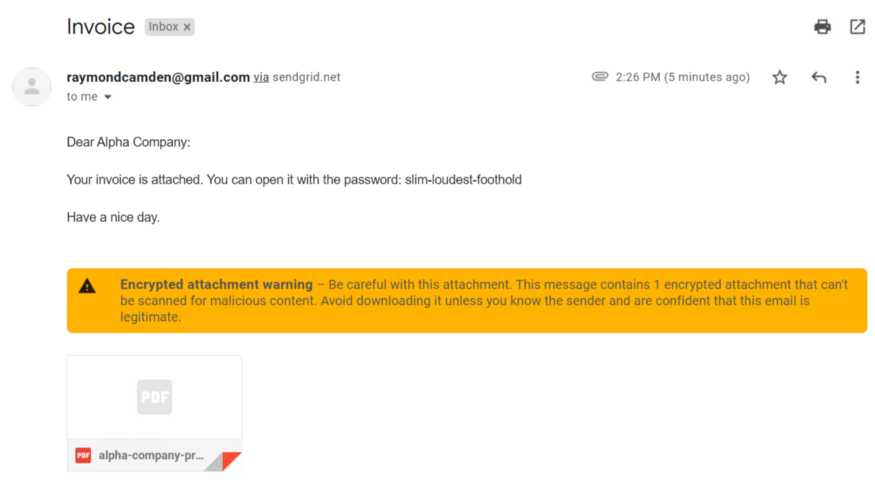
Notice we have to convert the PDF into base64 before sending. The final result is a fancy email with an attachment:
Next Steps
If you found this interesting and want to play with the code yourself, you can find the NodeJS script and Word template here: https://github.com/cfjedimaster/document-services-demos/tree/main/article_support/docgen-password Be sure to sign up for a free trial and give the Document Services a try yourself!
Published at DZone with permission of Raymond Camden, DZone MVB. See the original article here.
Opinions expressed by DZone contributors are their own.

Comments