Develop a Geocaching Multiplayer Game Using Flutter, Spring Boot, Oracle Database Free Spatial, and OpenStreetMap
Develop an app using an extremely powerful and entirely free full-stack consisting of Flutter, Spring Boot, Oracle Database with Spatial, and OpenStreetMap.
Join the DZone community and get the full member experience.
Join For FreeIn this blog, I will show you how to quickly create a full-stack app using an extremely powerful, versatile, popular, and entirely free software stack consisting of Flutter, Spring Boot, Oracle Database with Spatial (SQL, JSON, and blockchain), and OpenStreetMap. All of the source is of course available here.

As a use case, I will create a multi-player game based on geocaching. (Fun fact, there are now more than 3.1 million active geocaches in 196 different countries and even space.)
A player can place items/pictures at specific locations around the globe for other players to find. When a player finds a geocache location, they sign the guestbook and can see others that have signed the guestbook. Using the honesty policy, a player has the option to take any items/pictures with the understanding that they will put other items/pictures in place.
Our application is an online version of the game though it could conceivably be used to track/match the real-world version or extended to any number of other purposes.
We'll go from bottom to top, setting up the app and describing each bit of the architecture, from Oracle Database Free (showing JSON, Spatial, blockchain tables, etc.) to Spring Boot (showing REST, JSON, JDBC, etc.) to Flutter (web and mobile, widgets, maps, REST, etc.).
In short, we'll:
- Create the database.
- Configure Spring Boot to create and use a
GeoCacheUserand relevant tables and JSON docs in the database. Build and verify. - Build and run the Flutter service which will call the Spring Boot service which will call the Oracle database.
But first, let's take a quick walkthrough of the app.
App Walkthrough
The app has a navigation bar with three items: Top Caches, Add GeoCache, and Map (Spatial).
First, we'll add geocaches using the Add GeoCache form (providing name, lat, long, and image URL).
Then, we'll check the Map (Spatial) to see and select geocaches.

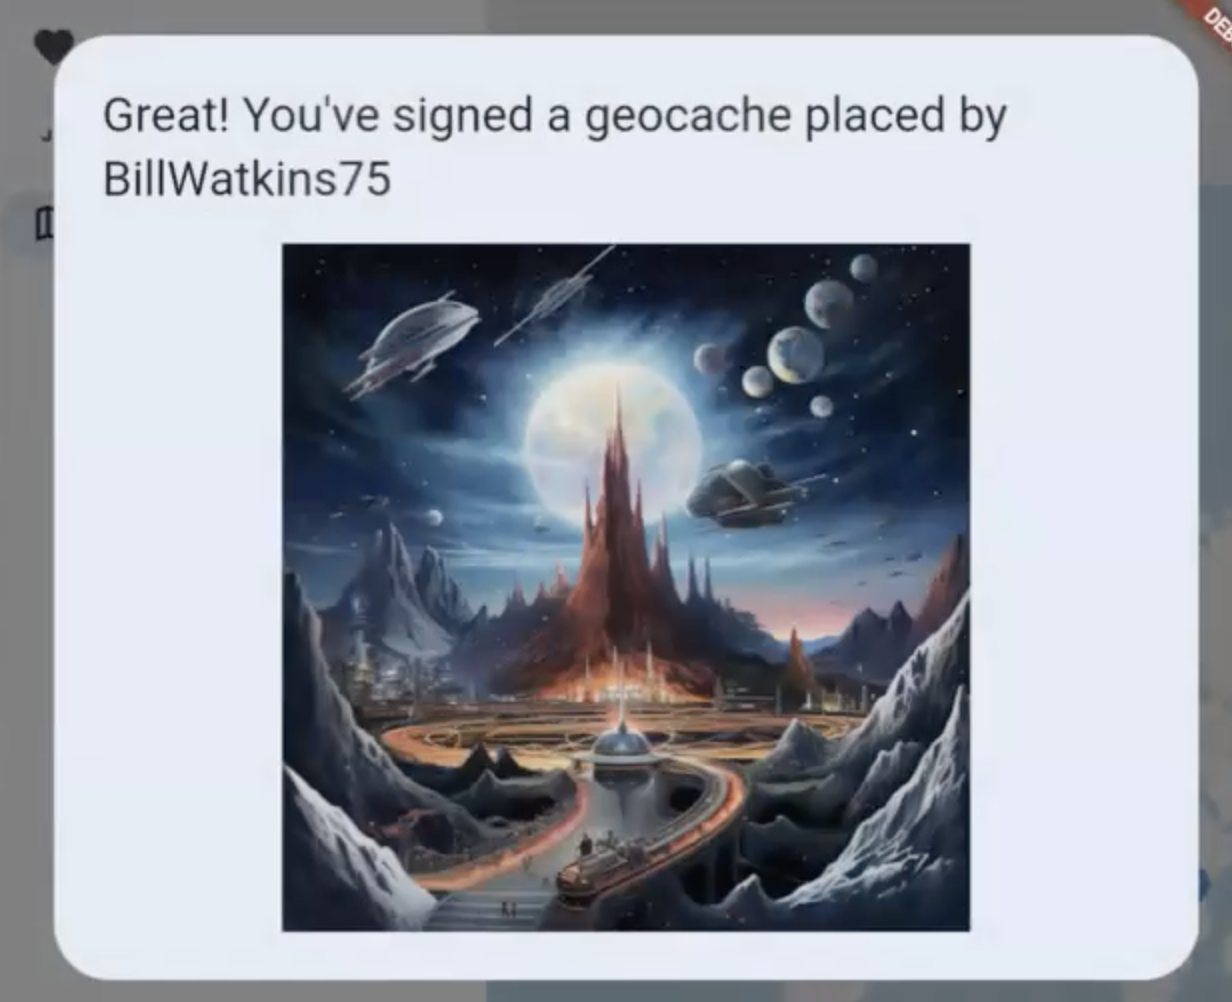
We'll notice the name and image of the cache and that we've signed it.

Finally, we'll go to Top Caches to see which caches had the most visits/signatures.

GeoJSON
GeoJSON is a standard (RFC 7946) that uses JSON objects to represent various geometrical entities and combinations of these together with user-defined properties. In this application, we are plotting simple latitude and longitude coordinates that have certain properties and so are using a feature collection structure that contains an array of features. Features, in turn, have a geometry of type point (that contains the coordinates) and properties with an array of values specific to the application such as the name of the person who added the geocache, the image location of the image they placed, and the name of the person/people that visited the geocache.
The following is an example of this GeoJSON and it is represented by objects in the database/Oracle, back end/Spring Boot, and front end/Flutter.
{
  "type": "FeatureCollection",
  "features": [
    {
      "type": "Feature",
      "geometry": {
        "type": "Point",
        "coordinates": [
          -81.5812,
          28.4187
        ]
      },
      "properties": {
        "name": "BillWatkins75",
        "imagelocation": "https://.../spacemountain.png"
      }
    }
  ]
}
Oracle Converged Database
In this application, we will use SQL, JSON, blockchain tables, and of course Spatial for the GeoJSON and then mapping of the same. The Oracle converged database is extremely powerful and versatile as it provides support for SQL, JSON (and both simultaneously via the JSON Duality functionality), REST, messaging and events, editions, IoT streaming, Machine Learning, blockchain, graph, and Spatial all in one database.
We can use any version of the Oracle database. On the cloud, we can use the Oracle always free autonomous database (that's also nice, as we can expose it via the Internet and make the game truly available globally/online in a couple of minutes) or we can use the Oracle 23c Free version where we can simply install or use a container image locally. Or of course, we could use the local for dev and cloud for production, etc. and either of these options is very quick to set up.
Always Free Oracle Cloud Database Option
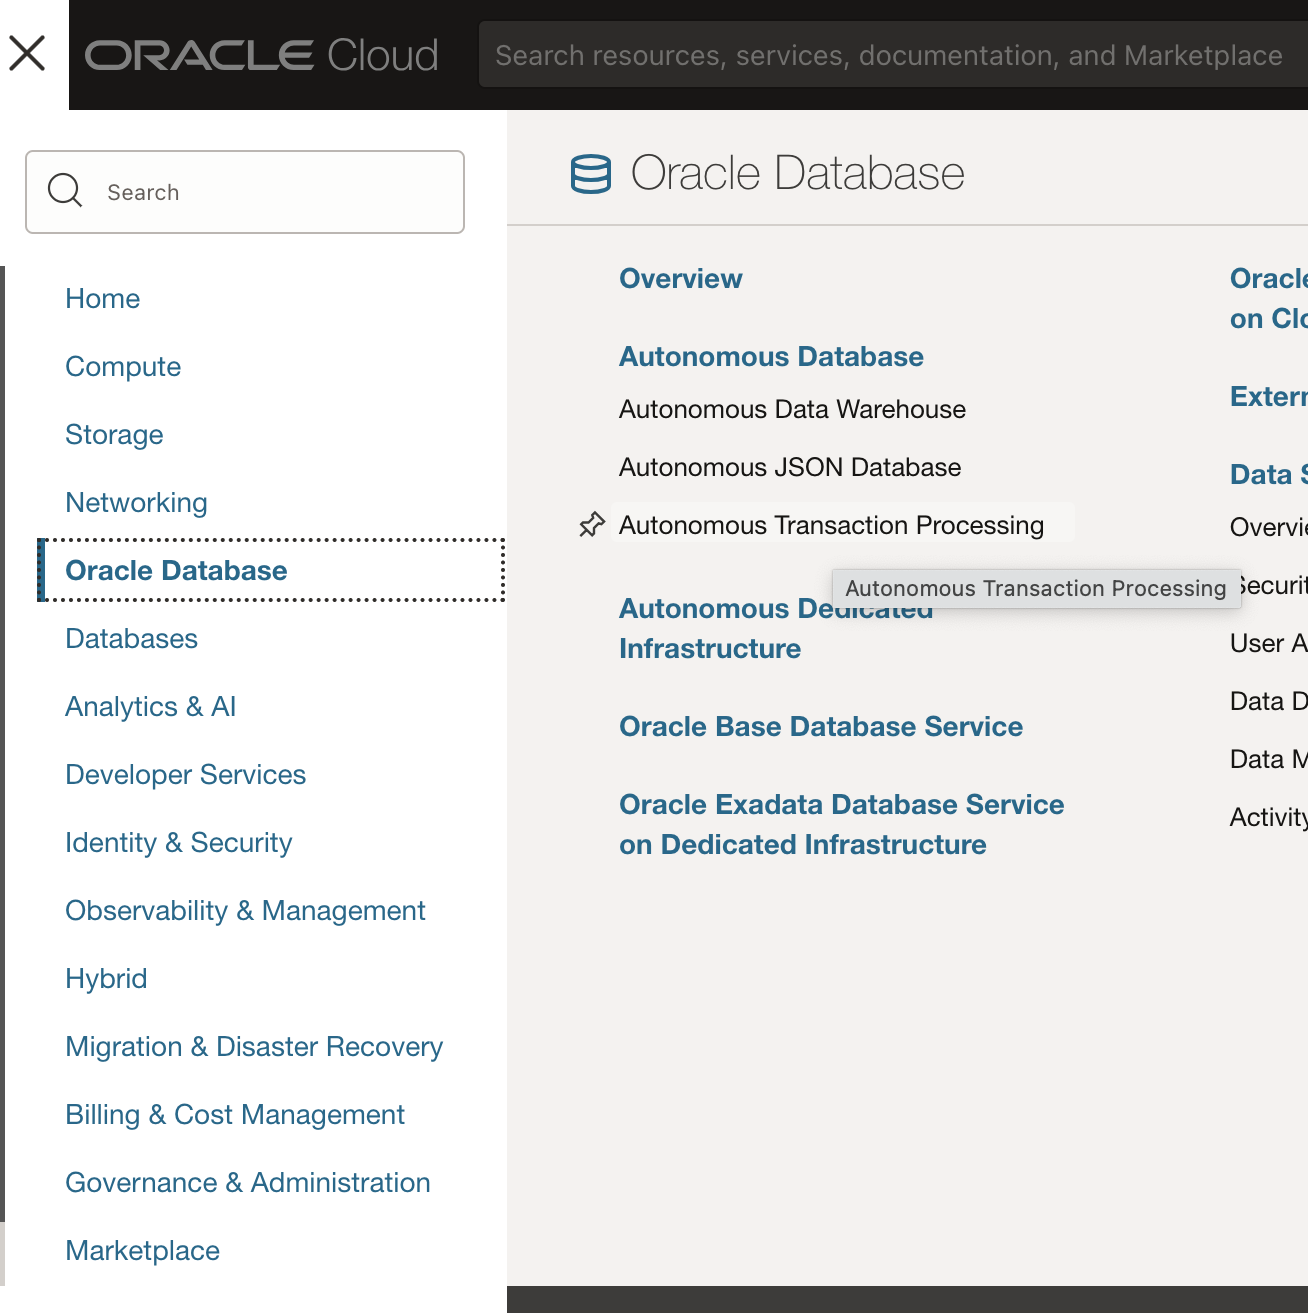
The prompts are very intuitive. You simply select Autonomous Transaction Processing in the Oracle Database menu screen as shown below, and then click the Create Autonomous Database button. You can take all of the defaults and simply provide an admin user password.

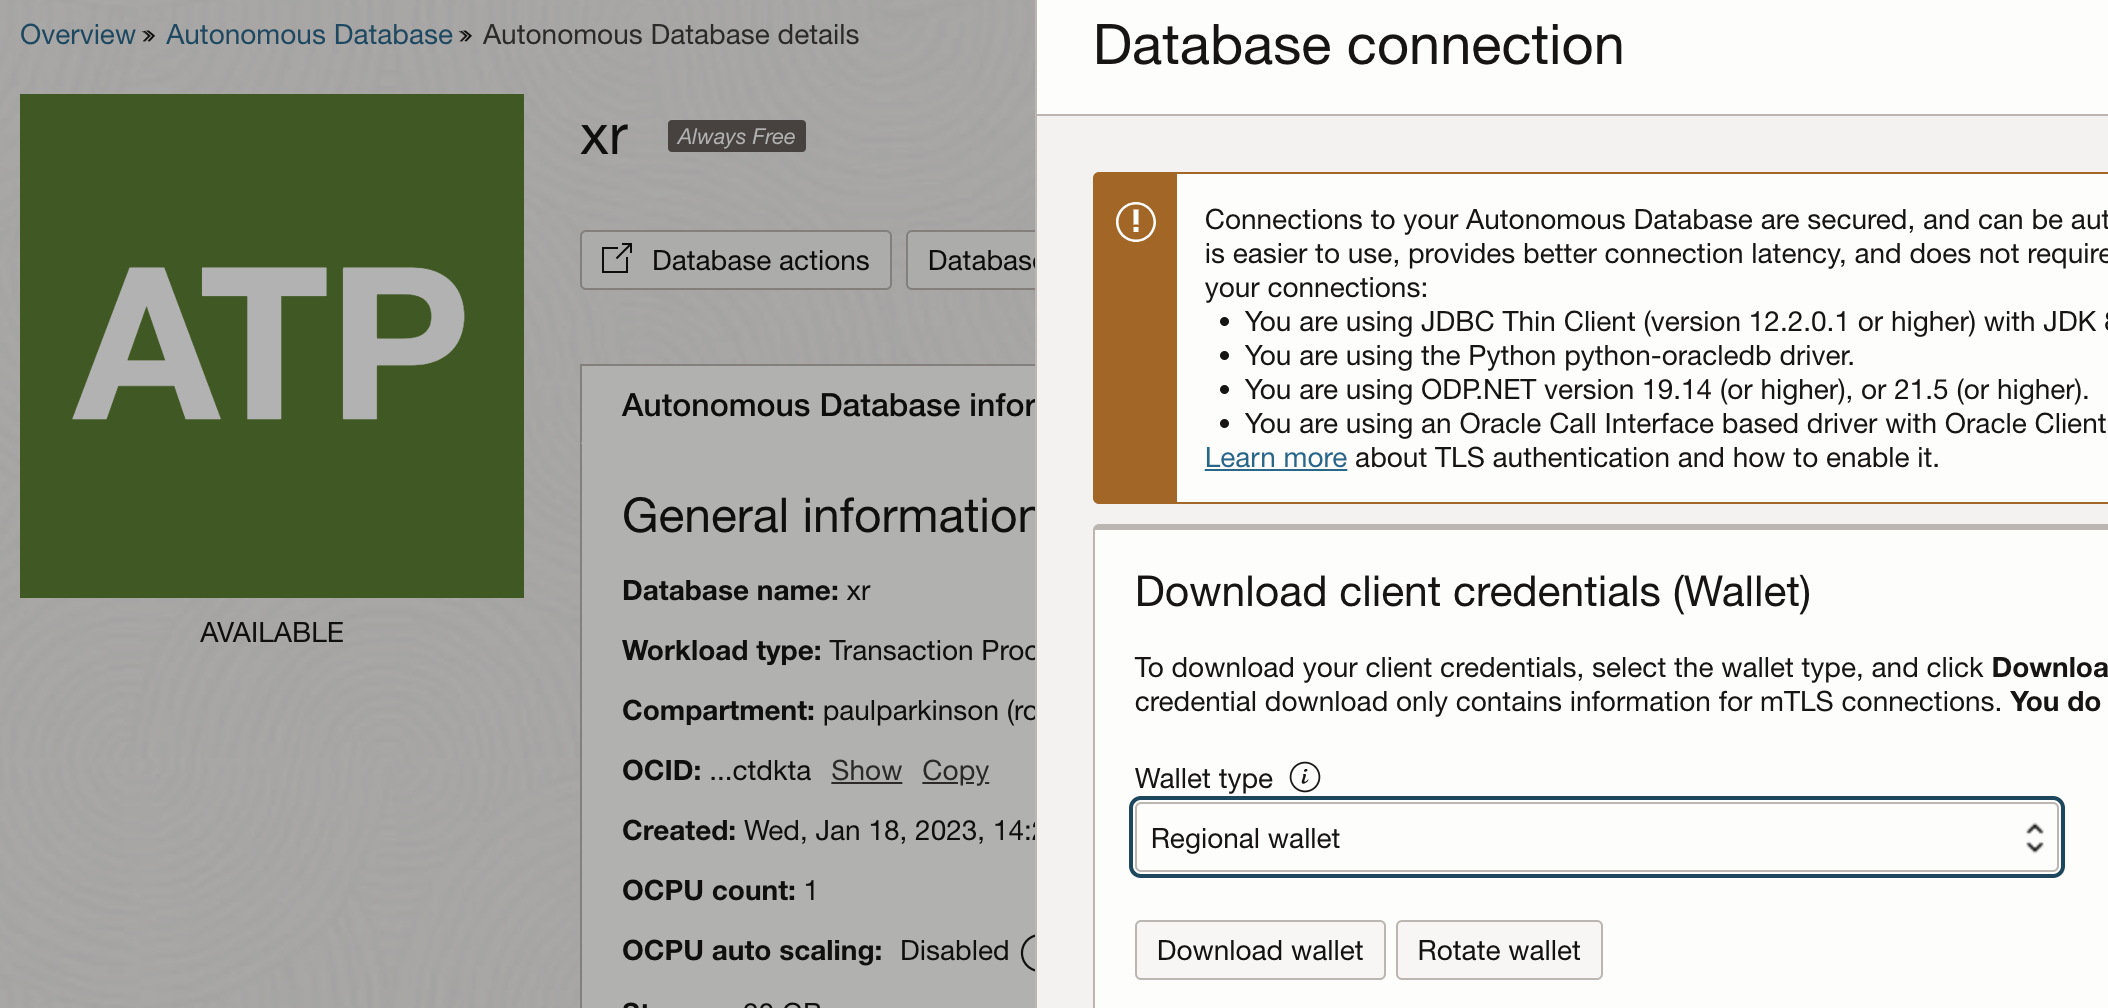
When the database is created/available, you will click the Database Connection button and download the wallet as shown here.

Oracle Database Free Option
Using the container image is very simple. You can simply execute the one line below, replacing -e ORACLE_PASSWORD=Welcome12345 with a password of your choice and replacing -v oracle-volume:/somedirectory with a directory location (or omitting it entirely if you only wish to have in-memory database).
docker pull
container-registry.oracle.com/database/free:latest; docker run -e ORACLE_PASSWORD=Welcome12345 -v oracle-volume:/somedirectory container-registry.oracle.com/database/free:latest
That's it!
Spring Boot
You could download and install SQLcl to manage either of the databases/options mentioned or click Database Actions and then SQL in the OCI console to manage the cloud database. This is a good idea as these are, of course, very useful and it is a normal best practice to do so in order to create users, etc. However, we will simply use Java code in our Spring Boot app to create the GeoCacheUser we will use for this app.
As usual, you will need Java and Maven to build the Spring Boot app. Clone or download the repos mentioned earlier, cd to the geocaching-game-flutter-springboot-oraclespatial/springboot_application directory, and follow these steps to create the GeoCacheUser we will use in the app:
- Modify the datasource config in src/main/resources/application.yaml, providing URL, username, and password.
- Run
mvn clean package. - Run
java -jar target/geojson-0.0.1-SNAPSHOT.jar. - Run
curl "http://localhost:8080/geocache/createDBUser?userName=GeoCacheUser&password=[youradminorsyspassword]"replacing the password value with yours. - Stop the Java/Spring Boot process started in step 3.
- Now, modify the datasource config in src/main/resources/application.yaml again; this time, providing the username and password you provided in step 4.
- Run
mvn clean package. - Run
java -jar target/geojson-0.0.1-SNAPSHOT.jar. - Run
curl http://localhost:8080/geocache/createTables.
The setup is now complete. You should be able to verify by running the following commands, though they will simply return empty JSON values at this point (e.g., {"type":"FeatureCollection","features":[]}).
-
curl http://localhost:8080/geocache/getGeoCaches -
curl http://localhost:8080/geocache/getGeoCacheTop10
Now that setup is out of the way, let's look at the Spring Boot portion of our application closer.
If you are involved with backend development at all, it is quite likely you are familiar with what is by far the most popular framework in this area: Spring Boot.
Generally, you would move the data operations out into a DAO (Data Access Object), @Component, or JPA, etc. However, for simplicity, the logic of this application is kept minimal and is contained in the Spring RestController, OracleGeoJSONController.java. The simple POJOs in the geojson package are simply a representation of the GeoJSON standard mentioned earlier.
The controller contains four main methods each of which uses a @PostMapping or @GetMapping (REST endpoint annotations) to receive requests from the Flutter application layer and uses Spring Boot's JDBCTemplate (a convenience template/API for using JDBC) to talk to the Oracle database.
addGeoCacheandgetGeoCachesmethods are used to store geocaches added by a user and retrieve them in order to plot them as markers on the map for the user to view. They work against the geocache table which is a simple table that stores JSON and was created during setup with:
CREATE TABLE geocache (geocache_doc VARCHAR2 (4000) CHECK (geocache_doc is json))
addGeoCacheJournalEntryandgetGeoCacheTop10are used to store visits to a geocache (the equivalent of signing the guestbook in a real-world geocache). These are journal/ledger-type entries, and so we use the blockchain table functionality in the Oracle database to demonstrate an example where, for example, NFT-type geocaching guarantees can be provided. Rows in a blockchain table are made tamper-resistant by special sequencing and chaining algorithms. Users can verify that rows have not been tampered with. Blockchain tables can be used to implement blockchain applications where the participants trust the Oracle Database provider, but want means to verify that their data hasn’t been tampered with. This is the very simple syntax of the table that was created during setup:
CREATE BLOCKCHAIN TABLE geocache_journal
        (creatorname VARCHAR2(128), visitorname VARCHAR2(128), imageurl VARCHAR2(128),
         longitude NUMBER, latitude NUMBER)
        NO DROP UNTIL 1 DAYS IDLE
        NO DELETE UNTIL 16 DAYS AFTER INSERT
        HASHING USING "SHA2_512" VERSION "v1"
These four methods are quite straightforward as we are just plotting the GeoJSON coordinate/points on the map in Flutter. There are other queries in the app that are currently unused by the application but are available as starters to be built upon for extra functionality re: spatial analysis, etc., as well as testing.
An example is the use of SDO_GEOMETRY (JGeometry), etc. to perform queries based on proximity and containment, filter data, measure distance relationships and combine/transform spatial data, and manage spatial sensor data from laser scanning or photogrammetry for 3D geographic information systems (GIS) and Smart City applications. A good starting point can be found in the Using GeoJSON Geographic Data documentation and the related Java API Spatial Java API Reference.
Also, from here it should be easy to expand to query the list of visitors of a given creator's caches, creators of a given visitor, etc. for follow, follow-back, analytics, functionality, etc.
Flutter
I will not go into differences between various languages, frameworks, etc. here, but to give an idea, Flutter is essentially tied with React Native as far as popularity.
Flutter has grown in popularity so quickly due in large part to the fact that it provides an abstraction to allow a single code base to run on "any screen" including mobile, web apps, desktop apps, etc. while at the same time allowing access to the native features of all of these devices/screens. It is also easy to use, built on the fast, object-oriented language, Dart, and based on widgets that naturally provide well-designed and adaptable UI constructs and patterns (again with inheritance such that themes, etc. may be implicitly inherited). As a result, another benefit is the extensive community support it has obtained.
Again, the app is made as simple and succinct as possible while still showing key advantages and concepts and providing a powerful foundation to build upon.
Flutter is quite easy to set up, but there is quite a bit of boiler code for any given project so the repos only provides three key files. There are also some components you may need to install, depending on your needs and environment. Again these should be easy to set up and so once you have finished the Install, Setup Editor, and Test Drive steps found here, you will be ready to continue with our GeoCaching application.
Once ready, copy the three files found in the geocaching-game-flutter-springboot-oraclespatial/flutter_application directory to the corresponding location in your project. Let's look closer at these three files:
- pubspec.yaml is the basic spec for the application including various configurations and dependencies. We have added three key dependencies in our application (corresponding imports are found in the *.dart file source code):
- flutter_map: ^5.0.0 provides map functionality (we are using openstreetmap.org - a free, editable map of the world that is built by volunteers, for tiles, etc.).
- latlong2: ^0.9.0 provides the functionality for the marker points we put on the map.
- http: ^1.0.0 provides the ability to make Rest calls (to our Spring Boot service in particular).
- geocachejson.dart contains the object representation of the FeatureCollection (i.e., GeoJSON), as well as the REST calls for fetching/reading from our Spring Boot service.
- main.dart is the main program for our Flutter service. It contains the following:
- A
main()method, which is the entry point of the app and calls into MyHomePage widget (widgets can be stateless or stateful), and in turn, has a Scaffold with a LayoutBuilder containing a Column with three navigation items that correspond to three widgets for display in the mainArea. GeoCacheTopScoresWidgetqueries for and displays the top ten most signed/visited geocache locations (i.e., calls the Spring BootgetGeoCacheTop10method). It includes the name, etc. of the cache, as well as an icon of the picture that got the most visits.GeoCacheFormWidgetcontains the form a user enters in order to create a geocache (i.e., calls the Spring BootaddGeoCachemethod).MapWidgetqueries for all of the geocache information (i.e., calls the Spring Boot methodgetGeoCaches) and displays it on the map. Users can move around the map as expected and select any location. When a location is selected, the image of the geocache is displayed along with a message notifying the user of what/whose cache they have signed. This is sent to the backend to be recorded in the blockchain table (i.e., calls the Spring BootaddGeoCacheJournalEntry).
- A
Run the App
Finally, with the database and Spring Boot app running we can run the Flutter app using whichever device we prefer by selecting from the bottom right menu and hitting the Start Debugging button. Further changes to the app are hot reloaded when the files are saved (making for fast dev cycles).
Note that depending on the environment Flutter and Spring Boot are run in, it may be necessary to configure CORS or other security support between the services. Or, for devs only, obviously, disable security (e.g., by clearing the relevant stamp files in the flutter\bin\cache directory and setting --disable-web-security in flutter\packages\flutter_tools\lib\src\web\chrome.dart).

Conclusion
I've intentionally made the application and source code as succinct as possible while providing a full stack with a considerable amount of functionality that should be easy to extend and build upon.
I look forward to any comments or questions you may have and really appreciate your time reading.
Opinions expressed by DZone contributors are their own.

Comments