Create a CDC Event Stream From Oracle Database to Kafka With GoldenGate
We create an integration between an Oracle DB and a Kafka broker through GoldenGate technology that publishes a CDC event stream in Kafka in real-time.
Join the DZone community and get the full member experience.
Join For FreeOracle provides a Kafka Connect handler in its Oracle GoldenGate for Big Data suite for pushing a CDC (Change Data Capture) event stream to an Apache Kafka cluster.
So, given an Oracle database, any DML operation (INSERT, UPDATE, DELETE) inside a business transaction completed succesfully will be converted in a Kafka message published in real-time.
This integration can be very interesting and useful for these kind of use-cases:
Given a legacy monolithic application having an Oracle database as single source of truth, it should be possible to create a real-time stream of update events just by monitoring the changes of relevant tables. In other words, we can implement data pipelines from legacy applications without changing them.
We need to grant that a Kafka message is published only if a database transaction completes successfully. In order to grant this feature we can write (always transactionally) the Kafka message in an ad-hoc monitored table by GoldenGate that, through its Kafka Connect handler, will publish an "INSERT" event storing the original Kafka message to unwrap.
In this article, we will explain, step-by-step, how to implement a PoC (Proof-of-Concept) for testing the integration between an Oracle database with Kafka through GoldenGate technology.
PoC Prerequisites
We will install all the stuff in a local virtual machine, so you need:
An installation of Oracle VirtualBox (I tested on Oracle VirtualBox 5.2.20)
- 16GB of RAM.
- Around 75GB of disk space free.
- And last but not least: to know vi.
PoC Architecture
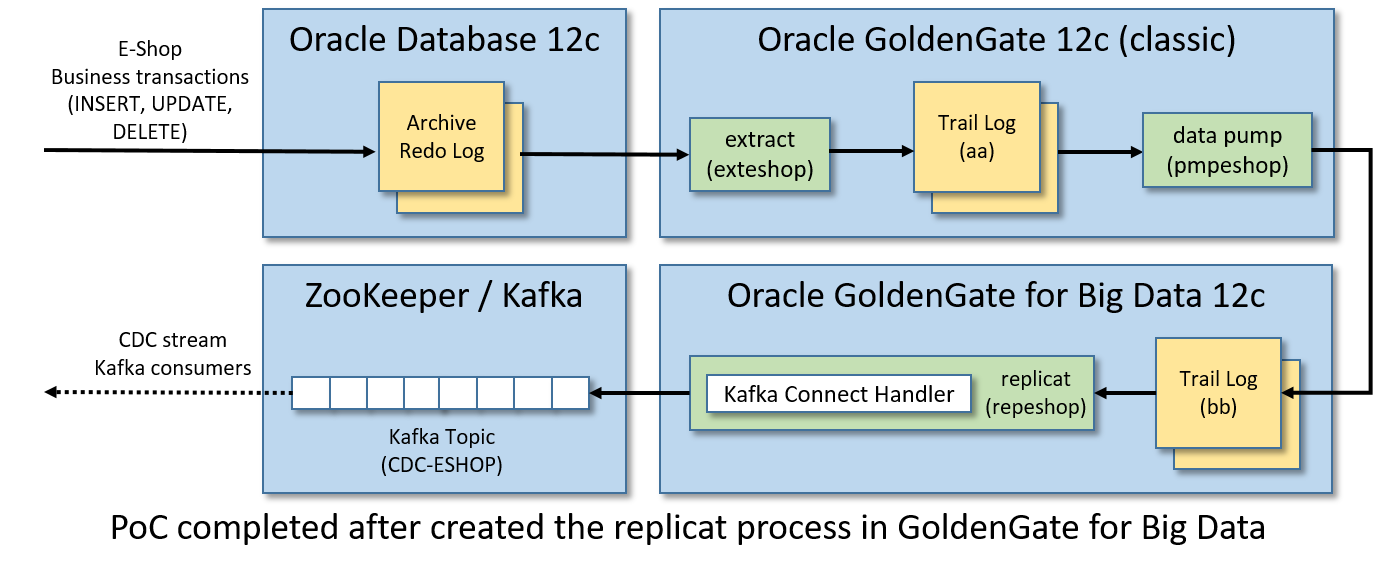
This guide will create a single virtual machine having:
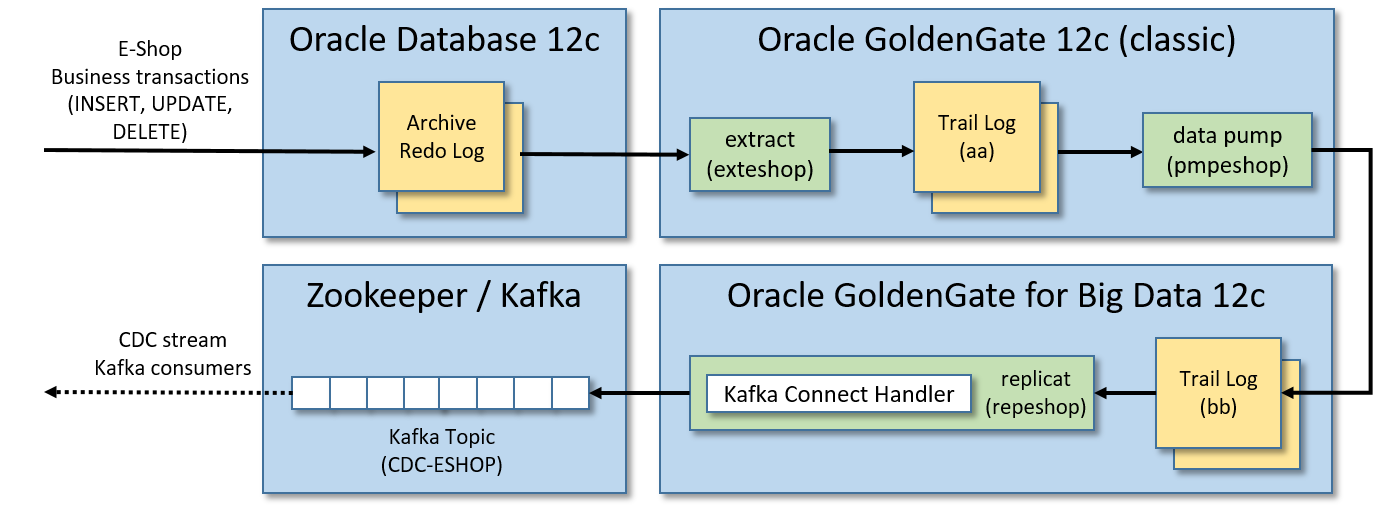
An Oracle Database 12c: where the tables to monitor are stored.
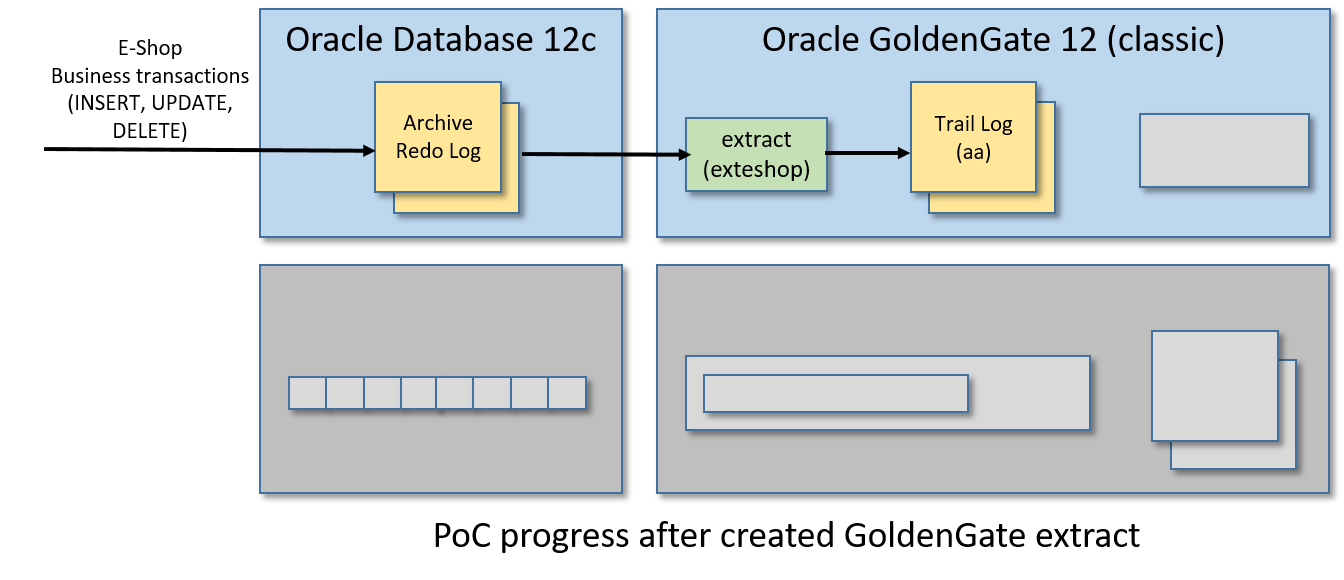
An Oracle GoldenGate 12c (classic version): where the business transactions applied on the monitored tables are extracted in real-time, stored in an intermediate log format (trail log) and pumped to a remote trail log managed by another GoldenGate (for Big Data) instance.
An Oracle GoldenGate for Big Data 12c: where the pumped business transactions are received and replicated in Kafka messages.
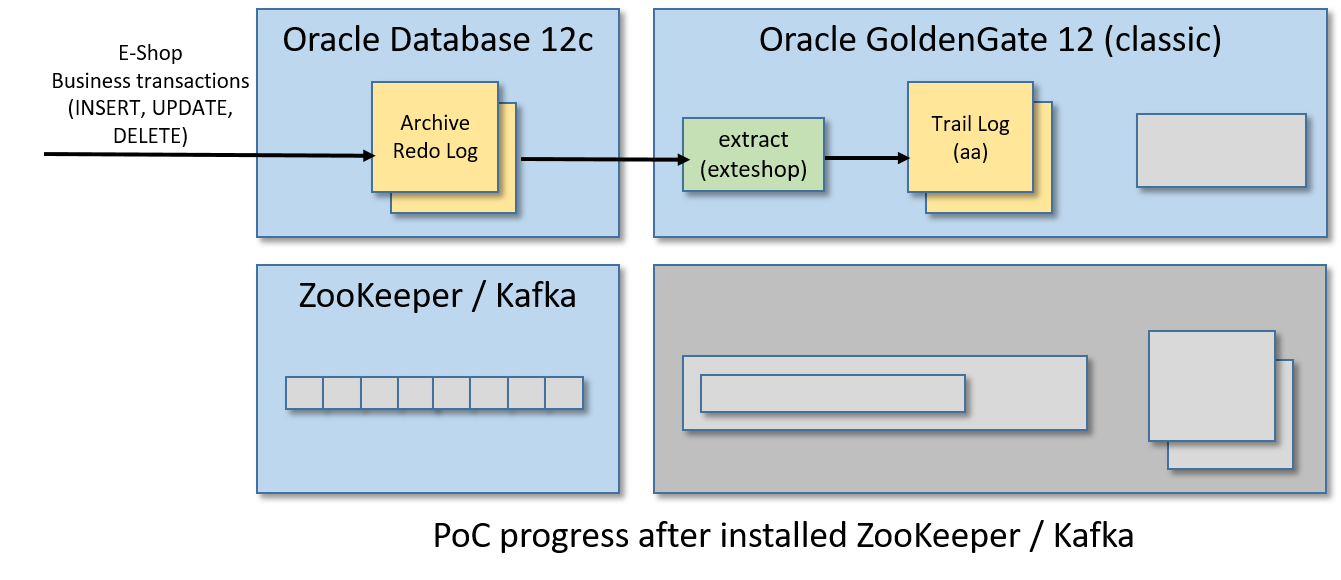
An Apache Zookeeper/Apache Kafka instance: where the business transactions converted in Kafka messages are published.
In other words, any INSERT, UPDATE and DELETE operation applied on some Oracle tables will generate a CDC event stream of Kafka messages that will be published in a single Kafka topic.
Following architecture and real-time data flow that we are going to create:
Step 1/12: Boot Oracle Database
You are free to install an Oracle database and Oracle GoldenGate manually. But (fortunately...) Oracle shares some virtual machines that hae all the stuff already installed and ready-to-go for development purposes.
Oracle VMs can be downloaded here, you need a free Oracle account to get them.
I used Oracle Big Data Lite Virtual Machine (ver. 4.11), it contains a lot of Oracle products including:
Oracle Database 12c Release 1 Enterprise Edition (12.1.0.2)
Oracle GoldenGate 12c (12.3.0.1.2)
Gets all the 7-zip files (around 22GB) from the above download page, extracts the VM image file BigDataLite411.ova and start the importing wizard in Oracle VirtualBox by double-clicking the file. After completing the import process, a VM named BigDataLite-4.11 will be available.
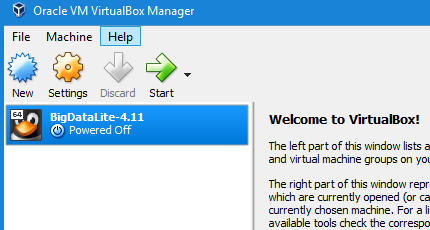
Starts BigDataLite-4.11 and logon with the following credentials:
user: oracle
password: welcome1
and a comfortable Linux Desktop environment will appear.
Double click the Start/Stop Services icon on the Desktop and:
Check the first item ORCL (Oracle Database 12c).
Uncheck all the other stuff (useless and harmful for the PoC).
Press ENTER to confirm the choice.
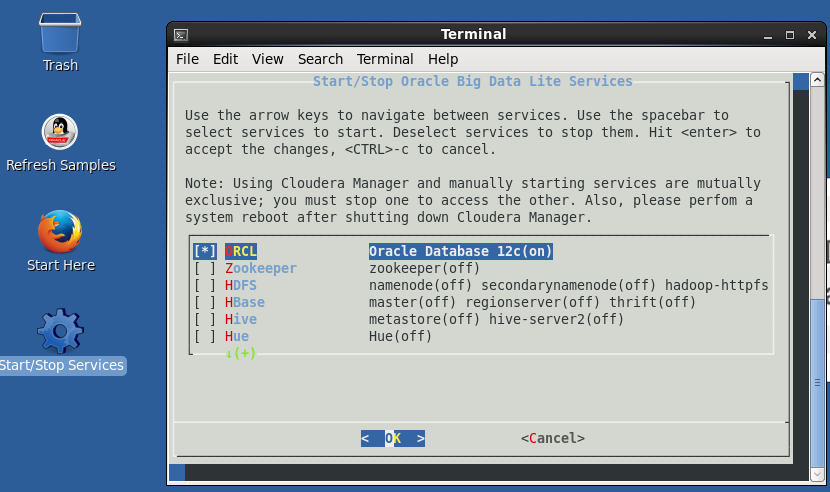
And finally the Oracle database will start.
When you will reboot the virtual machine the Oracle database will be started automatically.
Other useful information related to the downloaded VM:
The Oracle home folder ($ORACLE_HOME) is /u01/app/oracle/product/12.1.0.2/dbhome_1
GoldenGate (classic) is installed in /u01/ogg
SQL Developer is installed in /u01/sqldeveloper. You can start SQL Developer from the icon in the above toolbar.
- Oracle database is installed as a multitenant container database (CDB).
Oracle database listener port is 1521
Oracle SID of the root-container is cdb
Oracle SID of the PDB (pluggable database) is orcl
All the Oracle database users (SYS, SYSTEM, etc.) have as password welcome1
The tnsname alias for connecting to the PDB database is ORCL (see $ORACLE_HOME/network/admin/tnsnames.ora file content).
The Java home folder ($JAVA_HOME) is /usr/java/latest
The Java Development Kit installed in $JAVA_HOME is a JDK8 update 151.
Step 2/12: Enable Archive Log in Oracle
We need to enable the archive log in Oracle for using GoldenGate (classic).
Launch SQL Plus as SYS from a Linux shell of the VM:
sqlplus sys/welcome1 as sysdbaThen from the SQL Plus shell runs this list of commands (I suggest launching them one at time):
ALTER DATABASE ADD SUPPLEMENTAL LOG DATA;
ALTER DATABASE FORCE LOGGING;
ALTER SYSTEM SWITCH LOGFILE;
ALTER SYSTEM SET ENABLE_GOLDENGATE_REPLICATION=TRUE;
SHUTDOWN IMMEDIATE;
STARTUP MOUNT;
ALTER DATABASE ARCHIVELOG;
ALTER DATABASE OPEN;
Then check if the archive log was enabled succesfully:
ARCHIVE LOG LIST;The output should be something like this:
Database log mode       Archive Mode
Automatic archival       Enabled
Archive destination       USE_DB_RECOVERY_FILE_DEST
Oldest online log sequence     527
Next log sequence to archive   529
Current log sequence       529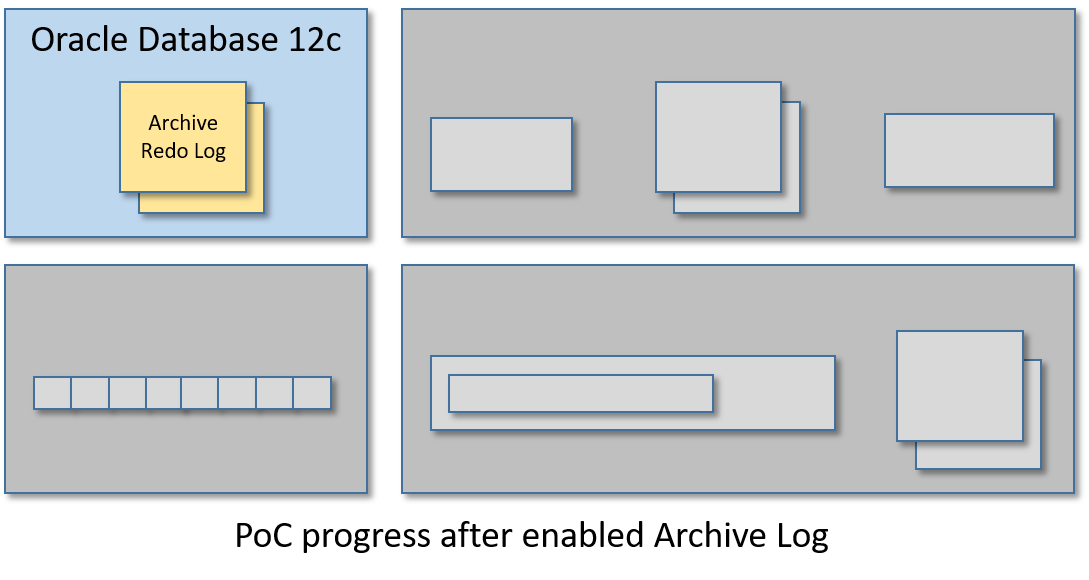
Step 3/12: Create a ggadmin User
A special Oracle administrator user needs to be created for the proper working of GoldenGate (classic).
Again, open SQL Plus from the Linux shell of the VM:
sqlplus sys/welcome1 as sysdbaand create the ggadmin user by running this script:
ALTER SESSION SET "_ORACLE_SCRIPT"=TRUE;
CREATE USER ggadmin IDENTIFIED BY ggadmin;
GRANT CREATE SESSION, CONNECT, RESOURCE, ALTER SYSTEM TO ggadmin;
EXEC DBMS_GOLDENGATE_AUTH.GRANT_ADMIN_PRIVILEGE(grantee=>'ggadmin', privilege_type=>'CAPTURE', grant_optional_privileges=>'*');
GRANT SELECT ANY DICTIONARY TO ggadmin;
GRANT UNLIMITED TABLESPACE TO ggadmin;
Step 4/12 - Create ESHOP Schema
We are going to create a schema (ESHOP) having just a couple of tables (CUSTOMER_ORDER and CUSTOMER_ORDER_ITEM) for generating the CDC event stream to push in Kafka.
Connect to the Oracle PDB having orcl as SID with SQL Plus (or, if you prefer, use SQL Developer):
sqlplus sys/welcome1@ORCL as sysdbaand run this script:
-- init session
ALTER SESSION SET "_ORACLE_SCRIPT"=TRUE;

-- create tablespace for eshop
CREATE TABLESPACE eshop_tbs DATAFILE 'eshop_tbs.dat' SIZE 10M AUTOEXTEND ON;
CREATE TEMPORARY TABLESPACE eshop_tbs_temp TEMPFILE 'eshop_tbs_temp.dat' SIZE 5M AUTOEXTEND ON;

-- create user schema eshop, please note that the password is eshop
CREATE USER ESHOP IDENTIFIED BY eshop DEFAULT TABLESPACE eshop_tbs TEMPORARY TABLESPACE eshop_tbs_temp;

-- grant eshop user permissions
GRANT CREATE SESSION TO ESHOP;
GRANT CREATE TABLE TO ESHOP;
GRANT UNLIMITED TABLESPACE TO ESHOP;
GRANT RESOURCE TO ESHOP;
GRANT CONNECT TO ESHOP;
GRANT CREATE VIEW TO ESHOP;

-- create eshop sequences
CREATE SEQUENCE ESHOP.CUSTOMER_ORDER_SEQ START WITH 1 INCREMENT BY 1 NOCACHE NOCYCLE;
CREATE SEQUENCE ESHOP.CUSTOMER_ORDER_ITEM_SEQ START WITH 1 INCREMENT BY 1 NOCACHE NOCYCLE;

-- create eshop tables
CREATE TABLE ESHOP.CUSTOMER_ORDER (
    ID NUMBER(19) PRIMARY KEY,
    CODE VARCHAR2(10),
    CREATED DATE,
    STATUS VARCHAR2(32),
    UPDATE_TIME TIMESTAMP
);

CREATE TABLE ESHOP.CUSTOMER_ORDER_ITEM (
    ID NUMBER(19) PRIMARY KEY,
    ID_CUSTOMER_ORDER NUMBER(19),
    DESCRIPTION VARCHAR2(255),
    QUANTITY NUMBER(3),
    CONSTRAINT FK_CUSTOMER_ORDER FOREIGN KEY (ID_CUSTOMER_ORDER) REFERENCES ESHOP.CUSTOMER_ORDER (ID)
);
Step 5/12: Initialize GoldenGate Classic
Now it is time to setup the GoldenGate (classic) instance installed in the BigDataListe-4.11 virtual machine.
From the Linux shell runs:
cd /u01/ogg
./ggsci
and the GoldenGate CLI (Command Line Interface) will start:
Oracle GoldenGate Command Interpreter for Oracle
Version 12.2.0.1.0 OGGCORE_12.2.0.1.0_PLATFORMS_151101.1925.2_FBO
Linux, x64, 64bit (optimized), Oracle 12c on Nov 11 2015 03:53:23
Operating system character set identified as UTF-8.

Copyright (C) 1995, 2015, Oracle and/or its affiliates. All rights reserved.

GGSCI (bigdatalite.localdomain) 1>
From the GoldenGate CLI start the manager with the following command:
start mgrit will boot the main controller process of GoldenGate (listening on port 7810).
Now create a credential store for storing the ggadmin user credentials (and refer to them with an alias having the same name):
add credentialstore
alter credentialstore add user ggadmin password ggadmin alias ggadmin
Now connect to Oracle database by using the ggadmin alias just created and enable additional log to the eshop schema stored in the PDB named orcl:
dblogin useridalias ggadmin
add schematrandata orcl.eshop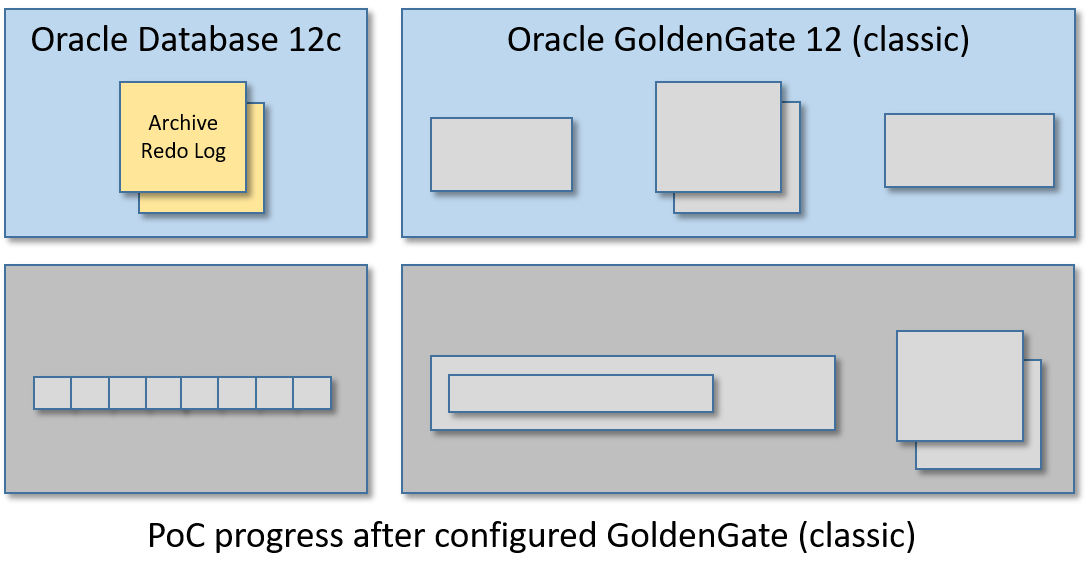
Step 6/12: Create a GoldenGate Extract
In this step, we are going to create a GoldenGate extract, this process will monitor the Oracle archive redo logs for capturing the database transactions related to the ESHOP tables and write this flow of SQL modifications in another log file named trail log.
From the GoldenGate CLI runs:
edit params exteshopThis command will open a vi instance that refers to a new empty file. Put in the vi editor the following content:
EXTRACT exteshop
USERIDALIAS ggadmin
EXTTRAIL ./dirdat/aa
TABLE orcl.eshop.*;
Save the content and exits vi for returning to GoldenGate CLI.
The saved content will be stored in the /u01/ogg/dirprm/exteshop.prm file. You can edit its content externally too, without the need to run the command "edit params exteshop" from GoldenGate CLI again.
Now register the extract process in Oracle, run the following commands from the GoldenGate CLI:
dblogin useridalias ggadmin
register extract exteshop database container (orcl)
The output of the last command should be something like this:
OGG-02003 Extract EXTESHOP successfully registered with database at SCN 13624423.Use the SCN number shown in order to complete the extract configuration. From GoldenGate CLI:
add extract exteshop, integrated tranlog, scn 13624423
add exttrail ./dirdat/aa, extract exteshop
Now we can start the GoldenGate extract process named exteshop:
start exteshopYou can check the status of the process with on of the following commands:
info exteshop
view report exteshop
Verify that the extract process is working correctly for concluding this step. Connect to the ESHOP schema with SQL Plus (or SQL Developer) by running this command from the Linux shell:
sqlplus eshop/eshop@ORCLCreate a mock customer order:
INSERT INTO CUSTOMER_ORDER (ID, CODE, CREATED, STATUS, UPDATE_TIME)
VALUES (CUSTOMER_ORDER_SEQ.NEXTVAL, 'AAAA01', SYSDATE, 'DRAFT', SYSTIMESTAMP);

INSERT INTO CUSTOMER_ORDER_ITEM (ID, ID_CUSTOMER_ORDER, DESCRIPTION, QUANTITY)
VALUES (CUSTOMER_ORDER_ITEM_SEQ.NEXTVAL, CUSTOMER_ORDER_SEQ.CURRVAL, 'Toy Story', 1);

COMMIT;
and finally, from the GoldenGate CLI, run:
stats exteshopand verify that the previous INSERT operations was counted. Below is a small sample of the stats command output:
Extracting from ORCL.ESHOP.CUSTOMER_ORDER to ORCL.ESHOP.CUSTOMER_ORDER:

*** Total statistics since 2019-05-29 09:18:12 ***
Total inserts                              1.00
Total updates                              0.00
Total deletes                              0.00
Total discards                             0.00
Total operations                           1.00
Another way to check that the extract process is working correctly is to check the timestamp of the GoldenGate trail log file. From Linux shell runs 'ls -l /u01/ogg/dirdat/' and verify that the timestamp of the files starting with "aa" has been changed.
Step 7/12: Install and Run Apache Kafka
Open Firefox from the Desktop environment of the VM and download Apache Kafka (I used kafka_2.11-2.1.1.tgz).
Now, open a Linux shell and reset the CLASSPATH environment variable (the current value set inside the BigDataLite-4.11 virtual machine can create conflicts in Kafka):
declare -x CLASSPATH=""From the same Linux shell, unzip the tarball and starts ZooKeeper and Kafka:
cd
tar zxvf Downloads/kafka_2.11-2.1.1.tgz
cd kafka_2.11-2.1.1
./bin/zookeeper-server-start.sh -daemon config/zookeeper.properties
./bin/kafka-server-start.sh -daemon config/server.properties
You can check if ZooKeeper is up by launching "echo stats | nc localhost 2181":
[oracle@bigdatalite ~]$ echo stats | nc localhost 2181
Zookeeper version: 3.4.5-cdh5.13.1--1, built on 11/09/2017 16:28 GMT
Clients:
 /127.0.0.1:34997[1](queued=0,recved=7663,sent=7664)
 /0:0:0:0:0:0:0:1:17701[0](queued=0,recved=1,sent=0)

Latency min/avg/max: 0/0/25
Received: 8186
Sent: 8194
Connections: 2
Outstanding: 0
Zxid: 0x3f
Mode: standalone
Node count: 25
You can check if Kafka is up with "echo dump | nc localhost 2181 | grep brokers" (a string /brokers/ids/0 should appear)
[oracle@bigdatalite ~]$ echo dump | nc localhost 2181 | grep brokers
/brokers/ids/0
The BigDataLite-4.11 virtual machine used for the PoC already has an older ZooKeeper instance started when the virtual machine boots. So be sure to have disabled all the services as described in the Step 1.
Furthermore, when you will open a new Linux shell be aware to always reset the CLASSPATH environment variable before launching ZooKeeper and Kafka as explained at the beginning of the step.
Step 8/12: Install GoldenGate for Big Data
Again, just use the Firefox browser installed in the VM for downloading Oracle GoldenGate for Big Data 12c from this page (I used Oracle GoldenGate for Big Data 12.3.2.1.1 on Linux x86-64). Be aware that you need a (free) Oracle account to get it.
Installation is very easy, just explode the tarball inside the downloaded zip:
cd ~/Downloads
unzip OGG_BigData_Linux_x64_12.3.2.1.1.zip
cd ..
mkdir ogg-bd-poc
cd ogg-bd-poc
tar xvf ../Downloads/OGG_BigData_Linux_x64_12.3.2.1.1.tar
And that's it, GoldenGate for Big Data 12c is installed in the /home/oracle/ogg-bd-poc folder.
Again, the BigDataLite-4.11 virtual machine already has an installation of GoldenGate for Big Data in the /u01/ogg-bd folder. But it is an older version with fewer options for connecting to Kafka.
Step 9/12: Start GoldenGate for Big Data Manager
Open the GoldenGate for Big Data CLI:
cd ~/ogg-bd-poc
./ggsci
The manager port needs to be changed, otherwise a conflict with the manager of the GoldenGate (classic) started before will be raised.
So from the GoldenGate for Big Data CLI runs:
create subdirs
edit params mgr
A vi instance will start, just write this content:
PORT 27801Then save the content and exits vi for returning back to the CLI, where we can finally start the GoldenGate for Big Data manager listening on port 27081:
start mgr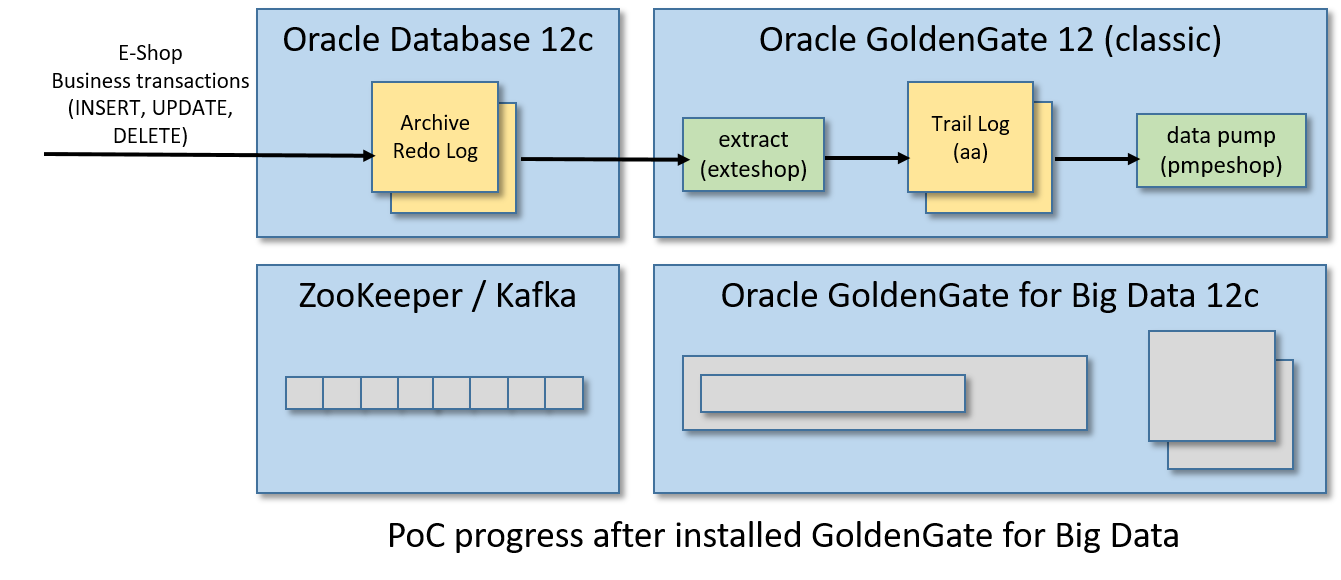
Step 10/12: Create Data Pump
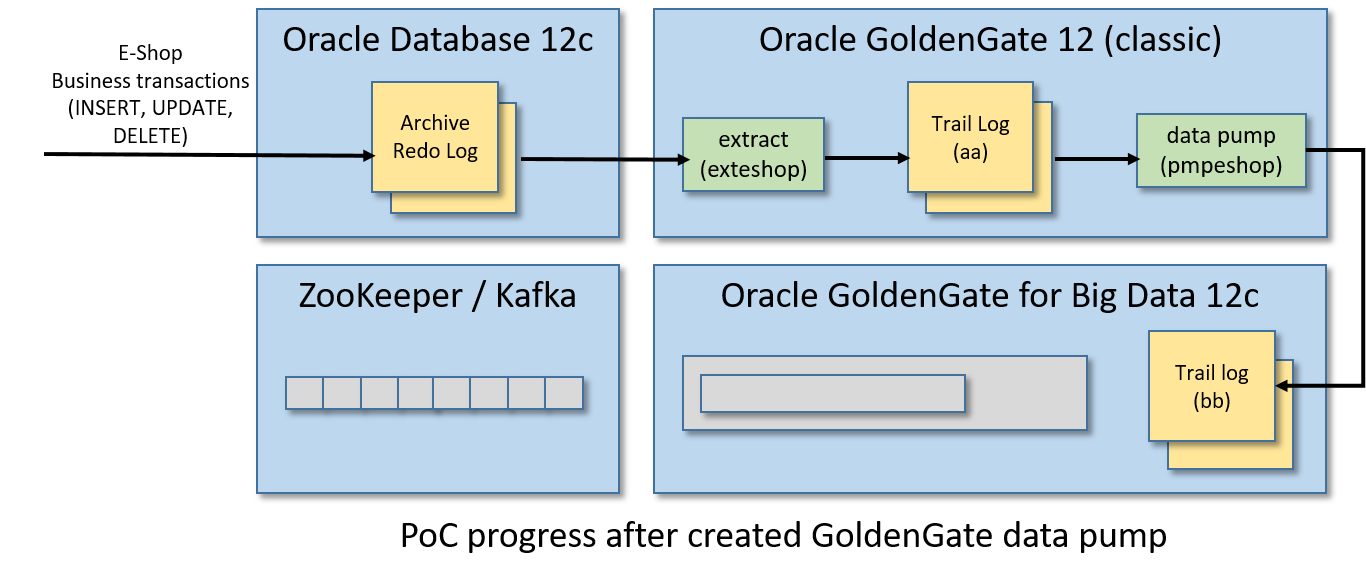
Now, we need to create what in GoldenGate world is named data pump. A data pump is an extract process that monitors a trail log and (in real-time) pushes any change to another trail log managed by a different (and typically remote) GoldenGate instance.
For this PoC, the trail log aa managed by GoldenGate (classic) will be pumped to a trail log bb managed by GoldenGate for Big Data.
So, if you close it, come back to the GoldenGate (classic) CLI from Linux shell:
cd /u01/ogg
./ggsci
From the GoldenGate (classic) CLI runs:
edit params pmpeshopand in vi put this content:
EXTRACT pmpeshop
USERIDALIAS ggadmin
SETENV (ORACLE_SID='orcl')
-- GoldenGate for Big Data address/port:
RMTHOST localhost, MGRPORT 27801
RMTTRAIL ./dirdat/bb
PASSTHRU
-- The "tokens" part it is useful for writing in the Kafka messages
-- the Transaction ID and the database Change Serial Number
TABLE orcl.eshop.*, tokens(txid = @GETENV('TRANSACTION', 'XID'), csn = @GETENV('TRANSACTION', 'CSN'));
save the content and exits vi.
As already explained for the extractor, the saved content will be stored in the /u01/ogg/dirprm/pmpeshop.prm file.
Now we are going to register and start the data pump, from the GoldenGate CLI:
dblogin useridalias ggadmin
add extract pmpeshop, exttrailsource ./dirdat/aa begin now
add rmttrail ./dirdat/bb extract pmpeshop
start pmpeshop
Checks the data pump status by running one of these commands from the CLI:
info pmpeshop
view report pmpeshop
You can even check if the trail log bb has been created in the dirdat folder of Golden Gate for Big Data:
[oracle@bigdatalite dirdat]$ ls -l ~/ogg-bd-poc/dirdat
total 0
-rw-r-----. 1 oracle oinstall 0 May 30 13:22 bb000000000
[oracle@bigdatalite dirdat]$
And what about to check the pumping process? From the Linux shell:
sqlplus eshop/eshop@ORCLExecute this SQL script for creating a new mock customer order:
INSERT INTO CUSTOMER_ORDER (ID, CODE, CREATED, STATUS, UPDATE_TIME)
VALUES (CUSTOMER_ORDER_SEQ.NEXTVAL, 'AAAA02', SYSDATE, 'SHIPPING', SYSTIMESTAMP);

INSERT INTO CUSTOMER_ORDER_ITEM (ID, ID_CUSTOMER_ORDER, DESCRIPTION, QUANTITY)
VALUES (CUSTOMER_ORDER_ITEM_SEQ.NEXTVAL, CUSTOMER_ORDER_SEQ.CURRVAL, 'Inside Out', 1);

COMMIT;
Now from GoldenGate (classic) CLI runs:
stats pmpeshopFor checking that the INSERT operations was correctly counted (below a part of the output):
GGSCI (bigdatalite.localdomain as ggadmin@cdb/CDB$ROOT) 11> stats pmpeshop

Sending STATS request to EXTRACT PMPESHOP ...

Start of Statistics at 2019-05-30 14:49:00.

Output to ./dirdat/bb:

Extracting from ORCL.ESHOP.CUSTOMER_ORDER to ORCL.ESHOP.CUSTOMER_ORDER:

*** Total statistics since 2019-05-30 14:01:56 ***
Total inserts                              1.00
Total updates                              0.00
Total deletes                              0.00
Total discards                             0.00
Total operations                           1.00
Again, you can also verify the timestamp of the trail log stored in GoldenGate for Big Data for testing the pump process. After a transaction commit, runs from Linux shell: "ln -l ~/ogg-bd-poc/dirdat" and checks the timestamp of the last file having "bb" as prefix.
Step 11/12: Publish Transactions to Kafka
Finally, we are going to create a replicat process in GoldenGate for BigData in order to publish the pumped business transaction in a Kafka topic. The replicat will read the INSERT, UPDATE, and DELETE operations inside the transactions from the the trail log bb and will convert them in Kafka messages encoded in JSON.
So, create a file named eshop_kafkaconnect.properties inside the folder /home/oracle/ogg-bd-poc/dirprm having this content:
# File: /home/oracle/ogg-bd-poc/dirprm/eshop_kafkaconnect.properties
# -----------------------------------------------------------

# address/port of the Kafka broker
bootstrap.servers=localhost:9092
acks=1

#JSON Converter Settings
key.converter=org.apache.kafka.connect.json.JsonConverter
key.converter.schemas.enable=false
value.converter=org.apache.kafka.connect.json.JsonConverter
value.converter.schemas.enable=false

#Adjust for performance
buffer.memory=33554432
batch.size=16384
linger.ms=0

# This property fix a start-up error as explained by Oracle Support here:
# https://support.oracle.com/knowledge/Middleware/2455697_1.html
converter.type=key
In the same folder, creates a file named eshop_kc.props having this content:
# File: /home/oracle/ogg-bd-poc/dirprm/eshop_kc.props
# ---------------------------------------------------
gg.handlerlist=kafkaconnect

#The handler properties
gg.handler.kafkaconnect.type=kafkaconnect
gg.handler.kafkaconnect.kafkaProducerConfigFile=eshop_kafkaconnect.properties
gg.handler.kafkaconnect.mode=tx

#The following selects the topic name based only on the schema name
gg.handler.kafkaconnect.topicMappingTemplate=CDC-${schemaName}

#The following selects the message key using the concatenated primary keys
gg.handler.kafkaconnect.keyMappingTemplate=${primaryKeys}

#The formatter properties
gg.handler.kafkaconnect.messageFormatting=op
gg.handler.kafkaconnect.insertOpKey=I
gg.handler.kafkaconnect.updateOpKey=U
gg.handler.kafkaconnect.deleteOpKey=D
gg.handler.kafkaconnect.truncateOpKey=T
gg.handler.kafkaconnect.treatAllColumnsAsStrings=false
gg.handler.kafkaconnect.iso8601Format=false
gg.handler.kafkaconnect.pkUpdateHandling=abend
gg.handler.kafkaconnect.includeTableName=true
gg.handler.kafkaconnect.includeOpType=true
gg.handler.kafkaconnect.includeOpTimestamp=true
gg.handler.kafkaconnect.includeCurrentTimestamp=true
gg.handler.kafkaconnect.includePosition=true
gg.handler.kafkaconnect.includePrimaryKeys=true
gg.handler.kafkaconnect.includeTokens=true

goldengate.userexit.writers=javawriter
javawriter.stats.display=TRUE
javawriter.stats.full=TRUE

gg.log=log4j
gg.log.level=INFO

gg.report.time=30sec

# Apache Kafka Classpath
# Put the path of the "libs" folder inside the Kafka home path
gg.classpath=/home/oracle/kafka_2.11-2.1.1/libs/*

javawriter.bootoptions=-Xmx512m -Xms32m -Djava.class.path=.:ggjava/ggjava.jar:./dirprm
If it was closed, restart the GoldenGate for Big Data CLI:
cd ~/ogg-bd-poc
./ggsci
and start to create a replicat from the CLI with:
edit params repeshopin vi put this content:
REPLICAT repeshop
TARGETDB LIBFILE libggjava.so SET property=dirprm/eshop_kc.props
GROUPTRANSOPS 1000
MAP orcl.eshop.*, TARGET orcl.eshop.*;
then save the content and exit vi. Now associate the replicat to the trail log bb and start the replicat process with these commands to launch from GoldenGate for Big Data CLI:
add replicat repeshop, exttrail ./dirdat/bb
start repeshop
Check that the replicat is live and kicking with one of these commands:
info repeshop
view report repeshop
Now, connect to the ESHOP schema from another Linux shell:
sqlplus eshop/eshop@ORCLand commit something:
INSERT INTO CUSTOMER_ORDER (ID, CODE, CREATED, STATUS, UPDATE_TIME)
VALUES (CUSTOMER_ORDER_SEQ.NEXTVAL, 'AAAA03', SYSDATE, 'DELIVERED', SYSTIMESTAMP);

INSERT INTO CUSTOMER_ORDER_ITEM (ID, ID_CUSTOMER_ORDER, DESCRIPTION, QUANTITY)
VALUES (CUSTOMER_ORDER_ITEM_SEQ.NEXTVAL, CUSTOMER_ORDER_SEQ.CURRVAL, 'Cars 3', 2);

COMMIT;
From the GoldenGate for Big Data CLI, check that the INSERT operation was counted for the replicat process by running:
stats repeshopAnd (hurrah!) we can have a look inside Kafka, as the Linux shell checks that the topic named CDC-ESHOP was created:
cd ~/kafka_2.11-2.1.1/bin
./kafka-topics.sh --list --zookeeper localhost:2181
and from the same folder run the following command for showing the CDC events stored in the topic:
./kafka-console-consumer.sh --bootstrap-server localhost:9092 --topic CDC-ESHOP --from-beginningYou should see something like:
[oracle@bigdatalite kafka_2.11-2.1.1]$ ./bin/kafka-console-consumer.sh --bootstrap-server localhost:9092 --topic CDC-ESHOP --from-beginning
{"table":"ORCL.ESHOP.CUSTOMER_ORDER","op_type":"I","op_ts":"2019-05-31 04:24:34.000327","current_ts":"2019-05-31 04:24:39.637000","pos":"00000000020000003830","primary_keys":["ID"],"tokens":{"txid":"9.32.6726","csn":"13906131"},"before":null,"after":{"ID":11.0,"CODE":"AAAA03","CREATED":"2019-05-31 04:24:34","STATUS":"DELIVERED","UPDATE_TIME":"2019-05-31 04:24:34.929950000"}}
{"table":"ORCL.ESHOP.CUSTOMER_ORDER_ITEM","op_type":"I","op_ts":"2019-05-31 04:24:34.000327","current_ts":"2019-05-31 04:24:39.650000","pos":"00000000020000004074","primary_keys":["ID"],"tokens":{"txid":"9.32.6726","csn":"13906131"},"before":null,"after":{"ID":11.0,"ID_CUSTOMER_ORDER":11.0,"DESCRIPTION":"Cars 3","QUANTITY":2}}
For a better output, install jq:
sudo yum -y install jq
./kafka-console-consumer.sh --bootstrap-server localhost:9092 --topic CDC-ESHOP --from-beginning | jq .
and here is how will appear the JSON events:
{
  "table": "ORCL.ESHOP.CUSTOMER_ORDER",
  "op_type": "I",
  "op_ts": "2019-05-31 04:24:34.000327",
  "current_ts": "2019-05-31 04:24:39.637000",
  "pos": "00000000020000003830",
  "primary_keys": [
    "ID"
  ],
  "tokens": {
    "txid": "9.32.6726",
    "csn": "13906131"
  },
  "before": null,
  "after": {
    "ID": 11,
    "CODE": "AAAA03",
    "CREATED": "2019-05-31 04:24:34",
    "STATUS": "DELIVERED",
    "UPDATE_TIME": "2019-05-31 04:24:34.929950000"
  }
}
{
  "table": "ORCL.ESHOP.CUSTOMER_ORDER_ITEM",
  "op_type": "I",
  "op_ts": "2019-05-31 04:24:34.000327",
  "current_ts": "2019-05-31 04:24:39.650000",
  "pos": "00000000020000004074",
  "primary_keys": [
    "ID"
  ],
  "tokens": {
    "txid": "9.32.6726",
    "csn": "13906131"
  },
  "before": null,
  "after": {
    "ID": 11,
    "ID_CUSTOMER_ORDER": 11,
    "DESCRIPTION": "Cars 3",
    "QUANTITY": 2
  }
}
Now leaves the kafka-console-consumer.sh process open and make some other database transactions on ESHOP for printing in real-time the CDC event stream sent to Kafka.
Following some samples of JSON events for UPDATE and DELETE operations:
// Generated with: UPDATE CUSTOMER_ORDER SET STATUS='DELIVERED' WHERE ID=8;
{
  "table": "ORCL.ESHOP.CUSTOMER_ORDER",
  "op_type": "U",
  "op_ts": "2019-05-31 06:22:07.000245",
  "current_ts": "2019-05-31 06:22:11.233000",
  "pos": "00000000020000004234",
  "primary_keys": [
    "ID"
  ],
  "tokens": {
    "txid": "14.6.2656",
    "csn": "13913689"
  },
  "before": {
    "ID": 8,
    "CODE": null,
    "CREATED": null,
    "STATUS": "SHIPPING",
    "UPDATE_TIME": null
  },
  "after": {
    "ID": 8,
    "CODE": null,
    "CREATED": null,
    "STATUS": "DELIVERED",
    "UPDATE_TIME": null
  }
}

// Generated with: DELETE CUSTOMER_ORDER_ITEM WHERE ID=3;
{
  "table": "ORCL.ESHOP.CUSTOMER_ORDER_ITEM",
  "op_type": "D",
  "op_ts": "2019-05-31 06:25:59.000916",
  "current_ts": "2019-05-31 06:26:04.910000",
  "pos": "00000000020000004432",
  "primary_keys": [
    "ID"
  ],
  "tokens": {
    "txid": "14.24.2651",
    "csn": "13913846"
  },
  "before": {
    "ID": 3,
    "ID_CUSTOMER_ORDER": 1,
    "DESCRIPTION": "Toy Story",
    "QUANTITY": 1
  },
  "after": null
}
Congratulations! You completed the PoC:
Step 12/12: Play With PoC
The Kafka Connect handler available in GoldenGate for Big Data has a lot of options useful to customize the integration according to your needs. Checks the official documentation here.
For example, you can choose to create a different topic for each table involved in the CDC stream, just edit this property in eshop_kc.props:
gg.handler.kafkaconnect.topicMappingTemplate=CDC-${schemaName}-${tableName}Restart the replicat after any change, from the GoldenGate for Big Data CLI:
stop repeshop
start repeshop
You can find some other configuration example in the folder "~/ogg-bd-poc/AdapterExamples/big-data/kafka_connect".
Conclusions
In this article we created a full integration between an Oracle database and a Kafka broker through the GoldenGate technology. The CDC event stream is published in Kafka in real-time.
For simplicity we have used a single virtual machine having all installed, but you are free to install GoldenGate for Big Data and Kafka in different hosts.
Let me know in the comments what you think of the potential (or limits) of this integration.
Opinions expressed by DZone contributors are their own.

Comments