Build Chatbot and Activate in Flutter App in 10 Minutes
In this post, we will walk you through the steps to create your own flutter chatbot and also the activation procedure.
Join the DZone community and get the full member experience.
Join For FreeFlutter is Google’s new open-source technology for creating native Android and iOS apps with a single codebase. Since it has ready-made and custom widgets, it’s easy to build the UI.
Follow These Steps To Create a Flutter Chatbot
Step 1: Setup an Account in Kommunicate
Login to your Kommunicate dashboard and navigate to the Bot Integration section.
Locate the Kompose section and click on Integrate Bot.
Now, set up your bot by providing the bot name, bot language, and human handoff setting, and finish the bot setup.
You can check your newly created bot in the below section:
- Dashboard →Bot Integration → Manage Bots:
Step 2: Create Welcome Messages and Answers for Your Flutter Chatbot
Go to the ‘Kompose – Bot Builder’ section and select the bot you created.
First, set the welcome message for your chatbot. The welcome message is the first message that the chatbot sends to the user who initiates a chat.
- Click the “Welcome Message” section in the “Enter Welcome message — Bot’s Message” box to provide the message your chatbot should be shown to the users when they open the chat and then save the welcome intent.
Once the welcome message creation is completed, the next step is to create answers for your chatbot.
The answers section is where you’ve to add all the user’s messages and the chatbot responses.
- Go to the “Answer” section, click +Add, then give an ‘Intent name’
In the Configure user’s message section — you need to mention the phrases that you expect from the users that will trigger.
Configure bot’s reply section — you need to mention the responses (Text or as Rich messages) the chatbot will deliver to the users for the particular user’s message. You can add any number of answers and follow-up responses for the chatbot.
Step 3: How To Activate the Chatbots
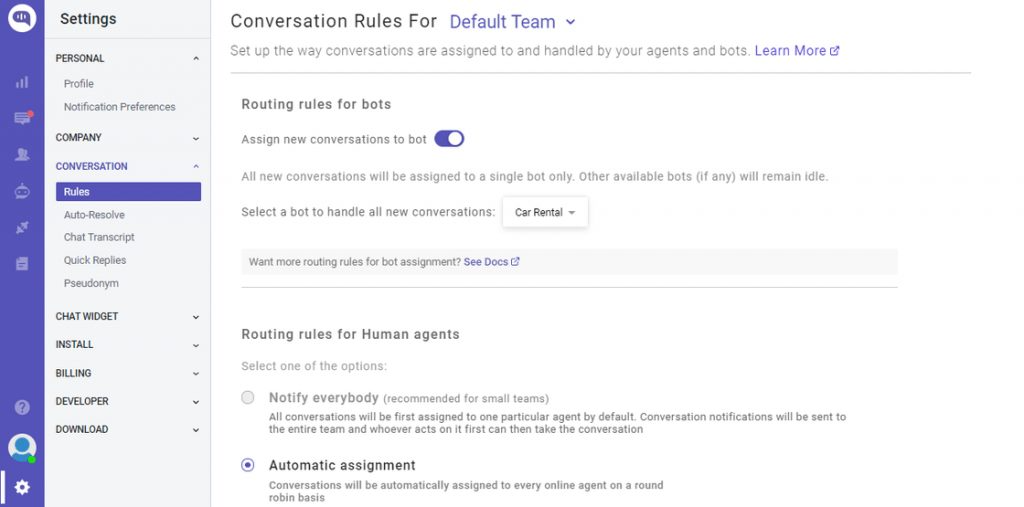
Once you create a bot, then you can set it as a default bot in the conversation routing rules section, as shown below.
- Click on ⚙️Settings >> Conversation rules >> Routing rules for bots >> Then click on bot like below and select your bot

Now, this bot will reply in all the conversations.
Step 4: Install Kompose Chatbot Into Flutter App
Kommunicate Flutter SDK allows you to add customizable live chat to your applications. It supports many hybrid platforms that are currently in the market. It provides a fast and expressive way to build native apps on both IOS and Android.
Prerequisites
Apps using Kommunicate can target Xcode 11 or later, and AndroidX is required.
Add Flutter SDK to your app
- Add the below dependency in your
pubspec.yamlfile:
dependencies:
# other dependencies
kommunicate_flutter: ^1.1.6Install package asflutter pub get
- Import kommunicate_flutter in your .dart file to use the methods from Kommunicate:
import 'package:kommunicate_flutter/kommunicate_flutter.dart';For iOS, navigate to your App/iOS directory from the terminal and run the below command:1pod install
Note: Kommunicate iOS requires min iOS platform version 10 and uses dynamic frameworks. Make sure you have the below settings at the top of your iOS/Podfile:
platform :ios, '12.0' use_frameworks!Get your Application ID
You can get the Application ID from the install section Kommunicate Dashboard.
- Go to ⚙️Settings >> INSTALL >> Install >> Your App ID:
Launch Conversation
Kommunicate provides build conversation function to create and launch conversations directly, saving you the extra steps of authentication, creation, initialization, and launch. You can customize the process by building the conversation object according to your requirements.
To launch the conversation, you need to create a conversation object. This object is passed to the build conversation function and based on the parameters of the object, the conversation is created/launched.
Below is an example to launch a conversation.
dynamic conversationObject = {
'appId': '',// The APP_ID obtained from kommunicate dashboard.
};
KommunicateFlutterPlugin.buildConversation(conversationObject) .then((clientConversationId) { print("Conversation builder success : " + clientConversationId.toString()); }).catchError((error) { print("Conversation builder error : " + error.toString()); });
That’s all! Run the Flutter app and chat with the chatbot.
You can easily integrate the Kompose chatbot into Flutter apps in a few simple steps.
In case you need more information, you can check out the Kommunicate documentation.
Kommunicate Sample application: Download the sample app from here, which includes ready-to-use Kommunicate Flutter SDK.
Go ahead and explore the Flutter integration with the Kompose chatbot.
Published at DZone with permission of Devashish Mamgain. See the original article here.
Opinions expressed by DZone contributors are their own.

Comments