How to Build a Video Streaming App With Screen Sharing Using Flutter
Looking to build a video streaming app with screen sharing? In this tutorial, we see how easily this goal is achieved with the EnableX-Flutter toolkit.
Join the DZone community and get the full member experience.
Join For FreeScreen sharing is a powerful way to foster immediate collaboration in a real-time meeting. It can speed things up while making sure that everyone is on the same page.
This post explains how to build a video streaming app with a screen sharing feature in the Flutter iOS and Android application using the EnableX Flutter development toolkit.
If you feel enabling the screen sharing feature is not that simple, you will be surprised!
Let’s get started.
What You’ll Need
To start screen sharing in the Flutter iOS app using EnableX-Flutter toolkit, users need to add "enx_flutter_plugin," "replay_kit_launcher," and "shared_preference_app_group" as a dependency in your pubspec.yaml.
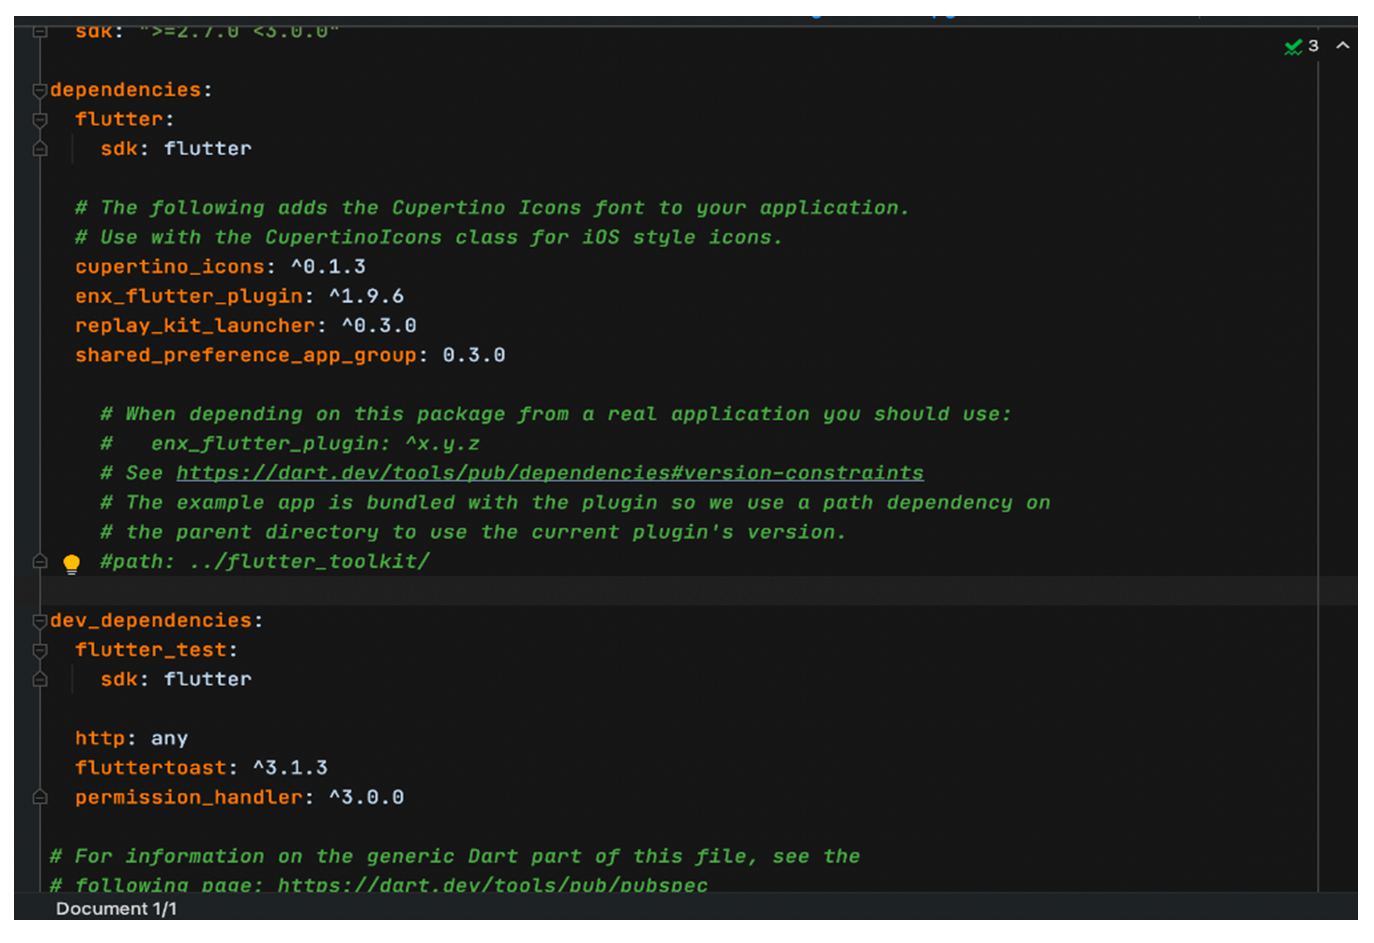
The purpose of the enx_flutter_plugin toolkit is to help enable real-time communication channels in your Flutter application.
The replay_kit_launcher opens RPSystemBroadcastPickerView in the Flutter iOS app.
ReplayKitLauncher.launchReplayKitBroadcast('BroadCastExtension');
Here it is to be noted that "BroadCastExtension," a free tool that allows to share or save content from anywhere on the web, is added through Xcode.
How to Add Broadcast Extension
You can do it easily by following the steps given below:
- Open your flutter project with iOS native workspace (Runner.xcworkspace)
- Select Xcode -> File -> New -> Target. Now, create a new broadcast upload extension target.
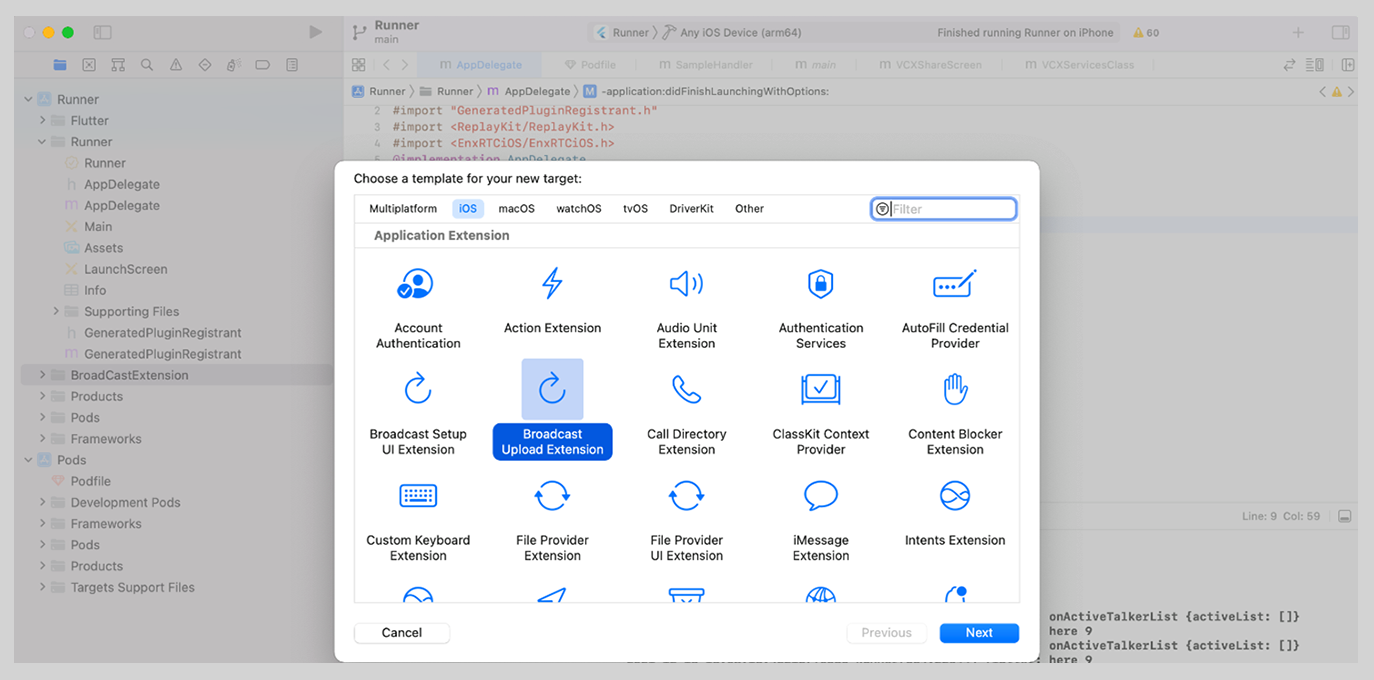
[Note: Ensure that your app target and broadcast extension target start with the same iOS version.]

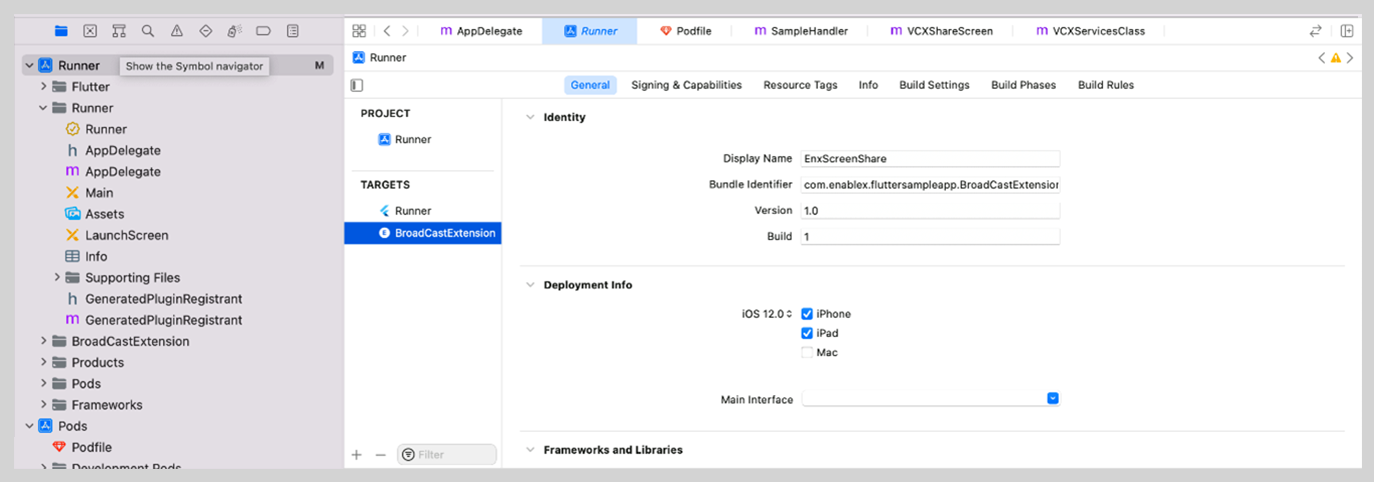
Once you’re done with adding the broadcast extension; make sure that you have used the correct bundle ID for the broadcast extension and app.
Your broadcast is now ready to start. And you’ll start receiving sample buffer (the buffer frame of your image) in the broadcast class SampleHandler invoking a delegate method. The SampleHandler is the default class for broadcast extension, which helps update the state of current activity to the extension target:
//To start getting the sample buffer frame of screen.

(void)processSampleBuffer:(CMSampleBufferRef)sampleBuffer withType:(RPSampleBufferType)sampleBufferType; get buffer frame
Here are three additional broadcast delegate methods as given below:
- If the broadcast stops
(void)broadcastFinished;
- If the broadcast pauses
(void)broadcastPaused
- If the broadcast resumes
(void)broadcastResumed
*shared_preference_app_group helps to share data from one target to another one.
How to Add App Group
Here is how it can be done:
Go to App Target -> Signing & Capabilities -> Click + icon on Capability -> App Groups.
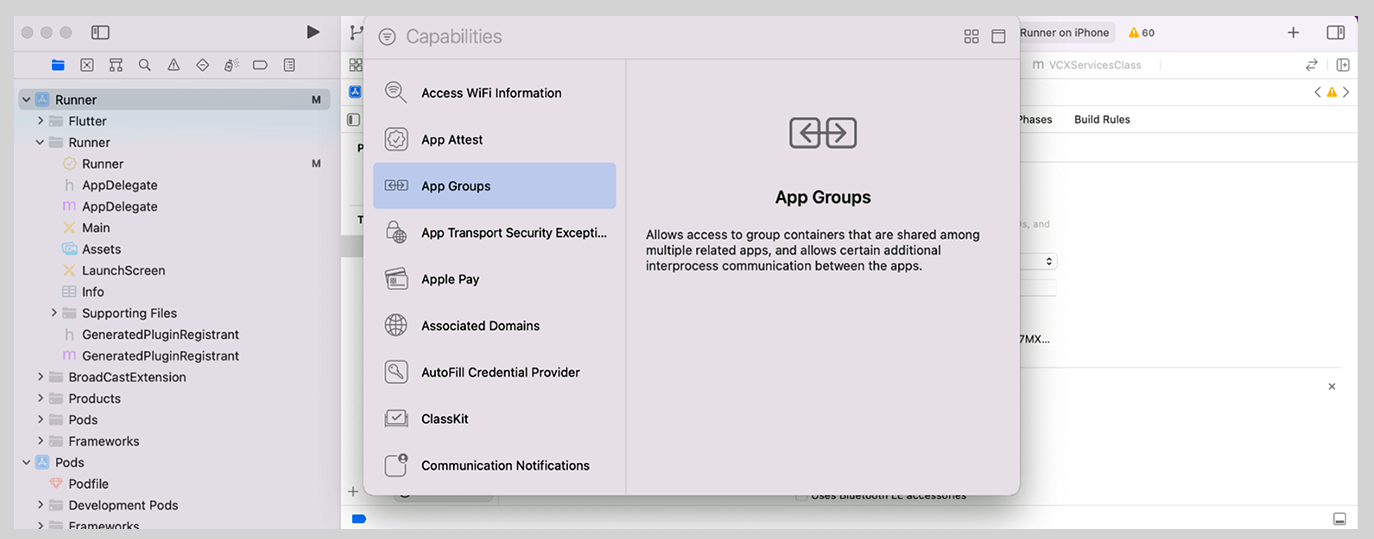
Once the app group is added, you can set a common name for it.
*App group should be added in another app target as well as in the extension target while making sure that the name of the app group remains the same in both targets.
After adding the shared_preference_app_group, a user needs to share their roomID and clientID to the broadcast extension via the app group. It makes sure that the broadcast extension also joins the same room and the screen frame is published.
The sample code for sharing data from the Flutter to iOS Native app is below:
await SharedPreferenceAppGroup.setAppGroup('group.vcxsample');
await SharedPreferenceAppGroup.setString('clientID', clientID);
await SharedPreferenceAppGroup.setString('RoomID', roomID);
How to Get Shared Data in Shared_Preference_App_Group to Native App
NSUserDefaults *userDefault = [[NSUserDefaults alloc] initWithSuiteName:@"appGroup_Name"];

  NSString *roomID   [userDefault objectForKey”@" roomID"];

NSString *roomID  = [userDefault objectForKey:@" clientID"];
After you get the roomID and clientID, a user needs to pass the same Client ID to SDK via APIs using the Broadcast Extension target.
[[EnxUtilityManager shareInstance] " withUserKey:@"clientID"];
You can use this roomID to create a new token using a broadcast extension and EnableX.
For joining the room through Broadcast Extension, the user needs to add a new broadcast target in the POD file and EnableX iOS SDKs given below:
target 'BroadCastExtension' do

 use_frameworks!

  pod 'EnxRTCiOS'

  pod 'Socket.IO-Client-Swift', '~> 15.0.0'

  # Pods for BroadCastExtension

end
Also, add the following in the POD file:
post_install do |installer|

  installer.pods_project.targets.each do |target|

  flutter_additional_ios_build_settings(target)|

  installer.pods_project.build_configurations.each         do |config|

config.build_settings['EXCLUDED_ARCHS[sdk=iphonesimulator*]'] = 'arm64'

config.build_settings['ENABLE_BITCODE'] = 'NO'

config.build_settings['APPLICATION_EXTENSION_API_ONLY'] with‘ 'No'

    end

  end

end
Once you join the meeting room via the broadcast extension successfully, the broadcast target starts receiving callbacks from EnableX iOS SDKs.
However, you also need to consider some additional scenarios:
- If the broadcast connection establishes successfully:
(void)broadCastConnected - If the broadcast connection fails:
(void)failedToConnectWithBroadCast:(NSArray *)reason - If the broadcast starts successfully:
(void)didStartBroadCast:(NSArray *)data - If the broadcast stops successfully:
(void)didStoppedBroadCast:(NSArray *)data - If the user from the main app stops screen sharing:
(void)didRequestedExitRoom:(NSArray *_Nullable)Data - If the user disconnects from the meeting room:
(void)broadCastDisconnected - If the user sharing the screen suddenly disconnects from the room:
(void)disconnectedByOwner - Once the broadcast connection is established:
(void)sendVideoBuffer:(CVPixelBufferRef _Nonnull )sampleBuffer withTimeStamp:(int64_t)timeStampNs
To enable screen sharing with the EnableX and Flutter plugin in an Android app, add “enx_flutter_plugin” and “flutter_foreground_task” as a dependency in your pubspec.yaml.
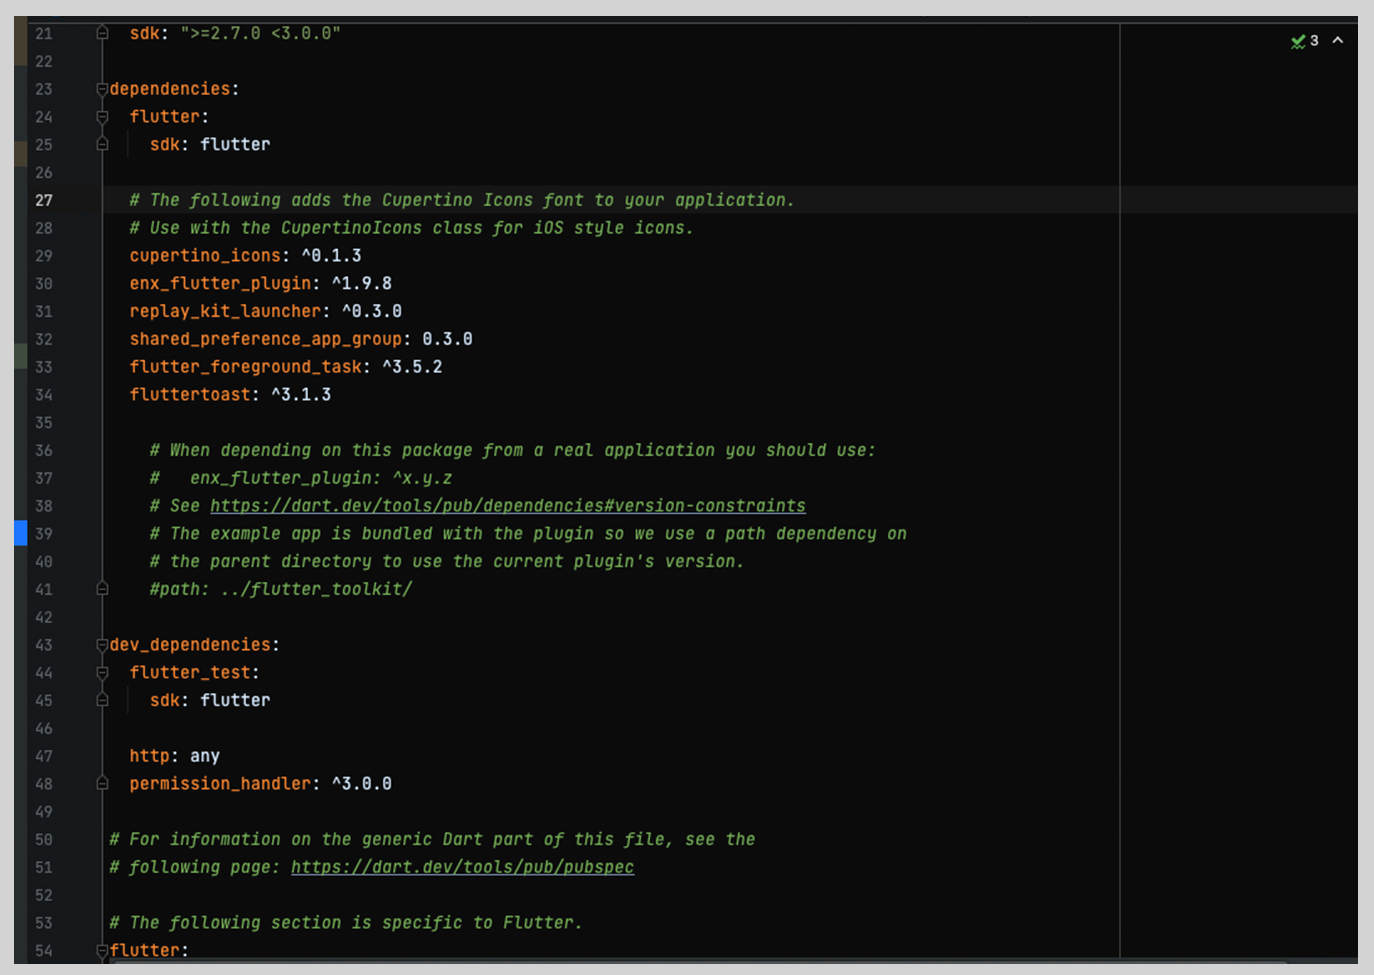
Here enx_flutter_plugin toolkit activates the real-time communication channel in a Flutter application.
For an Android platform, we use the Flutter foreground task plugin to implement the foreground service.
Before a user starts screen sharing, we need to init foreground service:

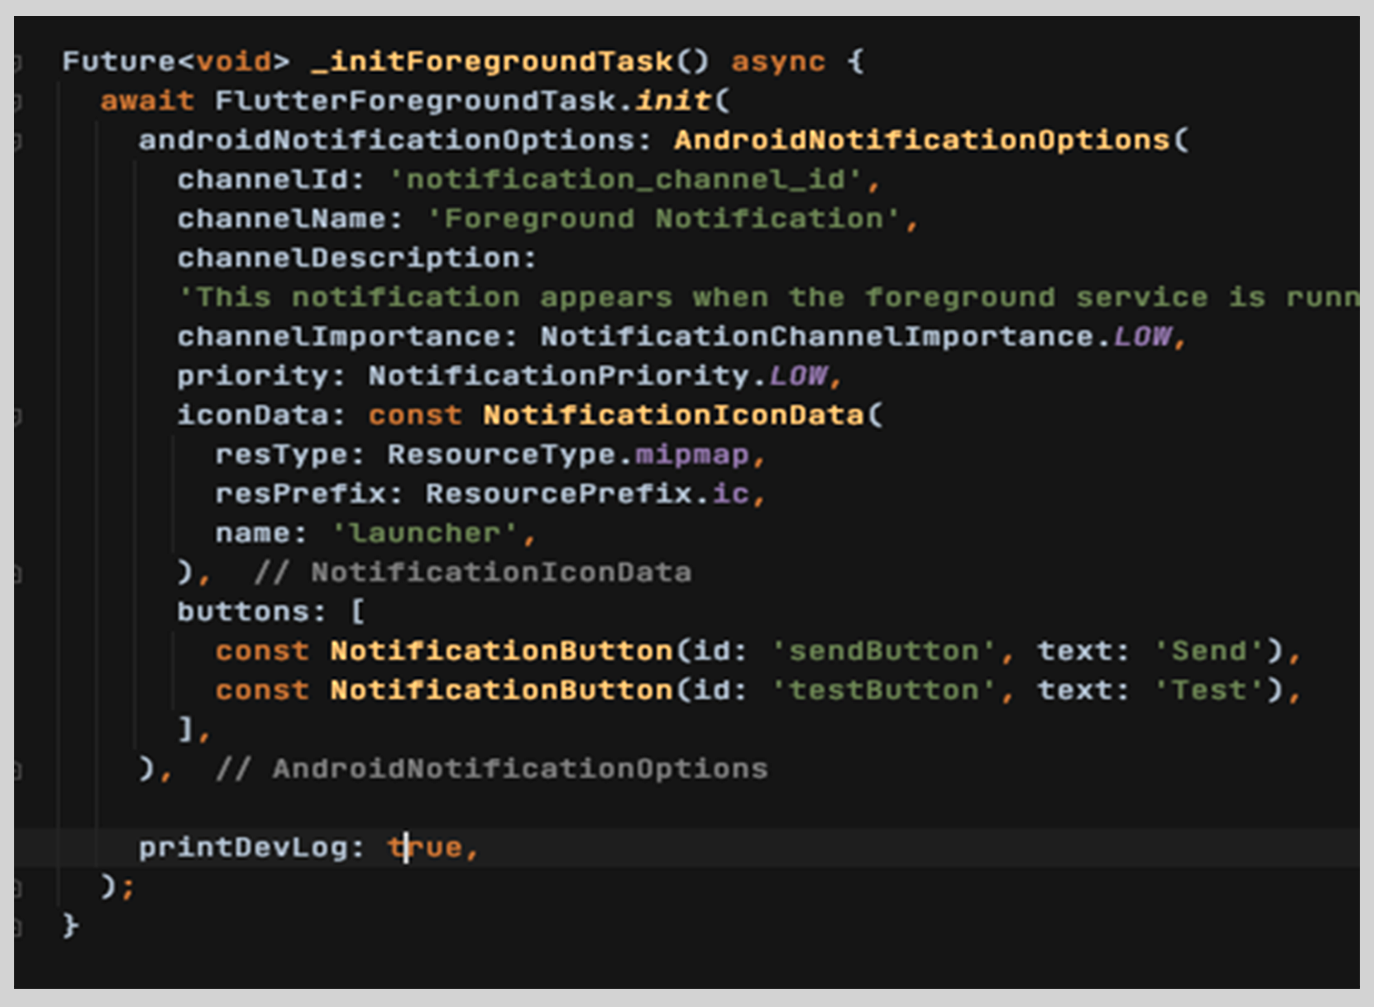
To start foreground service, you’ll need to add permission in mainifest.xml:
<uses-permission android:name="android.permission.FOREGROUND_SERVICE"/>
 <uses-permission android:name="android.permission.REQUEST_IGNORE_BATTERY_OPTIMIZATIONS" />
Also, you’ll need to register service in the Mainifest:

To stop, you’ll need to stop the Foreground Service.
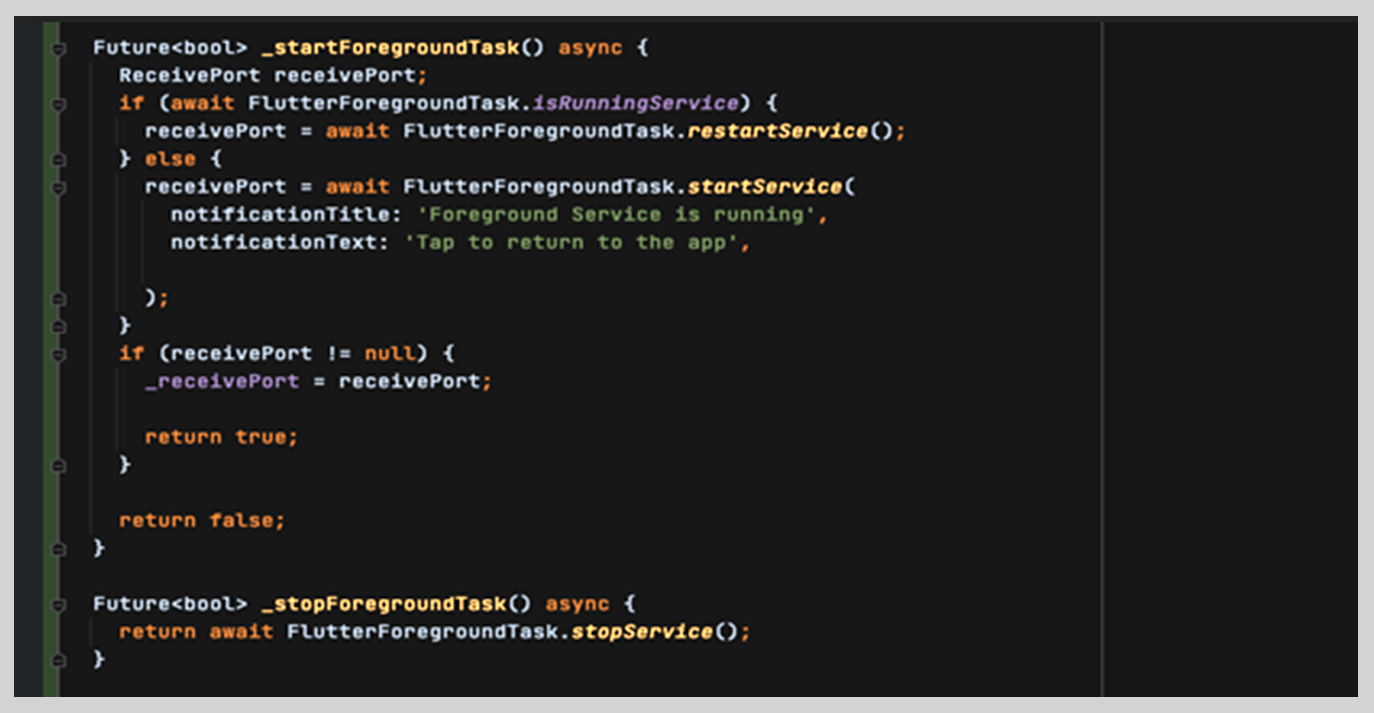
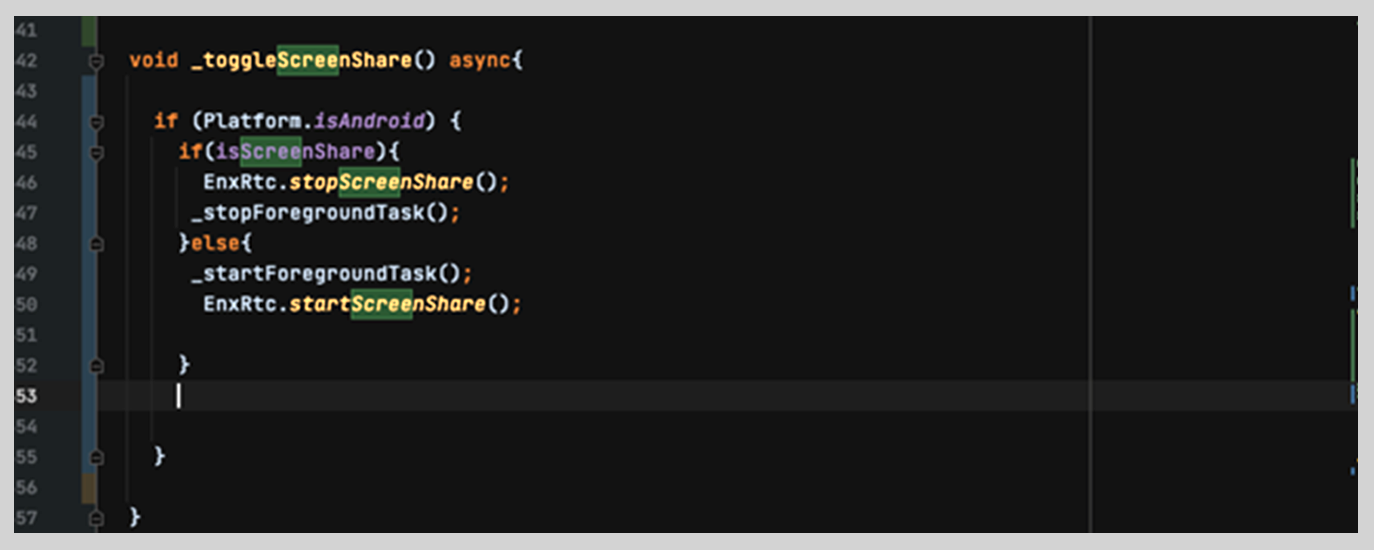
When screen sharing starts and stops successfully, the publisher receives acknowledgments of these events:
EnxRtc.onStartScreenShareACK=(Map<dynamic, dynamic> map){
   isScreenShare=true;

// Publisher receives acknowledgement

};
EnxRtc.onStoppedScreenShareACK=(Map<dynamic, dynamic> map){
   isScreenShare=false;

// Publisher receives acknowledgement that Screen Share stopped

 };
At the same time, other participants also receive a notification that screen sharing is now available:
EnxRtc.onScreenSharedStarted=(Map<dynamic, dynamic> map){

// A new Screen Share Stream is available, receive Information

};
EnxRtc.onScreenSharedStopped=(Map<dynamic, dynamic> map){

// Screen Share has stopped. Receive Information

  };
You can set up a video chat with a remote participant. Once you join the room, hit the share the screen button and start sharing your screen.
We hope you have enjoyed the post. Using the above method, you can easily build a powerful video calling app and enable the screen sharing feature using the EnableX-Flutter toolkit.
Build something exciting!
Opinions expressed by DZone contributors are their own.

Comments