Advance Traffic Management in Canary Using Istio, Argo Rollouts, and HPA
Learn how to set up Istio, Argo Rollouts, and HPA to attain advanced traffic management and autonomous scaling of pods in canary deployment.
Join the DZone community and get the full member experience.
Join For FreeAs enterprises mature in their CI/CD journey, they tend to ship code faster, safely, and securely. One essential strategy the DevOps team applies is releasing code progressively to production, also known as canary deployment. Canary deployment is a bulletproof mechanism that safely releases application changes and provides flexibility for business experiments. It can be implemented using open-source software like Argo Rollouts and Flagger. However, advanced DevOps teams want to gain granular control over their traffic and pod scaling while performing canary deployment to reduce overall costs. Many enterprises achieve advanced traffic management of canary deployment at scale using open-source Istio service mesh. We want to share our knowledge with the DevOps community through this blog.
Before we get started, let us discuss the canary architecture implemented by Argo Rollouts and Istio.
Recap of Canary Implementation Architecture With Argo Rollouts and Istio
If you use Istio service mesh, all of your meshed workloads will have an Envoy proxy sidecar attached to the application container in the pod. You can have an API or Istio ingress gateway to receive incoming traffic from outside. In such a case, you can use Argo Rollouts to handle canary deployment. Argo Rollouts provides a CRD called Rollout to implement the canary deployment, which is similar to a Deployment object and responsible for creating, scaling, and deleting ReplicaSets in K8s.
The canary deployment strategy starts by redirecting a small amount of traffic (5%) to the newly deployed app. Based on specific criteria, such as optimized resource utilization of new canary pods, you can gradually increase the traffic to 100%. The Istio sidecar handles the traffic for the baseline and canary as per the rules defined in the Virtual Service resource. Since Argo Rollouts provides native integration with Istio, it would override the Virtual Service resource to increase the traffic to the canary pods.

Canary can be implemented using two methods: deploying new changes as a service or deploying new changes as a subset.
1. Deploying New Changes as a Service
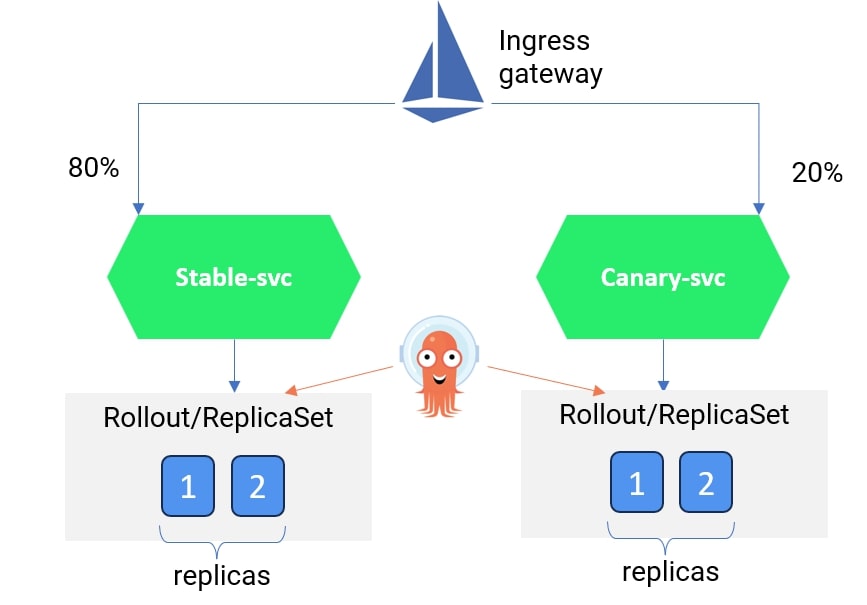
In this method, we can create a new service (called canary) and split the traffic from the Istio ingress gateway between the stable and canary services. Refer to the image below.

You can refer to the YAML file for a sample implementation of deploying a canary with multiple services here. We have created two services called rollouts-demo-stable and rollouts-demo-canary. Each service will listen to HTTP traffic for the Argo Rollout resource called rollouts-demo. In the rollouts-demo YAML, we have specified the Istio virtual service resource and the logic to gradually improve the traffic weightage from 20% to 40%, 60%, 80%, and eventually 100%.
2. Deploying New Changes as a Subset
In this method, you can have one service but create a new Deployment subset (canary version) pointing to the same service. Traffic can be split between the stable and canary deployment sets using Istio Virtual service and Destination rule resources.
Please note that we have thoroughly discussed the second method in this blog.
Implementing Canary Using Istio and Argo Rollouts Without Changing Deployment Resource
Since there is a misunderstanding among DevOps professionals that Argo Rollouts is a replacement for Deployment resource, and the services considered for canary deployment have to refer to the Argo Rollouts with Deployment configuration rewritten.
Well, that’s not true.
The Argo Rollout resource provides a section called workloadRef where existing Deployments can be referred to without making significant changes to Deployment or service YAML.
If you use the Deployments resource for a service in Kubernetes, you can provide a reference in the Rollout CRD, after which Argo Rollouts will manage the ReplicaSet for that service. Refer to the image below.

We will use the same concept to deploy a canary version using the second method: deploying new changes using a Deployment.
Argo Rollouts Configuration for Deploying New Changes Using a Subset
Let's say you have a Kubernetes service called rollout-demo-svc and a deployment resource called rollouts-demo-deployment (code below). You need to follow the three steps to configure the canary deployment.
Code for Service.yaml:
apiVersion: v1
kind: Service
metadata:
  name: rollouts-demo-svc
  namespace: istio-argo-rollouts
spec:
  ports:
  - port: 80
    targetPort: http
    protocol: TCP
    name: http
  selector:
    app: rollouts-demo
Code for deployment.yaml:
apiVersion: apps/v1
kind: Deployment
metadata:
  name: rollouts-demo-deployment
  namespace: istio-argo-rollouts
spec:
  replicas: 0 # this has to be made 0 once Argo rollout is active and functional.
  selector:
    matchLabels:
      app: rollouts-demo
  template:
    metadata:
      labels:
        app: rollouts-demo
    spec:
      containers:
      - name: rollouts-demo
        image: argoproj/rollouts-demo:blue
        ports:
        - name: http
          containerPort: 8080
        resources:
            requests:
              memory: 32Mi
              cpu: 5m
Step 1: Setup Virtual Service and Destination Rule in Istio
Set up the virtual service by specifying the back-end destination for the HTTP traffic from the Istio gateway. In our virtual service rollouts-demo-vs2, we mentioned the back-end service as rollouts-demo-svc, but we created two subsets (stable and canary) for the respective deployment sets. We have set the traffic weightage rule so that 100% of the traffic goes to the stable version and 0% goes to the canary version.
As Istio is responsible for the traffic split, we will see how Argo updates this Virtual service resource with the new traffic configuration specified in the canary specification.
apiVersion: networking.istio.io/v1alpha3
kind: VirtualService
metadata:
  name: rollouts-demo-vs2
  namespace: istio-argo-rollouts
spec:
  gateways:
  - istio-system/rollouts-demo-gateway
  hosts:
  - "*"
  http:
  - name: route-one
    route:
    - destination:
        host: rollouts-demo-svc
        port:
          number: 80
        subset: stable
      weight: 100
    - destination:
        host: rollouts-demo-svc
        port:
          number: 80
        subset: canary
      weight: 0
Now, we have to define the subsets in the Destination rules. In the rollout-destrule below, we have defined the subsets canary and stable and referred to the Argo Rollout resource called rollouts-demo.
apiVersion: networking.istio.io/v1alpha3
kind: DestinationRule
metadata:
  name: rollout-destrule
  namespace: istio-argo-rollouts
spec:
  host: rollouts-demo-svc
  subsets:
  - name: canary   # referenced in canary.trafficRouting.istio.destinationRule.canarySubsetName
    labels:        # labels will be injected with canary rollouts-pod-template-hash value
      app: rollouts-demo
  - name: stable   # referenced in canary.trafficRouting.istio.destinationRule.stableSubsetName
    labels:        # labels will be injected with stable rollouts-pod-template-hash value
      app: rollouts-demo
In the next step, we will set up the Argo Rollout resource.
Step 2: Setup Argo Rollout Resource
The rollout spec should note two important items in the canary strategy: declare the Istio virtual service and destination rule and provide the traffic increment strategy.
You can learn more about the Argo Rollout spec.
In our Argo rollout resource, rollouts-demo, we have provided the deployment (rollouts-demo-deployment) in the workloadRef spec. In the canary spec, we have referred to the virtual resource (rollouts-demo-vs2) and destination rule (rollout-destrule) created in the earlier step.
We have also specified the traffic rules to redirect 20% of the traffic to the canary pods and then pause for manual direction.
We have given this manual pause so that in the production environment, the Ops team can verify whether all the vital metrics and KPIs, such as CPU, memory, latency, and the throughput of the canary pods, are in an acceptable range.
Once we manually promote the release, the canary pod traffic will increase to 40%. We will wait 10 seconds before increasing the traffic to 60%. The process will continue until the traffic to the canary pods increases to 100% and the stable pods are deleted.
apiVersion: argoproj.io/v1alpha1
kind: Rollout
metadata:
  name: rollouts-demo
  namespace: istio-argo-rollouts
spec:
  replicas: 5
  strategy:
    canary:
      trafficRouting:
        istio:
          virtualService:
            name: rollouts-demo-vs2        # required
            routes:
            - route-one                 # optional if there is a single route in VirtualService, required otherwise
          destinationRule:
            name: rollout-destrule    # required
            canarySubsetName: canary  # required
            stableSubsetName: stable  # required
      steps:
      - setWeight: 20
      - pause: {}
      - setWeight: 40
      - pause: {duration: 10}
      - setWeight: 60
      - pause: {duration: 10}
      - setWeight: 80
      - pause: {duration: 10}
  revisionHistoryLimit: 2
  selector:
    matchLabels:
      app: rollouts-demo
  workloadRef:
    apiVersion: apps/v1
    kind: Deployment
    name: rollouts-demo-deployment
Once you have deployed all the resources in steps 1 and 2 and accessed them through the Istio ingress IP from the browser, you will see an output like the one below.

You can run the command below to understand how the pods are handled by Argo Rollouts.
kubectl get pods -n <<namespace>>
Validating Canary Deployment
Let’s say developers have made new changes and created a new image that is supposed to be tested. For our case, we will make the Deployment manifest file (rollouts-demo-deployment) by modifying the image value from blue to red (refer to the image below).
spec:
      containers:
      - name: rollouts-demo
        image: argoproj/rollouts-demo:blue
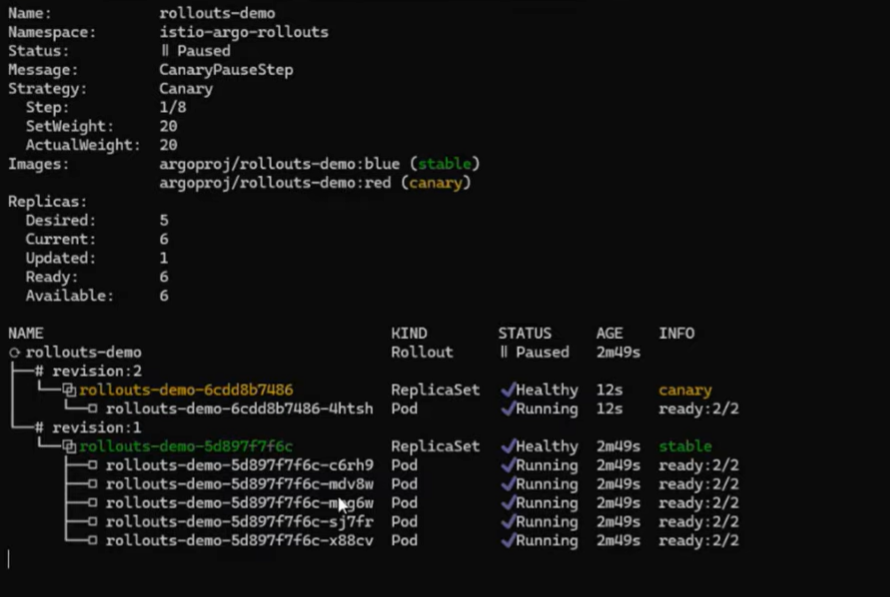
Once you deploy the rollouts-demo-deployment, Argo Rollout will understand that new changes have been introduced to the environment. It would then start making new canary pods and allow 20% of the traffic. Refer to the image below:

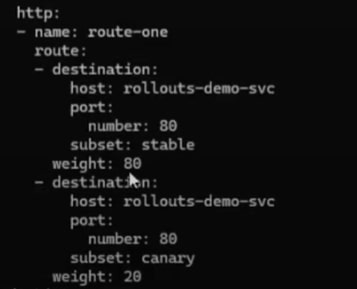
Now, if you analyze the virtual service spec by running the following command, you will realize Argo has updated the traffic percentage to canary from 0% to 20% (as per the Rollouts spec).
kubectl get vs rollouts-demo-vs2 -n <<namespace>> -o yaml
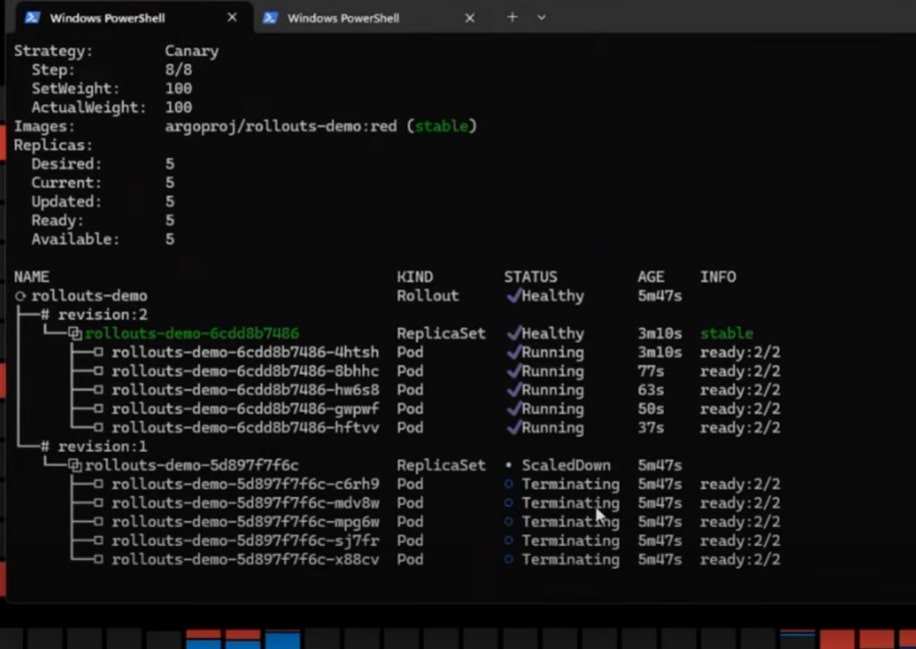
Gradually, 100% of the traffic will be shifted to the new version, and older/stable pods will be terminated.

In advanced cases, the DevOps team must control the scaling of canary pods. The idea is not to create all the pods as per the replica at each gradual shifting of the canary but to create the number of pods based on specific criteria. In those cases, we need HorizontalPodAutoscaler (HPA) to handle the scaling of canary pods.
Scaling of Pods During Canary Deployment Using HPA
Kubernetes HPA is used to increase or decrease pods based on load. HPA can also be used to control the scaling of pods during canary deployment. HorizontalPosAutoscaler overrides the Rollouts behavior for scaling of pods.
We have created and deployed the following HPA resource: hpa-rollout-example.
- Note: The HPA will create the number of pods = maximum (minimum pods as per HPA resource, or number of the replicas mentioned in the
Rollouts).
This means if the number of pods mentioned in the HPA resource is 2 but the replicas as per the Rollouts resource is 5, then a total of 5 pods will be created.
Similarly, if we update the replicas in the rollouts-demo resource as 1, then the number of pods created by HPA will be 2. (We will have updated the replicas to 1 to test this scenario.)
In the HPA resource, we have referenced the Argo Rollout resource rollouts-demo. That means HPA will be responsible for creating two replicas at the start. If the CPU utilization is more than 10%, more pods will be created. A maximum of six replicas will be created.
apiVersion: autoscaling/v1
kind: HorizontalPodAutoscaler
metadata:
  name: hpa-rollout-example
  namespace: istio-argo-rollouts
spec:
  maxReplicas: 6
  minReplicas: 2
  scaleTargetRef:
    apiVersion: argoproj.io/v1alpha1
    kind: Rollout
    name: rollouts-demo
  targetCPUUtilizationPercentage: 10
When we deployed a canary, only two replicas were created at first (instead of the five mentioned in the Rollouts).

Validating Scaling of Pods by HPA by Increasing Synthetic Loads
We can run the following command to increase the loads to a certain pod.
kubectl run -i -tty load-generator-1 -rm -image=busybox:1.28 -restart=Never - /bin/sh -c "while sleep 0.01; do wget -q -O- http://<<service name>>.<<namespace>>; done;"You use the following command to observe the CPU utilization of the pods created by HPA.
kubectl get hpa hpa-rollout-example -n <<namespace>> -watchOnce the load increases more than 10%, in our case to 14% (refer to the image below), new pods will be created.

 Many metrics, such as latency or throughput, can be used by HPA as criteria for scaling up or down the pods.
Video
Below is the video by Ravi Verma, CTO of IMESH, giving a walkthrough on advanced traffic management in Canary for enterprises at scale using Istio and Argo Rollouts.
Final Thought
As the pace of releasing software increases with the maturity of the CI/CD process, new complications will emerge. And so will new requirements by the DevOps team to tackle these challenges. Similarly, when the DevOps team adopts the canary deployment strategy, new scale, and traffic management challenges emerge to gain granular control over the rapid release process and infrastructure cost.
Published at DZone with permission of Debasree Panda. See the original article here.
Opinions expressed by DZone contributors are their own.

Comments