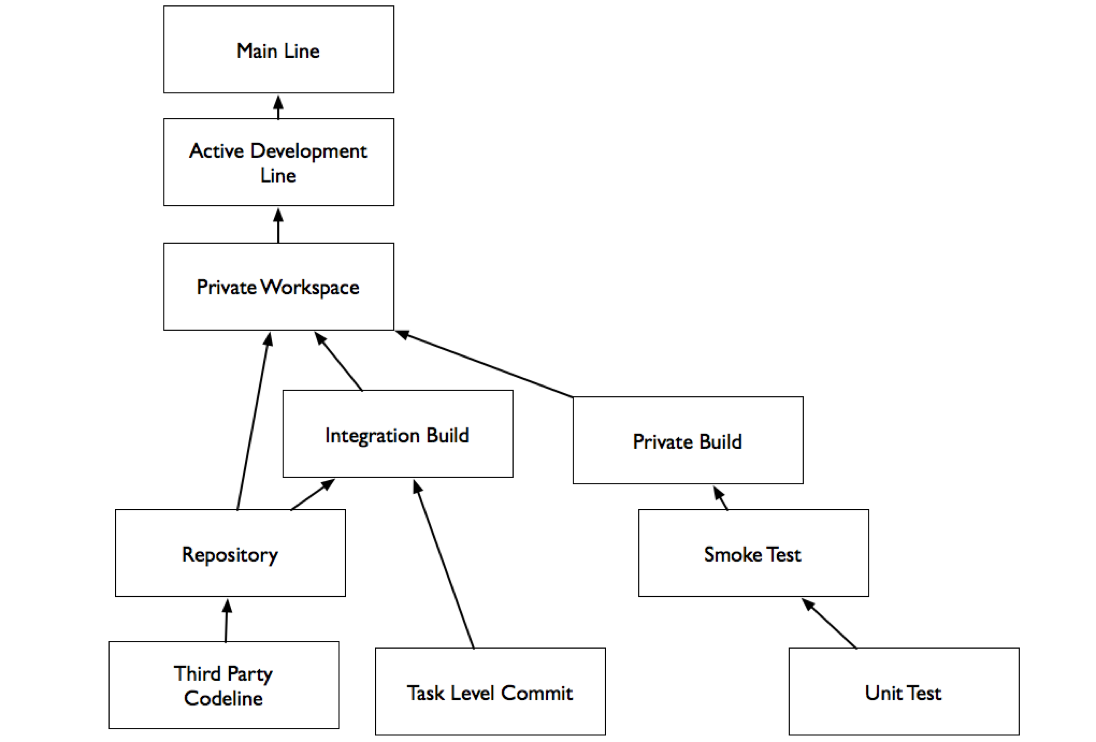
Private Workspace
To maintain an Active Development Line, you need an environment where developers can work with enough isolation that they are not disrupted, and identify integration issues before code is shared with the team. Developers need control over the state of the code they are working with so that they can work without distraction.
A Private Workspace is an environment where developers can build and test before accepting changes from the Active Development Line, or publishing them to the Active Development Line.
A Private Workspace has all of the dependencies a developer needs to work independently including:
- Code.
- The correct version of build tools.
- The correct version of dependencies.
- Configuration Files.
A developer needs to easily create the workspace from a simple set of instructions using the Repository, and a build tool that supports dependency management, such as Gradle or Maven. Tools such as virtual environments and containers can also help.
For the team to work effectively, developers need to follow the process in the Private Build pattern, updating their workspace frequently and committing changes frequently when the code is working to ensure that the status of the code accurately reflects the state of the Active Development Line.
Repository
To set up a new Private Workspace or an Integration Build you need to populate it from a repository that contains everything you need to build the code, including:
- Source Code
- Build Scripts
- Configuration
- Third Party Components
The Repository can be composed of a number of tools. The Source Code can be in a source code management system, components can be in an artifact repository, such as a Maven repository.
Ideally a developer should be able to create a workspace for a project in two steps:
- Check out a copy of the code from your SCM system.
- Run a build command (for example, a shell script or Gradle task) to configure and build the project.
The only documentation you should need is:
- The path to the project in the SCM System.
- The build command.
- Optional configuration changes to make for different environments.
You can document the workspace creation process in a well know location in the SCM repository, or on a CMS such as a wiki. A common convention would be to have a Getting Started page. Fewer, self-running scripts are better than a longer documented process, but the key attribute of a successful Getting Started process is that it can be executed without assistance from anyone else.
Having all dependencies in a single repository and simple procedure for creating a workspace will minimize the risk of introducing bugs that are related to environmental differences and improve efficiency when people join or move between projects.
Private Build
To avoid breaking the Active Development Line, perform a Private Build in your Private Workspace before committing changes. This will allow you to detect integration errors before they affect other developers.
The Private Build:
- Builds the code.
- Runs Smoke Tests.
- Runs Unit Tests.
- Creates a deployable artifact.
The Private Build should be identical to the Integration Build, or at least as close as possible. While IDEs can be used for day-to-day development, the build tools in your integration environment should be treated as the canonical build tool. The default private build may occasionally skip some tests in the interest of speed, but it should be possible to run the entire integration build (including tests) in a developer workspace.
To avoid checking in code that will break the integration Build developers run the Private Build as they develop. Before any commit developers should:
- Update their Private Workspace from the Active Development Line.
- Run the Private Build.
- Commit their changes only when the build passes.
The private build should be able to grab all dependencies automatically, and not rely on manual installs. A common mechanism for this is to pull dependencies from a Maven or Ivy repository using a build tool such as Gradle or Maven.
Integration Build
Building in a Private Workspace provides some assurance that all of the code works together, but you still want an automated mechanism to verify that the code that is in the version management system always builds and passes tests. An integration build runs automatically when changes are detected in the code line. The Integration Build:
- Updates the source in an integration workspace.
- Builds the code.
- Runs unit, smoke, and integration tests.
- Performs static analysis on the source code.
The integration build should be automated, fairly quick, and failures should be addressed immediately. If running a complete suite of tests takes too long, split the integration build into 2 phases, one which runs unit and smoke tests, and one which runs more thorough integration and regression tests.
Third Party Code Line
All of your locally developed code is in your Repository. Code from outside the organization that you depend on should also be in your Repository, as you need a way to manage dependencies. For binary dependencies, you can identify versions in your build configurations and use a repository manager. When you need to make customizations to open source code, you might want to manage the source code in your repository. A Third Party Code Line is a way you can easily manage local customizations to code.
- Add the third party source to your SCM repository.
- Label the original source.
- Create a branch for your local changes.
- When there is a new release of the third party code, add it to the mainline. Create a new branch for this code.
- Merge any relevant changes from the old branch to the new branch.
Once this is done, create an integration build for the code, and a mechanism for developers to reference the third party artifacts. If you are actively using an open source library, and your changes are not proprietary, consider contributing them to the project.
Task Level Commit
To help ensure that the Integration Build reflects the current state of the code, organize code changes by task oriented units of work and commit frequently. Associate each Task Level Commit with an issue from your issue tracking system to improve traceability. A Task Level commit is:
- Small. Commit changes when you have completed a unit of work.
- Frequent. Commit code as often as possible while maintaining working code.
- Associated with a feature being developed. For example, each commit could have an issue number mentioned.
You might commit after each of these steps:
- Add a method and a unit test.
- Use the new method.
Many issue tracking systems can associate commits with the issue identifiers, either by metadata or by finding issue IDs in the commit comments. Associating each commit with an issue is important to:
- Identify code changes that went into implementing an issue. This is useful for auditing and research.
- Identify the effort required for features.
- Help developers focus their efforts on useful features.
Be sure to update and build code before committing changes to the Main Line.
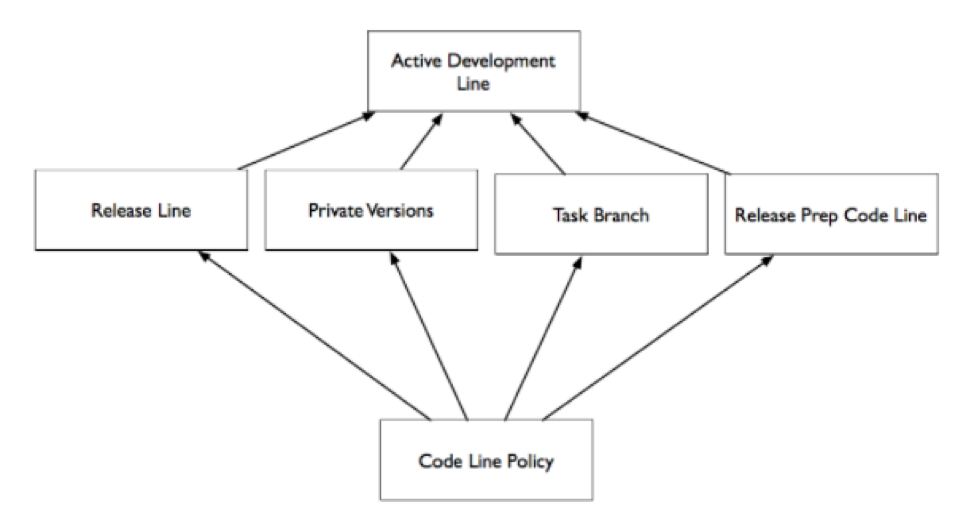
The Task Level commit is also a good pattern to follow when working on a Release Line.
Smoke Test
An Integration Build and Private Build use testing to help ensure that your code line is an Active Development Line. To verify that the code line still works after a change, run a Smoke Test after each change as part of the build. A smoke test is a quick to run integration test which:
- Is fast.
- Is Self-Evaluating.
- Provides broad coverage.
- Is Runnable by developers as part of a build-time test.
Smoke tests do not replace all manual quality assurance and analysis efforts, or Regression Tests, but they do allow for a way to catch common, critical errors quickly after each change.
Unit Test
Smoke Tests provide a quick way to make sure that the application works at a high level. You can rely on smoke tests only if you also have a mechanism to verify that your modules still work after you make a change. Unit tests are tests that test low level APIs and contracts.
Unit Tests are:
- Automated.
- Self-Evaluating.
- Fine Grained.
- Isolated. A unit test does not interact with other tests.
Unit tests test the contract that a class has with other components. Run unit tests while you are coding, before you check in changes, and as part of the build.
Writing unit tests as you code will also help you to identify coupling between modules so that you can remove it if it is inappropriate. Applying practices such as Test Driven Development, where you write tests before you write code, can be one way to ensure that you have good test coverage.
Unit tests can also help to identify module level regressions If the existing tests, and the tests that went with the change you are merging, both pass, you can be more confident that you merged the changes correctly.
Using a framework like xUnit can simplify your unit testing process.
Regression Test
Unit tests and smoke tests are designed to be fast and are meant to be run frequently. You still need a more comprehensive way to ensure that existing code does not get worse as you make other improvements.
Regression tests are typically a kind of integration test, though you can also write more isolate tests – more akin to unit tests -- to detect regressions. Regression tests are often driven by problems that you found reactively, and might take longer to run than a build time test should. Ideally, regression tests will be automated.
Regression tests should cover:
- Problems you find in the QA process.
- User-reported problems.
- System level requirements.
When you find an error in a released build, it's a good practice to add a test that identifies the issue to the build.
If the Regression Tests don't take too long to run, add them to the main integration build. Otherwise run them as a second stage build, and consider adding "run regression tests on build" to the code line policy of a Release Line.


{{ parent.title || parent.header.title}}
{{ parent.tldr }}
{{ parent.linkDescription }}
{{ parent.urlSource.name }}