What Is Advertised Kafka Address?
Learn more about the advertised Kafka address.
Join the DZone community and get the full member experience.
Join For FreeLet’s start with the basics. After successfully starting a Redpanda or Apache Kafka® cluster, you want to stream data into it right away. No matter what tool and language you chose, you will immediately be asked for a list of bootstrap servers for your client to connect to it.
This bootstrap server is just for your client to initiate the connection to one of the brokers in the cluster, and then it will provide your client with initial sets of metadata. The metadata tells the client the currently available brokers, and which the leader of each partition is hosted by which brokers so that the client can initiate a direct connection to all brokers individually. The diagram below will give you a better idea.

The client figures out where to stream the data based on the info given. Depending on the number of partitions and where they are hosted, your client will push or pull from the partitions to/from its host brokers.
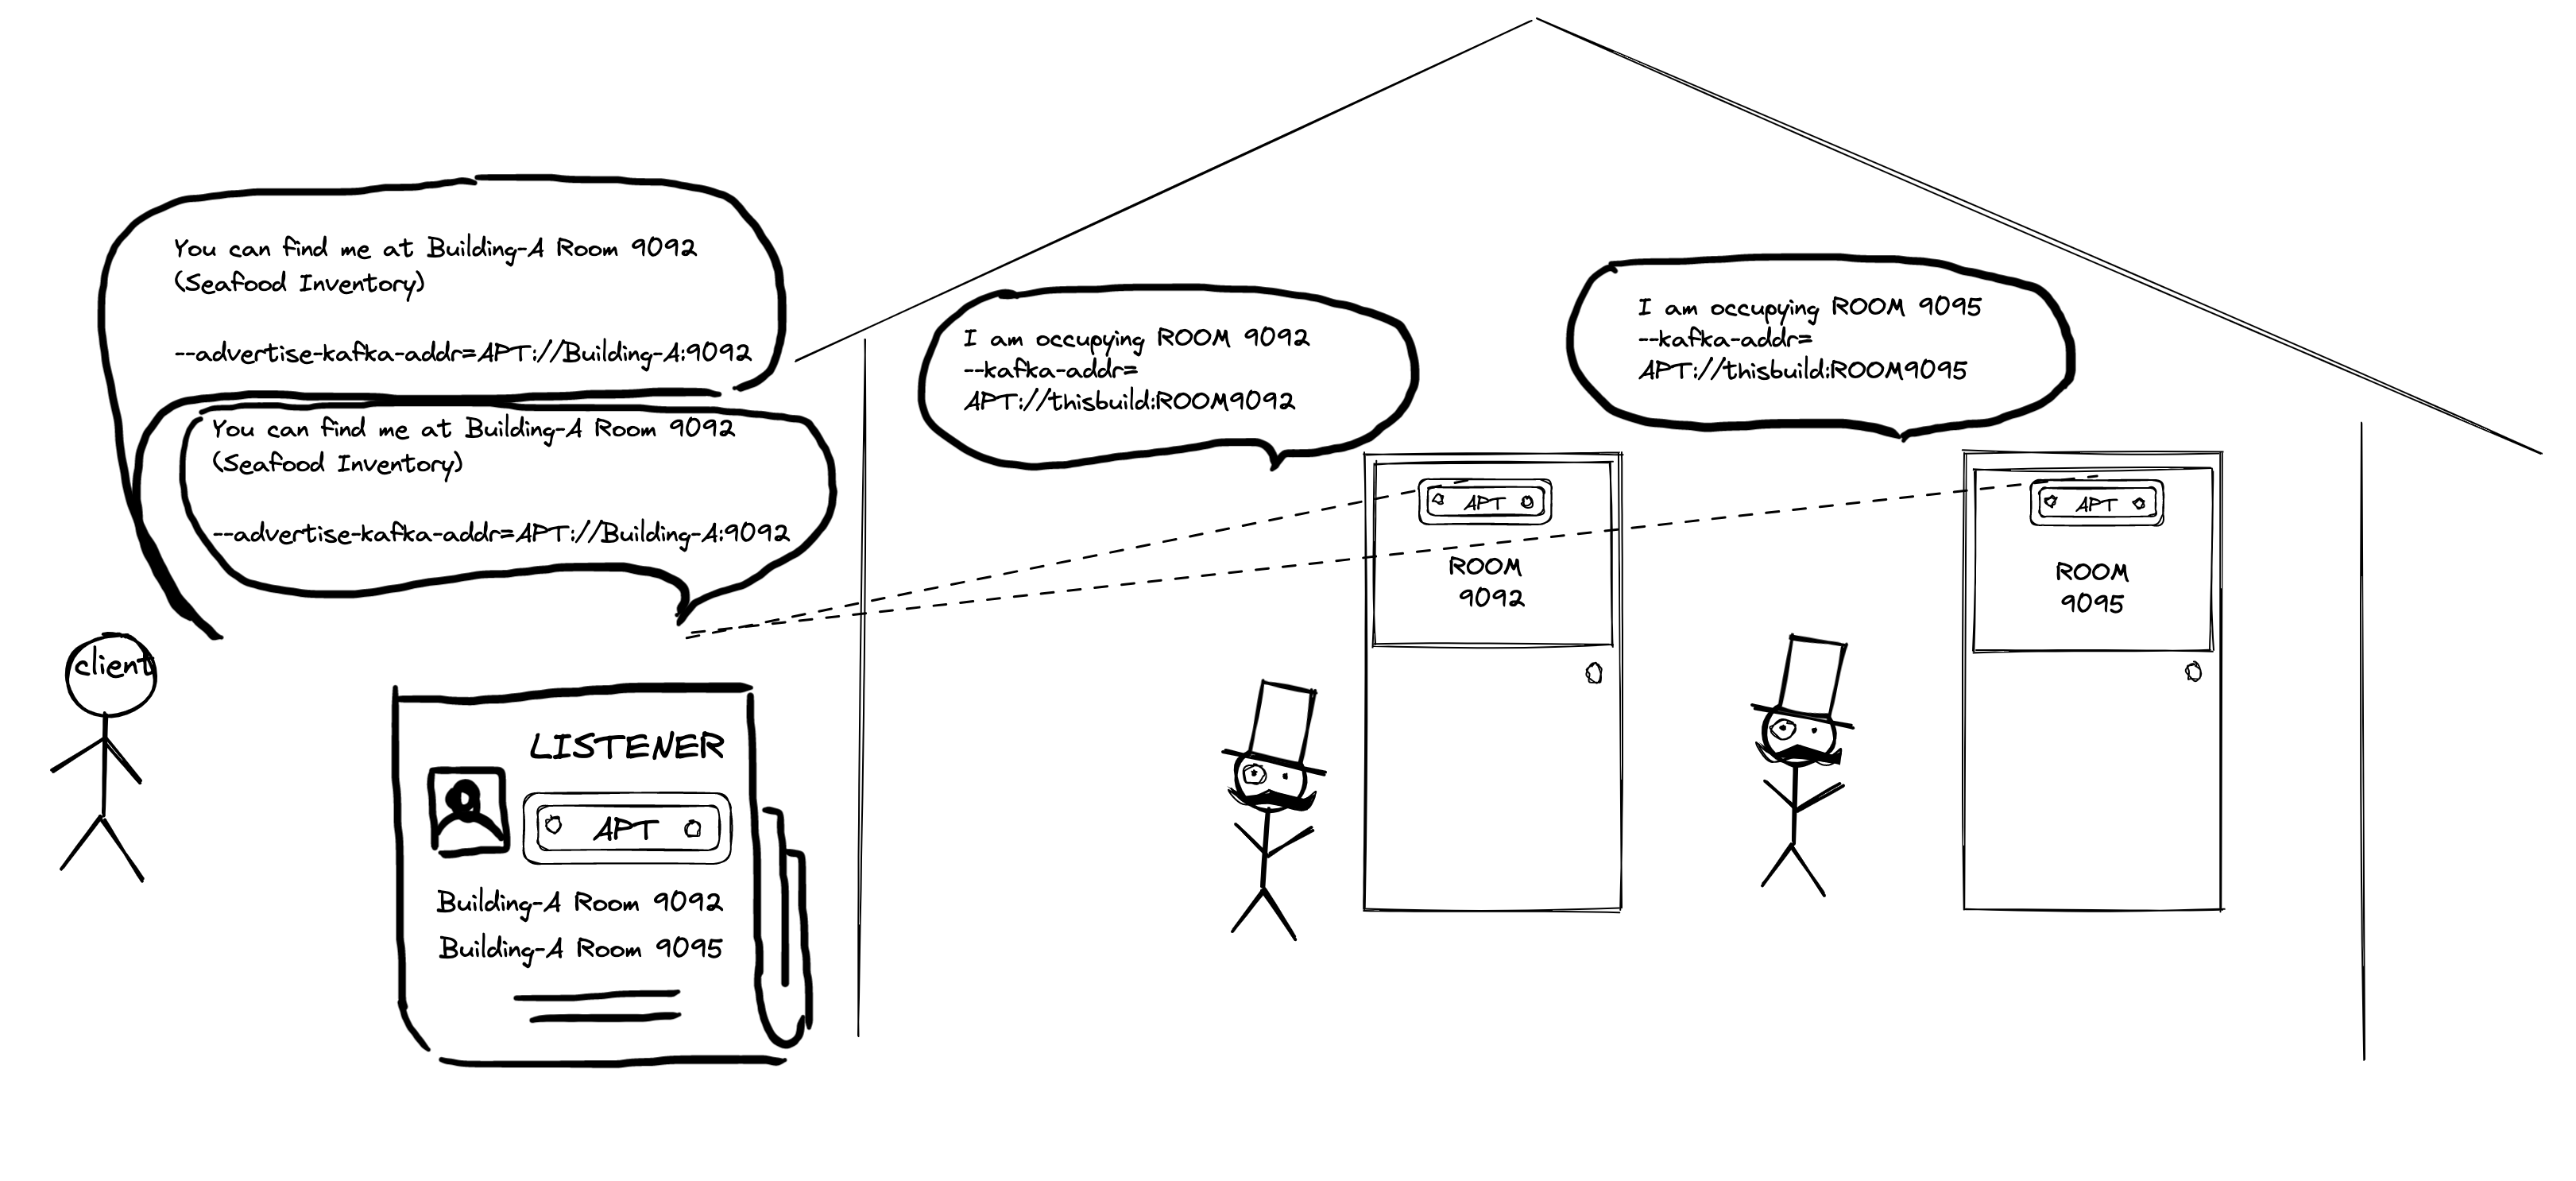
Both the Kafka address and the advertised Kafka address are needed. Kafka Address is used for Kafka brokers to locate each other, and the advertised address for the client to find them.
In this post, we’ll help you understand the advertised Kafka address, how to use it in Docker and Kubernetes (K8s), and how to debug it.
When To Use Kafka Address and Advertised Kafka Address
When starting up your Redpanda cluster, Kafka Address is used to bind the Redpanda service to its host and use the established endpoint to start accepting requests.
{LISTENER_NAME}://{HOST_NAME}:{PORT}
The broker uses the advertised Kafka address in the metadata, so your client will take the address to locate other brokers.
 To set it, use --kafka-addr and --advertise-kafka-addr with RPK or kafka_api or advertised_kafka_api inside /etc/redpanda/redpanda.yaml for each broker.
Until this point, everything seems straightforward. And, you might start to wonder whether the Kafka address and advertised Kafka address are actually redundant. It starts to get tricky when your client has no visibility into the cluster host, and if you pass the same internal address to the client, it won’t be able to resolve it. So, we need to modify the advertised Kafka address to let the Kafka client understand and be reachable from outside (i.e., external IP).
How To Use Kafka Address and Advertised Kafka Address in Docker (Container)
Another problem that often comes up is while running Redpanda brokers in Docker (container). The same applies to other more complex network topologies. But fear not, you already know the mechanics. All you need to do is put the right address for clients that reside in different places.
When running the Docker container, it creates its own network by default, but in the case where you need to have multiple of them communicating, you will need to set up a network (sometimes even multiple layers of network) by bridging them together. We know that the Kafka address is used for binding to the host, we’ll just use 0.0.0.0 as it will bind to all interfaces in the host and any port of your wish (do not use an already occupied port).
An example could be 0.0.0.0:9092 and 0.0.0.0:9095 for each broker running in the Docker container, you will register a name in the network, if your client is trying to access the broker within the network, all you need to do is set the advertised Kafka address to it’s registered hostname in the network. For example, if your first Redpanda container registered its name as Building-A, you can set the advertised Kafka address to Building-A:9092.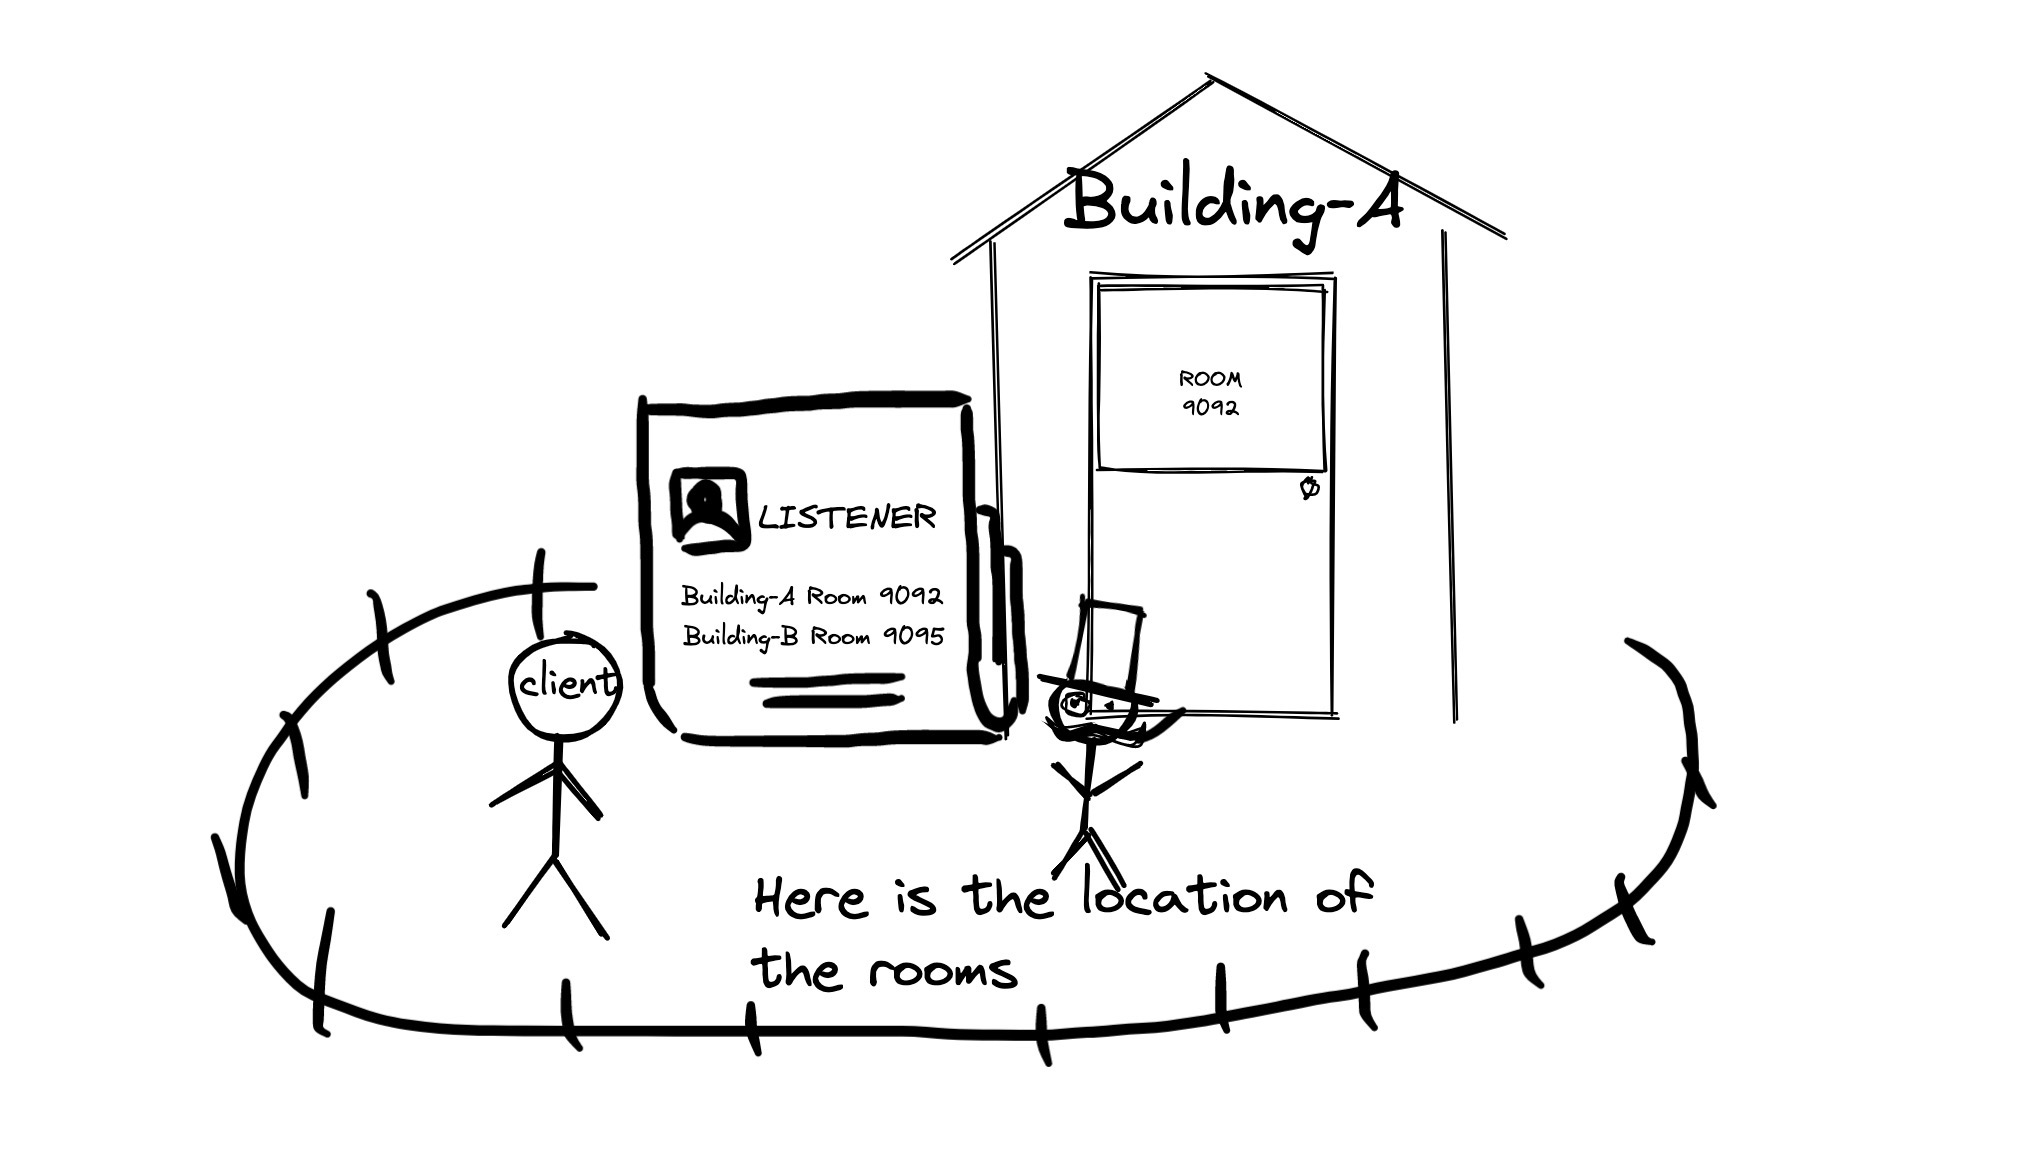
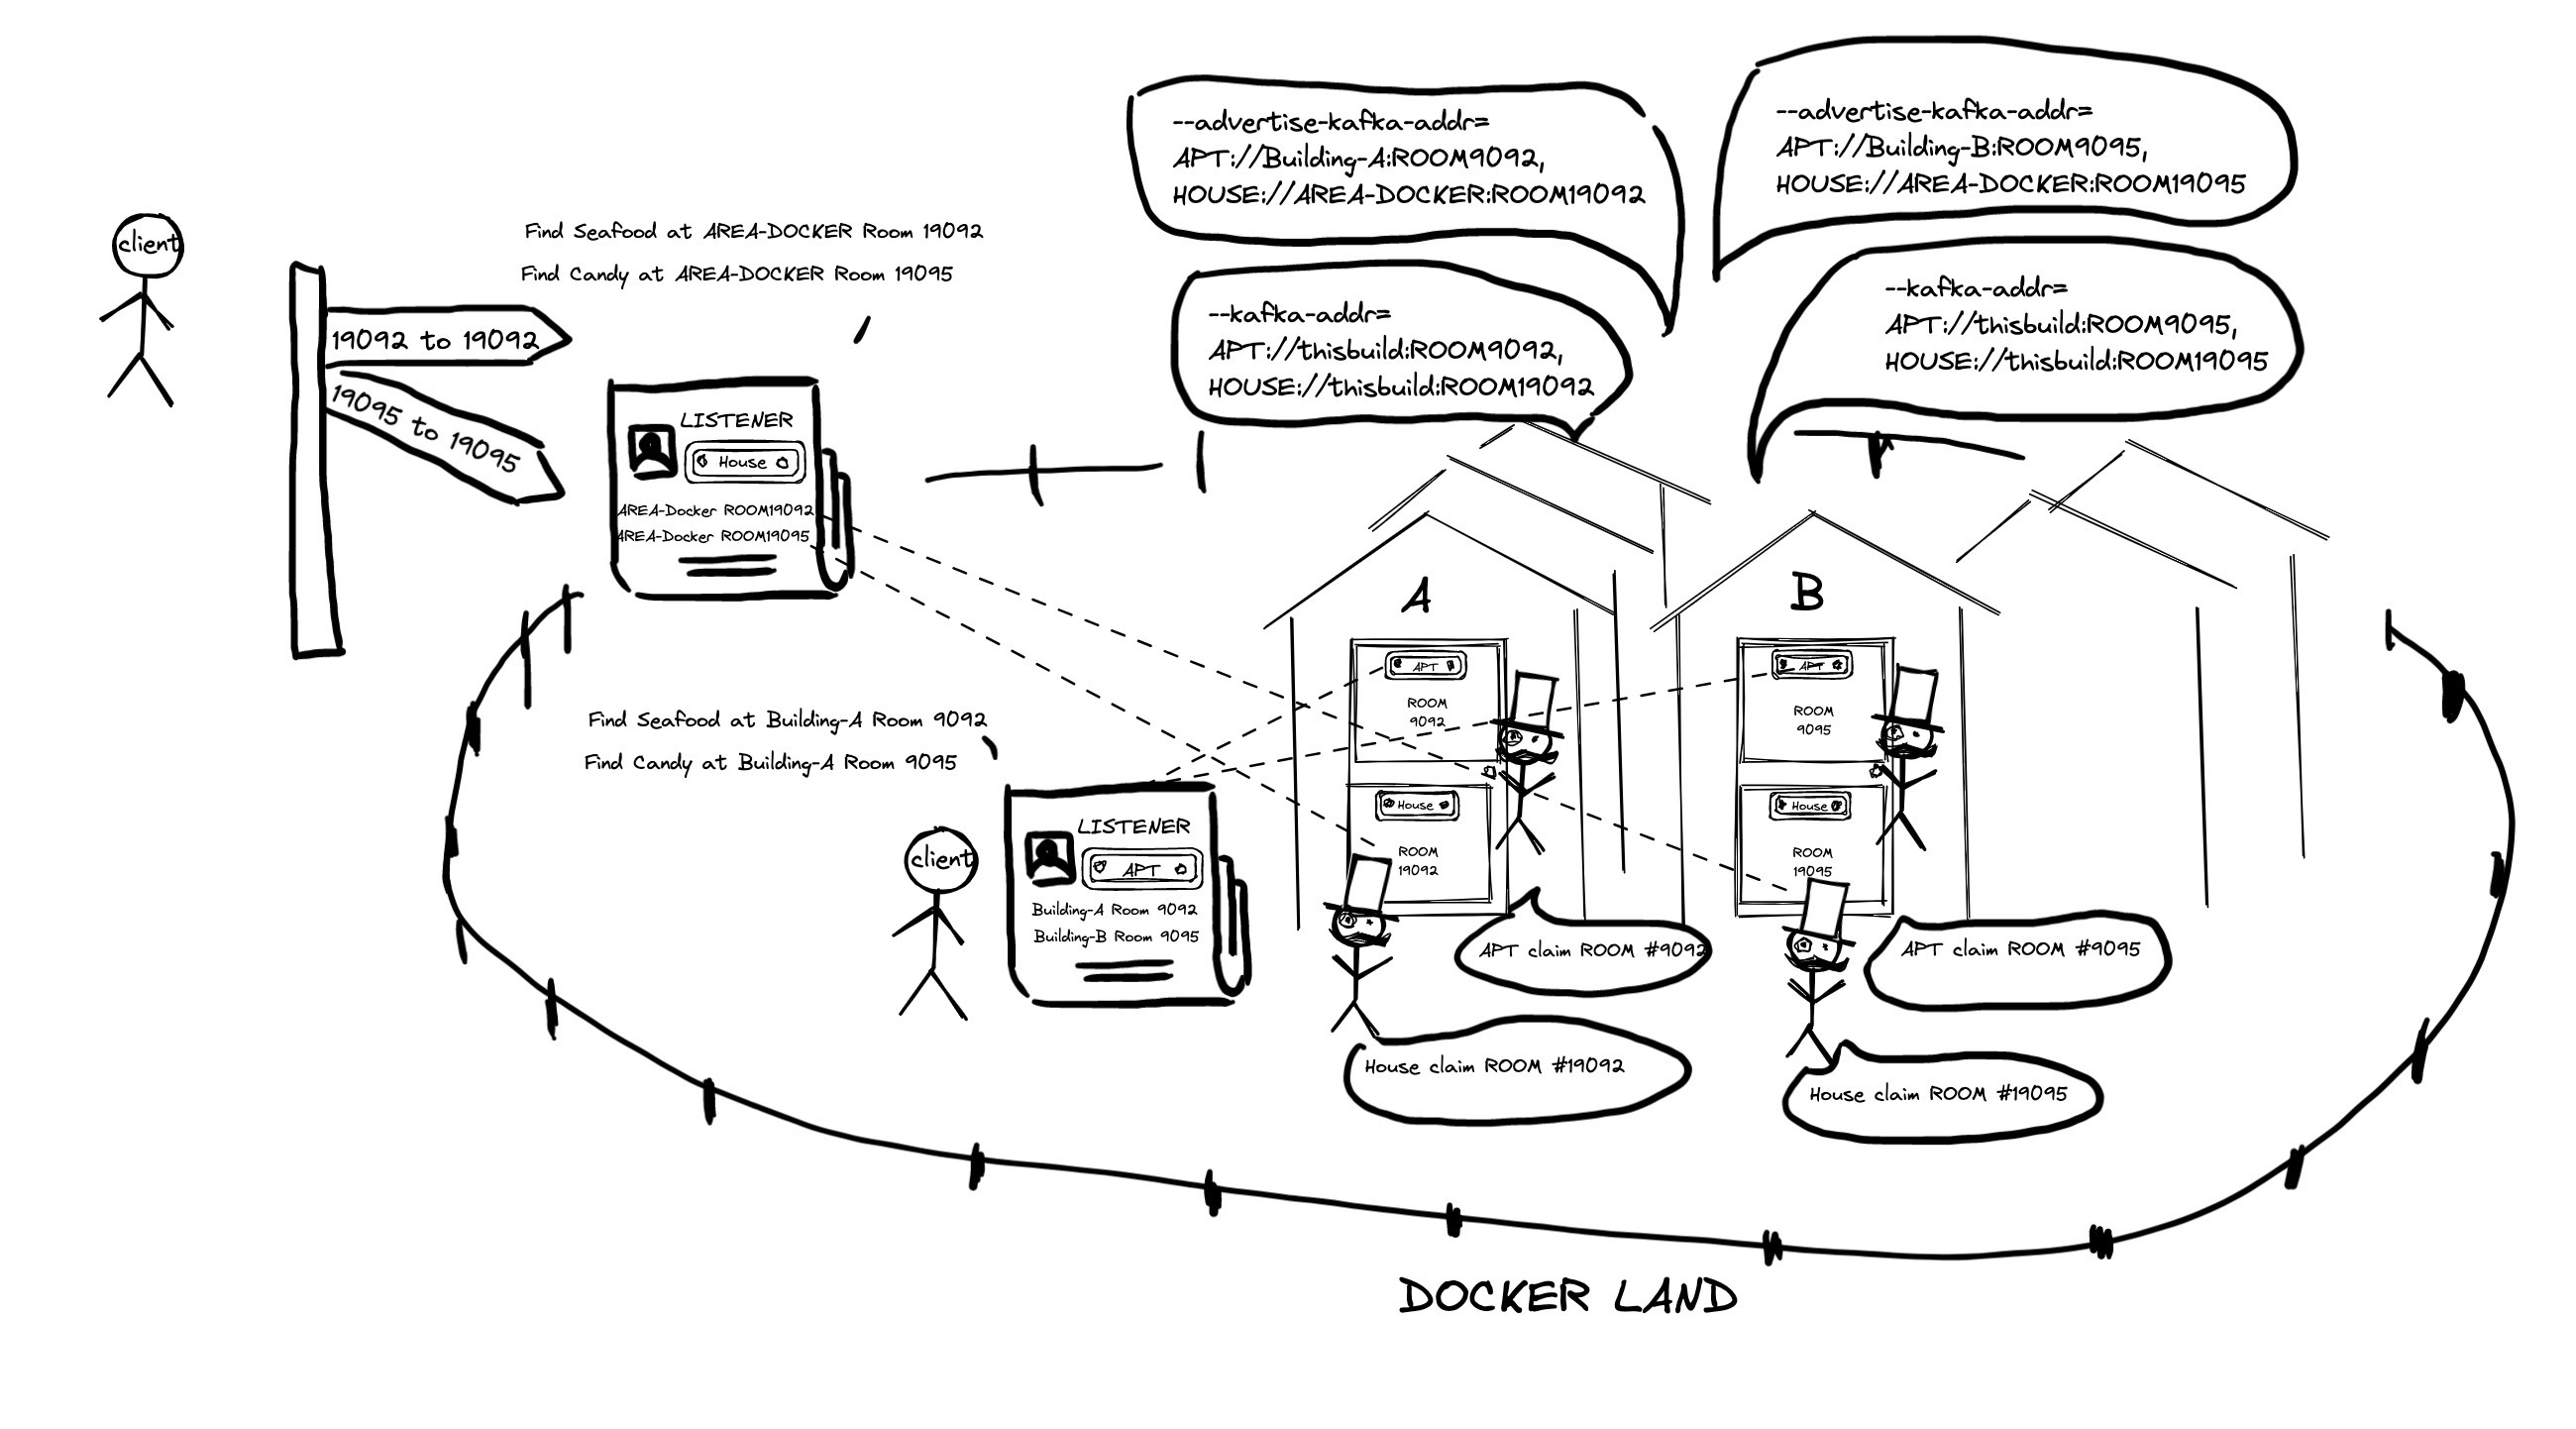
For clients outside of the Docker network, where they don’t have access to the network’s routing table, the advertised Kafka address will need to be set to the host where the Docker containers are running on, so the client can find it. And don’t forget that you also need to expose the port and associate that with the host.
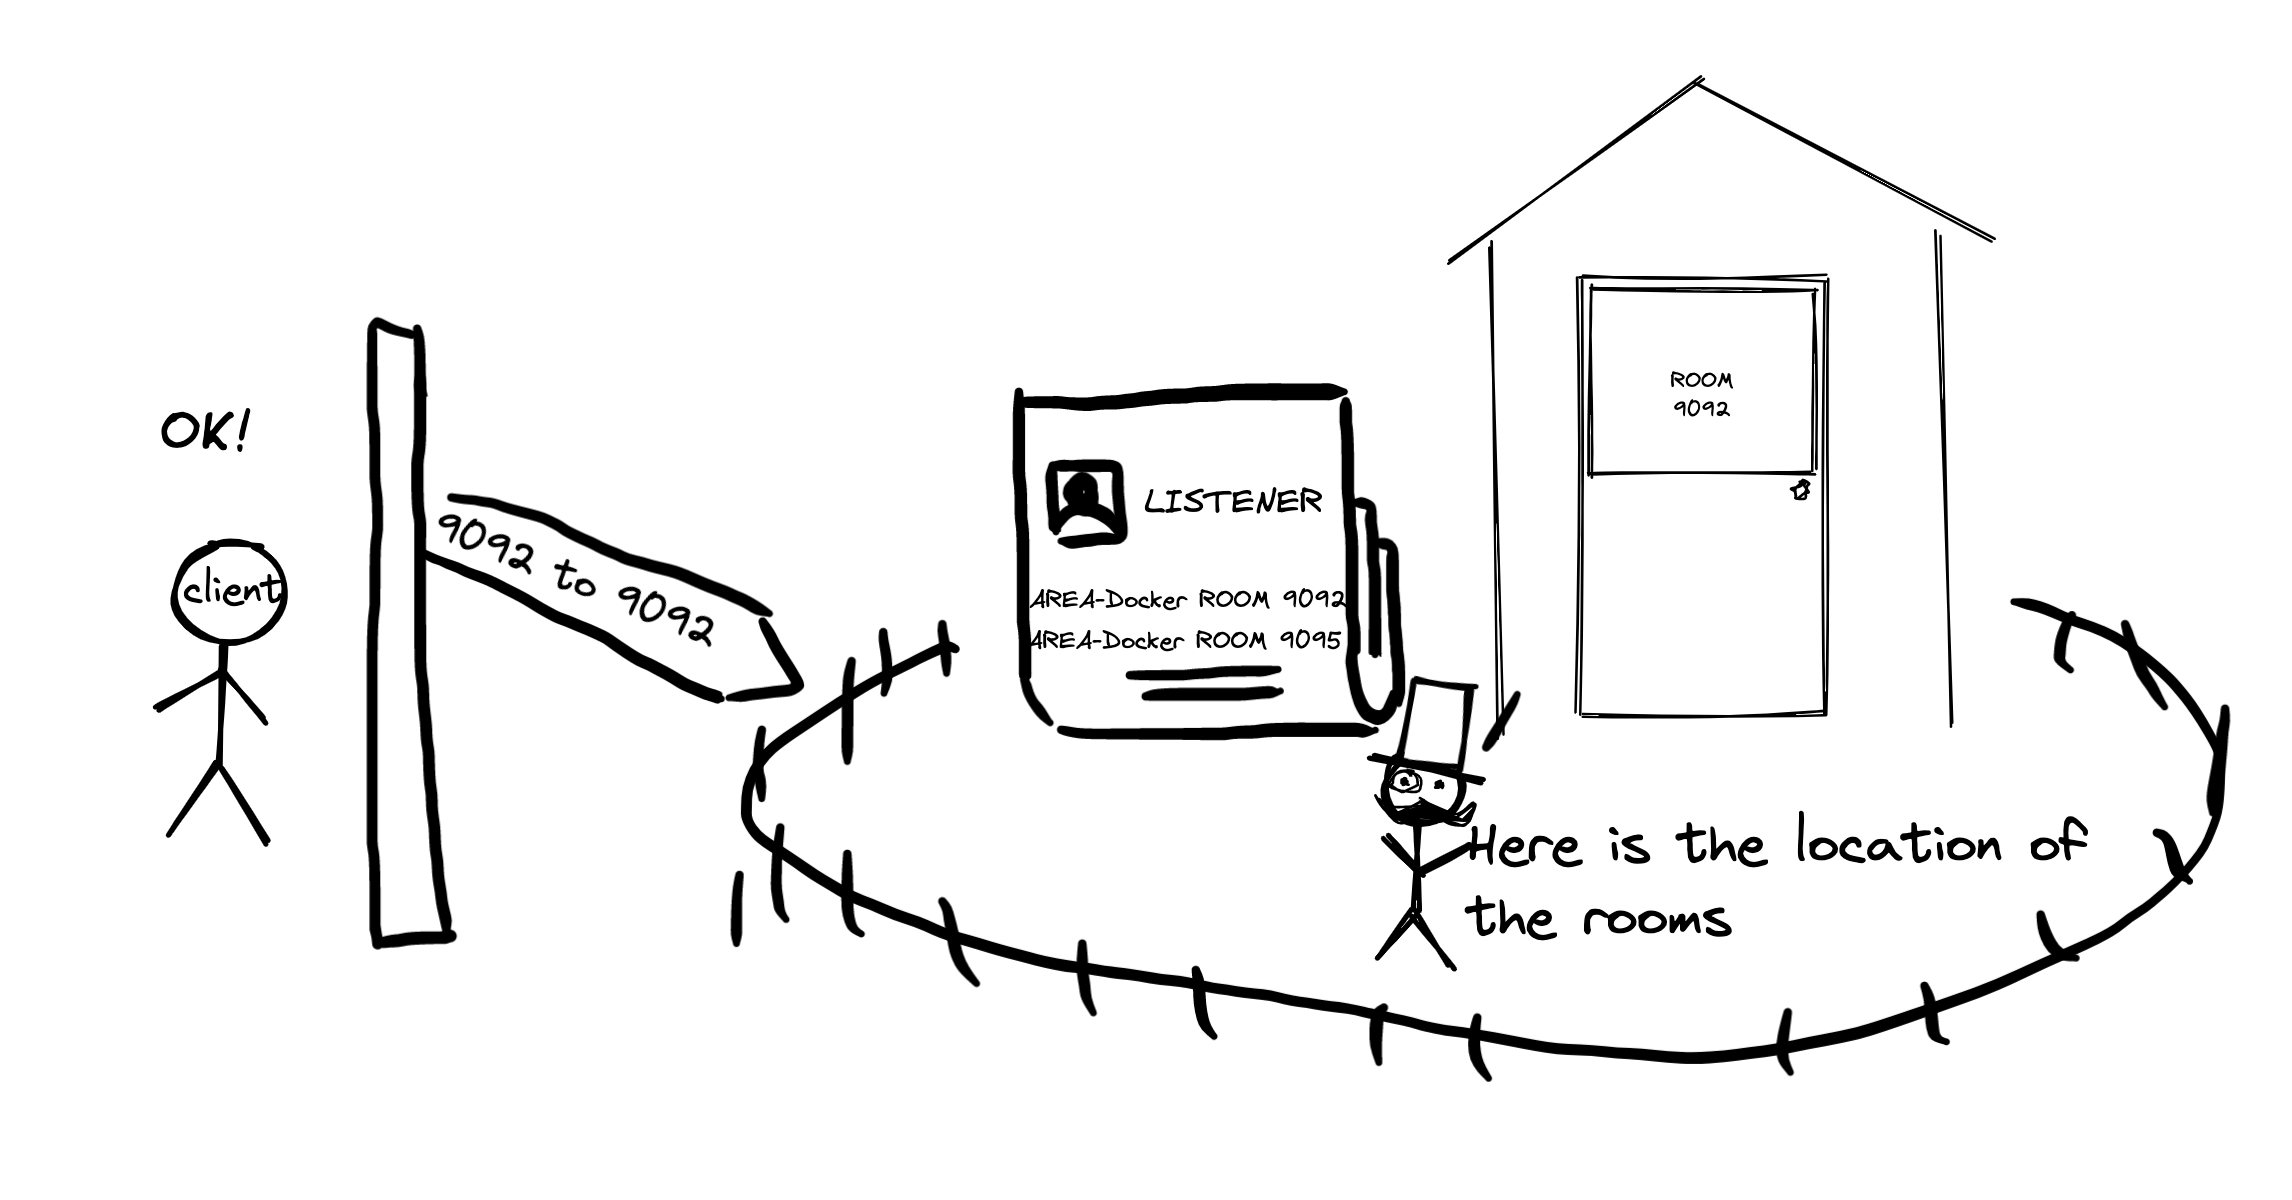
But, what happens if you have clients who both want to access the cluster at the same time? Simple, add multiple listeners! Each listener will return a set of advertised Kafka addresses for clients in a different environment.

Here’s a diagram for you.
Using Kafka Address and Advertised Kafka Address in K8s
Since Kubernetes is a platform that orchestrates containers, the concept is very similar to running Docker containers, but on a larger scale. In a typical Redpanda cluster, you will want to install a single Redpanda broker in an individual worker node.
All the pods running in the K8s would get assigned an internal address, that is only visible inside the Kubernetes environment, if the client is running outside of Kubernetes, it will need a way to find the brokers. So you can use NodePort to expose the port and use the public IP address of the hosting worker node.
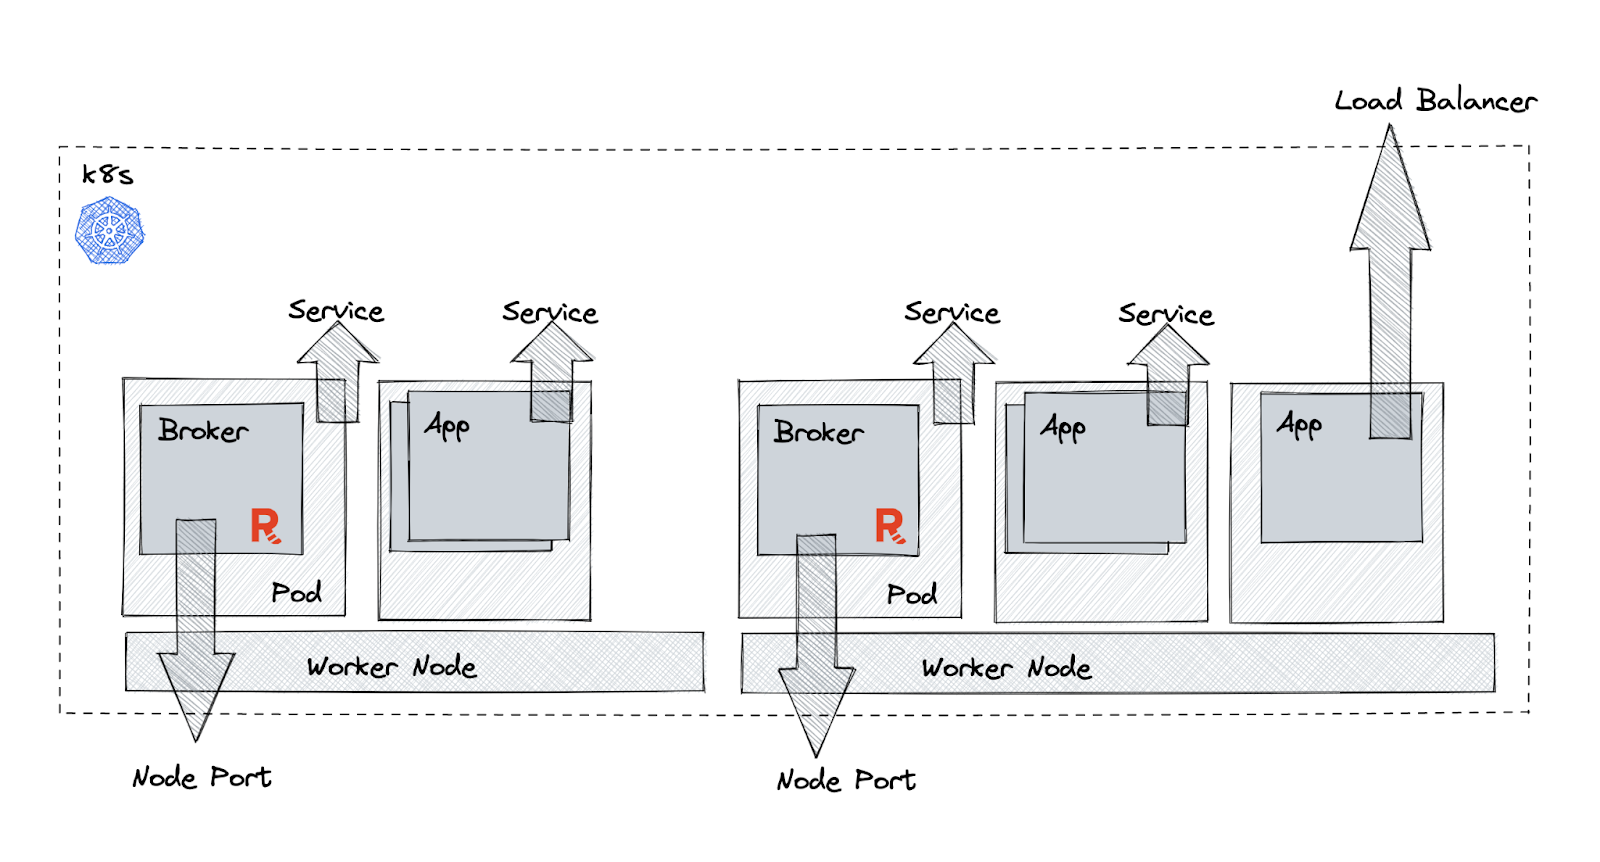
For the Kafka address, as usual, just bind it to the local container. For example, 0.0.0.0:9092 and 0.0.0.0:9095. As for the advertised Kafka address, we will need to set two listeners: one for internal connection, and one for external.
For internal clients, we can simply use the generated internal service name, for example, if your service name is set to Building-A, the advertised Kafka address will be internal://Building-A:9092.For the external listener use the hosting worker node’s public IP (or domain name ) with the port exposed in NodePort, where you will be assigned a new port. For example, if your first work node has public IP (Domain) as XXX-Blvd, and the new port assigned is 39092, you can set the advertised Kafka address to external://XXX-Blvd:39092 .
How to Debug the Advertised Kafka Address
When you are able to connect to your cluster with Redpanda Keep (rpk) and your client throws errors like “ENOTFOUND”. Check if the advertised_kafka_api is correctly set, with an address that can be resolved by your client.
> curl localhost:9644/v1/node_config

{"advertised_kafka_api":[{"name":"internal","address":"0.0.0.0","port":9092},{"name":"external","address":"192.186.0.3","port":19092}]....}
If you are running Docker, find out which port 9644 was exposed from Docker.
> docker port redpanda-0

8081/tcp -> 0.0.0.0:18081
9644/tcp -> 0.0.0.0:19644
18082/tcp -> 0.0.0.0:18082
19092/tcp -> 0.0.0.0:19092
And cURL.
> curl localhost:19644/v1/node_config

{"advertised_kafka_api":[{"name":"internal","address":"redpanda-0","port":9092},{"name":"external","address":"localhost","port":19092}]....}
If you are running Kubernetes, find out what is the exposed admin port.
> kubectl get svc redpanda-external -n redpanda

NAME                TYPE       CLUSTER-IP     EXTERNAL-IP   PORT(S)
redpanda-external NodePort 10.100.87.34 <none> 9644:31644/TCP,9094:31092/TCP,8083:30082/TCP,8084:30081/TCP 3h53m> kubectl get pod -o=custom-columns=NAME:.metadata.name,STATUS:.status.phase,NODE:.spec.nodeName -n redpanda
NAME NODE
redpanda-0 ip-1-168-57-208.xx.compute.internal
redpanda-1 ip-1-168-1-231.xx.compute.internal
redpanda-2 ip-1-168-83-90.xx.compute.internal>kubectl get nodes -o=custom-columns='NAME:.metadata.name,IP:.status.addresses[?(@.type=="ExternalIP")].address'
NAME IP
ip-1.us-east-2.compute.internal 3.12.84.230
ip-1.us-east-2.compute.internal 3.144.255.61
ip-1.us-east-2.compute.internal 3.144.144.138And cURL.
> curl 3.12.84.230:31644/v1/node_config

{"advertised_kafka_api":[{"name":"internal","address":"redpanda-1.redpanda.redpanda.svc.cluster.local.","port":9093},{"name":"default","address":"3.12.84.230","port":31092}].....}
Lastly, check if you are connecting to the correct listener(Port). And you’re all done!

Conclusion
If you made it this far, you should now have a better understanding of what the advertised Kafka address is and how you can use it in Docker and K8s.
To learn more about Redpanda, check out our documentation and browse the Redpanda blog for tutorials and guides on how to easily integrate with Redpanda. For a more hands-on approach, take Redpanda's free Community edition for a test drive!
Published at DZone with permission of Christina Lin, DZone MVB. See the original article here.
Opinions expressed by DZone contributors are their own.

Comments