WebDriverIO Integration With Cucumber
WebDriverIO has an extended set of built-in and community plugins that help in designing robust, scalable tests and easily integrate with third-party applications.
Join the DZone community and get the full member experience.
Join For FreeWebDriverIO: Next-generation Automation Framework
WebDriverIO is an open-source next-generation automation framework, that allows us to automate modern web and mobile applications. It has an extended set of built-in and community plugins that help in designing robust, scalable tests and easily integrate with third-party applications including cloud services (BrowserStack, Applitools, Sauce Labs), Docker, Jenkins, Bamboo, GitHub, and many more.
It helps in designing automation tests for web applications and native mobile applications in just a few lines of code, making it very popular among developers and testers. It runs on WebDriver protocol to support cross-browser testing, and Chrome DevTools protocol to support Chromium-based automation.
It can automate web applications designed with modern frameworks (Angular, React, Vue, HTML, JS, CSS, or more), native or hybrid mobile applications, and native desktop applications (designed with Electron.js). It supports Page Object Model, variety of selectors, helper functions, auto-waiting mechanism, customizable test suites, and multiple reporters like Junit, Allure, Spec, HTML, Video, JSON.
Refer to the official documentation of WebDriverIO from https://webdriver.io/docs/gettingstarted.
Cucumber
Cucumber is a Behavioral Driven Development (BDD) tool that allows one to write the scenarios from the user’s perspective. It is written in plain English language, which makes it easy to interpret and understand for all the stakeholders like product owners, domain experts, business analysts, developers, testers, and end-users. The users can write acceptance test scenarios to describe the behavior of the application. Cucumber utilizes the Gherkin keywords like Feature, Background, Scenario, Given, When, Then, and many more to write the test scenarios. It also maps the gherkin steps of the test scenarios to the actual test code, which can be generated in different languages supported by Cucumber like Java, Python, JavaScript, and many more.
Use Case
An automation team in a project is using the WebDriverIO framework and its plugins to design powerful and robust automation tests and perform end-to-end testing of the web application. The client has requested the project team to test the application from the user’s perspective by implementing BDD. The team has decided to use Cucumber as the BDD framework and write acceptance test scenarios in plain English language using Gherkin keywords. These scenarios must be mapped to the automation test code.
The project team must look forward to designing a framework that can integrate Cucumber BDD scenarios with the WebDriverIO test automation code, execute on multiple browsers, and generate interactive test reports. This will enable the team to achieve automated testing of the application from the user’s perspective.
Let’s have a look at implementing the integration of WebDriverIO with Cucumber: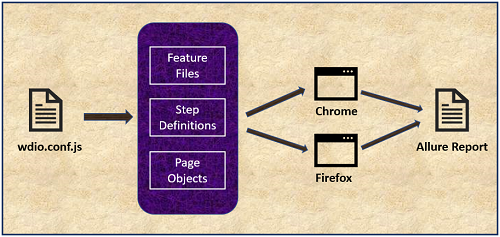
The above diagram indicates the model to integrate Cucumber with WebDriverIO. It mainly focuses on feature files, step definitions classes, page object classes, and wdio.conf.js file.
Feature Files |
Stakeholders/Users can write the acceptance test scenarios and business flow in plain English using Gherkin keywords. One feature file can have more than one scenario. |
Step Definitions |
Each step in the feature file scenario is converted into a method. These methods behave as step definitions and are updated with relevant automation test code using WebDriverIO. |
Page Objects |
Page Object Model design pattern is used to create page objects and increase reusability, avoid code duplication, improve readability, and easy code maintenance. These page objects files contain the selector of all the UI elements on the application page. This helps in keeping element selectors separate from the test code. |
wdio.conf.js |
This is the WebDriverIO TestRunner configuration file. This file controls the complete execution of the project and is customizable as per the requirements. We can configure local/remote runner, feature files to run, browser capabilities, log level settings, timeout settings, test runner services, supported frameworks (Mocha, Jasmine, Cucumber), reporters, cucumber options, before and after hooks. |
Cross-browser testing |
The test automation framework can be executed on multiple browsers like Chrome, Firefox, Internet Explorer, and Edge. |
Allure Report |
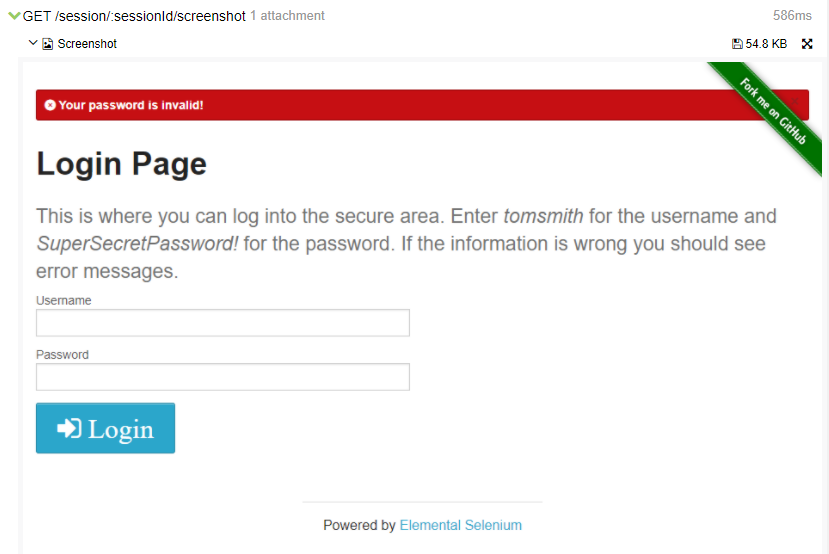
An interactive test report can be generated using Allure Reporter. The framework can also be configured to take page screenshots on test failure and attach them to the test report. |
Pre-Requisites:
- Download and install Node.js from https://nodejs.org/en/download/.
- Download and install VSCode (Visual Studio Code) from https://code.visualstudio.com/.
- The application under test: https://the-internet.herokuapp.com/login.
Detailed Steps to Integrate Cucumber With WebDriverIO
1. Launch VSCode IDE and install the necessary extensions, as stated below:
- VSCode Great Icons: To view beautiful and distinctive icons for files in VSCode projects
- Navigate to Extensions, search, and install 'VSCode Great Icons.'
- Use CTRL + SHIFT + P to open the command palette, type 'Preferences: File Icon Theme' and select 'VSCode Great Icons' from the list.
- Cucumber Language Support: To enable syntax auto-completion in feature file and step definition, formatting, code snippets, syntax highlight, and easy maintenance of cucumber files
- Search and install 'Cucumber (Gherkin) Full Support.'
- Search and install 'Snippets and Syntax Highlight for Gherkin (Cucumber).'
2. Create a new project folder with the name: WebDriverIO_Cucumber_Project at any desired location in the machine (Ex. C:\MyProjects).
3. Open the project folder in VSCode IDE.
4. Open a new terminal in VSCode and execute the command: npm init -y to create a basic structure of the package.json file.
5. Observe the package.json created inside the project folder:
xxxxxxxxxx
{
"name": "WebDriverIO_Cucumber_Project",
"version": "1.0.0",
"description": "",
"main": "index.js",
"scripts": {
"test": "echo \"Error: no test specified\" && exit 1"
},
"keywords": [],
"author": "",
"license": "ISC"
}
6. Execute the command: npm i --save-dev @wdio/cli to install WebDriverIO command-line client.
7. Observe the node_modules folder created inside the project folder. This folder contains all the necessary libraries.
8. Execute the command: npx wdio config to create and customize the wdio.conf.js file in the project.
9. Answer the prompted questions as stated below:
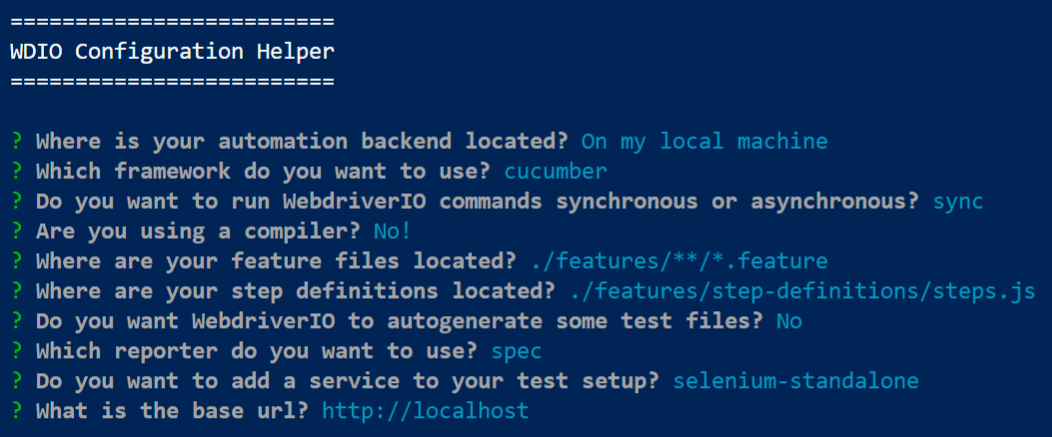
Where is your automation backend located? |
On my local machine |
We will be executing the test on the local machine. |
Which framework do you want to use? |
Cucumber |
Cucumber configuration settings will be added to wdio.conf.js. |
Do you want to run WebDriverIO commands synchronous or asynchronous? |
Sync |
We can choose the synchronous or asynchronous mode to run WebDriverIO commands. |
Are you using a compiler? |
No! |
The compiler is required if the test is written using next-generation JavaScript features. |
Where are your feature files located? |
(./features/**/*.feature) |
Location of feature file in the project folder. |
Where are your step definitions located? |
(./features/step-definitions/steps.js) |
Location of step definition in the project folder. |
Do you want WebDriverIO to autogenerate some test files? |
N |
We are creating an empty project. Mark it Yes to generate sample feature file and step definitions. |
Which reporter do you want to use? |
Spec |
Spec is a default reporter that shows the results in the terminal. |
Do you want to add a service to your test setup? |
selenium-standalone |
It supports execution on different browsers like chrome, firefox, internet explorer, and edge. Drivers are not required explicitly. |
What is the base URL? |
(http://localhost) |
Default URL to open, on project execution. |
These configuration settings can be modified later in the wdio.conf.js file if needed.
10. Observe the package.json inside the project folder:
x
{
"name": "WebDriverIO_Cucumber_Project",
"version": "1.0.0",
"description": "",
"main": "index.js",
"scripts": {
"test": "echo \"Error: no test specified\" && exit 1"
},
"keywords": [],
"author": "",
"license": "ISC",
"devDependencies": {
"@wdio/cli": "^7.1.0",
"@wdio/cucumber-framework": "^7.0.7",
"@wdio/local-runner": "^7.1.0",
"@wdio/selenium-standalone-service": "^7.0.7",
"@wdio/spec-reporter": "^7.0.7",
"@wdio/sync": "^7.1.0"
}
}
11. Observe the wdio.conf.js created inside the project folder. Cucumber options can be modified by changing the settings in the 'CucumberOpts.'
Create a Cucumber Feature File and Write the Test Scenarios Using Gherkin Keywords
12. In the project folder, create a new folder with the name: features.
13. Inside the features folder, create a new file with the name: login.feature.
14. Below is the code for the feature file:
xxxxxxxxxx
Feature: To test the login functionality in "The Internet Herokuapp"
Background:
Given the user is on login page
Scenario: The one where user logs in using valid credentials
When the user enters username as "tomsmith" and password as "SuperSecretPassword!"
And clicks on login button
Then the user must navigate to secure area page displaying a message "You logged into a secure area!"
Scenario Outline: The one where user logs in using invalid credentials
When the user enters username as "<username>" and password as "<password>"
And clicks on login button
Then the user must remain on login page displaying a message "<errorMessage>"
Examples:
| username | password | errorMessage |
| james | SuperSecretPassword! | Invalid username! |
| tomsmith | SuperPassword! | Invalid password! |
The above code in the feature file represents the valid and invalid login scenarios with validation of success and error messages.
Create Cucumber Step Definitions
15. Execute the command './node_modules/.bin/cucumber-js.cmd' to run the cucumber feature file scenarios and generate the step definition methods
16. Inside the features folder create a new folder with the name: step-definitions.
17. Inside the step-definitions folder, create a new file with the name: steps.js.
18. Add the below line of code in the steps.js file:
xxxxxxxxxx
const { Given, When, Then } = require('@cucumber/cucumber');
19. Copy the generated step definition methods and paste them into the steps.js file. Make sure not to copy the duplicate step definition methods
20. Rename the variables appropriately to make the code more understandable
21. Below is the code for the step definition file:
xxxxxxxxxx
const { Given, When, Then } = require('@cucumber/cucumber');
Given('the user is on login page', function () {
});
When('the user enters username as {string} and password as {string}', function (username, password) {
});
When('clicks on login button', function () {
});
Then('the user must navigate to secure area page displaying a message {string}', function (successMessage) {
});
Then('the user must remain on login page displaying a message {string}', function (errorMessage) {
});
The above code in the step definition file represents the methods generated for each scenario step in the feature file. Cucumber Expressions are used to handle similar steps smartly.
Create Page Objects and Specify the Selectors for UI Elements
22. Inside the features folder create a new folder with the name: pages.
23. Inside the pages folder, create three new files with names: base.page.js, login.page.js, secure.page.js.
base.page.js |
Parent class BasePage, which contains the common functionalities, that can be inherited by child classes |
login.page.js |
Child class LoginPage, which contains the selectors of Login page UI elements required for automation |
secure.page.js |
Child class SecurePage, which contains the selectors of Secure page UI elements required for automation |
24. Below is the code for the BasePage class:
/*
Create and export a module with class "BasePage". This class contains a function.
This class behaves as a Parent class, which contains the common functionalities, that can be inherited by child classes.
This module can be imported and called from the child classes.
*/
module.exports = class BasePage {
open (path) {
browser.url(path);
}
}
25. Below is the code for the LoginPage class:
xxxxxxxxxx
/*
Create and export a module with class "LoginPage".
This class behaves as a Child class, which contains the selectors of Login page UI elements required for the test automation scenarios.
This module can be imported and called from Step Definitions to access the UI elements.
*/
const BasePage = require('./base.page')
class LoginPage extends BasePage {
get userNameTextBox () { return $('#username') }
get passwordTextBox () { return $('#password') }
get loginButton () { return $('button[type="submit"]') }
get loginPageElement () { return $('div[class="example"] h2') }
get messageElement () { return $('#flash') }
open() {
super.open('https://the-internet.herokuapp.com/login')
}
}
module.exports = new LoginPage();
26. Below is the code for the SecurePage class:
xxxxxxxxxx
/*
Create and export a module with class "SecurePage".
This class behaves as a Child class, which contains the selectors of Secure page UI elements required for the test automation scenarios.
This module can be imported and called from Step Definitions to access the UI elements.
*/
const BasePage = require('./base.page')
class SecurePage extends BasePage {
get secureAreaElement () { return $('div[class="example"] h2') }
get messageElement () { return $('#flash') }
}
module.exports = new SecurePage();
Modify the Existing steps.js File and Write the Automation Code Using WebDriverIO Library Commands and Page Object Classes
27. Interact with Page Object classes and methods and write the WebDriverIO commands in the step definition methods to perform the test automation. Use expect() to perform the necessary validations.
28. Below is the code for the step definition file:
xxxxxxxxxx
/*
Import classes from newly created page object files.
Import the required keywords from Cucumber.
Use Page Object classes and methods to interact with the UI elements.
Use WebDriverIO commands to perform action the UI elements.
Use expect() to perform the necessary validations.
*/
const { Given, When, Then } = require('@cucumber/cucumber');
const LoginPage = require('../pages/login.page');
const SecurePage = require('../pages/secure.page');
Given('the user is on login page', function () {
LoginPage.open();
expect(browser).toHaveTitle('The Internet');
});
When('the user enters username as {string} and password as {string}', function (username, password) {
LoginPage.userNameTextBox.setValue(username);
LoginPage.passwordTextBox.setValue(password);
});
When('clicks on login button', function () {
LoginPage.loginButton.click();
});
Then('the user must navigate to secure area page displaying a message {string}', function (successMessage) {
expect(SecurePage.secureAreaElement).toExist();
expect(SecurePage.secureAreaElement).toHaveTextContaining('Secure Area');
expect(SecurePage.messageElement).toExist();
expect(SecurePage.messageElement).toHaveTextContaining(successMessage);
});
Then('the user must remain on login page displaying a message {string}', function (errorMessage) {
expect(LoginPage.loginPageElement).toExist();
expect(LoginPage.loginPageElement).toHaveTextContaining('Login Page');
expect(LoginPage.messageElement).toExist();
expect(LoginPage.messageElement).toHaveTextContaining(errorMessage);
});
The above code in the step definition file represents the interaction of elements with WebDriverIO commands to perform automation.
Configure the Project to Execute Test on Multiple Browsers (Chrome, Firefox)
29. Open the wdio.conf.js file and search for 'capabilities.'
30. By default, notice the Chrome browser is configured in the capabilities, allowing the test to run only on the Chrome browser.
31. We can add the capabilities for the Firefox browser, to make the test run for Chrome and Firefox browsers.
32. Below is the updated code for capabilities in the wdio.conf.js file:
xxxxxxxxxx
capabilities: [{
// maxInstances can get overwritten per capability. So if you have an in-house Selenium
// grid with only 5 firefox instances available you can make sure that not more than
// 5 instances get started at a time.
maxInstances: 5,
//
browserName: 'chrome',
acceptInsecureCerts: true
// If outputDir is provided WebdriverIO can capture driver session logs
// it is possible to configure which logTypes to include/exclude.
// excludeDriverLogs: ['*'], // pass '*' to exclude all driver session logs
// excludeDriverLogs: ['bugreport', 'server'],
},
{
maxInstances: 5,
browserName: 'firefox',
acceptInsecureCerts: true
}],
The above code in the wdio.conf.js file represents the capabilities for chrome and firefox browsers.
Configure the Project to Take the Page Screenshot in Event of Test Failure
33. In the project folder, create a new folder with the name: reports.
34. Inside the reports folder create a new folder with the name: screenshots.
35. Open the wdio.conf.js file and search for 'afterStep: function' under the Hooks section.
36. Uncomment the function and write the code to take a screenshot and save it in the reports/screenshots folder with a timestamp.
37. Below is the code for the afterStep function in the wdio.conf.js file:
xxxxxxxxxx
afterStep: function (step, context, { error, result, duration, passed, retries }) {
if(error) {
browser.saveScreenshot('./reports/screenshots/Fail_' +
moment().format('DD-MMM-YYYY-HH-MM-SS') + '.png')
}
},
The above code in the afterStep function will take a screenshot after every cucumber step, in event of step failure.
38. Add the below line of code in the wdio.conf.js file as a first-line to import the 'moment' library:
xxxxxxxxxx
const moment= require('moment');
Generate the Allure report
39. We want to generate interactive HTML reports, which can provide detailed information about the test execution, status, and display screenshots. We must use allure-reporter to generate the allure report.
40. Execute the command: npm install @wdio/allure-reporter --save-dev to install the allure-reporter.
41. Execute the command: npm install -g allure-commandline --save-dev to install Allure Commandline, which is used to generate allure reports from the test results.
42. Open the wdio.conf.js file and search for 'reporters.'
43. Update the reporters to 'allure' and specify the output directory for storing the allure results.
44. On test execution, allure results will be generated. These allure results contain all the test results and their associated details. These results will be used to generate the allure report.
45. Below is the code for reporters in the wdio.conf.js file:
xxxxxxxxxx
reporters: [['allure', {
outputDir: './reports/allure-results'
}]],
The above code will use an allure reporter to generate and save the allure results in the specified path.
46. Below is the project structure: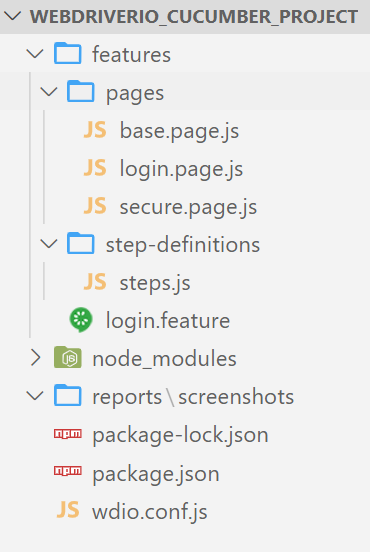
Execution of WebDriverIO_Cucumber_Project
47. Execute the command: npx wdio run ./wdio.conf.js to run the project.
48. Observe the test automation in real-time across Chrome and Firefox browsers and view the test results in the terminal window.
49. Observe the 'allure-results' folder created inside reports. This folder contains all the files associated with the test results.
50. Observe the 'screenshots' folder with the page screenshots for the failure scenario steps.
51. To generate the allure report, execute the command: allure generate reports/allure-results/.
52. Observe the 'allure-report' folder created inside the project. This folder contains the allure report and associated files.
53. Execute the command: allure open to view the allure report in a browser.
54. Below is the final project structure: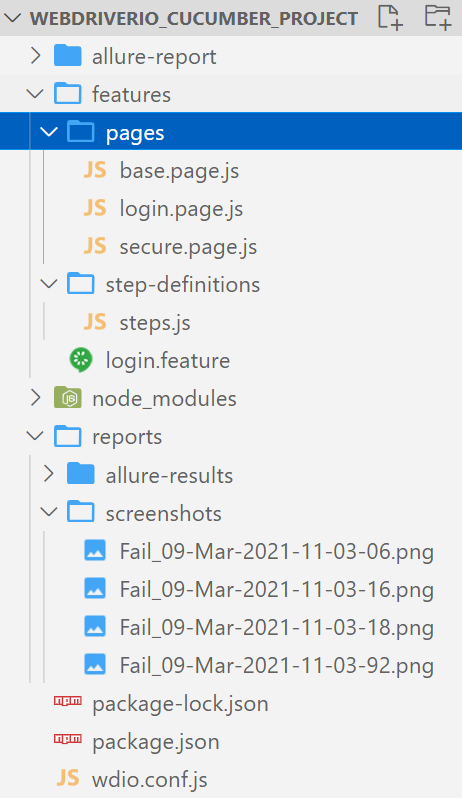
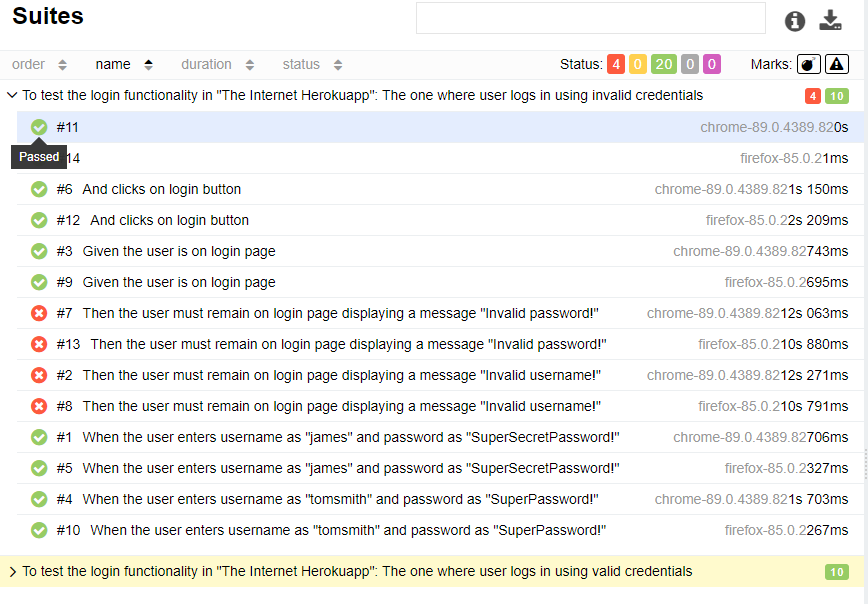
55. Below is the generated allure report: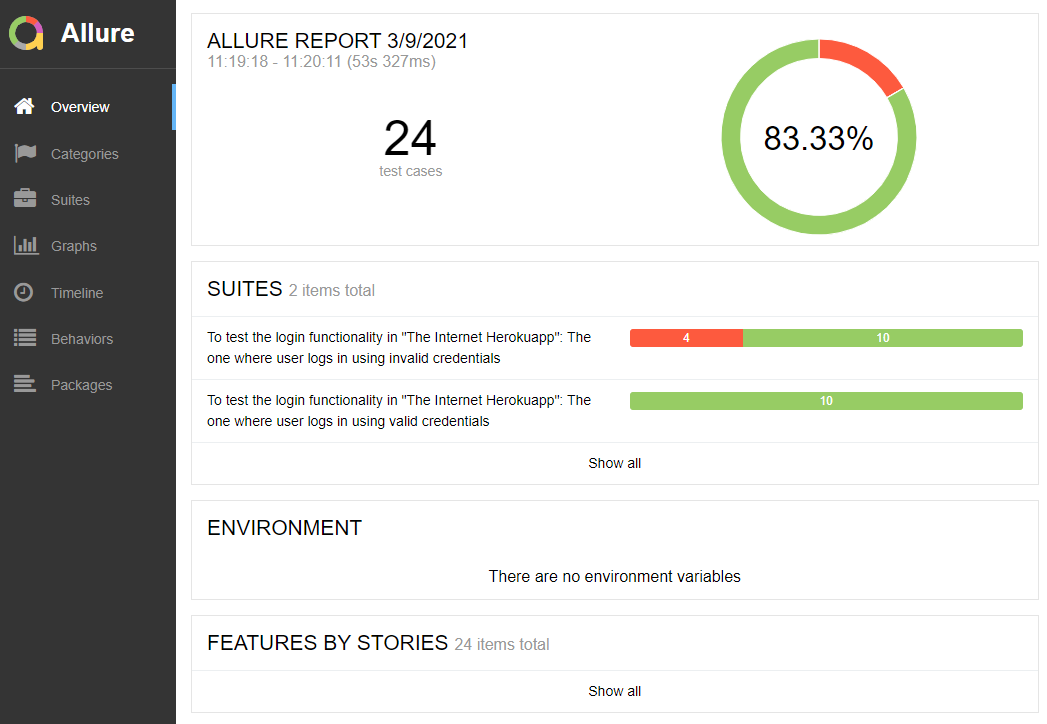
Opinions expressed by DZone contributors are their own.

Comments