Getting Started With WebdriverIO Typescript Jasmine
This WebdriverIO tutorial helps you set up the WebdriverIO Typescript Project using Jasmine and the Page Object Model. Learn how to Install and Configure!
Join the DZone community and get the full member experience.
Join For FreeWhat is WebdriverIO?
WebdriverIO is a progressive automation framework built to automate modern web and mobile applications. It simplifies the interaction with your app and provides a set of plugins that help you create a scalable, robust, and flakiness test suite. WebdriverIO is built on top of Selenium NodeJS bindings.
Webdriver IO is Open Source Framework managed by OpenJS foundation and follows W3 framework architectural standards
In Comparison with Selenium, WebdriverIO is better as it provides you a readymade framework with easy setup and configuration.
What Are the Key Features of Webdriverio?
Let's discuss the advantages of using WebdriverIO in Test Automation.
Extendable: Adding helper functions, or more complicated sets and combinations of existing commands is simple and really useful.
Cross Browser Testing: WebdriverIO supports almost all different types of browsers including Safari, Chrome, Edge, Firefox, etc.
Cross-Platform Support: WebdriverIO is NodeJS based automation framework it supports all major Operating Systems including Mac and Windows. So, you can run your tests on different platforms and ensure your application is working as expected.
Native Mobile Application Support: WebdriverIO not only supports Web Applications but also supports Mobile applications so you can test all mobile applications by configuring accordingly.
Easy Set up: Setting up WebdriverIO is super easy; it’s just some package installation and then configuring the config file. We are going to show that in this tutorial.
Assertion Library Support: WebdriverIO supports major assertion libraries like Jasmine, Mocha, etc. This helps you to write your automation framework seamlessly.
Community Support: Community support for this WebriverIO is great; there are tons of articles and knowledge base available over the internet so that you can learn and enhance your own framework.
This Detailed tutorial explains the following:
- How to set up WebdriverIO Page object model project from Scratch using Typescript and Jasmine.
- How to Install WebdriverIO aka WDIO CLI in your project.
- How to Configure Typescript in WebdriverIO.
- How to Configure wdio.conf.ts in WebdriverIO Project.
- How to Create first Page Object File in WebdriverIO and Typescript.
- How to Create the First Test in WebdriverIO.
- How to Execute WebdriverIO (WDIO).
- How to View the Results in WebdriverIO CLI.
How to Set Up Webdriverio Typescript Framework From Scratch
In this detailed tutorial, we are going to explain how to set up the WebdriverIO (WDIO) Test Automation Project using Typescript and Jasmine with Page Object Model in an easy way.
Pre-Requisites:
Step 1: Creating a New Folder (Ex: WebdriverIOTypScript)
Navigate to any of your drives. Create a fresh new folder (Ex: WebdriverIOTypescript).
Step 2: Creating a Package.json for Your WebdriverIO Project
Create a pacakge.json file.
In your newly created Project Folder, open the command prompt and type:
npm init
The above command asks you a set of pre-defined questions. Just hit [Enter] [Enter] unless you wish to specify. Once everything is done, this will create pacakge.json a file in your Project Folder.

Step 3: Opening the Project Folder in Visual Studio Code IDE
In Visual Studio Code, click File > Open > Choose Newly Created Project Folder > Click on Select Folder.

Step 4: Installing the WebdriverIO Command Line Interface, Also Known as WDIO CLI
We have opened our project folder in Visual Studio Code IDE, so let's start with the installation WebdriverIO. In order to install webdriverIO, we need to use npm pacakge @wdio/cli.
In your Visual Studio Code, Open Terminal.
Navigate to Terminal menu >Click on New Terminal.
Enter the below command to install Webdriverio on your machine:
npm install - save-dev @wdio/cli
Wait for the Installation to finish!

Step 5: Setting Up the WebdriverIO for Your End to End Test Automation Project
Once WeddriverIO is installed, we need to do the first-time setup of WDIO using the wdio config command.
From your Visual Studio Code Terminal, enter the below command:
npx wdio configThe command-line prompts for a set of Options Answer them like the below:
- Where is your automation backend located? On my local machine.
- Which framework do you want to use? Jasmine.
- Do you want to use a compiler? TypeScript (https://www.typescriptlang.org/).
- Where are your test specs located? ./test/specs/**/*.ts
- Do you want WebdriverIO to autogenerate some test files? No.
- Which reporter do you want to use? spec
- Do you want to add a service to your test setup? Chrome driver.
- What is the base URL? http://localhost

If you look at the above point, we are installing WebdriverIO for our Test Automation project, Which uses Typescript, Jasmine
Once the above steps are complete, It will create a default configuration for you
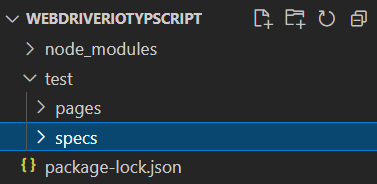
Step 6: Creating the Directory Structure for the WebdriverIO Typescript Project
We are creating WebdriverIO, a Typescript project with a page object model, so we need to follow the correct folder structure as given below:
- Create a Folder with name test in your root Project Folder.
- Under the test folder, create two folders: pages and specs.
The folder structure should look like the below:
WebdriverIOTypescript
-test
--pages
--specs

Step 7: Installing the Typescript and ts-node npm Packages for the WebDriverIO Project
In your Visual Studio Code Terminal, type the below command to install Typescript and ts-node:
npm install typescript ts-node --save-dev
Note: These packages should have been installed already if you choose Typescript Option during webdriver set up time. Just ensure it is installed correctly.
Step 8: Creating the tsconfig.json File for the WebdriverIO Project
Open Visual Studio Code Terminal, and type the below command:
npx tsc --initThe above will create a tsconfig.json file in your Project Root Directory.


Step 9: Configuring the tsconfig.json File in the WebdriverIO Project
Remove the default generated code, and replace it with the below code in tsconfig.json:
{
  "compilerOptions": {
    "target": "es2019",
    "types": [
      "node",
      "webdriverio/sync",
      "@wdio/jasmine-framework"
    ]
  },
  "include": [
    "./test/**/*.ts",
  ]
}
Step 10: Configuring the wdio.conf.ts File
The wdio.conf.ts file already has a lot of self-generated code, so we might not need all of those. You can copy and paste the below code:
export const config: WebdriverIO.Config = {

 specs: [
        './test/**/*.ts'
    ],
 capabilities: [{
        browserName: 'chrome',
        maxInstances: 1,
    }],
    framework: 'Jasmine',
    jasmineOpts: {
        defaultTimeoutInterval: 120000,
    },
    autoCompileOpts: {
        autoCompile: true,
        // for all available options
        tsNodeOpts: {
            transpileOnly: true,
            project: 'tsconfig.json'
        },
    }
}
Step 11: Writing Your First Page-Object File for the WebdriverIO Typescript Project
Let us try to create a Simple Google Search Test case.
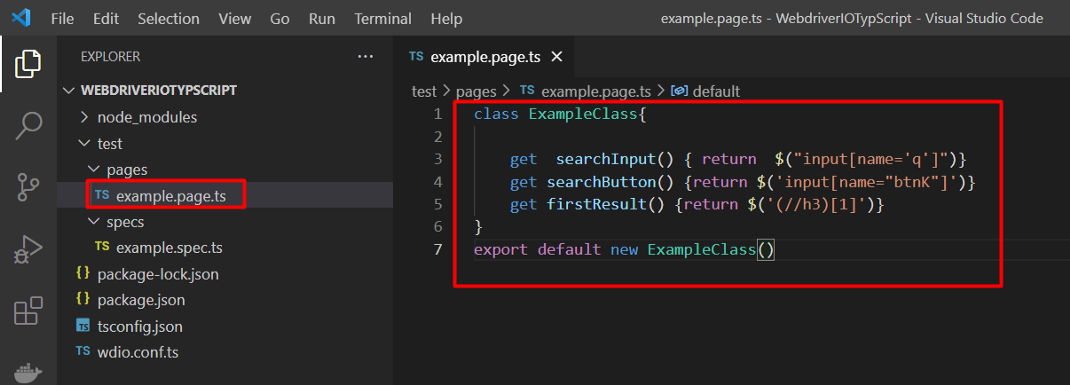
Navigate to the tests folder, open the pages folder, and create a new file called example.page.ts.
So, the location of example.page.ts is test/pages/example.page.ts.
Add the below code:
//example.page.ts
class ExampleClass{
    get  searchInput() { return  $("input[name='q']")}
    get searchButton() {return $('input[name="btnK"]')}
    get firstResult() {return $('(//h3)[1]')}
}
export default new ExampleClass()

Step 12: Writing Your First Spec File for the WebdriverIO Typescript Project
Navigate to tests/specs/ ,and create new file called example.spec.ts
Copy and paste the below code into example.spec.ts:
//example.spec.ts
import ExampleClass from "../pages/example.page"
describe('Google Search', () => {
  it('should search for sepcified text',async() => {
    await browser.url('https://www.google.com');
    await (await ExampleClass.searchInput).setValue("Webdriver IO Search Example");
    await browser.keys('Enter')
    await expect(await((await ExampleClass.firstResult).getText())).toContain("WebdriverIO")
  });
});

Step 13: Executing the WDIO Typescript Tests
Once you have completed all the above tests, run your tests with the below command:
npx wdio run ./wdio.conf.ts
Step 14: WDIO Test Results in Console
Tests start executing, and you will see the results in the command line:

Issues You Might Face in Setting-Up WebdriverIO
Why is the Chrome Browser not launching in WebdriverIO?
This issue is mostly related to your configuration file, i.e wdio.conf.ts. Check your settings properly.
Why am I getting ".setText()? .click() is not a function in WebdriverIO?"
If you are using the async mode, usually you will get this; prefix your web element with await issue will be resolved.
Why is my WebdriverIO test not executing?
Sometimes there are a lot of Selenium Webdriver instances running, which might cause your tests to behave weirdly when you execute. You might have to restart the system or kill all the instances of the web drivers.
Frequently Asked Questions on WebdriverIO
- Is WebdriverIO "selenium Based"?
Yes, WebdriverIO uses Selenium NodeJS Bindings Internally.
- Does "WebdriverIO Support Native Mobile Apps"?
Yes, WDIO Supports Native Mobile Apps.
- What are the "supported Selectors in WebdriverIO"?
WebdriverIO supports all major selectors including CSS selectors and Xpath.
- What are the "WebdriverIO Supported Browsers"?
WebdriverIO supports all major browsers:
- Chrome – ChromeDriver
- Firefox – Geckodriver
- Microsoft Edge – Edge Driver
- Internet Explorer – InternetExplorerDriver
- Safari – SafariDriver
- Can I Configure Webdriver Project to CI/CD tools like Jenkins, Azure DevOps, etc?
Yes, WebdriverIO Project can be configured to CI/CD tools.
- What are the "frameworks or assertion libraries WebdriverIO supports"?
WebdriverIO Currently supports Mocha, Jasmine, and Cucumber assertion libraries or frameworks.
- Does "WebdriverIO support Run Tests in Parallel"?
Yes, WebdriverIO Supports Parallel Test Runs. You just need to configure your wdio.conf file for that.
- How do I "run a single spec or test file in WebdriverIO"?
You can use the below command to run your single spec or tests in webdriverIO:
npx wdio run ./wdio.conf.js --spec test/specs/example.e2e.js
- How do I take "screenshots on WebdriverIO"?
WebdriverIO provides screenshot capability. View this detailed article on how to take screenshots in webdriverIO.
Encourage me to write more articles by buying a coffee for me.
If you are looking for any help, support, guidance contact me on LinkedIn|https://www.linkedin.com/in/ganeshsirsi
Opinions expressed by DZone contributors are their own.


Comments