Using Jakarta EE/MicroProfile to Connect to Apache Kafka: Part 1 — Hello World
Learn how to securely integrate Apache Kafka with Eclipse MicroProfile.
Join the DZone community and get the full member experience.
Join For FreeApache Kafka is a community-distributed streaming platform that has three key capabilities: publish and subscribe to streams of records, store streams of records in a fault-tolerant durable way, and then process streams as they occur. Apache Kafka has several success cases in the Java world. This post will cover how to benefit from this powerful tool in the Jakarta EE/MicroProfile universe.
Apache Kafka Core Concepts
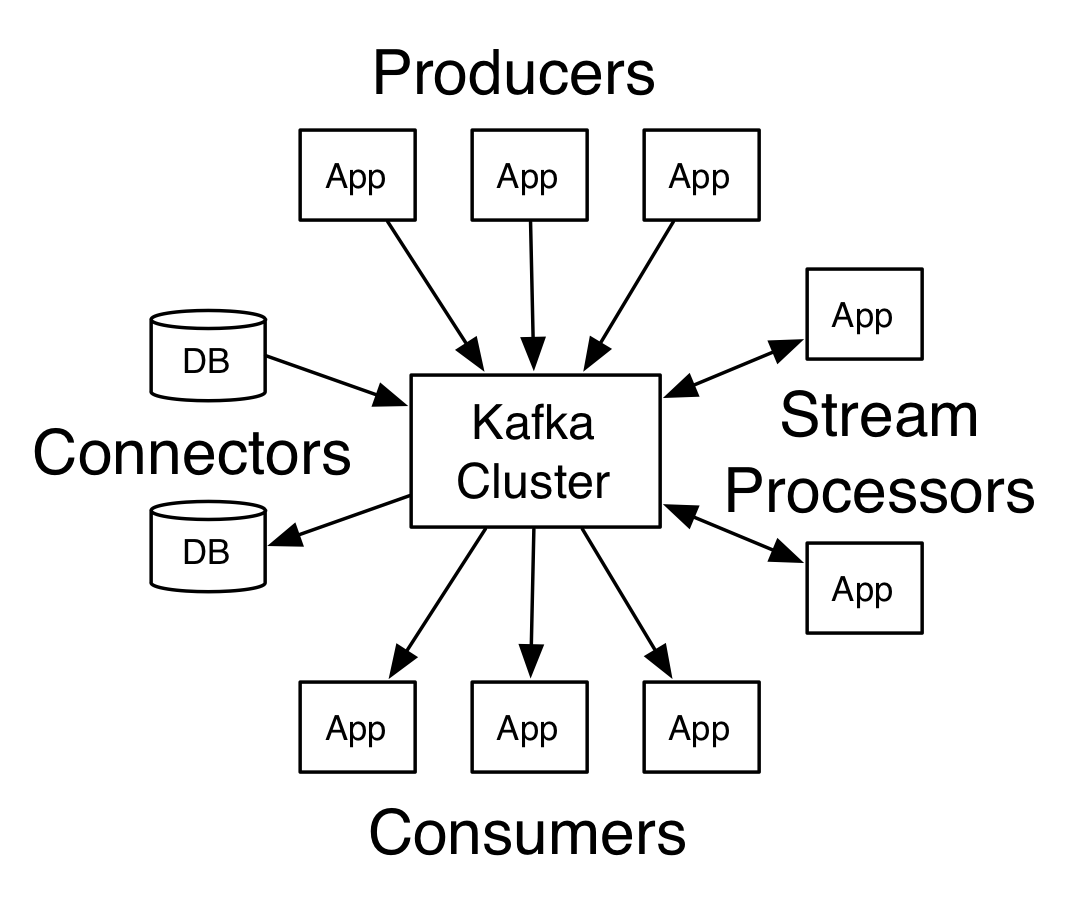
Kafka is run as a cluster on one or more servers that can span multiple data centers; Kafka cluster stores a stream of records in categories called topics, and each record consists of a key, a value, and a timestamp.
From the documentation, Kafka has four core APIs:
The Producer API allows an application to publish a stream of records to one or more Kafka topics.
The Consumer API allows an application to subscribe to one or more topics and process the stream of records produced to them.
The Streams API allows an application to act as a stream processor, consuming an input stream from one or more topics and producing an output stream to one or more output topics, effectively transforming the input streams to output streams.
The Connector API allows building and running reusable producers or consumers that connect Kafka topics to existing applications or data systems.

Install Apache Kafka
The official documentation has a nice getting started with Apache Kafka post that teaches you how to install it with Zookeeper. Briefly, Kafka uses Zookeeper to Cluster membership, topic configuration, and so on.
Download the 2.1.0 release and un-tar it.
tar -xzf kafka_2.11-2.1.0.tgz
cd kafka_2.11-2.1.0
First, start a Zookeeper instance
bin/zookeeper-server-start.sh config/zookeeper.propertiesAnd finally, start with Apache Kafka:
bin/kafka-server-start.sh config/server.propertiesUsing Docker

There is also the possibility of using Docker. As it requires two images, one to Zookeeper and one to Apache Kafka, this tutorial will use docker-compose. Follow these instructions:
Create a docker-compose.yml and set it with the configuration below:
version:  '3.2'

services:

  zookeeper:
    image: "confluent/zookeeper"
    networks:
      - microprofile
    ports:
      - 2181:2181

  kafka:
    image: "confluent/kafka"
    networks:
      - microprofile
    ports:
      - 9092:9092
    environment:
      - KAFKA_ADVERTISED_HOST_NAME=kafka
      - KAFKA_ZOOKEEPER_CONNECT=zookeeper:2181
      - KAFKA_ADVERTISED_PORT=9092
    depends_on:
      - zookeeper

networks:
    microprofile:
Then, run the command:
docker-compose -f docker-compose.yml up -dTo connect as localhost, also define Kafka as the localhost within Linux, append the value below at the /etc/hosts:
127.0.0.1 localhost kafkaApplication With Eclipse MicroProfile
The Eclipse MicroProfile is an open-source project whose goal is to define a microservices application platform that is portable across multiple runtimes. Eclipse MicroProfile has several plans to make it easier to create enterprise applications at the Microservices and cloud age. To connect with Apache Kafka, there is the Eclipse MicroProfile Reactive that has the Reactive Message.
The sample code will smoothly create a sender and receiver message from Apache Kafka using CDI 2.0 and Java SE; this project will use the Maven structure. Therefore, the first step of this demo is to define the dependencies. The project needs a MicroProfile configuration implementation, CDI 2.0 implementation, and MicroProfile reactive dependencies.
    <properties>
        <project.build.sourceEncoding>UTF-8</project.build.sourceEncoding>
        <maven.compiler.source>1.8</maven.compiler.source>
        <maven.compiler.target>1.8</maven.compiler.target>
        <weld-core.version>3.1.0.Final</weld-core.version>
        <slf4j-api.version>1.7.26</slf4j-api.version>
    </properties>

    <dependencies>
        <dependency>
            <groupId>org.slf4j</groupId>
            <artifactId>slf4j-simple</artifactId>
            <version>${slf4j-api.version}</version>
            <scope>compile</scope>
        </dependency>
        <dependency>
            <groupId>io.smallrye</groupId>
            <artifactId>smallrye-config</artifactId>
            <version>1.3.5</version>
        </dependency>

        <dependency>
            <groupId>io.smallrye.reactive</groupId>
            <artifactId>smallrye-reactive-messaging-provider</artifactId>
            <version>0.0.4</version>
        </dependency>
        <dependency>
            <groupId>io.smallrye.reactive</groupId>
            <artifactId>smallrye-reactive-messaging-kafka</artifactId>
            <version>0.0.4</version>
            <exclusions>
                <exclusion>
                    <!-- this avoid having the logging working, to exclude it -->
                    <groupId>org.slf4j</groupId>
                    <artifactId>slf4j-log4j12</artifactId>
                </exclusion>
            </exclusions>
        </dependency>
        <dependency>
            <groupId>io.smallrye.reactive</groupId>
            <artifactId>smallrye-reactive-streams-operators</artifactId>
            <version>0.4.1</version>
        </dependency>

        <dependency>
            <groupId>org.jboss.weld.se</groupId>
            <artifactId>weld-se-core</artifactId>
            <version>${weld-core.version}</version>
        </dependency>
        <dependency>
            <groupId>javax.enterprise</groupId>
            <artifactId>cdi-api</artifactId>
            <version>2.0.SP1</version>
        </dependency>

    </dependencies>
Then, the next step is to create the configuration files at src/main/resources/META-INF.
The first one is to enable the CDI, the bean.xml file.
<beans xmlns="http://xmlns.jcp.org/xml/ns/javaee"
       xmlns:xsi="http://www.w3.org/2001/XMLSchema-instance"
       xsi:schemaLocation="http://xmlns.jcp.org/xml/ns/javaee
http://xmlns.jcp.org/xml/ns/javaee/beans_1_1.xsd"
       bean-discovery-mode="all">
</beans>
The second and last one is microprofile-config.properties that has the setup configurations to Eclipse MicroProfile that connects to Apache Kafka, such as implementation to serialize/deserialize the records, which are composed of a key and the respective value.
# Kafka Sink
smallrye.messaging.sink.data.type=io.smallrye.reactive.messaging.kafka.Kafka
smallrye.messaging.sink.data.bootstrap.servers=localhost:9092
smallrye.messaging.sink.data.key.serializer=org.apache.kafka.common.serialization.StringSerializer
smallrye.messaging.sink.data.value.serializer=org.apache.kafka.common.serialization.StringSerializer
smallrye.messaging.sink.data.acks=1
## Kafka Source
smallrye.messaging.source.kafka.type=io.smallrye.reactive.messaging.kafka.Kafka
smallrye.messaging.source.kafka.bootstrap.servers=localhost:9092
smallrye.messaging.source.kafka.topic=kafka
smallrye.messaging.source.kafka.group.id=demo
smallrye.messaging.source.kafka.key.deserializer=org.apache.kafka.common.serialization.StringDeserializer
smallrye.messaging.source.kafka.value.deserializer=org.apache.kafka.common.serialization.StringDeserializer
Consequently, with all the configuration set up, the last step is to create the class that will send/receive messages from Apache Kafka. The API has fluent information; therefore, there are Incoming and Outgoing annotations. At the Sender class, there is a BlockingQueue, which just sends a message when there is a text in the queue.
@ApplicationScoped
public class Receiver {

    private static final Logger LOGGER = Logger.getLogger(Receiver.class.getName());

    @Incoming("kafka")
    public CompletionStage<Void> consume(KafkaMessage<String, String> message) {
        String payload = message.getPayload();
        String key = message.getKey();
        MessageHeaders headers = message.getHeaders();
        Integer partition = message.getPartition();
        Long timestamp = message.getTimestamp();
        LOGGER.info("received: " + payload + " from topic " + message.getTopic());
        return message.ack();
    }

}
@ApplicationScoped
public class Sender {
private static final Logger LOGGER = Logger.getLogger(Sender.class.getName());
private BlockingQueue<String> messages = new LinkedBlockingQueue<>();
public void add(String message) {
messages.add(message);
}
@Outgoing("data")
public CompletionStage<KafkaMessage<String, String>> send() {
return CompletableFuture.supplyAsync(() -> {
try {
String message = messages.take();
LOGGER.info("Sending message to kafka with the message: " + message);
return KafkaMessage.of("kafka", "key", message);
} catch (InterruptedException e) {
throw new RuntimeException(e);
}
});
}
}Finally, the last class is to start the CDI container, and then, send some message to the Kafka. Thus, you can see the result log.
public class App {
    public static void main(String[] args) {
        SeContainer container = SeContainerInitializer.newInstance().initialize();
        Sender sender = container.select(Sender.class).get();
        sender.add("Hello world");
        sender.add("Otávio");
        sender.add("Poliana");
        sender.add("Clement");
    }
}
To conclude, we see the potential of Apache Kafka and why this project became so accessible to Big-Data players. This is a simple example of how secure it is to integrate with Eclipse MicroProfile. A special thanks to Clement Escoffier because he helped me out at this sample code, which can also be found on GitHub.
Opinions expressed by DZone contributors are their own.

Comments