Tutorial: Git with Eclipse
If you aren't currently using a version control system or are exploring one, check out how to use Git with Eclipse using the EGit plugin.
Join the DZone community and get the full member experience.
Join For Free
EGit with Eclipse
VCS In a Nutshell
In a nutshell, a VCS is a database or a system which allows me to store and retrieve files. It keeps a history and I can go back in time to retrieve an earlier state or compare different states. It "versions" items or files in a kind of database. In most cases, such a database is used by multiple users or developers, and with this, the system is able to "merge" changes of different developers; it keeps an audit track and backup of all the changes. Not using a VCS for any medium or larger scale project especially with multiple developers collaborating sounds like suicide to me. If you never have used a version control system, you probably want to start using one. I have used different VCSs (CVS, SVN, Git), and while I still keep projects for historical reasons in CVS and SVN, I’m using Git for all my new stuff.
If a VCS or Git is new to you, I recommend you have a look at this tutorial video: https://git-scm.com/video/what-is-version-control
Git – Quick Start
The Git project has been started by the famous Linus Torvalds. It is a modern and distributed version control system. To install Git, follow the links and tutorial.
With Git there are several basic actions:
- add: adding files to the list of changes
- commit: enter the change into the (local) repository
- push: transfer the changes in the local repository to the remote one
- pull: get the changes from the remote repository
By default, there is always a local repository. A remote repository is needed to share something, e.g. on GitHub.
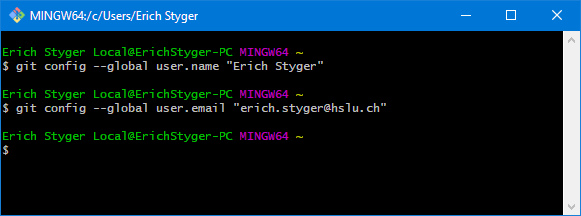
In the Git Bash shell, configure first your username and default email address:
git config --global user.name "John Doe"
git config --global user.email "john.doe@company.com"
Git configuration
That all that we need for configuration.
To create a new Git repository I use:
git init myGitRepowhich creates the repository with that name after the "init".
Next, I create a readme.txt in that folder created (I’m using nano below, you can use any text editor):
cd myGitRepo
nano readme.txt
To add that file to the repository I use:
git add readme.txtand then commit it to the repository with:
git commit -m"initial version of readme"
Added file to the repository
Instead of doing things on the command line, you are free to use graphical clients.
EGit Client for Eclipse
I’m always having a GUI client installed beside of the command line version and the Eclipse plugin. Each client has its pros and cons, and I’m using SourceTree which is free-of-charge. My model is:
- Using a GUI client like SourceTree for normal working with Git
- Using the command line version for more advanced things or for automation
- Using the Eclipse plugin for working with Eclipse projects
My preference for an Eclipse plugin is "EGit," for which I wrote an article how to install into CodeWarrior. Many Eclipse distributions already come with a Git client pre-installed, and the NXP MCUXpresso IDE comes with EGit, too.
Otherwise, use (or update) from the following Eclipse Update site (Help > Install New Software):
http://download.eclipse.org/egit/updatesGoing forward, I will show how to use Eclipse (NXP MCUXpresso IDE 10.2) with EGit.
Git Perspective and Repository Setup in Eclipse
In Eclipse I switch to the Git perspective:

Open Git Perspective
From the Git perspective, I can add an existing repository (e.g. the one I have created above with the shell):

Add existing repository
Then browse to the repository folder and add it:

Adding existing repo
Instead of using the shell, I can use it to create a new repository, too:

Create a new repository
Then it asks me for the repository folder name:

New Eclipse Git repository
and it adds it to the available repositories:

List of repos
Or I can clone from an existing repository, e.g. from GitHub. For this I use "clone":

Clone a Repository
For example, I can clone and use the McuOnEclipse repository on GitHub:
https://github.com/ErichStyger/mcuoneclipse.gitYou won’t have access rights to push to that repository on GitHub. If you want to make changes to a GitHub repository, clone it on GitHub to your own list of repository and use your repository URL.

Cloning McuOnEclipse
Press next and select the desired branch (if any).

Select branch
Then specify the (new/empty) directory name where to clone the repository:

Local Destination
Press Finish and it will download repository content which might take a while depending on the data in the repository.
Adding Projects to Repository
With the repository configured, I can add an existing project to a repository. Right-Click on the project and select Team > Share Project…

Sharing Project
Select the VCS to use:

Select VCS
Select the repository to use and press Finish:

Selected Repository
Ignore File
Git uses the file .gitignore to filter (hide) files or folders which should not end up in the repository.
Git stores the list of files and folders to be ignored into a file named .gitignore. By default, the Project Explorer view hides all files starting with a dot. To show them, use the "Filters and Customization" menu:

Filters and Customization
And then uncheck the *.resources setting:

Filters
With this I can edit the .gitignore file inside Eclipse:

Default .gitignore file
The file is processed from the top to the bottom, with # used to start a comment line.
As a general rule: ignore everything which is derived or generated as it would easily create conflicts in the repository.
For a list of things to be ignored for CodeWarrior and Processor Expert see here.
Update: It is recommended to ignore the .settings folder of the project (see discussions in the comments section of this article). The .settings folder contains XML files with local plugin settings and are specific to the user. So do not put that folder into the version control system.
For MCUXpresso IDE and SDK projects it is very simple: only the output folder with the generated make and object files needs to be ignored which is usually named "Debug" and/or "Release." As seen from the above .gitignore, Eclipse already added this to the list, so we are fine.
Commit
In the previous step I have added the project to the list of changes. But it is not yet stored in the repository. For this I need to do a commit. With the project added I have now many more actions available in the Team menu:

Extended Team Menu
With the "Commit…" menu item I get a Git Staging view:

Git Staging
The left upper area shows all the changes. I have to stage them into the lower left area using drag&drop or using the "+" and "++" icons in that toolbar and add a commit message:

Ready to commit
Then I can commit (make the change in the local repository and push later) or do a commit with a push to the remote repository.
I prefer to make smaller commits and then push them later. With a local (not shared) repository a push is not needed/possible as the push is to the remote repository.
Push, Pull and Compare
The push action is available in the Team menu:

Push
In the same menu, I find the pull actions (to get the changes from the repository).
To compare the changes, double-click on the file and it opens the Eclipse diff view:

Compare Changes
Import from Git
Another cool thing is that I can import projects from Git into my workspace. I use the Import item from the File menu:

Import
Then select import from Git:

Import Projects from Git
Select the repository source:

Select Repository Source
If you have cloned the McuOnEclipse repository, you can select that one or any of your repositories:

Select Git Repository
Then select the folder with the project(s) to import:

Select Project to Import
That way I can easily import projects from any repository.
As always with Eclipse, there are many ways to do one thing. Another way to import projects is from the Git Repositories view:

Importing Git Projects
More Features
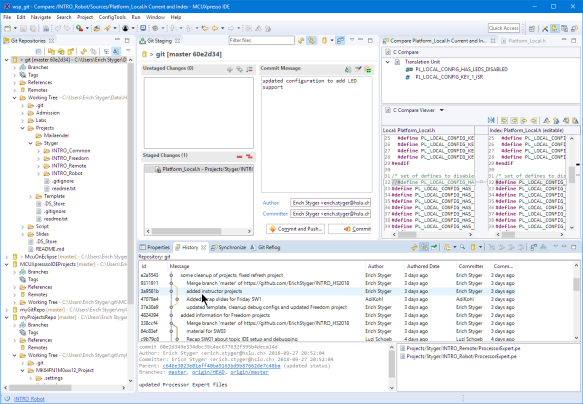
Be free to explore more of the EGit features in Eclipse. I recommend going through the Git perspective default views. For example, the History view:

Git History View

Git History
Summary
Eclipse with the EGit plugin makes it easy to work with the Git version control system. It takes a bit practice if not familiar with version control systems, but things are easy to learn and the internet is full of more tutorials and videos. Keep learning
Happy Gitting!
Published at DZone with permission of Erich Styger, DZone MVB. See the original article here.
Opinions expressed by DZone contributors are their own.

Comments