Transitioning From Postman to Insomnia
Insomnia usage guide for REST APIs, how to set up environments, authentication, variables, and use them dynamically with examples.
Join the DZone community and get the full member experience.
Join For FreeAs we move away from using Postman, many of us are transitioning to Insomnia for API testing. In this article, I will share how I’ve set up Insomnia to streamline my own workflow. While Insomnia offers a wide range of capabilities beyond HTTP requests, I focus on using it solely for exercising HTTP requests. I hope this provides a useful reference as you configure your own setups.
Just to clarify upfront, this isn't an installation guide. Getting Insomnia installed correctly can be a bit tricky, and I, too, have encountered some challenges during the installation and setup process.
Several versions of Insomnia are available, and I’ve opted for version 8.1, which I found to be stable. While I’ve also worked with earlier releases, some older versions had notable bugs. If you're encountering issues like being unable to filter or sort your collections or if the "smart" tags aren't functioning as expected, it may help to update to the latest stable version.
This guide presents a comprehensive approach to using Insomnia, going beyond the basics to explore advanced techniques. Whether you're a beginner looking to get started or an experienced user seeking to streamline your API workflows, this guide will provide the insights and tools needed to maximize your use of Insomnia.
What I Appreciate Most About Insomnia
- Smooth Startup: Unlike Postman, which often gets stuck with "cannot load" errors, Insomnia launches seamlessly every time.
- URL Preview and Copy: The ability to preview and easily copy URLs, especially when using variables, is incredibly helpful.
- Efficient Endpoint Search: Quickly filtering and searching for specific endpoints streamlines the workflow.
- Pinning Requests: The option to pin requests, though limited to the current folder, helps keep important tasks easily accessible.
- Flexible Sorting Options: A variety of sorting options in the endpoints panel make it easy to organize and find what I need.
Workspaces, Projects, and Collections
I use a single workspace — the default "Personal" workspace — but within that workspace, I manage multiple projects. Each project corresponds to a different EAI (Enterprise Application Integration). This setup works well when the hosts or availability zones for each EAI are distinct and unrelated. However, if your EAIs share common hosts or availability zones, consolidating them into a single project may be effective. Otherwise, I recommend creating a separate project for each EAI to maintain clarity and avoid potential conflicts.
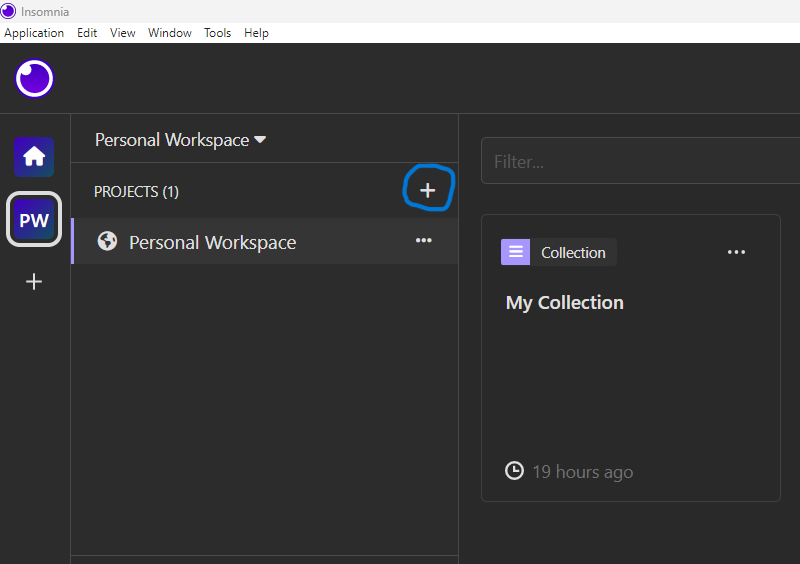
Each project includes (or will include) a collection tile (for your requests) as well as one or more "documentation" tiles. Testing and other automation processes are outlined within the documentation tile but are beyond the scope of this article. You can return to your projects at any time by clicking the “home” icon.
After creating a new project (highlighted in red above), you’ll have the option to create either a new collection or a new document. In most cases, you’ll likely want to choose “collection.”
Proxy Configuration
First things first: you will likely need to configure the proxy settings. To do this, navigate to the "Preferences" menu (found in the application menu or via the icon in the lower-left corner). Once there, go to the "General" tab, scroll down, and enter the following settings:

Now, we’re diving into the core of the matter. For most users, creating and managing requests is the primary function they want to perform in Insomnia.
For the remainder of this guide, I’ll be using an example service called “DairyProducts-API.” This service exposes several endpoints, including a variety of “actuator” endpoints, and it’s running across multiple environments in Pivotal Cloud Foundry (PCF) — specifically in the clwdev1 and clwprod1 spaces. These environments include Development, Release, Staging, and Production.
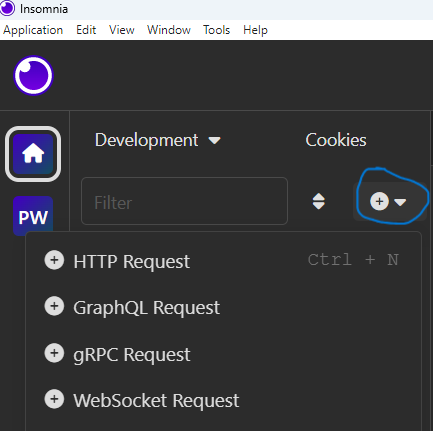
To begin working with your requests, locate the "filter" input field in the user interface. To the right of this field, click the + button. This will typically allow you to create either a new HTTP request or a folder to organize your requests.
Setting Up Requests for "actuator/info"
To monitor and track the Git commit details of each service instance running in different environments (Release, Staging, and Production), we’ll configure a set of requests for the actuator/info endpoint.
Steps to Set Up Requests
1. Create a New Request for Each Environment
For each environment (Release, Staging, Production), we'll create a separate request. This allows us to check the relevant commit information for each service instance running in those environments.
2. Rename Each Request
Rename the request according to the environment to which it corresponds. For example:
Release - Actuator InfoStaging - Actuator InfoProduction - Actuator Info
3. Specify the Correct URL for Each Environment
You’ll need to define the correct URL for the actuator/info endpoint for each environment. While these are technically “availability zones,” I’m using Insomnia terminology in this guide, where the environment-specific URLs will look something like:
https://release.example.com/actuator/infohttps://staging.example.com/actuator/infohttps://production.example.com/actuator/info
By setting up these environment-specific requests, you'll be able to easily check the latest Git commit details for each instance across the various environments.
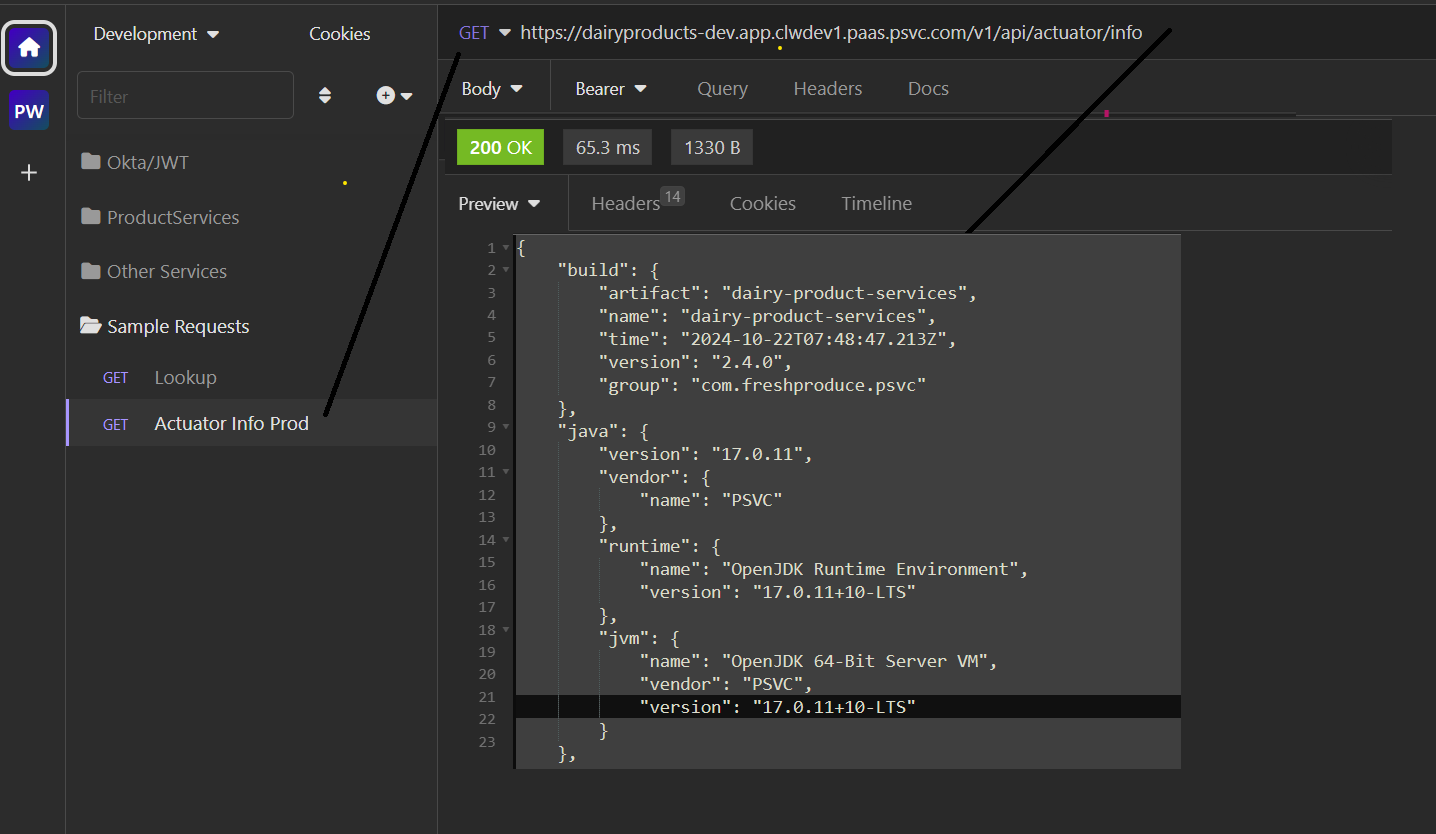
Note: This amounts to nine separate requests, each serving the same function but targeting nine different availability zones. And yes, I will be integrating a load balancer later on.
For now, however, with the actuator endpoints, the goal is to directly access specific availability zones rather than routing through the GSLB (Global Server Load Balancer) at this stage. The only distinction between each request lies in a segment of the URL.

Defining Sub-Environments for Each Availability Zone
To define a sub-environment for each availability zone and create a variable to use in the URL, follow these steps:
1. Access the "Manage Environments" Dialog
Press 'Control-E' (or click the gear icon, depending on your version) to open the dialog.
2. Create a Sub-Environment for Each Availability Zone
There are two types of environments: shared and private. The main difference is that private environments are not exported, but functionally, they are the same as shared ones when not exported.
For each sub-environment, create a JSON-formatted document with key-value associations.
3. Define the "az" Variable
Add a variable named az for each sub-environment, assigning it the appropriate value for the availability zone.
4. Finalize Your Changes
When you're done, click the Close button to save your settings. Pressing "Escape" will discard any unsaved changes.
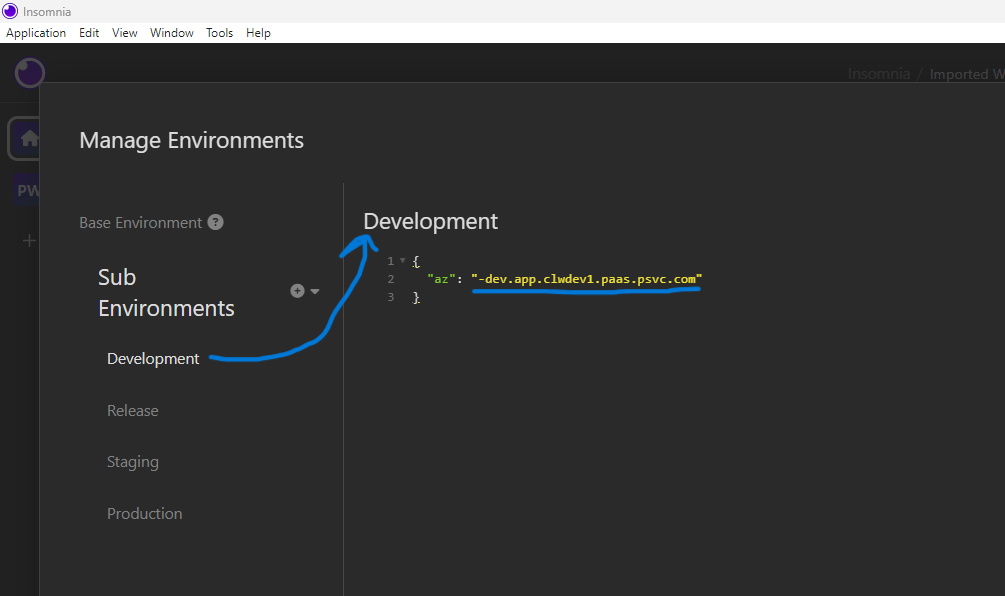
In my case, the value for each az variable is:
|
Release |
-rel.app.clwdev1.paas.psvc.com |
|
Staging |
-stage.app.clwprod1.paas.psvc.com |
|
Production |
-prod.app.clwprod1.paas.psvc.com |
Now, I’ll return to clean up my collection by eliminating duplicate entries. Please choose any of the (nearly) duplicate entries to begin.
- Navigate to the URL and place your cursor at the start of the “AZ” section. Specifically, it should be positioned between
productsand-rel. - Type a slash (just momentarily — this is useful for inserting a variable).
- Then, type
az(or press "CTRL + space") to trigger a pop-up, allowing you to select the appropriate value. -
Finally, remove the temporary slash you inserted earlier and delete everything from
-reltodairyproducts.com.
Your result should look like this:

And then this:
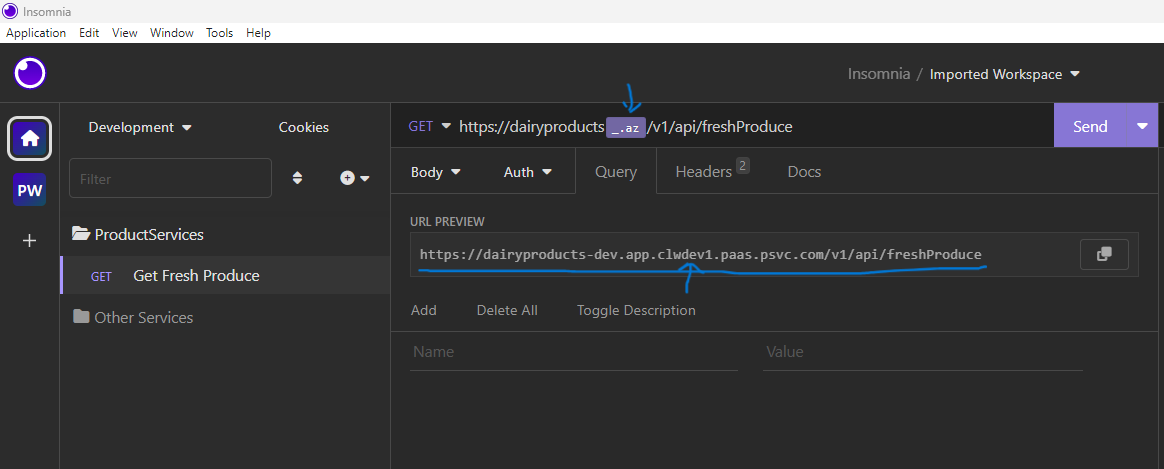
Click on the 'Query' tab to view the resulting URL after the variable has been expanded. In the upper-left corner, you can select your desired environment, and the URL preview will update accordingly.
Next, delete any duplicate requests and rename the remaining request so that the environment name is no longer reflected in the request title.

Okta JWT Security Tokens
At DairyProducts, we ensure our service endpoints are secured, with some exceptions for health-related endpoints, such as /health, /actuator/info, and /actuator/health. To enforce this security, we use Okta and JSON Web Tokens (JWT), pronounced "jot."
Okta is a third-party identity provider that issues (or "mints") tokens that are valid for a specified period, such as two hours. These tokens grant access to the respective services based on the environment in which they were issued.
JWT Domains
Okta issues JWTs for different environments, and the tokens are restricted by domains:
1. Development/Release (Dev/Rel) Tokens
These tokens can be used in both Development and Release environments but cannot be used in Staging or Production.
2. Staging Tokens
Tokens issued for Staging are restricted to Staging and cannot be used in Development, Release, or Production.
3. Production Tokens
Production tokens are exclusive to the Production environment.
This creates three distinct domains from a JWT perspective, ensuring that tokens are scoped appropriately for each environment.
Token Requests
To issue a JWT for each domain, we’ll need to create three separate requests. Each request requires the following four pieces of information:
- Issuer URL: The URL where the token is issued by Okta.
- Client ID: The unique identifier for your application in Okta.
- Client Secret: The secret key associated with your Client ID, used to authenticate your application.
- Scope: The scope defines the level of access granted by the token. For example, it might specify permissions related to reading or writing to certain services.
Example Folder Structure
I have organized my Okta JWT-related configurations and credentials inside a dedicated folder for easy management:
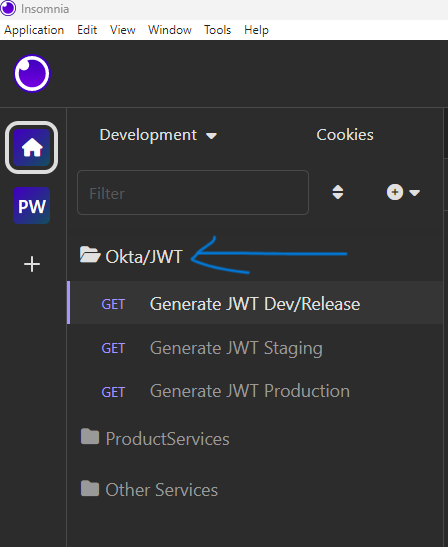
Okta/JWT/This folder contains the necessary configurations and secrets required to generate tokens for the different domains. When creating JWT requests, ensure that you have the right issuer URL, client ID, client secret, and scope for the specific environment (Dev/Rel, Staging, or Production).
Security Note
Make sure that sensitive information, such as your Client ID and Client Secret, is kept secure and never exposed in code repositories or logs. Use environment variables or a secure secrets manager to handle these securely.
I’ve put mine inside a separate folder called “Okta/JWT” like this:
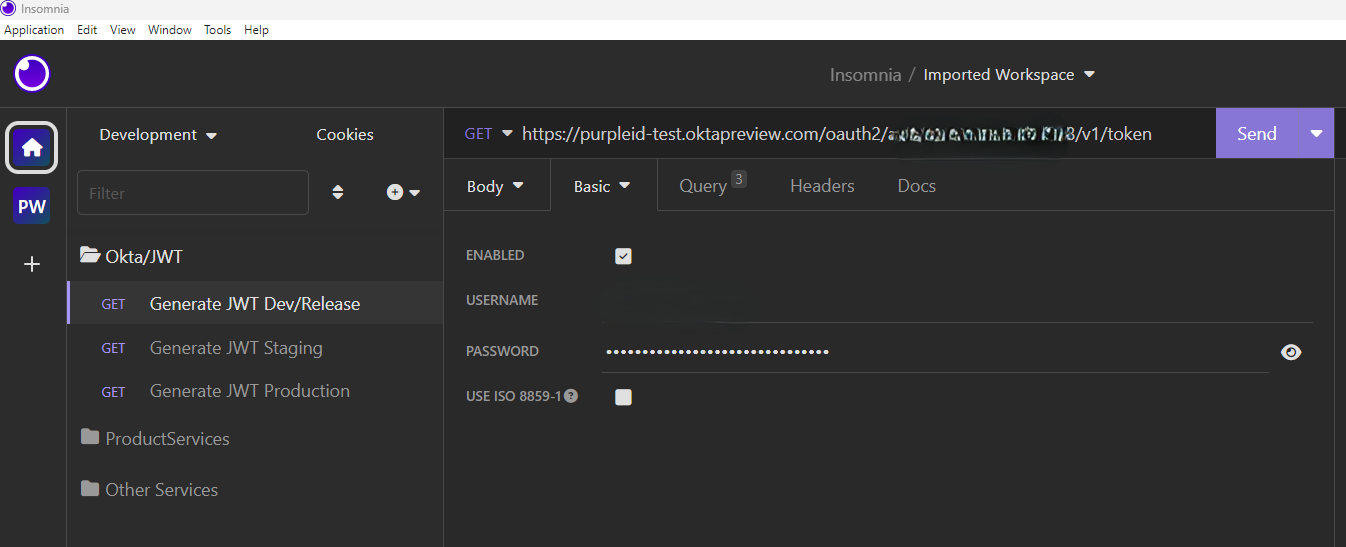
Now, let’s look at the details for the DevRel request. The “issuer URL” is the URL. Be sure that “/v1/token” is appended at the end. Click on the “Auth” tab and set the authorization type to “basic.” For the “username,” use your “client ID.” For the “password,” use the “client secret.”
Click on the “Query” tab and set the following URL arguments:
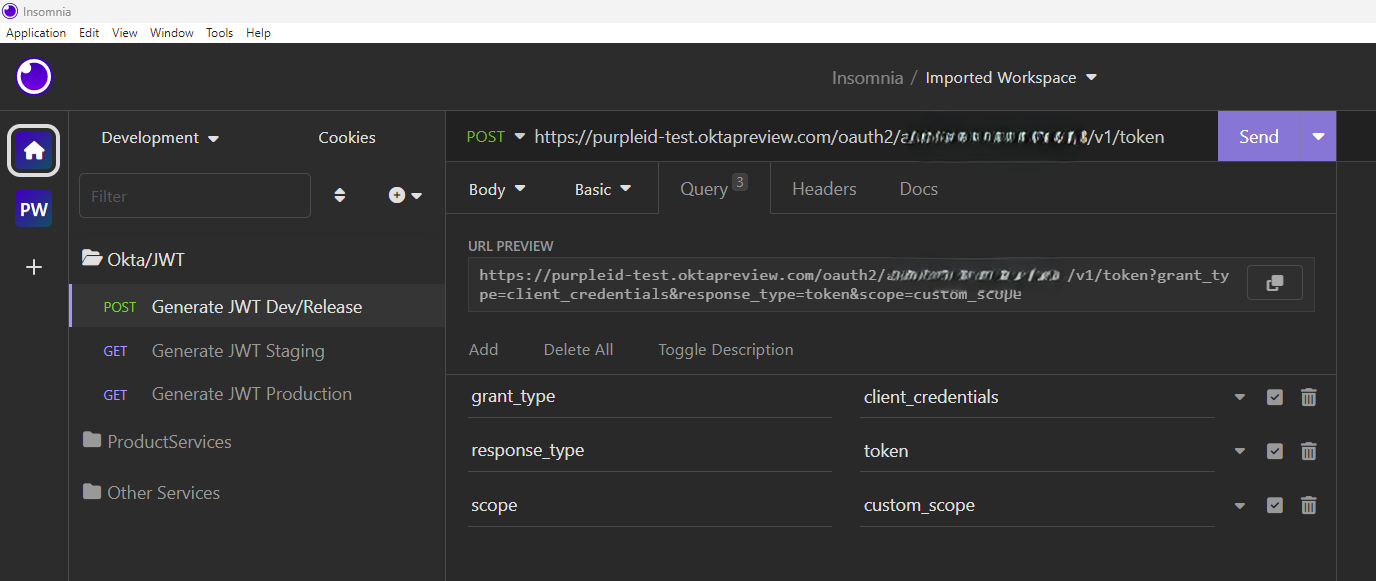
Set “grant_type” to “client_credentials”. Set “response_type” to “token.” Set “scope” as appropriate for your application.
Click on the “Headers” tab. Add a header called “Content-Type” with the value “application/x-www-form-urlencoded.” The result looks like this:

Now click “Send,” and you should see something like this:

Hint: A JWT can contain multiple scope values. By minting a JWT with multiple scopes, you can likely use that same JWT for all services that you intend to call. I’ve created a variable in my “base environment” called “all_scopes,” which contains all of my scopes. So, the URL arguments in my JWT request definition actually look like this:

And in my “base environment”:

Repeat these steps for the other two requests (for Staging and Production).
Secured Request
For this next section, I assume you have an endpoint that requires a JWT of your own. Setting this up to access one of my services will not work for you, as you likely have not been authorized to access my services. You need to do this for your own services.
Let’s use a JWT in a request to a secured endpoint.
First, we’ll do that with a simple solution using copy/paste with the token. Using this method is slow, tedious, and error-prone. Create a new request with your secured URL. Click on the “Auth” tab to open the authorization options. Select “Bearer”.
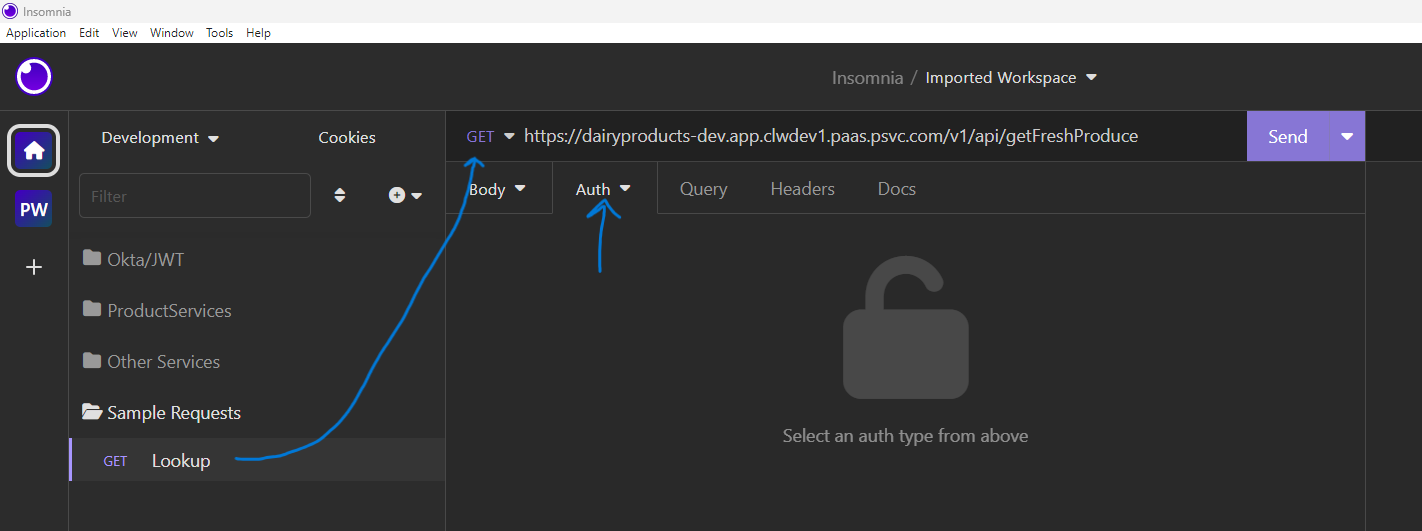
From your “fetch” request, copy the “access_token” value and paste that into the “token” field for the “Bearer” authorization tab. You do not need to provide a prefix. Insomnia uses the default value of “Bearer “ for that prefix.
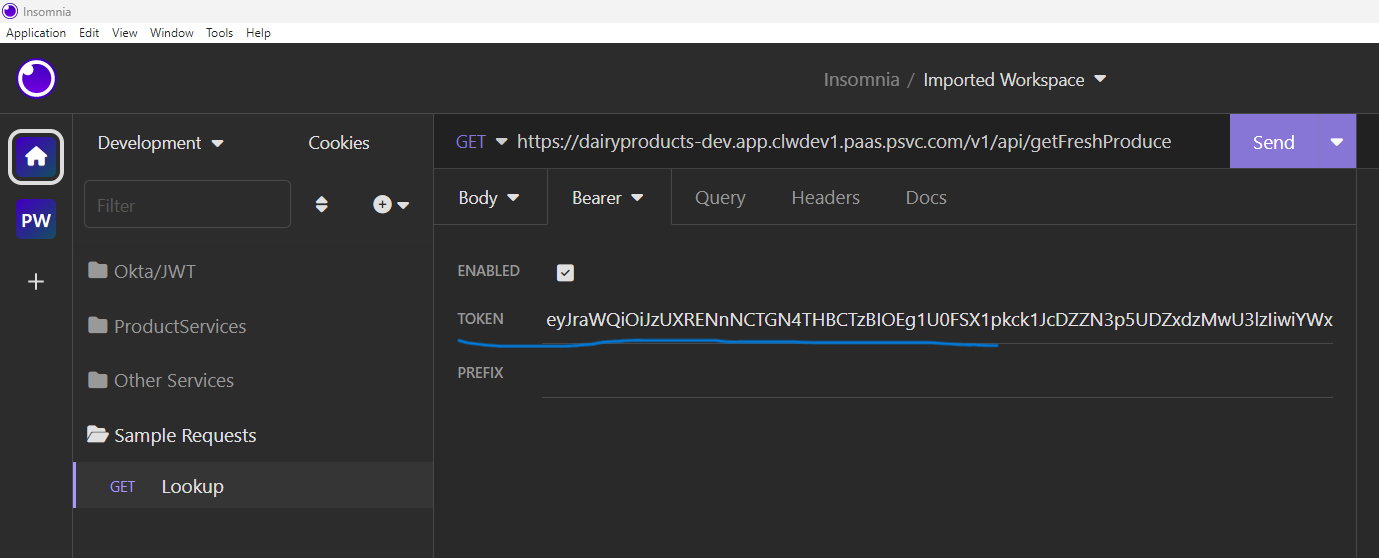
You should now be able to “Send” your request and get a successful response.
Using a Variable
On our way towards a better solution, let’s put that same token value into a variable. Go into the “Base Environment” dialog and create a variable named jwt_devrel. The value is the same JWT that you used in your endpoint request.

Back to the secured endpoint request, replace the token with a variable. Start by clearing out the value that you entered earlier. With the cursor still in the “token” field, start typing jwt (or press control-space). There will be a popup, and you can select the jwt_devrel variable.
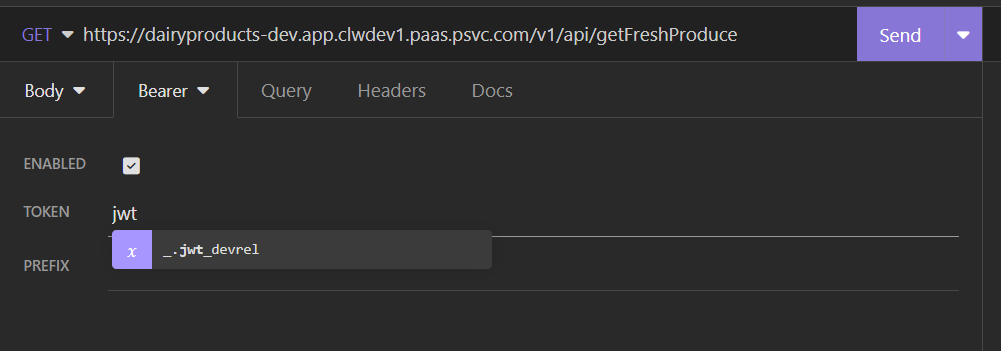
Once again, you should be able to “Send” your request and get a successful response.

Variables and Environment-Specific Contexts
This endpoint request is currently “hard-coded” to use the JWT for the Development and Release security domain. Having created JWT requests earlier for each security domain (properly) implies that we will be using the correct JWT (devrel, stg, or prd) for the selected environment.
Start by creating two additional variables in the “Base Environment” dialog for jwt_stg and jwt_prd like this:

You can leave the additional values empty for now.
For the secured request above, we “hard-coded” which JWT to use (jwt_devrel). However, variables can be “chained” (or “nested”).
Variable names can be referenced just about anywhere. There are three places to define a variable. In order of precedence, it first checks the folder-specific environment. If not found there, it then checks the current sub-environment (as selected in the environment drop-down).
Finally, it checks the “base environment.” If the value contains a (nested) variable, then the process starts over for that portion of the value that contained the variable. (If a variable cannot be resolved, then an error will occur for the null value.)
Putting this into action for our secured requests, the bearer token value will be the variable jwt. The sub-environment will define jwt to point to one of jwt_devrel, jwt_stg, or jwt_prd. The resulting jwt_devrel, jwt_stg, or jwt_prd will be defined in the base environment. In a picture, here is what we’re doing:

Go back to each of the sub-environments that we created at the beginning and add a new variable called jwt and set the value to one of jwt_devrel (for the Development and Release environments) or jwt_stg (for the staging environments) or jwt_prd (for the production environments). A couple of samples will look like this:
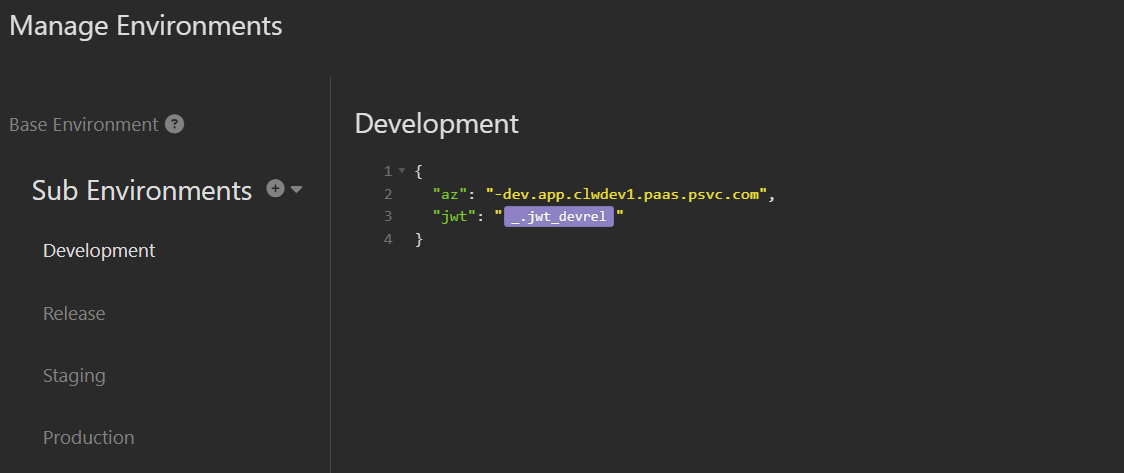
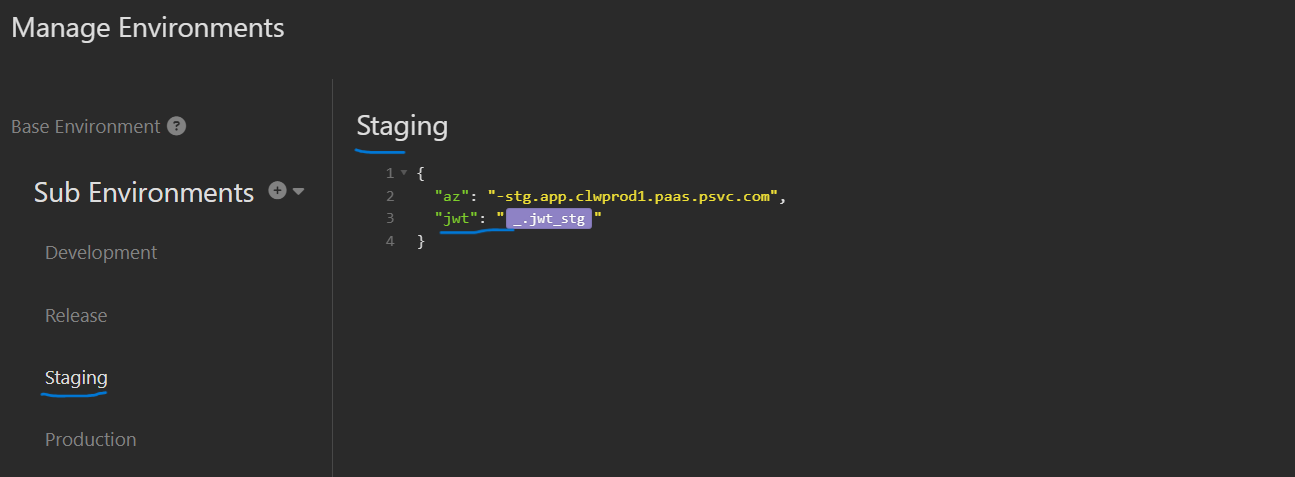

Finally, update the request’s authorization value to jwt (allowing the sub-environment selection to properly chain to the desired value). However, you must first select one of the sub-environments in the drop-down, or Insomnia will not be able to resolve the reference.

We’re almost there. The request references the variable jwt. The sub-environment resolves jwt to the corresponding security-domain variables, jwt_devrel, jwt_stg or jwt_prd. That last value is defined in the base environment to contain the actual JWT.
Automatically Regenerating the JWT
The JWT (for jwt_devrel) generated above was valid for about two hours. Hopefully, it’s still current, depending on how quickly you have worked through this guide. But at some point, the JWT will expire.
What we’re about to do is to have Insomnia automatically refresh the JWT only when needed. A JWT will not be refreshed when it’s still current but will be refreshed upon expiration. This is the point that we move from banging sticks and rocks together to using the power of Insomnia as a more advanced tool. This is where Insomnia will excel over some other tools (like SoapUI).
Let’s review how to get a fresh JWT:
- When needed.
- Run the “fetch request that we created at the beginning.”
- From the response, copy the value from the “access_token” into the value for the jwt_* variable.
Here are the steps to automate that process:
- Open the “Base environment” dialog.
- Delete the contents of the
jwt_devrelvariable and position the cursor in the (now) empty quotes. - Type control-space to search for a variable.
- Start typing “response” and wait.
- From the popup list, select “Response – Body Attribute.”
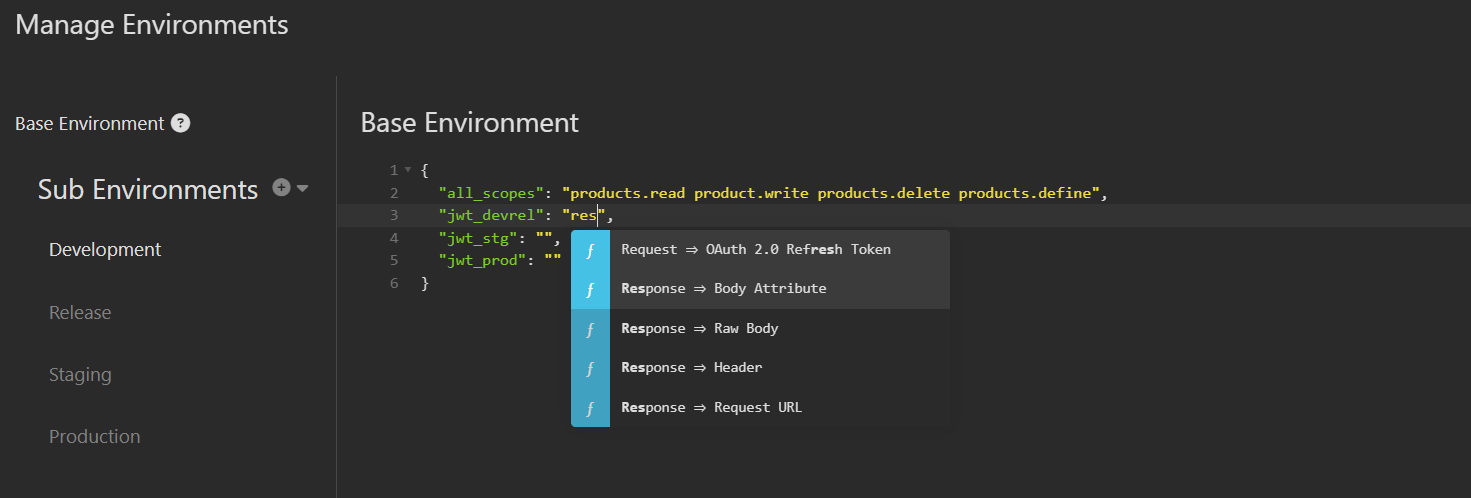
The value will be replaced with an orange placeholder. Double-click on that orange placeholder.
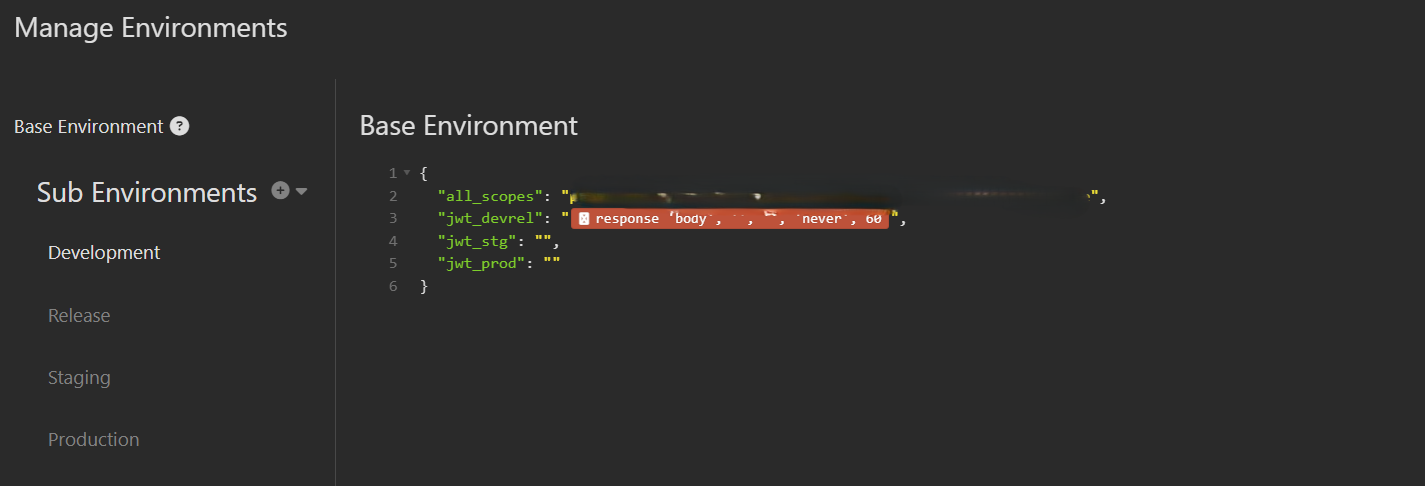
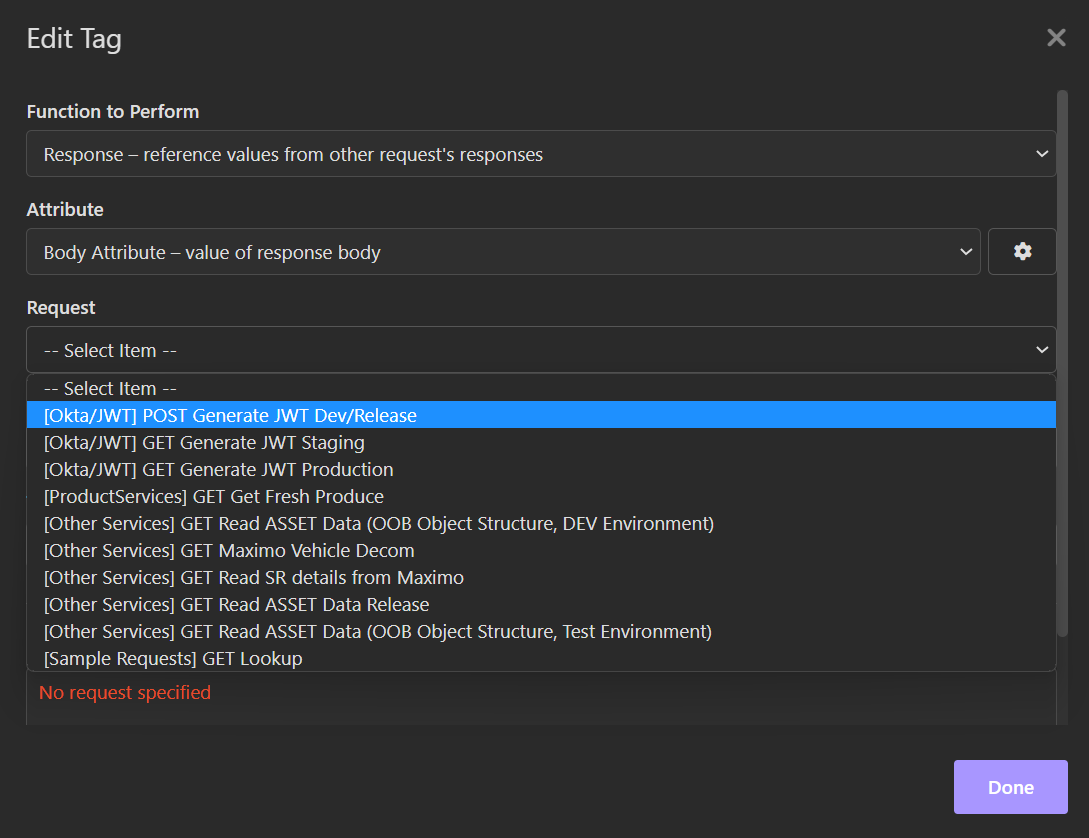
The next dialog that appears is the key to automating the JWT refresh.
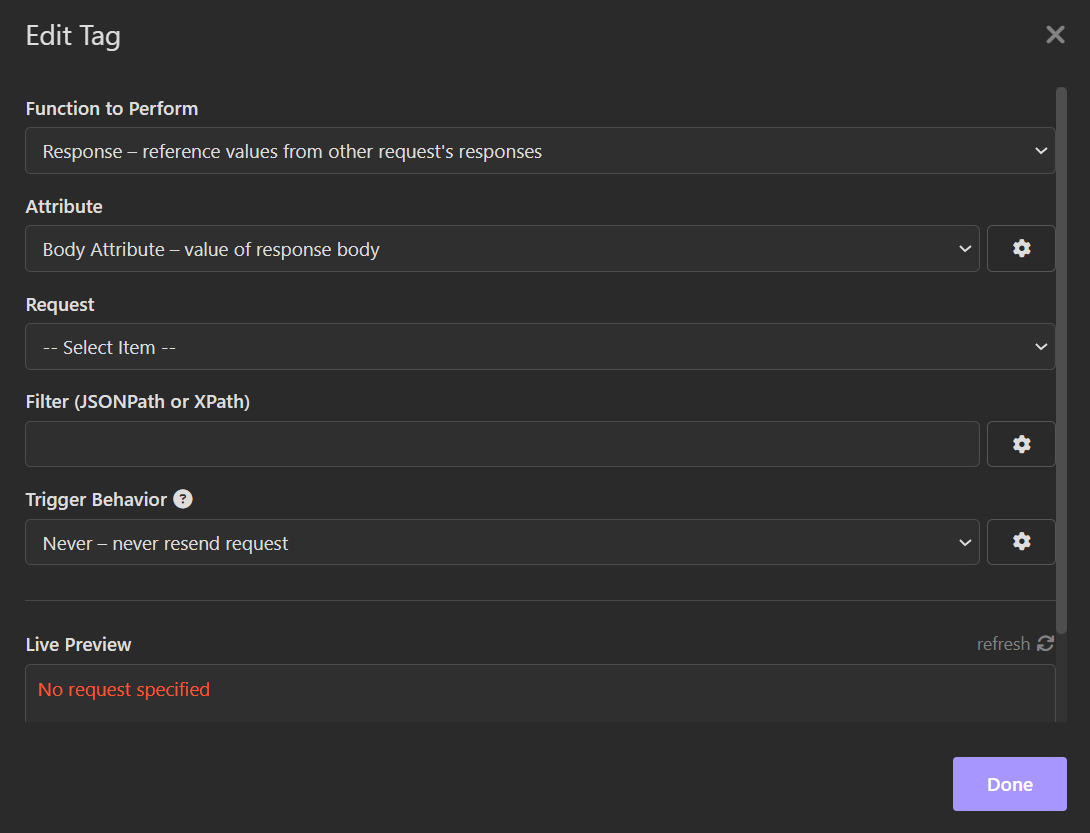
Click on the “Request” field (3rd option) and select the request that corresponds to fetching a dev/rel token:
Click on the “Filter” field and type: “$.access_token” (exactly).
Set the refresh trigger to be when the existing token expires.
Set the TTL (time-to-live) or allowable age for a token. This is set manually in this input. For two hours, the value is 7200 seconds.
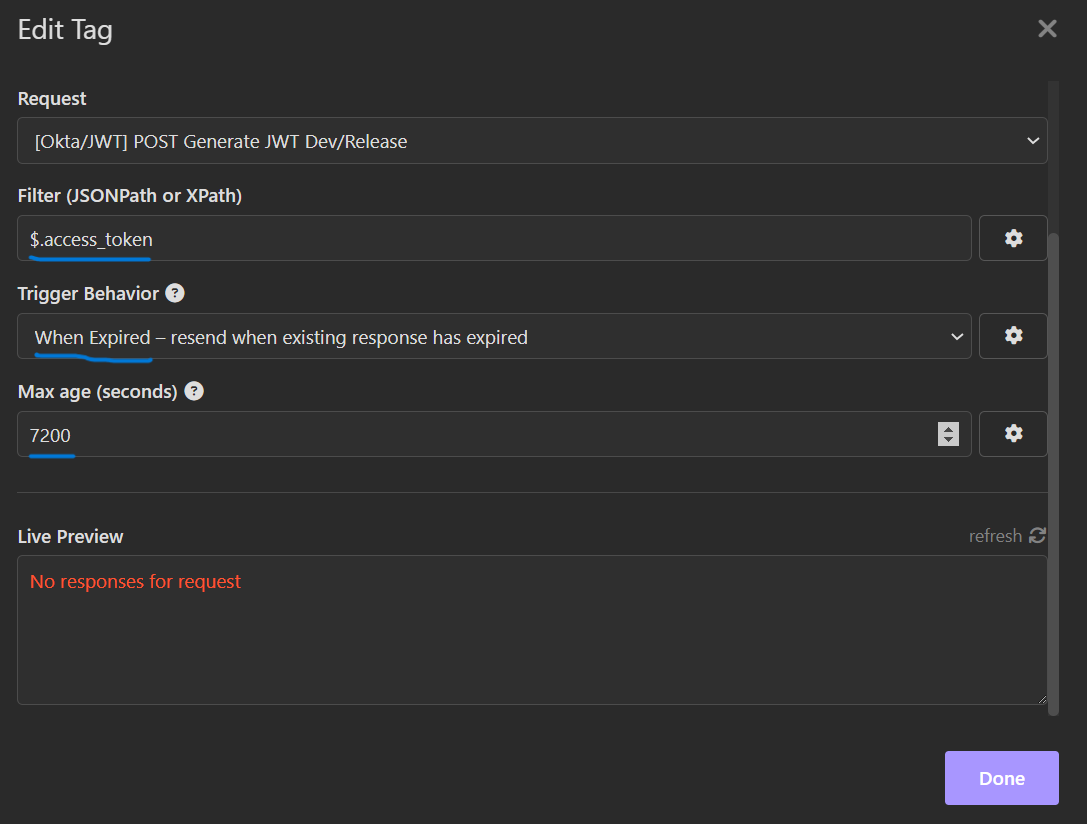
(Optional) Click on the “refresh” icon to test the refresh. The result should be what appears to be a JWT.
And you’re done (for the Dev/Release tokens)!
Repeat this same process but for the staging and production equivalents.
These are some of the important areas of Insomnia that I have explored and found to be useful.
Conclusion
To wrap things up, while Postman has been the first and most popular choice for API testing for a long time, Insomnia is gaining momentum to become a favorite for many developers, and for a good reason. Its simple, intuitive interface and powerful features — like easy environment management, built-in debugging, and support for plugins — make it a great choice for anyone looking to work more efficiently.
Insomnia isn’t just an alternative to Postman; it often offers a smoother, faster experience, especially if you’re looking for something lightweight and flexible. Whether you’re dealing with REST, GraphQL, or gRPC, Insomnia has the tools to keep you productive. If you haven’t tried it yet, it’s worth checking out — your development workflow might just thank you for it.
Published at DZone with permission of Sharad Jain. See the original article here.
Opinions expressed by DZone contributors are their own.

Comments