Setting Apache Nifi on Docker Containers
Apache Nifi comes to mind if you are looking for a simple, robust tool to process data from various sources.
Join the DZone community and get the full member experience.
Join For Free
The system I work on is about to undergo a significant tech-refresh. The goal is to improve the current hindrances that prevent ingesting more data. The remedy requires a product that receives inputs from external sources, processes them, and disseminates the outcomes to their destinations.
Apache Nifi implements the flow-based programming (FBP) paradigm; it composes of black-box processes that exchange data across predefined connections (an excerpt from Wikipedia).
In short, Apache NiFi is a tool to process and distribute data. Its intuitive UI supports routing definitions, a variety of connectors (in/out), and many built-in processors. All these features combined together make it a suitable optional platform for our use case.
In view of our system’s future needs, we decided to evaluate Nifi thoroughly. The starting point is setting up an environment.
In this article, I’ll describe how to set up a Nifi environment using Docker images and run a simple predefined template; building a Nifi flow from scratch will be covered in another article. The main three parts of the article are:
- Reviewing Apache Nifi concepts and building-blocks
- Setting Nifi Flow and Nifi Registry (based on Docker images)
- Loading a template and running it
Ready? Let’s start with the foundations.
Nifi Components and Concepts
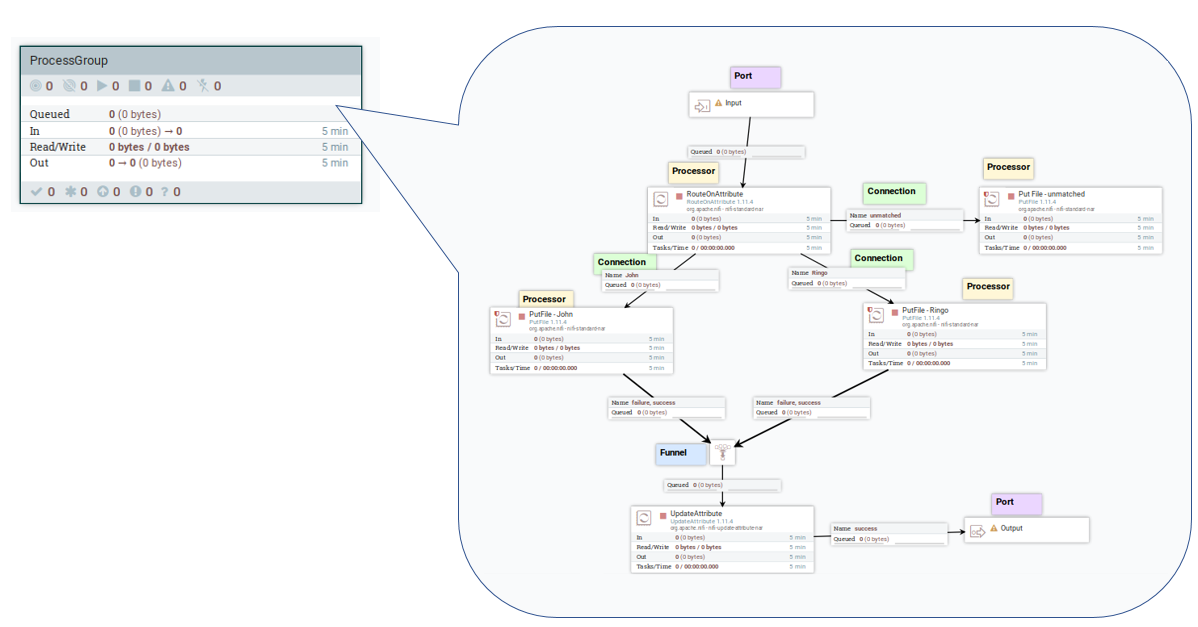
Nifi is based on the following hierarchy:
- Process Group
A collection of processors and their connections. A process group is the smallest unit to be saved in version control (Nifi Registry). A process group can have input and output ports that allow connecting Process Groups. With that, data flow can be composed of more than one Process Group. - Processor
A processing unit that (mostly) has input and output linked to another processor by a connector. Each processor is a black-box that executes a single operation; for example, processors can change the content or the attributes of the FlowFile (see below). - FlowFile
This is the logical set of data with two parts (content and attributes), which passes between the Nifi Processors. The FlowFile object is immutable, but its contents and attributes can change during the processing. - Connection
A Connection is a queue that routes FlowFiles between processors. The routing logic is based on conditions related to the processor’s result; a connection is associated with one or more result types. A connection's conditions are the relationships between processors, which can be static or dynamic. While static relationships are fixed (for example — Success, Failure, Match, or Unmatch), the dynamic relationships are based on attributes of the FlowFile, defined by the user; the last section in this article exemplifies this feature with RouteOnAttribute processor. - Port
The entry and exit points of a Process Group. Each Process Group can have one or more input or output ports, distinguished by their names. - Funnel
Combines the data from several connections into a single connection.
The Nifi flow below depicts these components:
Setting the Nifi Environment
Instead of installing Nifi on my machine, I chose to work with Nifi hosted on Docker containers, mainly for the following reasons:
- Portability: the Nifi application can be replicated or moved to another host.
- Flexibility to have multiple Nifi applications on the same host, each with a different port.
- Low foot-print: avoiding changing the host machine.
- Ability to freeze the environment when taking snapshots during the process of defining Nifi flows.
Launching Nifi Application
I used Ubuntu, a Debian-based Linux, so you can find the commands to install and configure Docker in this article.
Once Docker is installed, download the latest Nifi image version from DockerHub.
You can create and start a Docker container with the default settings:
$ docker run apache/nifi
However, I want to create a bit more sophisticated container that allows the following:
- Name my container (I named it nifi2)
- Controlling the port, rather than the default 8080 port
- Being able to see the loading and standard output of Nifi
- Create a shared volume between my host (shared-directory) and the container (ls-target)
The example command below achieves the above (the name of the container is nifi2)
xxxxxxxxxx
$ docker run --name nifi2 -p 8091:8080 -i -v ~/document/Nifi/shared-directory:/opt/nifi/nifi-current/ls-target apache/nifi
Hurray! your Nifi application is running and accessible via port 8091.
Next is setting a version control tool — Nifi Registry.
Launching Nifi Registry
Nifi Registry is a stand-alone sub-project of Nifi that allows version control of Nifi flows. It allows saving the flow’s state, sharing flows between different Nifi application, enabling rollbacks, and other version control features.
Although you can backup the flowfile.xml.gz file that contains all the Process Groups’ information, the proper way to manage versions is using Nifi Registry; its main advantage is the simplicity in saving changes encapsulated in a dedicated flow.json file per Process Group.
Nifi Registry image is available in Docker Hub; run the commanddocker pull to install it.
The Docker command below defines and starts a Nifi Registry container. I chose not using the -d (detach) option, as suggested in DockerHub, so the progress and output of the container will be visible while it is running. Unlike the Nifi container, this time I chose to keep the default port since I won’t be using multiple Nifi Registry instances.
xxxxxxxxxx
$ docker run --name nifi-registry -p 18080:18080 apache/nifi-registry
Connecting the Nifi Application to Version Control
Generally, we can connect a Nifi application to one or more registries. That allows flexibility when working with more than one environment.
To connect our Nifi application (http://localhost:8091/nifi) to a registry, let’s access the Nifi Setting → Registry Client → [+].

Next, we need the Registry address. Since the Nifi application is not running on the host machine, trying to access the Nifi Registry with address http://localhost:18080/nifi-registry will not work. Our Nifi application runs from within a container, so it needs the external host’s IP. The IP of the host machine can be obtained by inspecting the Nifi’s container
xxxxxxxxxx
$ docker inspect nifi2
The host’s IP is the Gateway:

Since the output of this command is extensive, the command below will fetch only the IP of the gateway:
xxxxxxxxxx
$ docker inspect nifi2 --format='{{.NetworkSettings.Networks.bridge.Gateway}}'
After that, the definition of the Nifi Registry is straightforward. The image below exemplifies a Nifi application connected to two Nifi Registry instances.


Let’s create a bucket and call it Flow-Development. In the image below, I created two buckets, one for development and the other for staging:

Although our Nifi canvas is empty and there is no Process Group to save, the foundations are there. After we create a Process Group it can be saved into the registry.
Now, we’re ready to move on.
Exploring the Nifi Container
Once the Nifi container is running, we can run the command docker exec to enter into the container and explore it; the following command runs bash in the container (using the parameters -i for interactivity and -t for terminal):
xxxxxxxxxx
$ docker exec -i -t nifi2 /bin/bash
Navigating in the container’s directories, you can reach to thenifi/conf directory, which holds the flow.xml.gz file. This file holds all the Nifi UI canvas information that includes all Process Groups; any change is saved automatically.
Another important file is conf/nifi.properties . It holds the configuration of Nifi, including the location of flow.xml.gz. You can read more about the configuration file in this link.
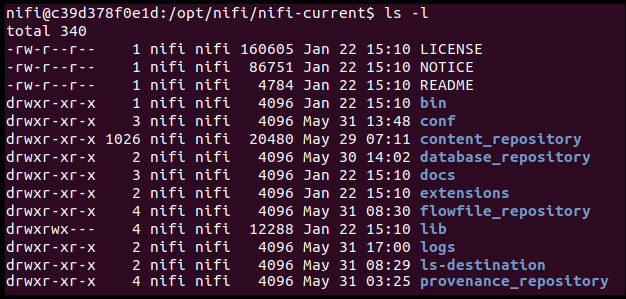
Nifi Repositories
Nifi has three main repositories:
- FlowFile Repository: stores the metadata of the FlowFiles during the active flow.
- Content Repository: holds the actual content of the FlowFiles.
- Provenance Repository: stores the snapshots of the FlowFiles in each processor. With that, it outlines a detailed data flow and the changes in each processor and allows an in-depth discovery of the chain of events.
After entering into the Nifi container, these repositories reveal:
Importing a Nifi flow
So, after setting and running the Nifi application and connecting it to Nifi Registry, you’re ready to go and run a data flow.
Instead of building a Nifi flow from scratch, let’s load an existing one. There are two options to load Flow into Nifi:
- Import a template into Nifi Flow (XML file)
- Import a flow definition (JSON file) into Nifi Registry and then create a process group from it.
The first is straight forward, whereas the latter is a bit more complicated but can be done easily using Nifi toolkit, which is not covered in this article.
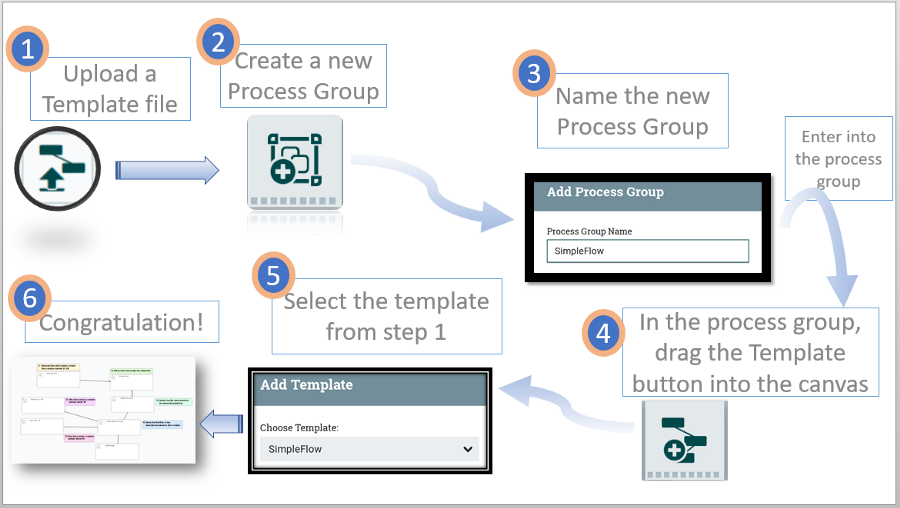
You can download the sample template from GitHub, and then upload it into your Nifi application:
Understanding the template’s flow
This template includes five steps, starting from generating a file with random text, rename it, extract properties, and route the results into directories based on the extracted properties (the details are depicted in the GitHub repository).
Once the processing ends, the files are saved under a local directory in the container itself. Going back to the container’s run command shows it included a shared volume definition(ls-target). This volume is the destination of the processed files, and thus it can be accessed from the host:
xxxxxxxxxx
$ docker run --name nifi2 -p 8091:8080 -i -v ~/document/Nifi/shared-folder:/opt/nifi/nifi-current/ls-target apache/nifi
Troubleshooting: you may have a problem dropping the files into the directory if permissions were not granted: (the error message is “permission denied”):

To rectify this problem, grant permissions to the directory (chmod command).
This directory can be accessed from within the container too:

Open the Process Group’s variables and see the target folder is defined there:

Diving Into the Nifi Processors
You can start all the processors at once with right-click on the canvas (not on a specific processor) and select the Start button. After a while, the files should reach the destination folders.
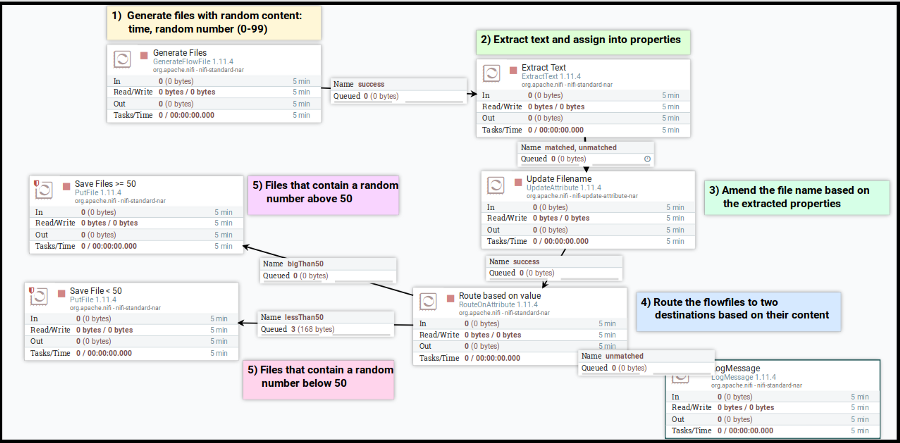
Each generated file undergoes a process of changing its name and being routed based on its content; I preferred to keep it simple and avoid changing the files’ content. Nevertheless, this template exemplifies some features of Nifi processors:
- Extracting attributes based on content:

- Using attributes and change the filename (an attribute of the FlowFile):

- Exemplifying Nifi expression language:

- Route logic based on attributes:

The template uses the following processors:
- GenerateFlowFile: generates FlowFiles, useful for testing purposes. It allows controlling the frequency, quantity, and size of each FlowFile.
- ExtractText: extracts text from the FlowFile’s content.
- UpdateAttribue: updates the FlowFile’s attributes.
- RouteOnAttribute: creates dynamic relationships and defines the routing logic based on the attribute’s value.
- PutFile: saves the FlowFile’s content into a directory. In this example, the processor creates the destination directory if it doesn’t exist and set permissions of the files.
Demonstrating Back-Pressure Feature
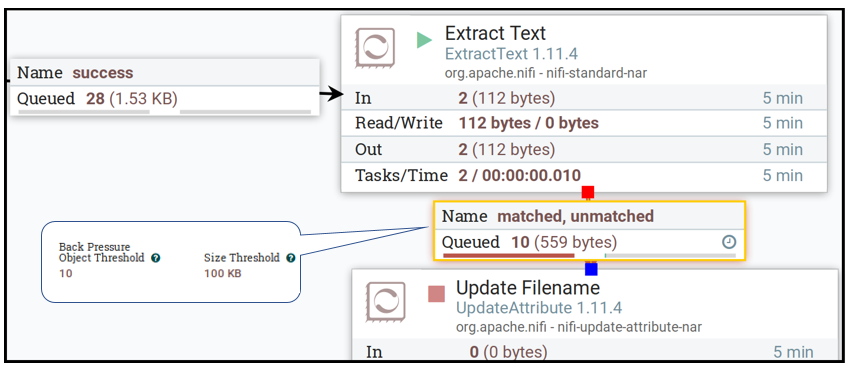
Once the process runs, you can stop the Update Filename processor and see what happens. In a short while, the connector that passes FlowFiles to Update Filename will reach a limit and repress files from flowing into the previous processor in the flow.
This behaviour is a showcase of the Back Pressure definition; the connector is limited by the number of FlowFiles or their overall size. In case this mechanism is activated, it points out a problem. This is a trigger to start investigating what went wrong. It may be a problem, such as malfunction processor, or an indication the fundamental load has increased and thus the flow should be tuned or distributed.
Saving the Process Group Into Nifi Registry
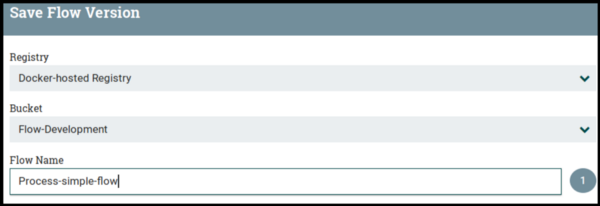
After running the template and changing it a bit, you want to save it. Remember Nifi Registry?
Choose “Start version control” and save the Process Group to the bucket you created before:
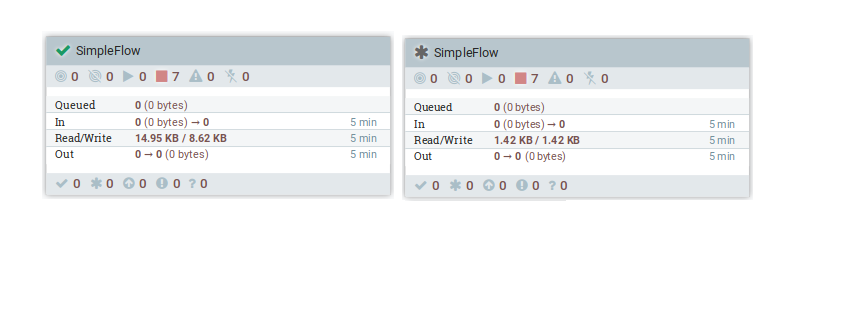
Nifi indicates whether a Process Group’s latest state is captured in the version control or not: a green check means it has been saved in the registry. If there are changes that were not committed to the registry, it is signalled with a dark asterisk.
Some Best Practices Before Closure
- It's recommended to use Process Groups since this is the minimal unit to be saved in Nifi Registry.
- Use comments, labels, and colours to document and organize the Nifi flow.
- Nifi has extensive automation capabilities (Nifi REST API, Nifi Toolkit ), which were not covered in this article. Nifi Toolkit can automate processes using a command-line tool; besides working more efficiently, the benefits of such automation are significant to establish a CI/CD pipeline.
Wrapping-up
If you’ve made it until here, you obtained a working platform to implement your application; this template uses only a few basic processors but it can be a springboard for continuing to build a more complex flow that uses the impressive variety of Nifi processors.
This article scratches only the tip of the iceberg; there are many aspects and functionality to cover, like data provenance, logging, variables and parameters, Nifi services, converging processors’ output using funnels, and more. The supporting tools for automation is a huge area to cover too.
I’ll leave these topics for subsequent articles.
Keep on building!
— Lior
Opinions expressed by DZone contributors are their own.

Comments