Selenium Python Tutorial: Getting Started With Pytest
Perform simple and scalable automation tests with python and pytest. Learn how to run your Automation test script in with pytest in this Selenium Python.
Join the DZone community and get the full member experience.
Join For FreeAccording to the Developer Survey 2019 by StackOverflow, Python is considered to be the fastest-growing programming language. Though PyUnit (or unit test) is the default Selenium test automation framework in Python, many developers and testers prefer the pytest framework.
In this introductory article of the Selenium Python tutorial series, I’ll give you a brief look at the basics of the pytest framework. Below is the gist of the topics that I’ll cover in this Selenium Python tutorial.
Introduction To Pytest Framework
pytest is a popular Python testing framework, primarily used for unit testing. It is open-source and the project is hosted on GitHub. pytest framework can be used to write simple unit tests as well as complex functional tests.
It eases the development of writing scalable tests in Python. Unlike the PyUnit (or unit test) framework, tests written using pytest are expressive, compact, and readable as it does not require boiler-plate code.
Selenium testing with Python and a pytest is done to write scalable tests for database testing, cross-browser testing, API testing, and more. It is easy to get started with pytest, as the installation process is very simple.
The pytest framework is compatible with Python 3.5+ and PyPy 3. The latest version of the pytest is 5.4.1.
To know more about the pytest you can visit the pytest website and pytest GitHub repository.
Below are some of the interesting facts about pytest obtained from the project’s GitHub repository:
|
|
Advantages Of Pytest Framework
Here are some of the primary advantages of Selenium testing with Python and pytest:
It can be used for simple as well as complex functional test cases for applications and libraries. You can even use a pytest to execute multiple test cases.
Existing Python code that uses other Python testing frameworks can be ported easily to the pytest.
The Selenium test automation framework can be used for projects that practice TDD (Test Driven Development) as well as open-source projects.
Switching to the pytest framework is easy as it is compatible with other Python test frameworks such as PyUnit (or unit test) and Nose2.
Parameterization is supported in the pytest which helps in the execution of the same test with different configurations using a simple marker.
The availability of pytest fixtures makes it easy for common test objects to be available throughout a module/class/session/function.
Getting Started With Selenium Testing With Python and Pytest
As the pytest is not a part of the standard Python library, it needs to be installed separately. To install pytest, you have to execute the following command on the terminal (or command prompt) that makes use of the Python package manager (pip):
pip install –U pytest
The following command should be executed to verify the status of the installation:
pytest --version
Here is the output when the installation is performed on the Windows 10 machine:
 PyCharm is the most popular IDE for development using the Python language.
Depending on the requirement, you can opt for the Community version or the Professional version. The community version of PyCharm is free and open-source; the same can be downloaded from PyCharm official download link.
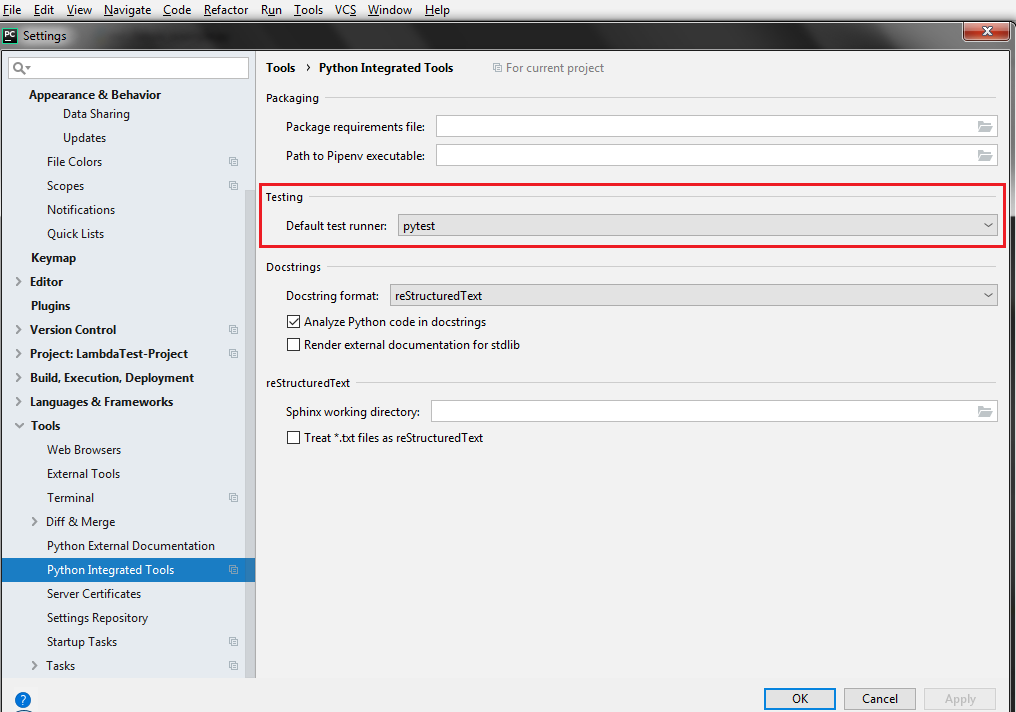
Once the PyCharm installation is complete, it is necessary to set the default test runner as a pytest. Navigate to File, Settings, Tools, Python Integrated Tools, and select a pytest to make it the default test runner.

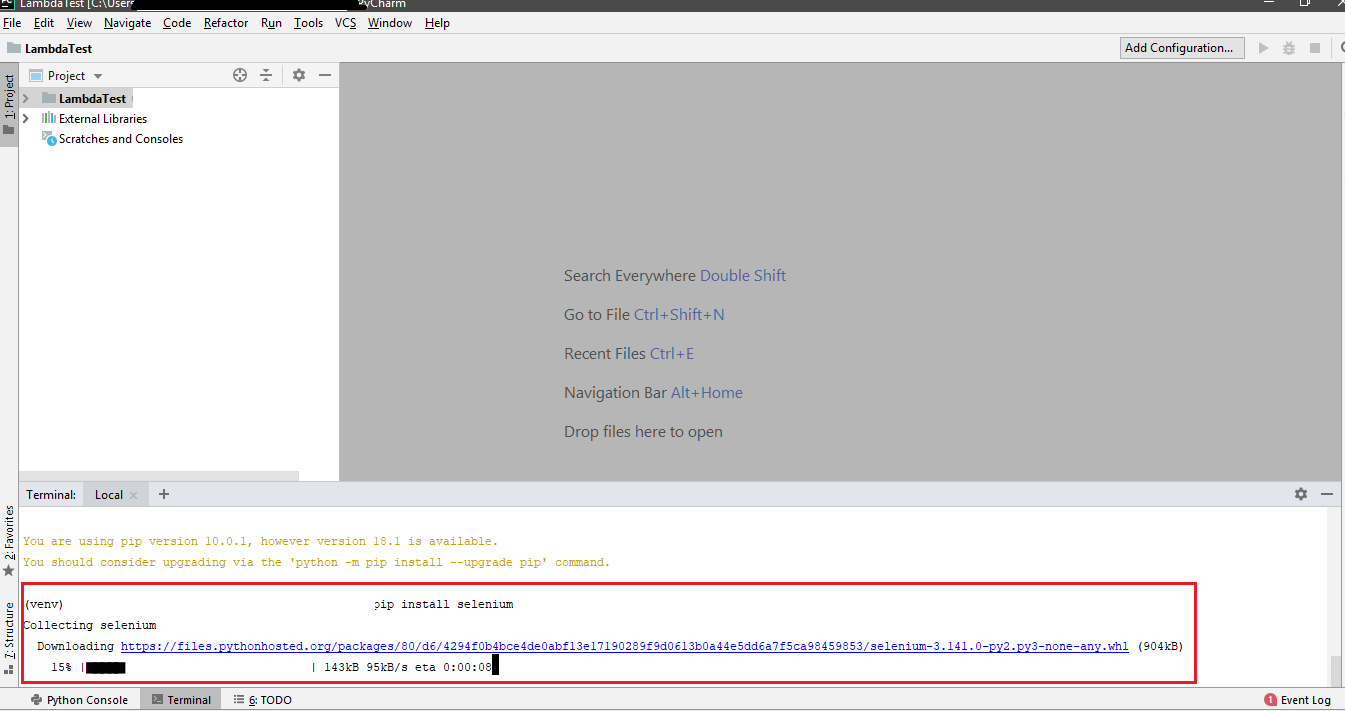
As the pytest will be used for automated browser testing, we also have to install the Selenium package for Python. Selenium for Python can be installed by executing the following command on the Windows terminal (or prompt) or the terminal of PyCharm.
pip install -U selenium

Prerequisites For Selenium Testing With Python and Pytest
For using the pytest framework, Python needs to be installed on the machine. Python for Windows can be downloaded from here. Along with Python 3.5+, the pytest is also compatible with PyPy3. Prior knowledge of Python will help get started with Selenium automation testing with pytest.
Since the pytest will be used for automated browser testing, Selenium WebDriver for the browser under test needs to be installed. Download links for Selenium WebDriver for popular browsers are below:
Browser |
Download location |
Opera |
https://github.com/operasoftware/operachromiumdriver/releases |
Firefox |
|
Chrome |
|
Internet Explorer |
https://github.com/SeleniumHQ/selenium/wiki/InternetExplorerDriver |
Microsoft Edge |
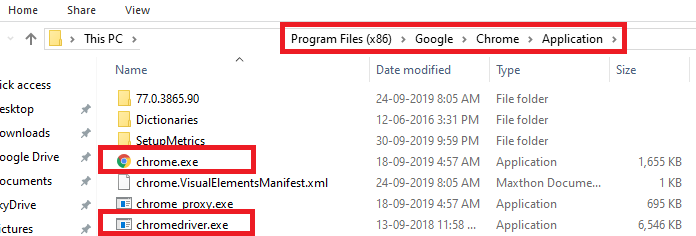
It is always a good practice to install the WebDriver for the corresponding web browser in the location where the browser executable (.exe) is present. By doing this, you do not have to specify the WebDriver path when instantiating the browser.
Executing the pytest command (without mentioning a filename) on the terminal will run all the Python files that have filenames starting with test_* or ending with *_test. These files are automatically identified as to test files by the pytest framework.
The framework also mandates that the test methods should start with ‘test’ else the method will not be considered for execution. Below are two mandatory requirements for test code for Selenium testing with Python and pytest.
xxxxxxxxxx
File naming nomenclature — File name should be test_*.py or *_test.py
Test Method nomenclature — Test method should be of the format test*
These are mandatory requirements as the pytest has features built-in to the framework that supports the auto-discovery of test modules and test methods (or functions).
Running Your First Selenium Test Automation Script With Python and Pytest
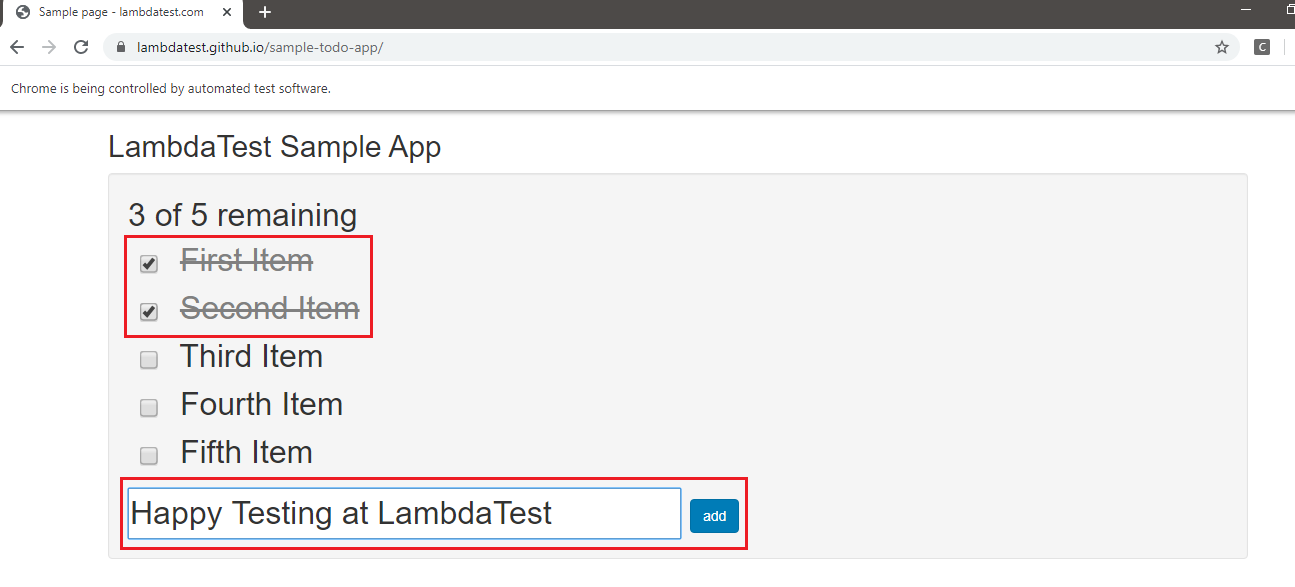
To demonstrate Selenium testing with Python and pytest, I’ll test the LambdaTest ToDo App scenario for this Selenium Python tutorial:
1. Navigate to the URL https://lambdatest.github.io/sample-todo-app/
2. Select the first two checkboxes
3. Send ‘Happy Testing at LambdaTest’ to the textbox with id = sampletodotext
4. Click the Add Button and verify whether the text has been added or not
The implementation file (Sample.py) can be located in any directory as the invocation will be done using the filename.
Implementation
xxxxxxxxxx
#Implementation of Selenium test automation for this Selenium Python Tutorial
import pytest
from selenium import webdriver
import sys
from selenium.webdriver.chrome.options import Options
from selenium.webdriver.common.keys import Keys
from time import sleep
def test_lambdatest_todo_app():
chrome_driver = webdriver.Chrome()
chrome_driver.get('https://lambdatest.github.io/sample-todo-app/')
chrome_driver.maximize_window()
chrome_driver.find_element_by_name("li1").click()
chrome_driver.find_element_by_name("li2").click()
title = "Sample page — lambdatest.com"
assert title == chrome_driver.title
sample_text = "Happy Testing at LambdaTest"
email_text_field = chrome_driver.find_element_by_id("sampletodotext")
email_text_field.send_keys(sample_text)
sleep(5)
chrome_driver.find_element_by_id("addbutton").click()
sleep(5)
output_str = chrome_driver.find_element_by_name("li6").text
sys.stderr.write(output_str)
sleep(2)
chrome_driver.close()
Code Walk-Through
Step 1 — The necessary modules are imported, namely pytest, sys, selenium, time, etc.
xxxxxxxxxx
#importing necessary module for Selenium Python tutorial
import pytest
from selenium import webdriver
import sys
Step 2 — The test name starts with test_ (i.e. test_lambdatest_todo_app) so that the pytest can identify the test. Using the Selenium WebDriver command, the Chrome WebDriver is instantiated. The URL is passed using the .get method in Selenium.
xxxxxxxxxx
#Initiating ChromeDriver for this Selenium Python Tutorial
def test_lambdatest_todo_app():
chrome_driver = webdriver.Chrome()
chrome_driver.get('https://lambdatest.github.io/sample-todo-app/')
chrome_driver.maximize_window()
Step 3 — The Inspect Tool feature of the Chrome browser is used to get the details of the required web elements i.e. checkboxes with name li1and li2 and button element with id = addbutton.
Once the web elements are located using the appropriate Selenium methods [i.e. find_element_by_name(), find_element_by_id()], necessary operations [i.e. click(), etc.] are performed on those elements.
xxxxxxxxxx
#Identifying Required Elements and performing necessary operation on them for Selenium Python tutorial
chrome_driver.find_element_by_name("li1").click()
chrome_driver.find_element_by_name("li2").click()
.........................
.........................
chrome_driver.find_element_by_id("addbutton").click()
sleep(5)
output_str = chrome_driver.find_element_by_name("li6").text
.........................
Step 4 — The close() method of Selenium is used to release the resources held by the WebDriver instance.
chrome_driver.close()
Execution
The following command is executed on the terminal after navigating to the directory that contains the test code.
pytest SampleTest.py --verbose --capture=no
Using --verbose, the verbosity level is set to default. The --capture=no is used to capture only stderr and not stdout.
For adding more options to the pytest command, you can execute the --help option with pytest.
pytest --help
Here is the snapshot with the test execution in progress:


Wrapping It Up
In this introductory article of the ongoing Selenium Python tutorial series, I gave you a brief look at Selenium testing with Python and pytest. pytest is one of the most popular Selenium test automation frameworks in Python.
We also demonstrated the usage of the pytest framework with Selenium where the URL under test was the LambdaTest ToDo App. pytest framework mandates a particular naming nomenclature for test methods and tests files as it has auto-discovery of test modules and test methods.
The availability of fixtures and classes makes it an ideal framework for automation testing, including cross-browser testing.
You should now be able to do Selenium Python testing with pytest.In case of any doubt, do reach out to us. Feel free to share this article with your peers and help us reach out to them. That’s all for now.
Happy Testing!
Published at DZone with permission of Himanshu Sheth. See the original article here.
Opinions expressed by DZone contributors are their own.


Comments