Remote JMX Monitoring of a Mule Instance
Join the DZone community and get the full member experience.
Join For Freein this post i will describe how to enable monitoring of a remote mule instance using jmx. in addition i will also enable the mx4j web interface that will expose the jmx properties of the mule instance in a web application and i will install the jolokia mule agent, which makes it possible to use hawtio to monitor the mule instance.
enabling jmx for a mule instance using a mule application
as of writing this, the finest granularity for which jmx monitoring can be enabled is an entire mule instance. thus it is not possible to enable jmx monitoring per application basis in a mule instance.
this of course has advantages and disadvantages and we are going to use this fact to our advantage by deploying an application to a mule server that does nothing but enable jmx monitoring for the server.
- create a directory named “mulejmxenabler”.
- in this new directory, create a file named “mule-config.xml” with the following contents:
<?xml version="1.0" encoding="utf-8"?>
<mule xmlns="http://www.mulesoft.org/schema/mule/core"
    xmlns:management="http://www.mulesoft.org/schema/mule/management"
    xmlns:spring="http://www.springframework.org/schema/beans"
    xmlns:xsi="http://www.w3.org/2001/xmlschema-instance"
    xsi:schemalocation="
http://www.springframework.org/schema/beanshttp://www.springframework.org/schema/beans/spring-beans-current.xsd
http://www.mulesoft.org/schema/mule/corehttp://www.mulesoft.org/schema/mule/core/current/mule.xsd
http://www.mulesoft.org/schema/mule/managementhttp://www.mulesoft.org/schema/mule/management/current/mule-management.xsd">

    <management:jmx-server>
        <management:connector-server
            url="service:jmx:rmi:///jndi/rmi://192.168.1.73:1096/jmxrmi"/>
    </management:jmx-server>
</mule>
- in the above file, replace the ip address “192.168.1.73” with either the external ip address or the dns name of the computer running the mule server that you want to monitor.
- optionally, you may change the port number 1096 to any port that you rather use.
- deploy the application by copying the directory mulejmxenabler with its contents to the apps directory of the mule instance that is to be monitored.
-
verify that the application was successfully deployed in the log of the mule instance (mule.log if you are using the community edition, mule_ee.log if you are using the enterprise edition).
you should see something like this:info 2014-08-24 16:24:24,009 [mule.app.deployer.monitor.1.thread.1] org.mule.module.launcher.muledeploymentservice: ================== new exploded application: mulejmxenabler info 2014-08-24 16:24:24,010 [mule.app.deployer.monitor.1.thread.1] org.mule.module.launcher.application.defaultmuleapplication: ++++++++++++++++++++++++++++++++++++++++++++++++++++++++++++ + new app 'mulejmxenabler' + ++++++++++++++++++++++++++++++++++++++++++++++++++++++++++++ info 2014-08-24 16:24:24,668 [mule.app.deployer.monitor.1.thread.1] org.mule.module.launcher.muledeploymentservice: ++++++++++++++++++++++++++++++++++++++++++++++++++++++++++++ + started app 'mulejmxenabler' + ++++++++++++++++++++++++++++++++++++++++++++++++++++++++++++
the above is the minimum configuration that i need to enable remote jmx access to a mule instance.
try connect to the mule instance using some jmx monitoring application, like
jvisualvm
or
java mission control
. the following steps describe how to do when using java mission control:
- launch java mission control.
- right-click in the jvm browser pane and select new connection.
-
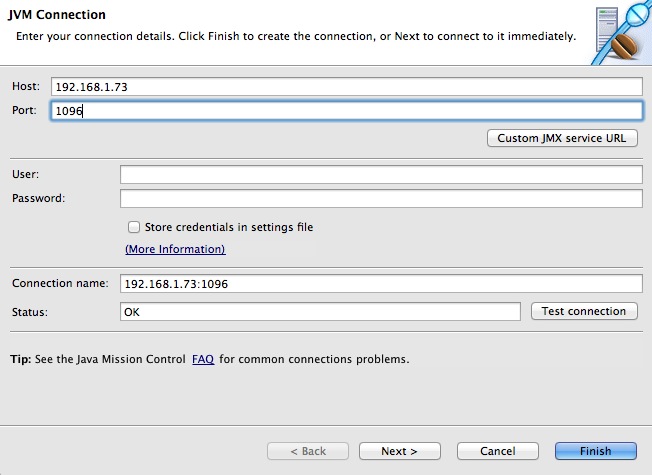
in the host field, enter the ip address or dns name that you used earlier in the mule-config.xml file.
in my case that will be “192.168.1.73”. -
in the port field, enter the port number that you also entered in the mule-config.xml file earlier.
in my case it was “1096”. -
click the test connection button.
the status should be reported as ok as in this picture.
-
click the finish button.
you are now ready to connect to the mbean server of the mule instance and start monitoring it.
this approach has the advantage of allowing modifications to the jmx configuration of a mule instance without having to restart it. if i want to make any modifications to the jmx configuration, enable or disable jmx in the mule instance i just edit the mule-config.xml file in the apps/mulejmxenabler directory in the mule instance home and save it. if hot deployment has not been disabled, the mule server will automatically re-deploy the application and pick up the changes.
enabling jmx for a mule instance using wrapper parameters
one alternative for enabling jmx monitoring of a mule instance that i have had success with is to add a set of java vm parameters in the wrapper configuration file of the mule instance.
the wrapper configuration file is named “wrapper.conf” and can be found in the conf directory of the mule instance.
to enable remote jmx access, add the following additional jvm parameters to your wrapper.conf file:
# enables remote jmx management without authentication or ssl over
port 1096.
wrapper.java.additional.4=-dcom.sun.management.jmxremote
wrapper.java.additional.5=-dcom.sun.management.jmxremote.port=1096
wrapper.java.additional.6=-dcom.sun.management.jmxremote.authenticate=false
wrapper.java.additional.7=-dcom.sun.management.jmxremote.ssl=false
wrapper.java.additional.8=-djava.rmi.server.hostname=192.168.1.73
important notes!
-
you must adjust the numbering of the additional jmv parameters, as described in the comments in the wrapper.conf file!
thus 4, 5, 6, 7 and 8 may not be the correct numbers for your wrapper.conf file. - you must change the ip address to the remote ip address of the computer on which the mule server is running.
- you may want to change the port number.
- the mule instance must be restarted after the modifications, in order for them to come into effect.
the drawback with this approach is that the mule instance needs to be restarted each time there is a modification to the jmx-related configuration parameters.
with the target computer running mac os x, i need to chose one of the two described ways to enable remote jmx monitoring – if i use wrapper parameters, the mulejmxenabler application will not start properly.
on ubuntu i can chose either of the two approaches but was also able to use both approaches simultaneously without errors.
enabling the mx4j web interface
if you are using the first approach, enabling jmx using a mule application, then adding the following xml element to the mule-config.xml file as a child element of the <mule> element enables the mx4j web interface exposing the jmx beans of the mule instance in question:
<management:jmx-mx4j-adaptor
    jmxadaptorurl="http://192.168.1.73:1100">
</management:jmx-mx4j-adaptor>
as before, the ip address needs to be changed to the external ip address of the computer on which the mule instance is run. the port number may be changed from 1100 to any free port that you rather use.
the mx4j web interface may, in my case, then be accessed using the url
http://192.168.1.73:1100.
install the jolokia mule agent
with the first approach to enable jmx in a mule instance described above, you can also enable jolokia – the jmx-to-http bridge which enables use of the hawtio – an extensible web-based management console for java applications.
note!
version 1.2.2 of the jolokia mule agent, which at the time of writing is the latest, does not work with mule 3.5 due to the jetty libraries having been updated from version 6 to version 8.
in this example i used mule 3.4, which is the latest version of mule that still use the jetty 6 libraries, as far as i know.
- download the jolokia mule agent from http://www.jolokia.org/download.html
- move the agent jar file to the lib/opt directory in the mule instance that you want to monitor.
-
add the following configuration as a child element of the <mule> element in the mule-config.xml of the mulejmxenabler application created earlier:
the port number may be modified as desired.
<custom-agent name="jolokia-agent"
class="org.jolokia.mule.jolokiamuleagent">
    <spring:property name="port" value="1095"/>
</custom-agent>
-
open the url
http://192.168.1.73:1095/jolokia/
in a web browser. note that you have to modify the ip address to the remote ip address of the computer running the mule instance and the port to the port number entered in the configuration earlier. if the jolokia agent was successfully enabled, you should see something like this in your web browser:
{"timestamp":1408898064,"status":200,"request":{"type":"version"},"value":{"protocol":"7.2","config":{"maxdepth":"5","maxobjects":"10000","historymaxentries":"10","agentid":"192.168.1.73-1277-41c62ae4-mule","agenttype":"servlet","debug":"false","debugmaxentries":"100"},"agent":"1.2.2","info":{"product":"jetty","vendor":"mortbay","version":"6.1.26"}}}
with the jolokia agent in place, we can now monitor the mule instance using hawtio:
- download the hawtio jar from http://hawt.io/getstarted/index.html
- launch hawtio using the command “java -jar hawtio-app-1.4.17.jar” (the name of the jar file needs to match that of the file you downloaded earlier).
-
hawtio should open a web browser and display a welcome page.
if not, try the url http://localhost:8080/hawtio/welcome - click the connect button in the upper left corner of the hawtio webpage.
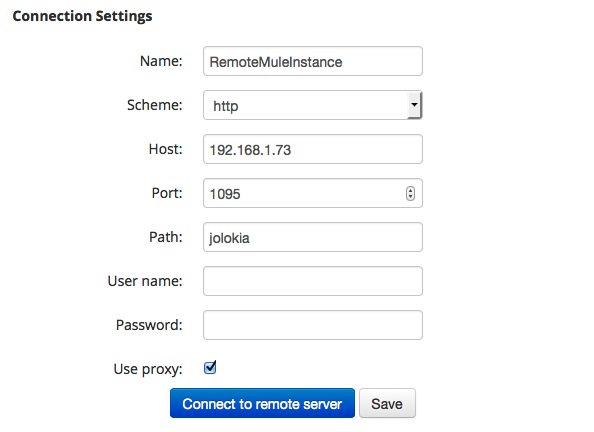
- click the remote button.
- on the right, enter the remote ip of the computer on which your mule instance is running in the host field. 192.168.1.73 in my case.
- enter the port, 1095 in my case, from the configuration file in the port field.
- make sure the use proxy checkbox is checked.
- click the connect to remote server button.
- a new window or tab should open in your web browser.
-
click the dashboard button in the upper left corner.
you should now see information about the target computer, such as cpu and memory usage. -
click the jmx button next to the dashboard button.
here you find the regular jmx management features.
click the threads button next to the jmx button.
this tab shows information about the different threads running in the target jvm.
final words
there are more things to tweak, but i hope that this will get you started with remote jmx monitoring of a mule instance. from there you can start modifying the parameters, adding security etc according to your requirements.
more information on mule jmx management can be found here: http://www.mulesoft.org/documentation/display/current/jmx+management
the oracle webpage on jmx technology can be found here: http://www.oracle.com/technetwork/java/javase/tech/javamanagement-140525.html
finally, the oracle jmx tutorial can be found here: http://docs.oracle.com/javase/tutorial/jmx/
Published at DZone with permission of Ivan K. See the original article here.
Opinions expressed by DZone contributors are their own.


Comments