Read GPS Data With a Raspberry Pi Zero W and Node.js
Learn more about reading GPS Data with a Raspberry Pi and Node.js.
Join the DZone community and get the full member experience.
Join For Free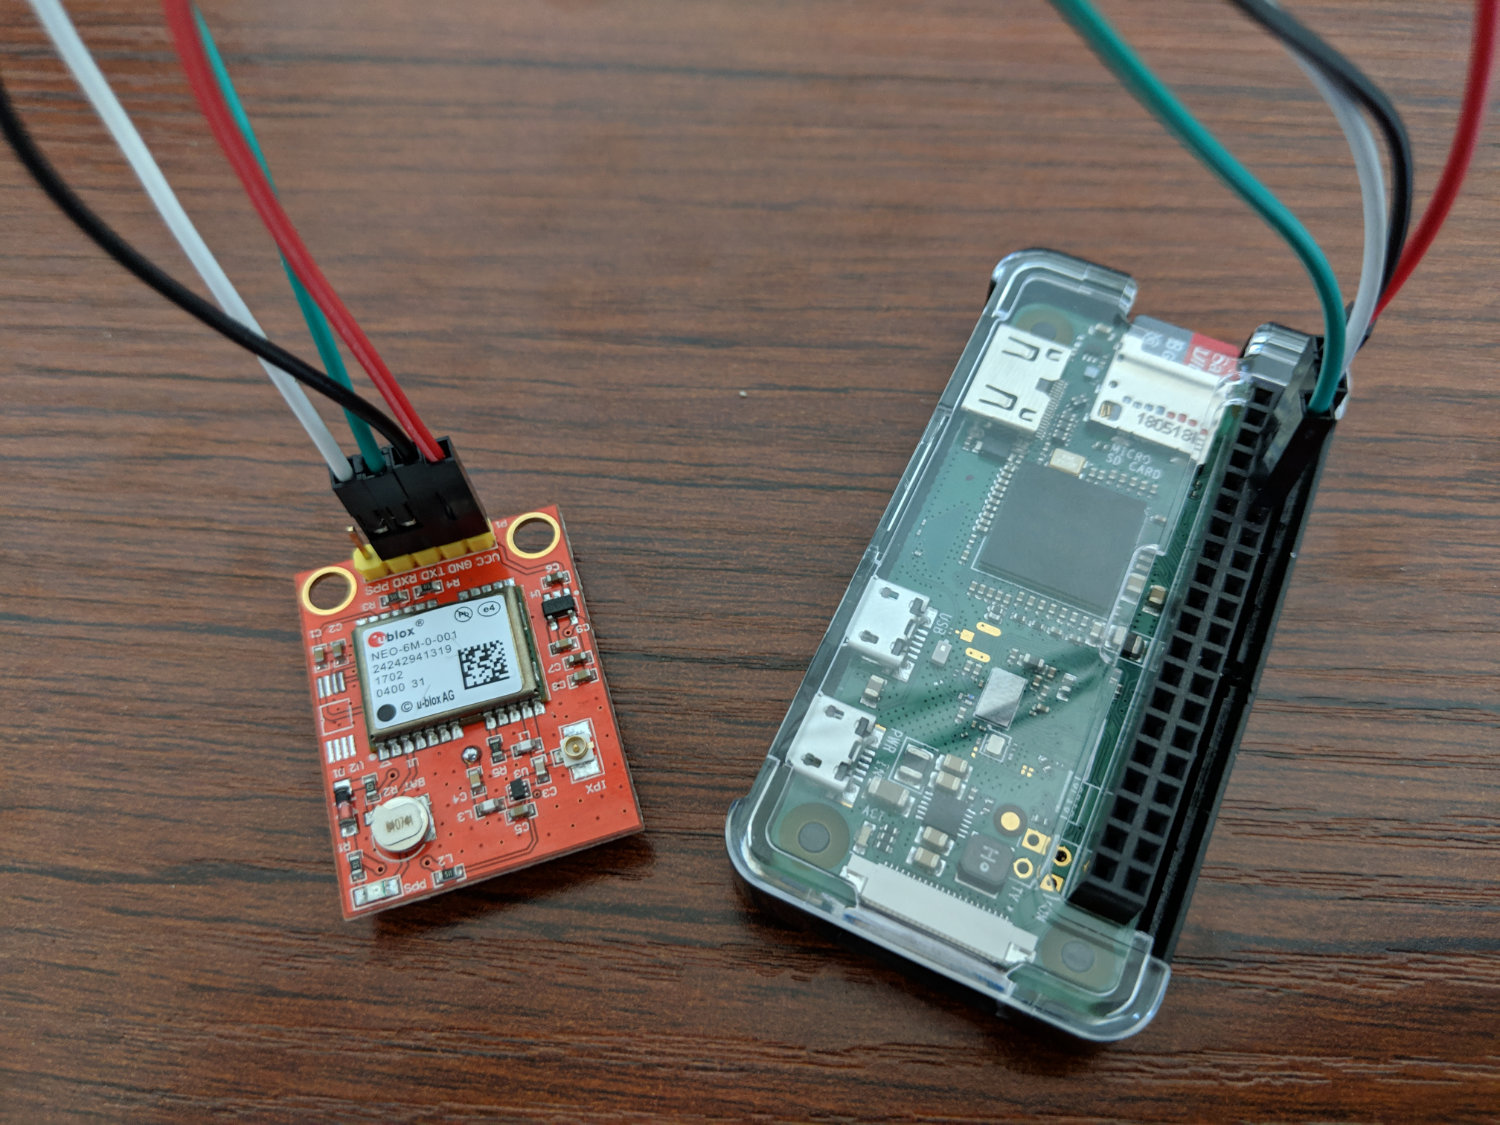
The Raspberry Pi is an awesome piece of Internet of Things (IoT) hardware and when equipped with the correct modules, it can do powerful things with minimal effort. Take GPS for example. You can pick up a NEO 6M GPS module or similar for roughly the same price of a Raspberry Pi, read position information, and reverse geocode that information to address estimates.
In this tutorial, we’re going to see how to hook up a GPS module to a Raspberry Pi Zero W, read the data over the serial port connection, and send it to HERE in exchange for human-readable addresses. We’re going to do all this with just a few lines of Node.js and JavaScript.
The Software and Hardware Requirements
Before we get too invested in the project, let me outline the hardware and software requirements. In terms of hardware, I’m using the following:
- U-blox NEO 6M GPS Module
- Raspberry Pi Zero W
There is fine print to the above hardware. My GPS module already had pins attached and I had soldered a GPIO header to my Raspberry Pi Zero W myself. I also have an antenna for my GPS module to boost my signal. How you get to that point is up to you, but in terms of specific hardware, that is the IoT device and GPS module I’m using.
To get an idea of what my setup looks like, take a look at the following image:

When it comes to software, having Node.js installed on your Raspberry Pi Zero W is a requirement. If you need help installing it, take a look at my tutorial titled, Install Node.js on a Raspberry Pi Zero W without NodeSource.
Configuring the Wires and Enabling Serial Port Communication on the Raspberry Pi
Before we attach the GPS module, we need to enable serial port communication on the Raspberry Pi. This isn’t for the host computer to Raspberry Pi communication, but Raspberry Pi to GPS module communication.
Assuming you are using Raspbian, which is one of the most common Raspberry Pi Linux distributions, execute the following after establishing an SSH connection:
sudo raspi-configAfter executing the above command, you’ll be shown a configuration prompt with options far beyond what we’re trying to accomplish.
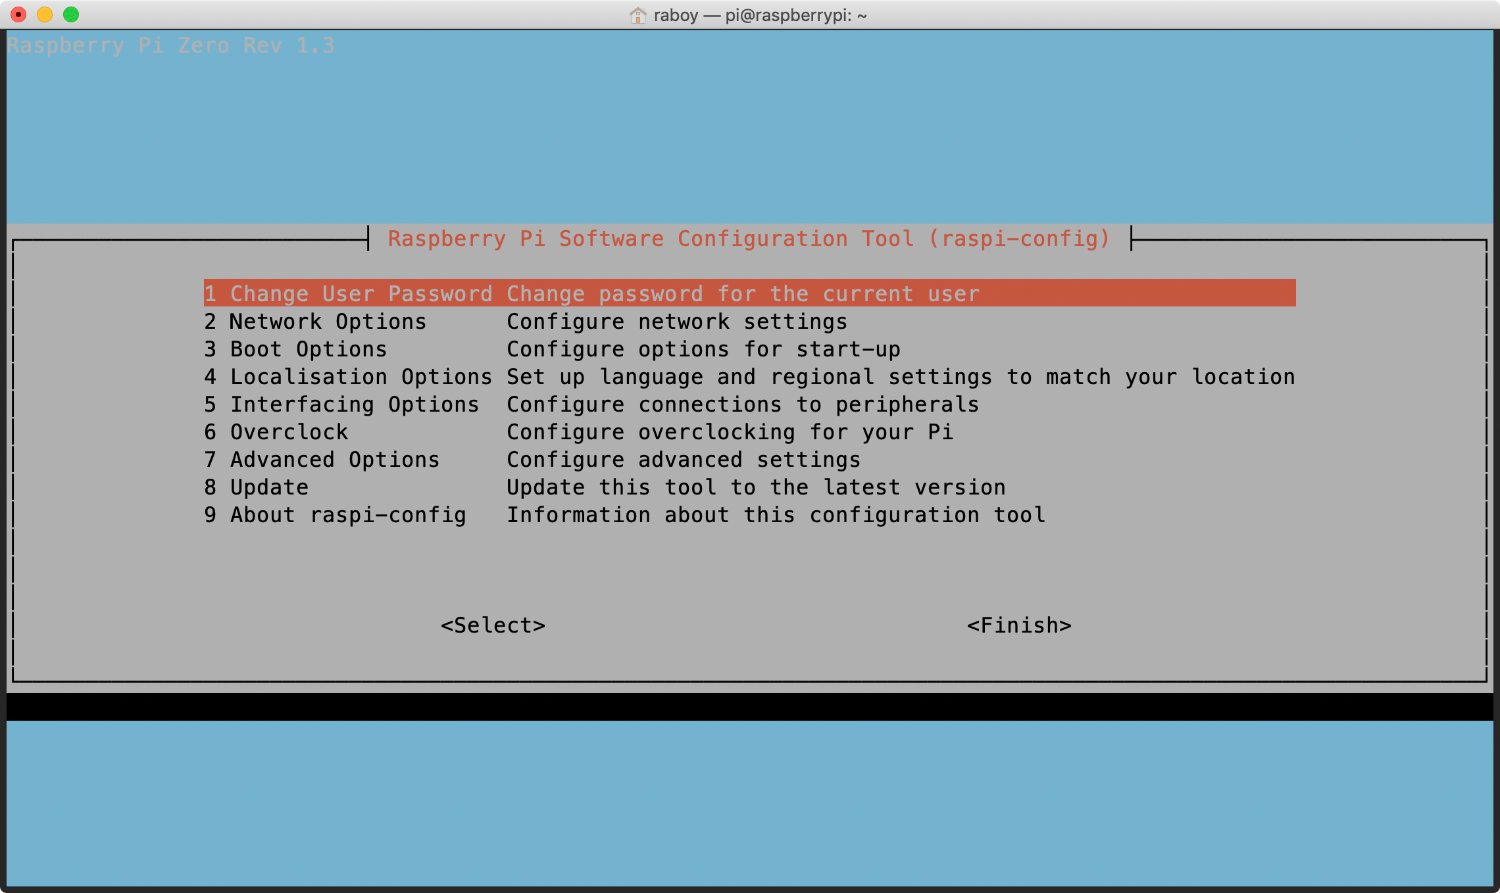
Inside the configuration tool, you’re going to want to choose Interfacing Options from the list. This is where we are given an opportunity to choose how to interface with the Raspberry Pi.
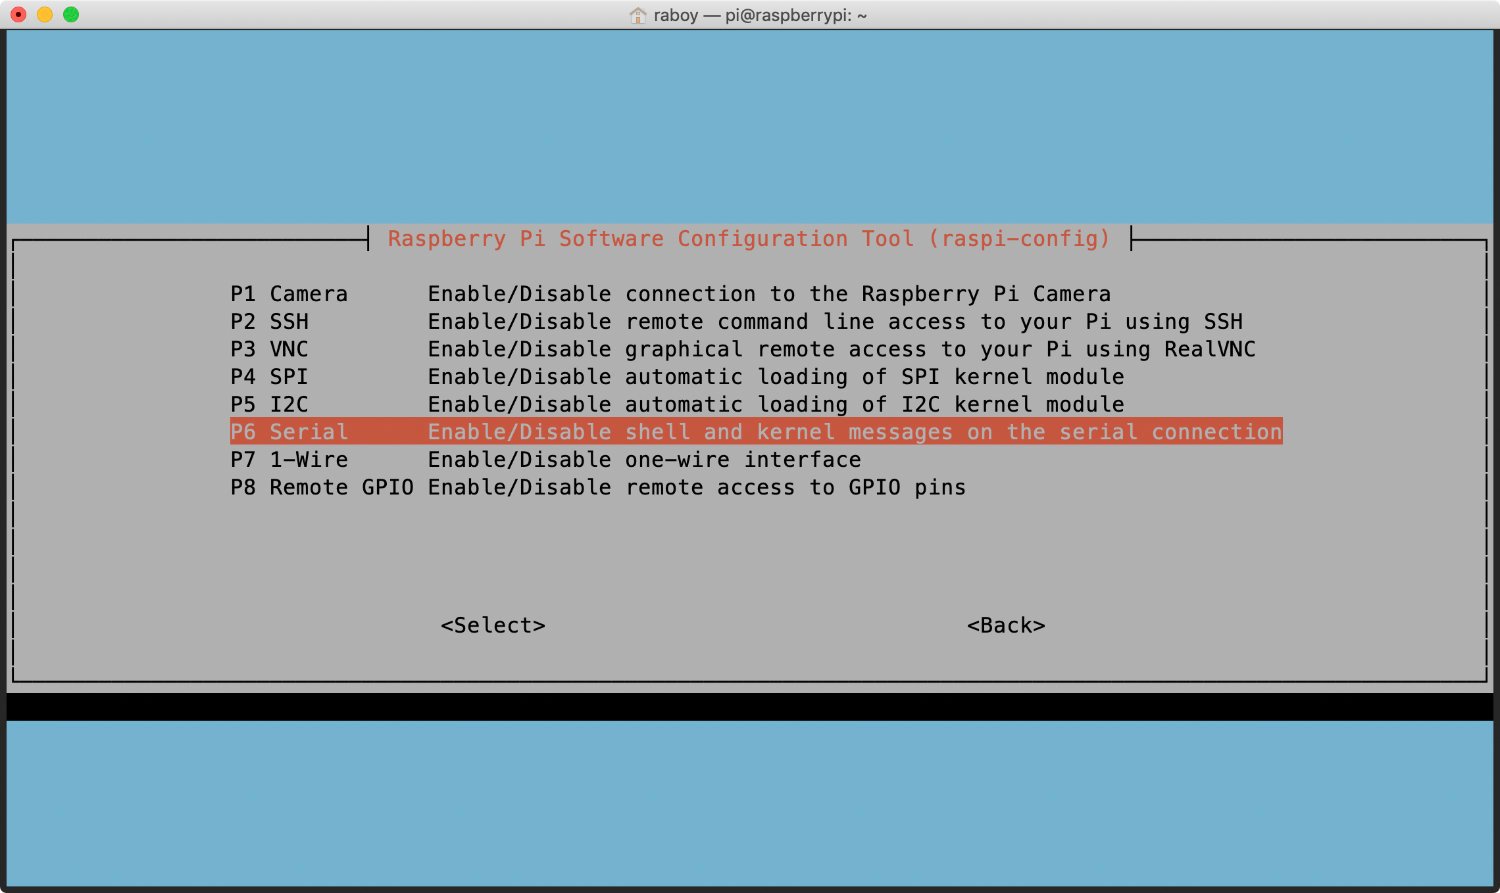
For this particular tutorial, we’re interested in using the serial port on the Raspberry Pi Zero W through the GPIO header. From the list, select P6 Serial to be brought to the next screen.
To finalize the configuration, the first of two screens will ask about enabling serial based logins.
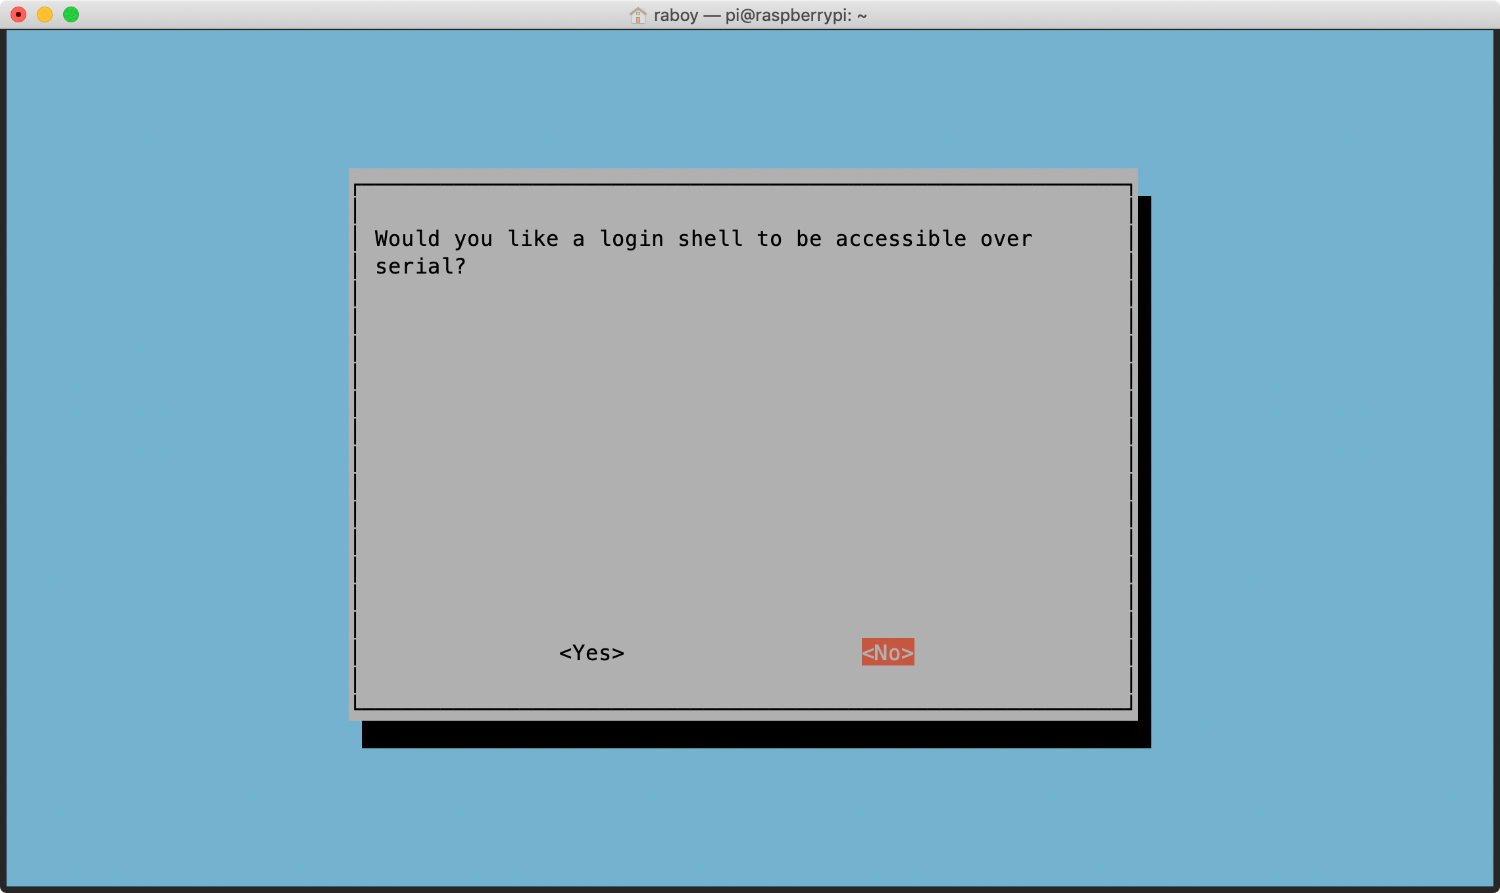
We’re already using SSH so being able to log in through the serial connection is not relevant to us. Go ahead and choose No to proceed to the next step.
The next screen will ask about the port hardware being enabled.
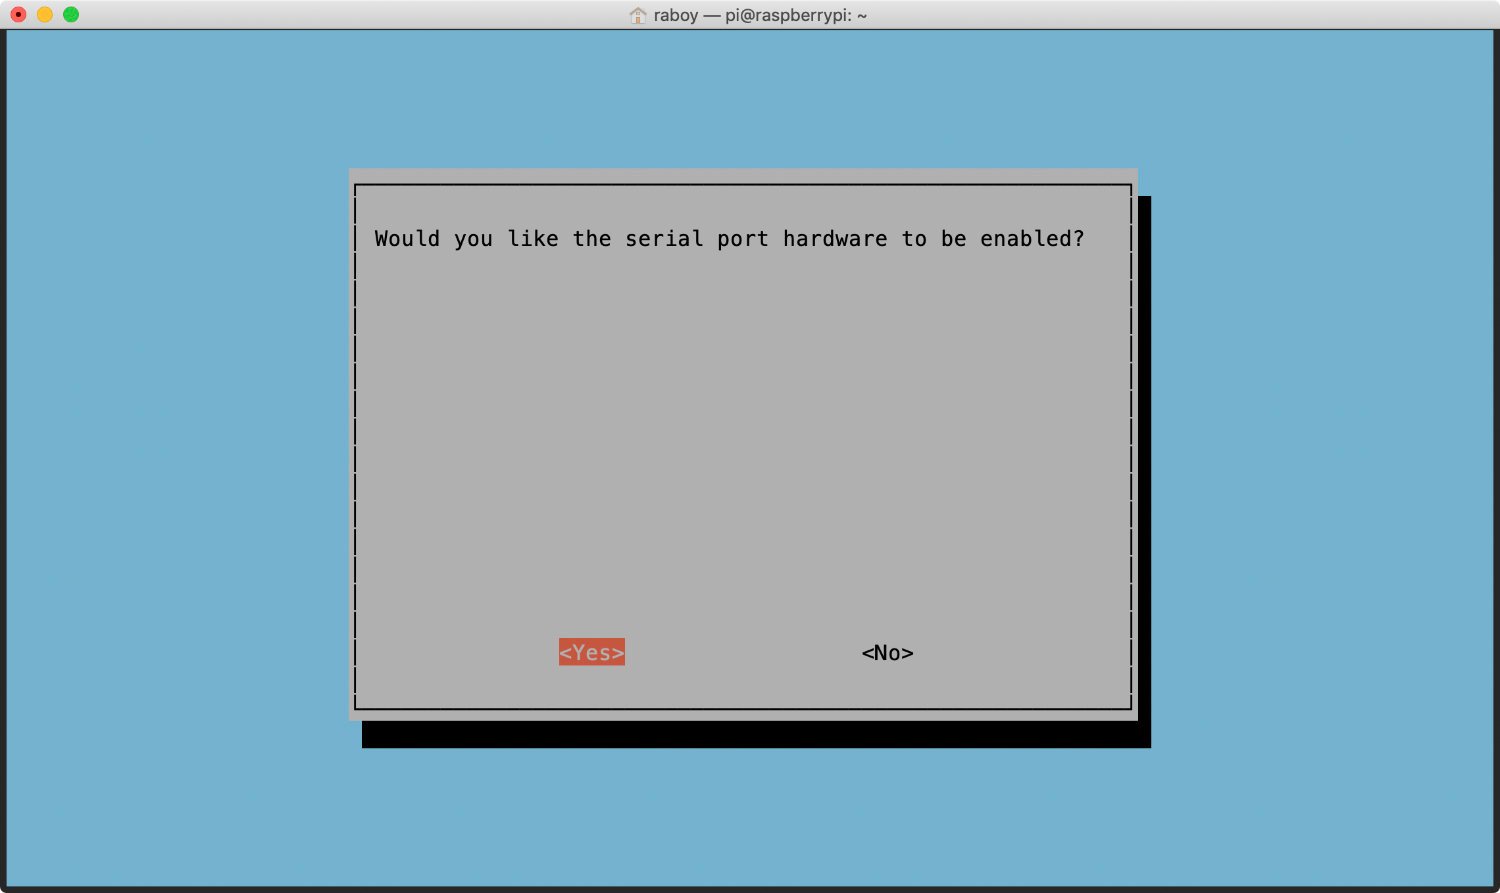
We must enable this so that way our Raspberry Pi can read the GPS data coming in from the pin connection.
Once you’ve completed this step, you should restart your Raspberry Pi. Instead of doing a restart, you can do a complete shutdown because we plan to connect our GPS module. The Raspberry Pi Zero W should not be powered when we start connecting our pins.
You can get an idea of my pin setup in the following picture:
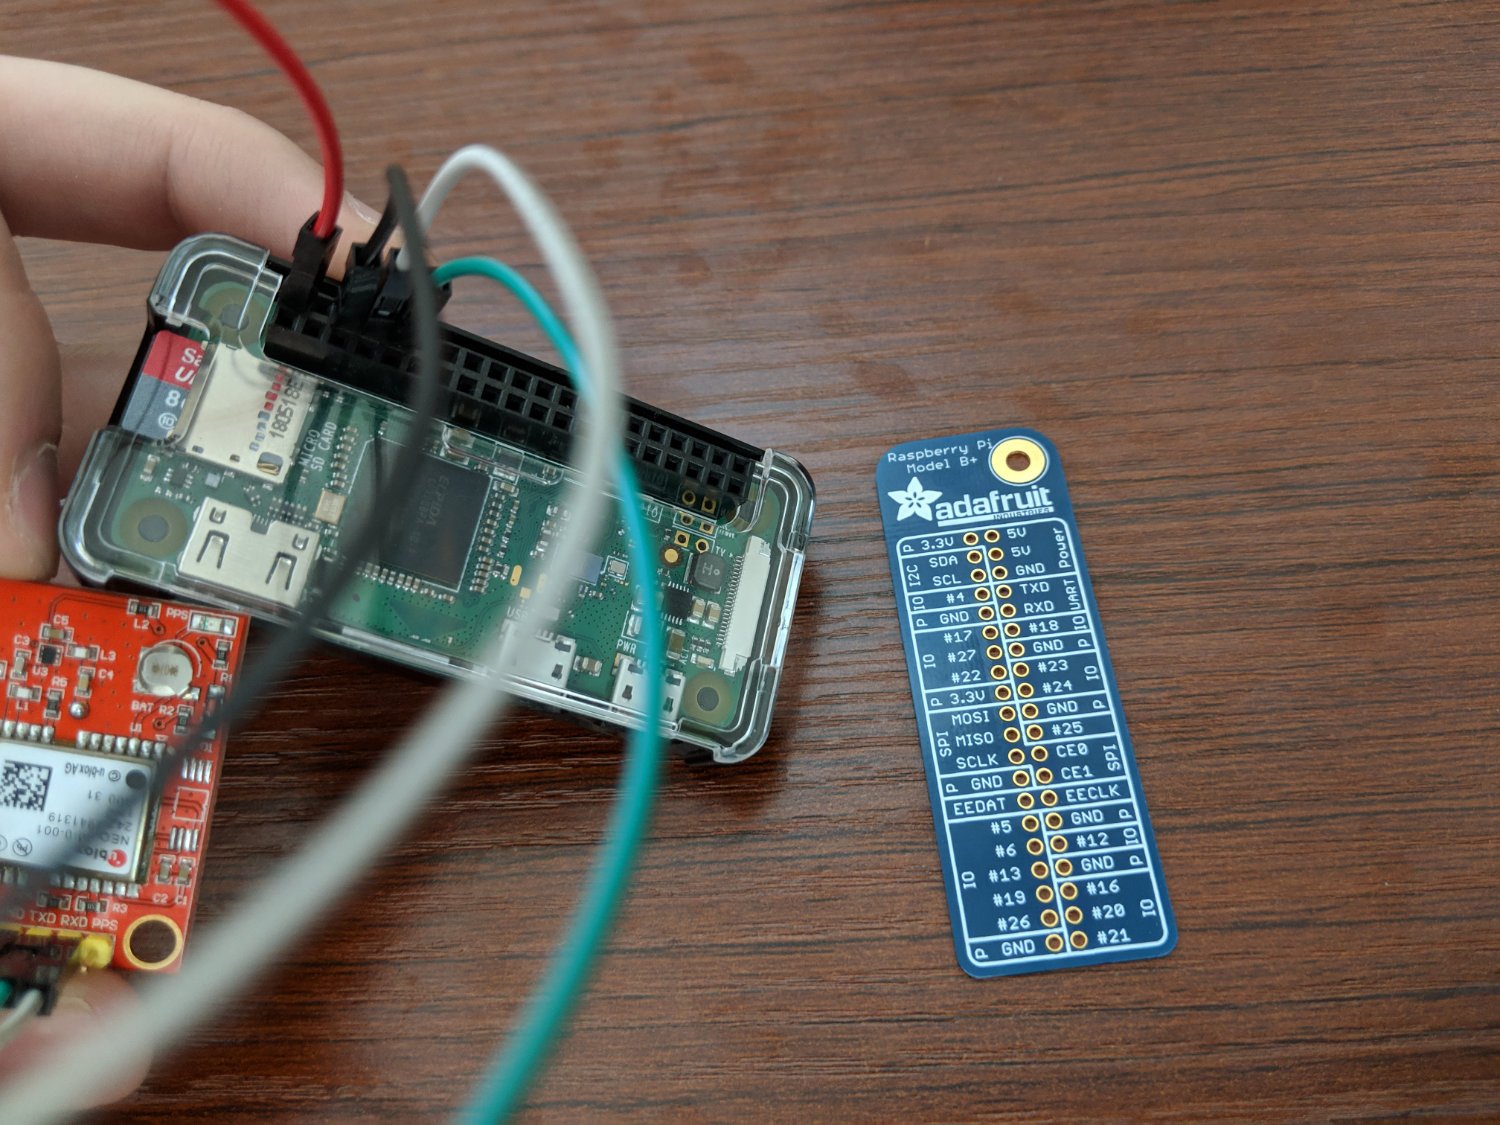
You probably noticed my Adafruit GPIO template. If you don’t have one, I strongly recommend buying one since the pins are not marked on the Raspberry Pi. This will save you from having to do lookups on the internet for the layout.
My pin connections are as follows:
- GPS VCC to Raspberry Pi 5V (Red)
- GPS GND to Raspberry Pi GND (Black)
- GPS RXD to Raspberry Pi TXD (White)
- GPS TXD to Raspberry Pi RXD (Green)
Once connected, you should be able to view the incoming stream of data. On my Raspberry Pi, the serial port is /dev/ttyS0, but yours may be different.
At this point, we can focus on the code.
Reading From the Serial Port, Parsing the Data, and Reverse Geocoding it With HERE
You should already have Node.js configured on your Raspberry Pi Zero W by now. If you haven’t, please consult this tutorial.
On your Raspberry Pi, create a new directory and execute the following commands:
npm init -y
npm install serialport --save
npm install gps --save
npm install request --save
npm install request-promise --save
The above commands will create a new package.json file and install our dependencies. We’ll be using serialport to read from our serial port, gps to parse our NMEA sentences, which are returned from the GPS module, and request as well as request-promise for making HTTP requests to the HERE Reverse Geocoding API.
Create an app.js file within your project and include the following lines:
const SerialPort = require("serialport");
const SerialPortParser = require("@serialport/parser-readline");
const GPS = require("gps");
const Request = require("request-promise");

const port = new SerialPort("/dev/ttyS0", { baudRate: 9600 });
const gps = new GPS();

const APP_ID = "HERE_APP_ID";
const APP_CODE = "HERE_APP_CODE";

const parser = port.pipe(new SerialPortParser());

function getAddressInformation(latitude, longitude) {}

gps.on("data", async data => {});
parser.on("data", data => {});
The above code will essentially initialize our dependencies. We are configuring the correct serial port and baud rate, defining our HERE API tokens, and drawing the blueprint for our event listeners.
If you don’t already have a HERE Developer Portal account, you’ll need one to get your tokens. It is free, so don’t worry.
Before we start reading and parsing our GPS data, let’s create our function for swapping latitude and longitude coordinates with addresses. Add the following to the getAddressInformation function:
function getAddressInformation(latitude, longitude) {
    let address = {};
    return Request({
        uri: "https://reverse.geocoder.api.here.com/6.2/reversegeocode.json",
        qs: {
            "app_id": APP_ID,
            "app_code": APP_CODE,
            "mode": "retrieveAddress",
            "prox": latitude + "," + longitude
        },
        json: true
    }).then(result => {
        if (result.Response.View.length > 0 && result.Response.View[0].Result.length > 0) {
            address = result.Response.View[0].Result[0].Location.Address;
        }
        return address;
    });
}
Using a simple HTTP request and some parameters as defined in the HERE Reverse Geocoding API, we can get an estimate of the address for that position.
Now, let’s look at the event listener for when data comes through the serial port:
parser.on("data", data => {
    try {
        gps.update(data);
    } catch (e) {
        throw e;
    }
});
When data comes through the serial port, the goal is to pass it to the GPS NMEA parser. We could parse it ourselves, but using an already existing parser does help.
The NMEA parser would look like this:
gps.on("data", async data => {
    if(data.type == "GGA") {
        if(data.quality != null) {
            let address = await getAddressInformation(data.lat, data.lon);
            console.log(address.Label + " [" + data.lat + ", " + data.lon + "]");
        } else {
            console.log("no gps fix available");
        }
    }
});
GPS modules return NMEA sentences of different formats. My NEO 6M module returns $GPGGA formatted sentences. You can figure out what yours returns by just reviewing the raw data that comes back in the serial port event listener.
When the data is parsed, we check for data quality. If the data quality is null or zero, it means we probably don’t have a GPS fix. Without a GPS fix, we won’t have latitude and longitude positions. When we do have a fix, we can use those positions in our getAddressInformation function.
If you’re not using an antenna on your GPS, it could take a day to get data. As soon as I attached to mine, it took just a few minutes to get a fix.
Conclusion
You just saw how to read, parse, and reverse geocode GPS data on a Raspberry Pi Zero W with JavaScript and Node.js. While this example was quite simple, it can open the door to complicated ideas.
If you’re a fan of Golang, I also wrote a tutorial just like this Node.js tutorial. It is titled, Interacting with a NEO 6M GPS Module using Golang and a Raspberry Pi Zero W.
Published at DZone with permission of Nic Raboy, DZone MVB. See the original article here.
Opinions expressed by DZone contributors are their own.

Comments