Practical Serverless: Long-Running Workflows With Human Interactions Using Step Functions and Ballerina
Take a look at how to do long-running workflows using AWS Step Functions and Ballerina. This includes the addition of human interactions with the workflow.
Join the DZone community and get the full member experience.
Join For FreeIntroduction
In this article, we will take a look at how to create long-running workflows using AWS Step Functions and the Ballerina language. AWS Step Functions allow us to define state machines that can have tasks such as executing a Lambda function, inserting a message to a queue using AWS Simple Queue Service (SQS), messaging with AWS Simple Notification Service (SNS), and more. This also encourages reusability by allowing existing services or functions to be composed. You can have rules for defining functionality such as error handling, automatic retry, and parallel processing.
But arguably the most important feature of creating workflows with Step Functions is the ability to control its execution with external input. We can pause, continue, or stop the workflows whenever we want. This is especially important when we need to have human interactions with the workflow. Here, we will look at a case study, where we generate a workflow that has steps that expect human interaction to complete its execution.
Case Study: Leave Approval System
This scenario is based on a system that tracks employees’ leave requests and routes the requests to their leads for approval. The lead will be sent an email with the subordinate’s request information, such as the date and their name, and he will click a link to approve or deny the leave request. This decision will be noted by the system, and an email with the decision will be sent to the employee who made the initial request.
Figure 1 shows the overall architecture of the system.
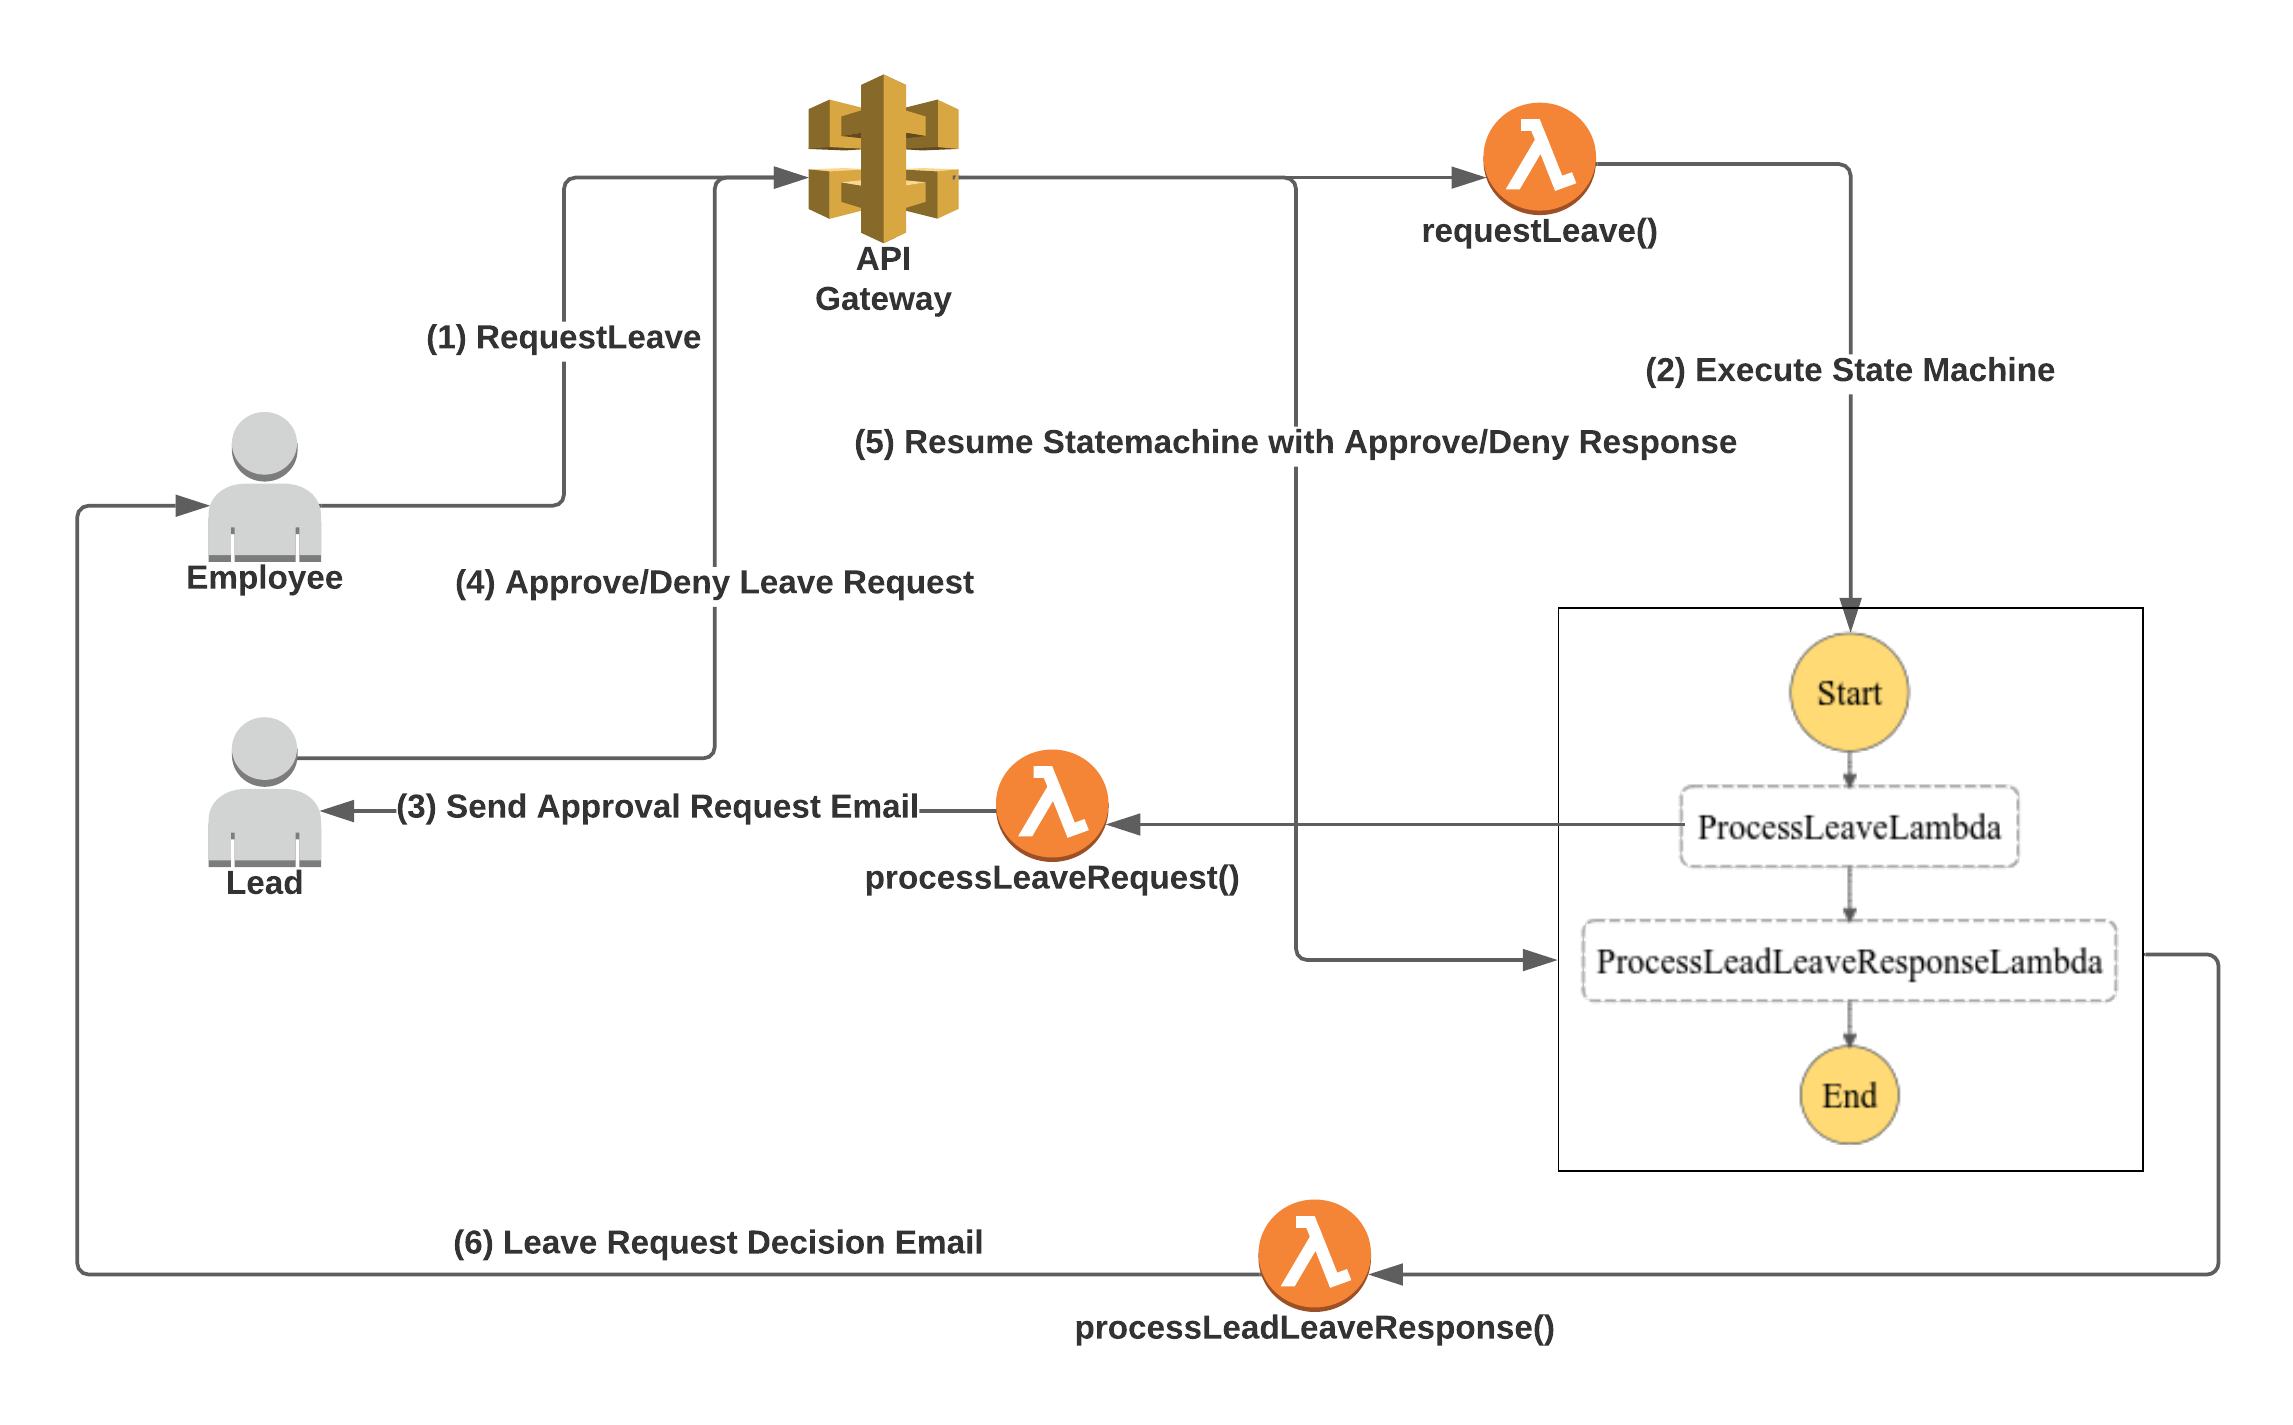
Figure 1: Leave Approval System Architecture
In our system, the central component is the AWS Step Functions state machine, which defines the steps that will be taken to complete our process. Our workflow is rather simple — it contains a step that takes in a leave request, which sends an email to the employee’s lead and pauses the workflow at this point. This is where we use a service integration pattern of waiting for a callback using a task token. In our state task, we put the suffix “.waitForTaskToken” to the resource, e.g. Lambda invocation, to notify that it should pass in a task token to the task invocation, and the task should wait until it is called back with the provided task token. We use this task token to generate an email that is sent to the employee’s lead for approval.
The lead retrieves an email, which will contain two links that encapsulate the task token and the decision that is taken here. The links are endpoints defined in the AWS API gateway. The API gateway forwards this information to a Lambda function, which does any further processing required. It resumes the state machine by performing a callback with the task token. Now, the state machine moves into processing the response by the lead task, where it executes another Lambda function to notify the employee who requested the leave, via email.
Implementation
In this section, let’s take a look at the implementation of each component of the system.
Lambda Functions
Let’s define each of the Lambda functions we will be using when running the system. These Lambda functions will be used when dispatching requests from the API gateway, and also as steps in the Step Functions state machine.
The first Lambda function implementation is “requestLeave”, which is shown in Listing 1. This is used when starting a state machine execution through an API gateway call, which is triggered by a REST API resource by the user.
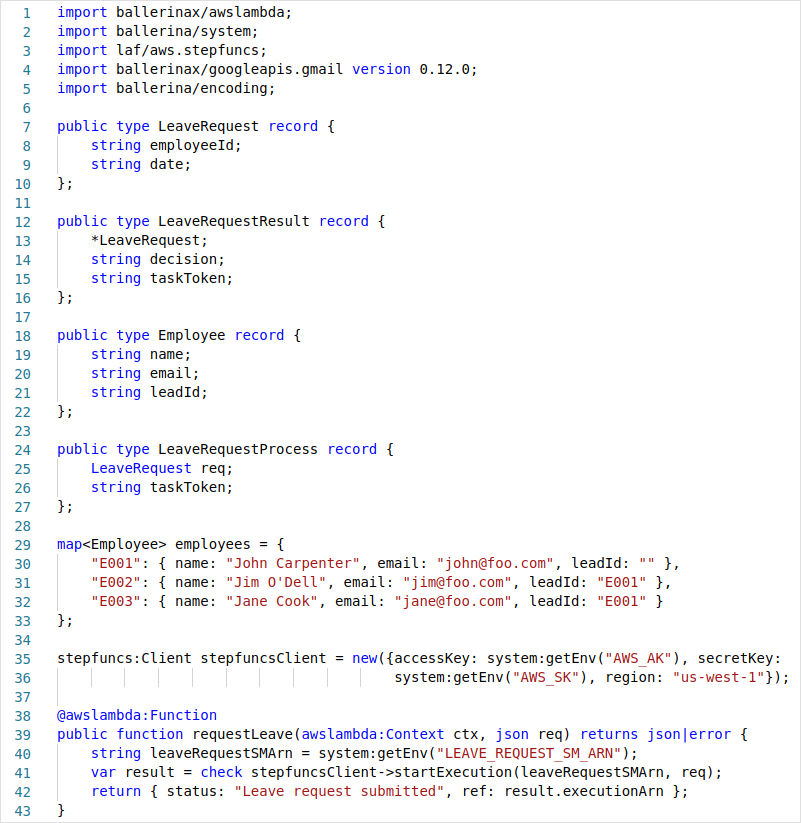
Listing 1: Common Data Types and the “requestLeave” Function Definition
The code above defines the data types we will be using for other functions as well, and also initializes the Ballerina AWS Step Functions client to control Step Functions state machines. The “requestLeave” function looks up the state machine Amazon Resource Name (ARN) using an environment variable, which we would update in the function after we have created the state machine. The input data for this function contains the employee leave request information, such as the requested date and the employee number.
Next, we define the “processLeaveRequest” function. This is the first step that is executed by our state machine. The implementation can be seen in Listing 2.

Listing 2: The “processLeaveRequest” Function Definition
Here, we look up the employee information, find the corresponding lead, and send an email requesting the leave approval for the given employee. The email contains two links that are API Gateway REST endpoints, which are connected to another Lambda function to process the lead’s response. This link contains the employee information and the task token as path parameters to do the callback to the suspended workflow. The base URL for the REST resource is provided as an environment variable, which should be populated with details of the REST API created in the API Gateway.
The next Lambda function is “submitLeadResponse”, which is invoked by the aforementioned links in the lead’s mail to submit the leave approval response. This function is called through a REST endpoint in the API Gateway. The code for this is shown in Listing 3.

Listing 3: The “submitLeadResponse” Function Definition
In the “submitLeadResponse” function, we use the passed in task token and call the “sendTaskSuccess” remote function to resume the state machine that is waiting for the response from the employee’s lead.
After the state machine has resumed from where it was let off, it moves into processing the response sent by the lead. For this, it calls the Lambda function “processLeadLeaveResponse”. Listing 4 shows this function’s code.

Listing 4: The “processLeadLeaveResponse” Function Definition
In this function, we get the chance to do any further processing, such as persisting the decision given and finally communicating the result to the employee who made the leave request. In our implementation, we simply send an email with the lead’s decision directly to the employee.
The full source code for the Ballerina Lambda functions can be found here.
Building the Lambda Functions
The following shows the building of the Ballerina Lambda functions.

Figure 2: Building the Ballerina Lambda Functions
The above code generates the Lambda functions and packages them to a zip format that is ready to be deployed. Let’s deploy each of the functions one by one.
$ aws lambda create-function --function-name requestLeave --zip-file fileb://aws-ballerina-lambda-functions.zip --handler functions.requestLeave --runtime provided --role arn:aws:iam::908363916138:role/lambda-role --layers arn:aws:lambda:us-west-1:141896495686:layer:ballerina:2 --memory-size 512 --timeout 10
In the deployment above, we are not providing the environment variable values at this time since we don’t have the value for the environment variable “LEAVE_REQUEST_SM_ARN”, which contains the ARN for our state machine. We will update the function configuration later on with all the environment variable values when the state machine is created.
$ aws lambda create-function --function-name processLeaveRequest --zip-file fileb://aws-ballerina-lambda-functions.zip --handler functions.processLeaveRequest --runtime provided --role arn:aws:iam::908363916138:role/lambda-role --layers arn:aws:lambda:us-west-1:141896495686:layer:ballerina:2 --memory-size 512 --timeout 10
Here also, since we are missing the value for the “LEAVE_LEAD_RESP_URL” environment variable for the “processLeaveRequest” function, we will update the function configuration to add the environment variable values when we create the API Gateway REST endpoint later.
$ aws lambda create-function --function-name submitLeadResponse --zip-file fileb://aws-ballerina-lambda-functions.zip --handler functions.submitLeadResponse --runtime provided --role arn:aws:iam::908363916138:role/lambda-role --layers arn:aws:lambda:us-west-1:141896495686:layer:ballerina:2 --memory-size 512 --timeout 10 --environment "Variables={AWS_AK=$AWS_AK,AWS_SK=$AWS_SK}"
$ aws lambda create-function --function-name processLeadLeaveResponse --zip-file fileb://aws-ballerina-lambda-functions.zip --handler functions.processLeadLeaveResponse --runtime provided --role arn:aws:iam::908363916138:role/lambda-role --layers arn:aws:lambda:us-west-1:141896495686:layer:ballerina:2 --memory-size 512 --timeout 10 --environment "Variables={GMAIL_ACCESS_TOKEN=$GAT,GMAIL_REFRESH_TOKEN=$GRT,GMAIL_CLIENT_ID=$GCI,GMAIL_CLIENT_SECRET=$GCS}"
The full list of the Lambda deployment commands can be also found here.
Step Functions State Machine
The AWS Step Functions defines its state machines using a JSON based language. This is a simple to use language, where you can define each of your states and the transitions between them. Check the developer guide for more information on creating Step Functions state machines. For a complete language reference, check the Amazon States Language Specification.
To create the Step Functions state machine, navigate to https://console.aws.amazon.com/states/home, and create a new state machine with the contents mentioned here. The final representation will look similar to Figure 3.
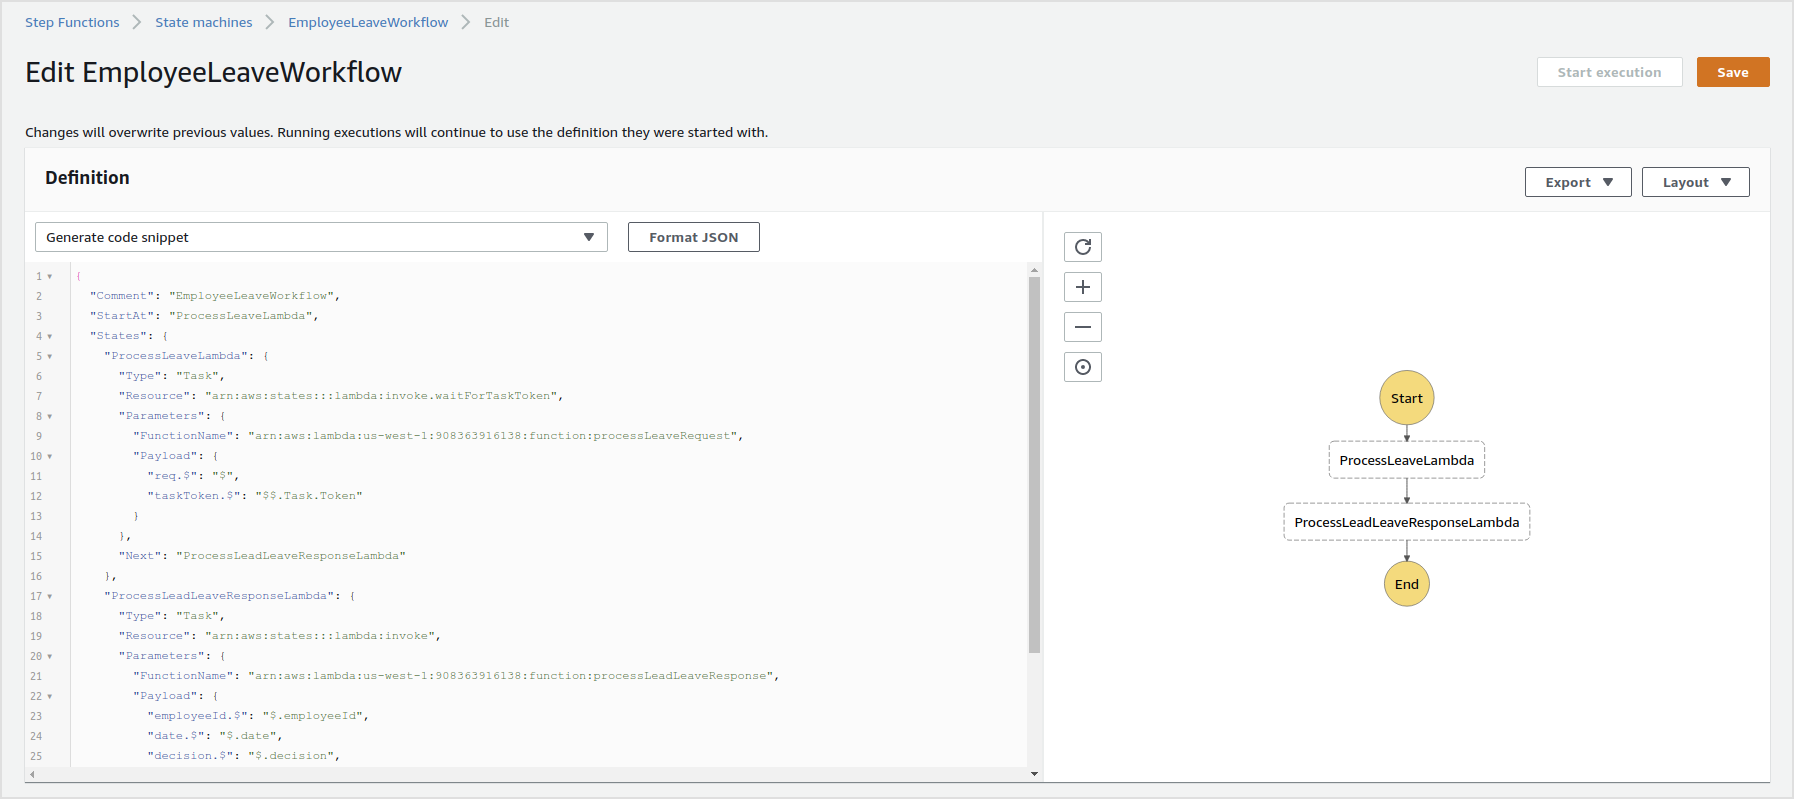
Figure 3: Deployment of the “EmployeeLeaveWorkflow” Step Functions State Machine
NOTE: While creating the state machine, you will need to create an IAM role to be attached to the state machine. Make sure you provide the permissions required to execute Lambda functions by attaching a suitable policy, e.g. “AWSLambdaFullAccess”.
After the state machine is created, you will now be able to look up its ARN on the state machine’s landing page. Let’s use this value to update our “requestLeave” function configuration to add the “LEAVE_REQUEST_SM_ARN” environment variable.
$ aws lambda update-function-configuration --function-name requestLeave --environment "Variables={AWS_AK=$AWS_AK,AWS_SK=$AWS_SK,LEAVE_REQUEST_SM_ARN=$LEAVE_REQUEST_SM_ARN}"
API Gateway Resources
Let’s navigate to the API Gateway page in AWS to create the resources for “request_leave” and “leave_lead_response” endpoints.
The following screen in Figure 4 shows the configuration of the “request_leave” resource.

Figure 4: Deploying “request_leave” API Resource
Here, in the creation of the “GET” resource method, we provide the “requestLeave” Lambda function as the target and deploy the API resource. After deploying the API to a stage, we will be able to find the endpoint URL of the resource, in a similar manner shown in Figure 5.

Figure 5: API Resource “request_leave” Endpoint URL
This endpoint URL will be directly used by employees when submitting leave requests to the system. It was decided by the company CEO that, if you do not know how to do a POST request with CURL, then you are not worthy of getting any leave anyway.
Note: In a more real-world implementation, the “request_leave” resource should have user authentication to make sure the correct person is requesting leave.
The next API resource is “leave_lead_response”, which is the endpoint sent to the email for the lead to provide the decision. The resource is in the format “/leave_lead_response/{empId}/{date}/{decision}/{taskToken}”. Here, the path parameters are mapped to the body of the target Lambda function “processLeadLeaveResponse”. The resource configuration is shown in Figure 6.

Figure 6: Deploying “leave_lead_response” API Resource
Here, click on “Integration Request” and fill the “URL Path Parameter” information as shown below in Figure 7.
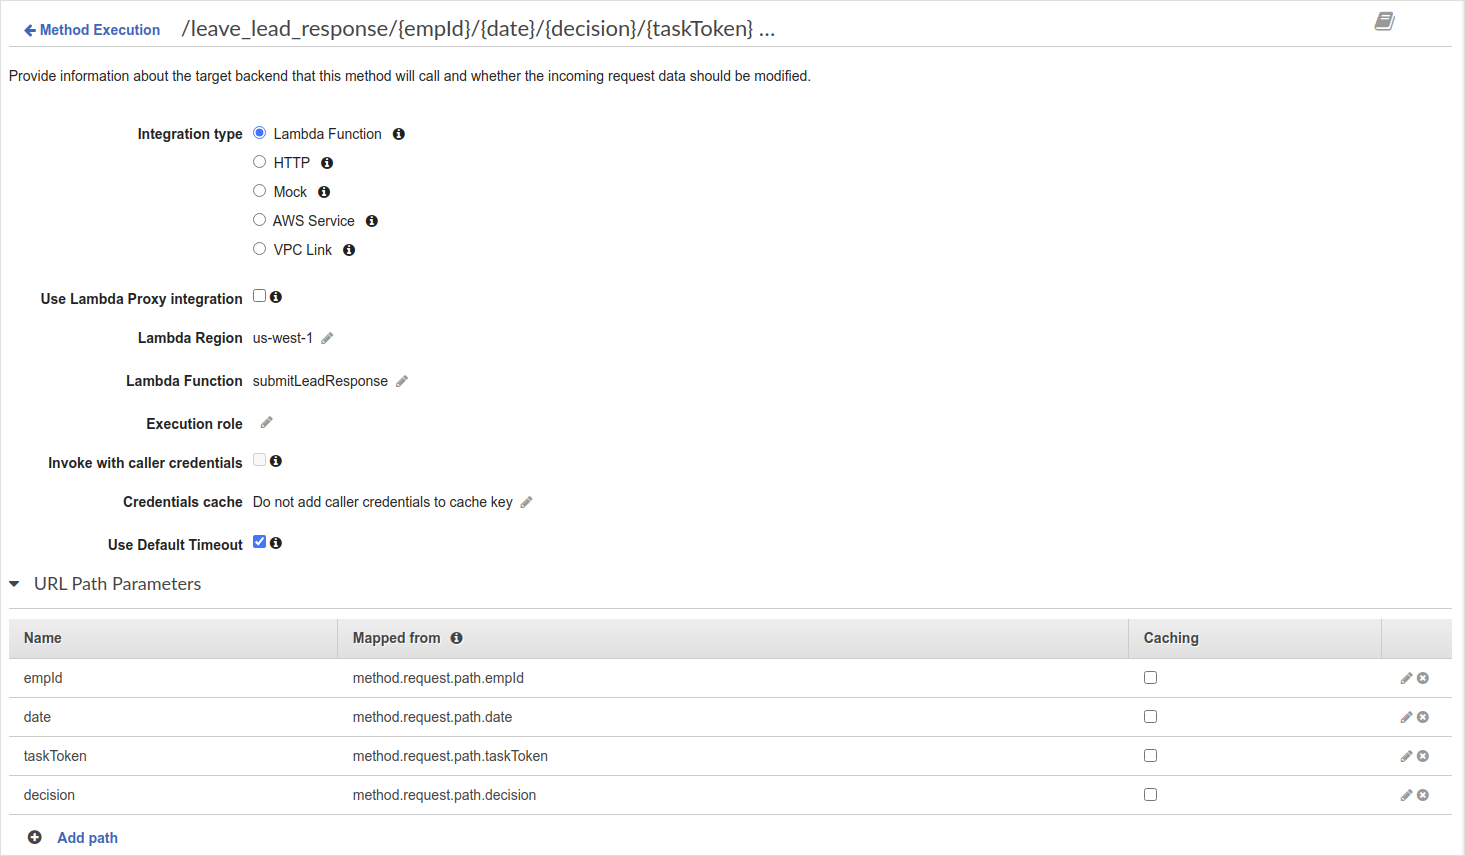
Figure 7: API Resource “leave_lead_response” URL Path Parameter Mapping
At the bottom of the same page, we should now provide a mapping template as shown in Figure 8.
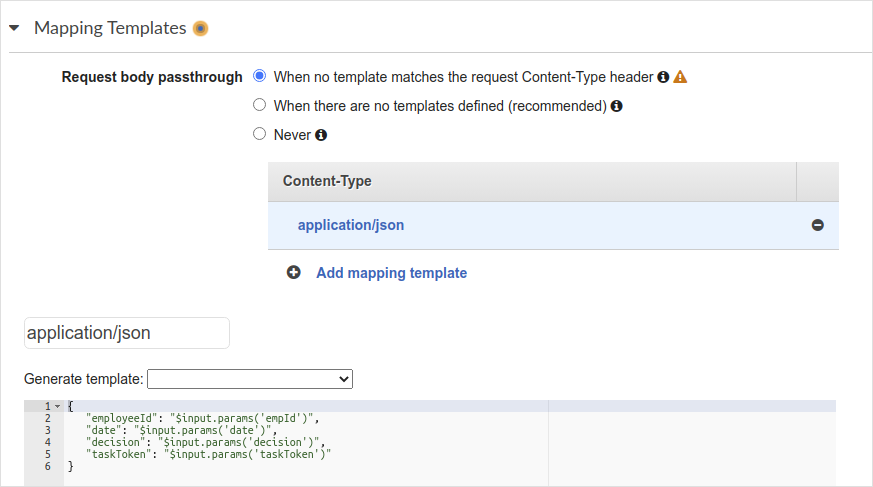
Figure 8: API Resource “leave_lead_response” Mapping Template
After deploying the “leave_lead_response” resource, we now have its endpoint URL value for setting the “LEAVE_LEAD_RESP_URL” environment variable along with other values in the “processLeaveRequest” Lambda function.
$ aws lambda update-function-configuration --function-name processLeaveRequest --environment "Variables={GMAIL_ACCESS_TOKEN=$GAT,GMAIL_REFRESH_TOKEN=$GRT,GMAIL_CLIENT_ID=$GCI,GMAIL_CLIENT_SECRET=$GCS,LEAVE_LEAD_RESP_URL=$LEAVE_LEAD_RESP_URL}"
Demo Run
Leave Request for Jim
$ curl -d '{"employeeId":"E002", "date":"2020-11-01"}' https://xxxxxx.execute-api.us-west-1.amazonaws.com/prod/request_leave
{"status":"Leave request submitted", "ref":"arn:aws:states:us-west-1:908363916138:execution:EmployeeLeaveWorkflow:ccdc8a63-6afd-4998-a97b-9067359e4890"}
Lead email:

Figure 9: Email for Leave Request by Jim
Click “Approve”.
Employee email:

Figure 10: Mail Received by Jim
Leave Request for Jane
$ curl -d '{"employeeId":"E003", "date":"2020-12-20"}' https://xxxxxx.execute-api.us-west-1.amazonaws.com/prod/request_leave
{"status":"Leave request submitted", "ref":"arn:aws:states:us-west-1:908363916138:execution:EmployeeLeaveWorkflow:208c4d98-cfc8-4897-9189-d70cbb373475"}
Lead email:

Figure 11: Email for Leave Request by Jane
State Machine Status:
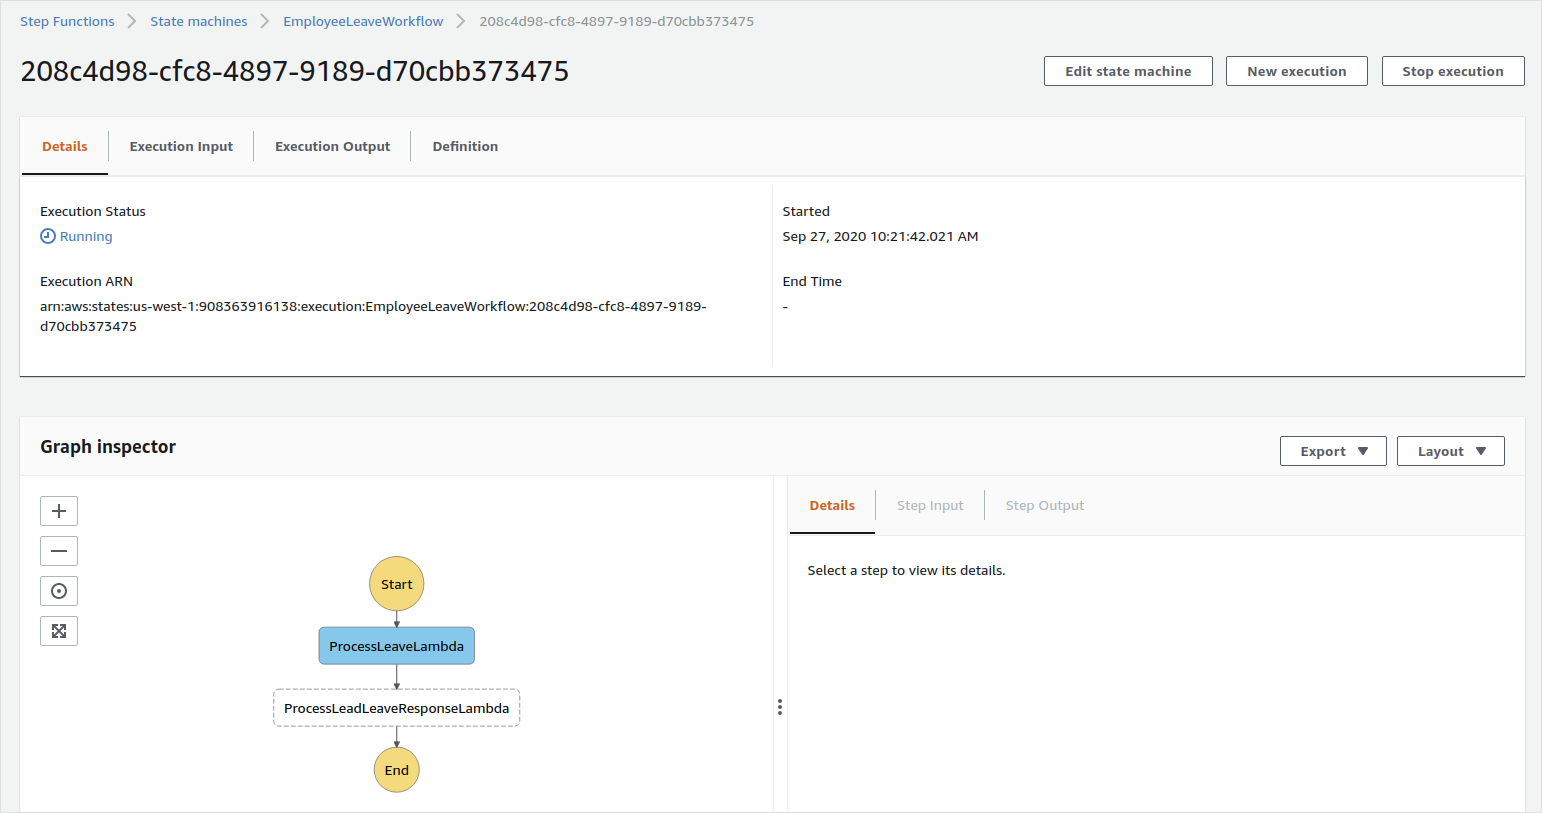
Figure 12: Jane’s Leave Request Sent State Machine Status
Click “Deny” in the mail.
Employee email:

Figure 13: Mail Received by Jane
Final State Machine Status:
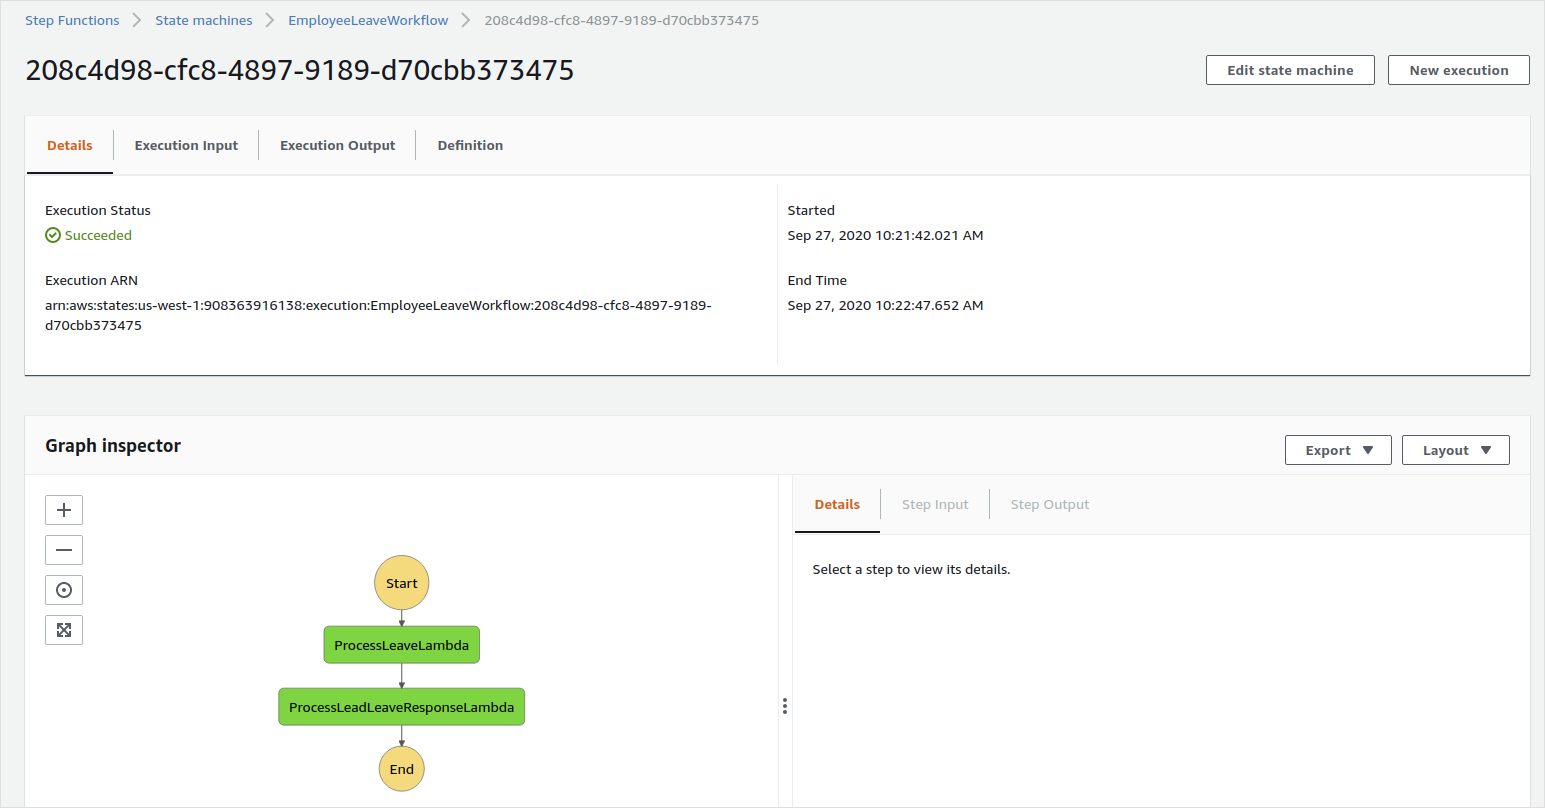
Figure 14: Jane’s Leave Request Resolved State Machine Status
Summary
In this article, we have looked at how to implement a long-running workflow using AWS Step Functions along with the Ballerina programming language. A sample scenario with human interaction was used for demonstrating the process required when defining and deploying such a solution.
For more information on writing serverless functions in Ballerina, refer to the following resources:
Published at DZone with permission of Anjana Fernando. See the original article here.
Opinions expressed by DZone contributors are their own.

Comments