Oracle Data Integrator (ODI): Executing A Load Plan
This article explains how to create and execute a Load Plan in Oracle Data Integrator.
Join the DZone community and get the full member experience.
Join For FreeWhat Is Load Plan?
A Load Plan is an executable object in Oracle Data Integrator that can contain a sequence of several types of steps and each step can contain a child steps. Depending on the step type, the steps can be executed conditionally, in parallel or sequentially.
By default, an ODI Load Plan contains an empty root serial step. This root step is mandatory and the step type cannot be changed.
Why Load Plan Is Required?
Many organizations often used Oracle Data Integrator for populating very large data warehouses. In these use cases, it is common to have thousands of tables being populated using hundreds of scenarios. The execution of these scenarios has to be organized in such a way that the data throughput from the sources to the target is the most efficient within the batch window.
Load Plans help the user organizing the execution of scenarios in a hierarchy of sequential and parallel steps.
Creating a Load Plan
ODI Load Plans appear in both the Designer and Operator Navigator.
To create a new Load Plan you will need to locate the “Load Plans and Scenarios” tab. There on the left corner, you will find a folder with a drop-down in which you will need to select “New Load Plan.”
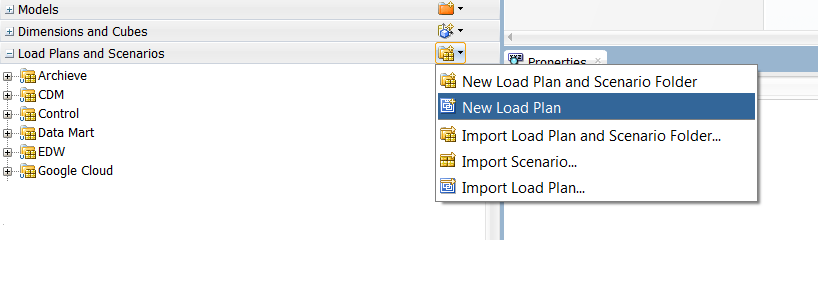
Once you have click on the “New Load Plan” option, The Load Plan Editor is displayed. In the Load Plan Editor, type the Name, Folder Name, and a Description for this Load Plan.
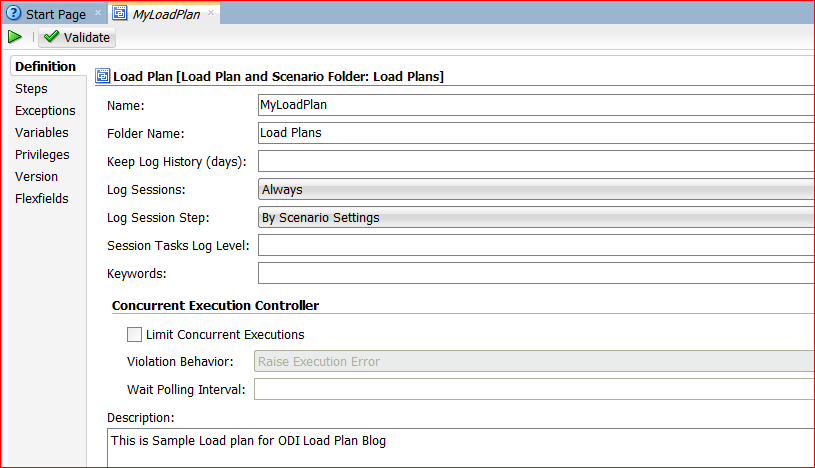
As we can see from the above (Figure 2), there are some other settings that are optional. In this example, I will use the Oracle ODI default settings but you can enter the appropriate ODI load plan settings that fit your needs (Please read below explanations for optional settings).
Log Sessions: Select how the session logs should be preserved for the sessions started by the Load Plan.
Possible values are:
- Always(Default): Always keep session logs.
- Never: Never keep session logs.
- Error: Only keep the session log if the session completed in an error state.
Log Session Step: Select how the logs should be maintained for the session steps of each of the session started by the Load Plan. Note that this applies only when the session log is preserved.
Possible values are:
- By Scenario Settings(Default): Session step logs are preserved depending on the scenario settings.
- Never: Never keep session step logs.
- Errors: Only keep the session step log if the step is in an error state.
Session Tasks Log Level: Select the log level for sessions. This value corresponds to the Log Level value when starting unitary scenarios. The default is 5.
Keywords: Enter a comma-separated list of keywords that will be set on the sessions started from this load plan. These keywords improve the organization of ODI logs by session folders and automatic classification. Note that you can overwrite these keywords at the level of the child's steps.
You can also modify the Concurrent Execution Controller by enabling and disabling the "Limit Concurrent Executions" checkbox.
Limit Concurrent Executions checkbox is diable(unticked) which means no restriction is imposed and more than one instance of this load plan can be running simultaneously.
On the other hand, if you will enable(Ticked) it then you have to select either "Raise Execution Error" or "Wait to Execute".
"Raise Execution Error" will throw an execution error message if an instance of the load plan is already running, attempting to run another instance whereas "Wait to Execute" will put another execution in a wait status till the first instance of the load plan is complete.
Now that you have entered the basic ODI load plan information click on the “Steps” tab on the left-hand corner.
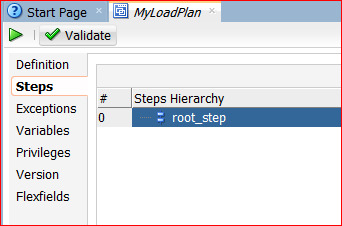
Here you can add steps by click on the “Green +” on the top right-hand corner.
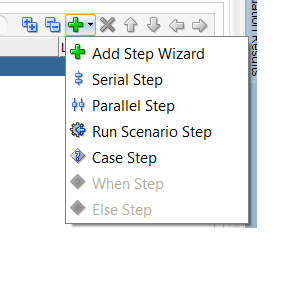
You can add the serial step, parallel step, or case step as per your requirement and drag the scenario to your load plan.
If your Load Plan requires conditional branching, or if your scenarios use variables, select the Variables tab and declare variables.
Now another great thing, you can also add exception steps that are used in the event of a load plan step failing, select the Exceptions tab and define the exception step.
Load Plan Example
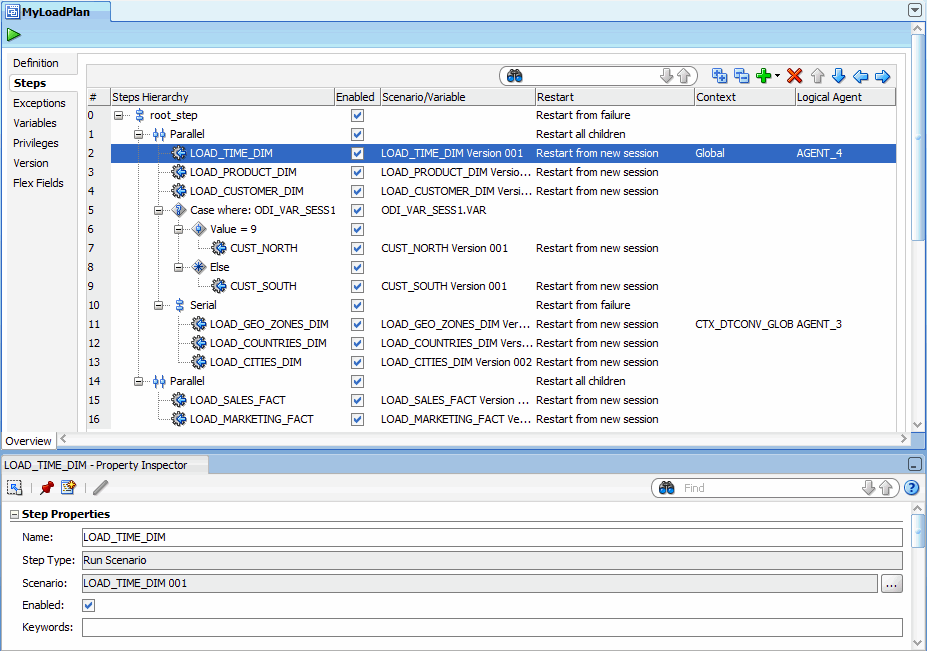
Please see below an example of Load Plan where:
- Dimensions are loaded in parallel. This includes the LOAD_TIME_DIM, LOAD_PRODUCT_DIM, LOAD_CUSTOMER_DIM scenarios, the geographical dimension and depending on the value of the ODI_VAR_SESS1 variable, the CUST_NORTH or CUST_SOUTH scenario.
- The geographical dimension consists of a sequence of three scenarios (LOAD_GEO_ZONE_DIM, LOAD_COUNTRIES_DIM, LOAD_CITIES_DIM).
- After the dimensions are loaded, the two fact tables are loaded in parallel (LOAD_SALES_FACT and LOAD_MARKETING_FACT scenarios).
Running a Load Plan
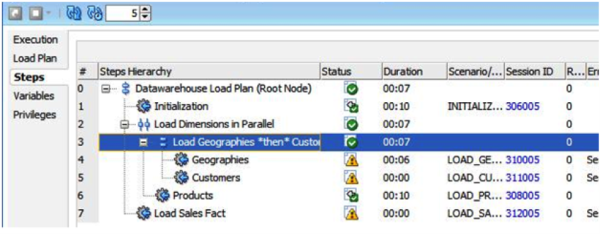
Run the ODI Load Plan by clicking the "Execute" button. The load plan running will be shown in the "Load Plan Executions" according to the Operator. Steps taken along with their status and statistics are shown in the "Steps Tab." This tab reflects the executions in-progress and can be refreshed.
We can also run the load plan in the command line. Please see below syntax to run the load plan in the command line.
startloadplan.bat load_plan_name context_code [log_level]
"-AGENT_URL=agent_url" ["-KEYWORDS=Keywords"] ["variable=value"]*
Conclusion
This post has explained how to create and execute the Load plan in Oracle data integrator. If you have any questions on this then feel free to ask in the comments section!
Further Reading
Load Testing Your Application Using JMeter, Docker, and Amazon Web Services
3 Phases of a Successful Performance Testing Methodology
Opinions expressed by DZone contributors are their own.

Comments