Next Generation Front-End Tooling: Vite
In this article, we will look at Vite Core features, working with static assets and images, building libraries, and server integration.
Join the DZone community and get the full member experience.
Join For FreeIn this article, we will look at Vite core features, basic setup, styling with Vite, Vite working with TypeScript and frameworks, working with static assets and images, building libraries, and server integration.
Why Vite?
- Problems with traditional tools: Older build tools (grunt, gulp, webpack, etc.) require bundling, which becomes increasingly inefficient as the scale of a project grows. This leads to slow server start times and updates.
- Slow server start: Vite improves development server start time by categorizing modules into “dependencies” and “source code.” Dependencies are pre-bundled using esbuild, which is faster than JavaScript-based bundlers, while source code is served over native ESM, optimizing loading times.
- Slow updates: Vite makes Hot Module Replacement (HMR) faster and more efficient by only invalidating the necessary chain of modules when a file is edited.
- Why bundle for production: Despite the advancements, bundling is still necessary for optimal performance in production. Vite offers a pre-configured build command that includes performance optimizations.
- Bundler choice: Vite uses Rollup for its flexibility, although esbuild offers speed. The possibility of incorporating esbuild in the future isn’t ruled out.
Vite Core Features
Vite is a build tool and development server that is designed to make web development, particularly for modern JavaScript applications, faster and more efficient. It was created with the goal of improving the developer experience by leveraging native ES modules (ESM) in modern browsers and adopting a new, innovative approach to development and bundling. Here are the core features of Vite:
Fast Development Server
One of Vite’s standout features is its incredibly fast development server. It leverages native ES modules (ESM) in modern browsers to provide lightning-fast loading and updates during development. This means that your changes are reflected in the browser almost instantly, thanks to features like Hot Module Replacement (HMR).
Native ES Modules (ESM)
Vite takes advantage of the native ES modules support in modern browsers, allowing you to use import and export statements directly in your code without the need for bundling during development. This speeds up the development process by eliminating the bundling step for ESM-supported browsers.
Flexible Configuration
Vite offers a simple and intuitive configuration system. Developers can configure their project’s settings using a vite.config.js file, making it easy to customize build and development options to suit specific project requirements.
Asset Handling
Vite handles various assets, including images, fonts, and other static resources, allowing you to import and use them directly in your code. It automatically processes and optimizes these assets during production builds.
CSS Handling
Vite supports a variety of CSS solutions, including native CSS modules, PostCSS for advanced CSS transformations, and various CSS preprocessors like SCSS and Less. This flexibility makes it easy to manage styles in your project.
Plugin System
Vite provides a plugin system that allows developers to extend its functionality. You can find and use various plugins from the Vite ecosystem or create custom plugins to tailor Vite to your project’s specific needs.
Efficient Production Builds
When it comes to production, Vite produces highly optimized and tree-shaken builds. It automatically analyzes your code to eliminate dead code paths, reducing the bundle size for faster loading times.
Multiple Framework Support
While initially designed for Vue.js, Vite is not limited to any specific JavaScript framework. You can use it with Vue, React, or even vanilla JavaScript projects.
Active Development and Community
Vite is actively developed and has a growing community. This means you can expect regular updates, bug fixes, and an expanding ecosystem of plugins and tools.
Basic Setup: Scaffolding, Working With TypeScript, Frameworks, and Project Templates
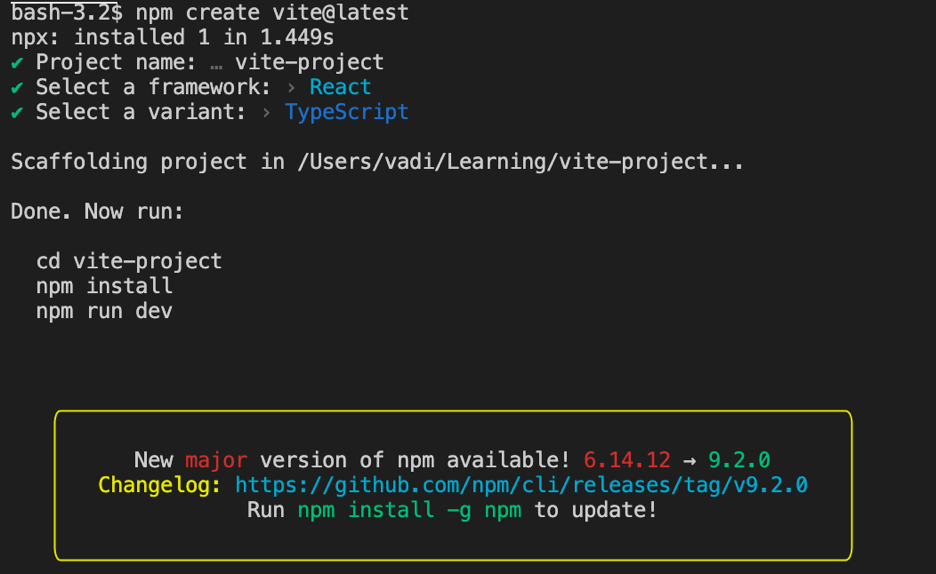
Vite provides a variety of JavaScript/TypeScript libraries and frameworks support, which easily chooses from scaffolding projects. Below are easy steps to start with the Vite project.
- Create a new directory and provide the below NPM command; Vite supports npm,yarn, pnpm, and based package manager commands.
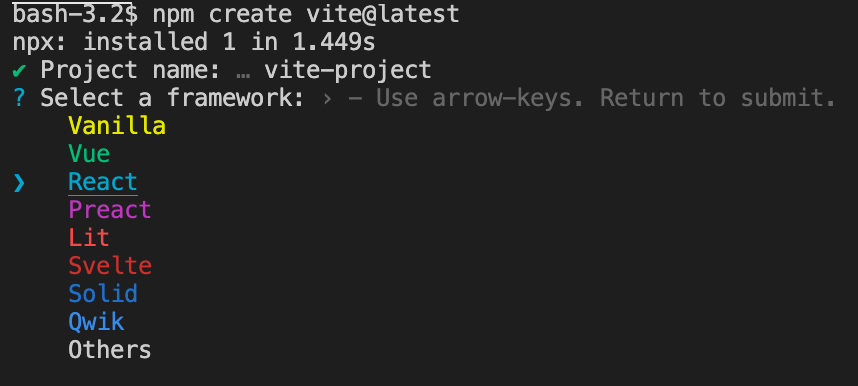
- Select a framework; here, choose the React Library.
![React Library]()
3. Select a variant. Here, choose the TypeScript-supported project.
4. Based on the variant selection, a scaffolding project will be created. Now get into the vite-project directory and install the NPM (npm install).
Note: Vite requiers Node.js version 18+. 20+.
 5. While performing the npm run dev command, Vite builds the project package with the ESM module.
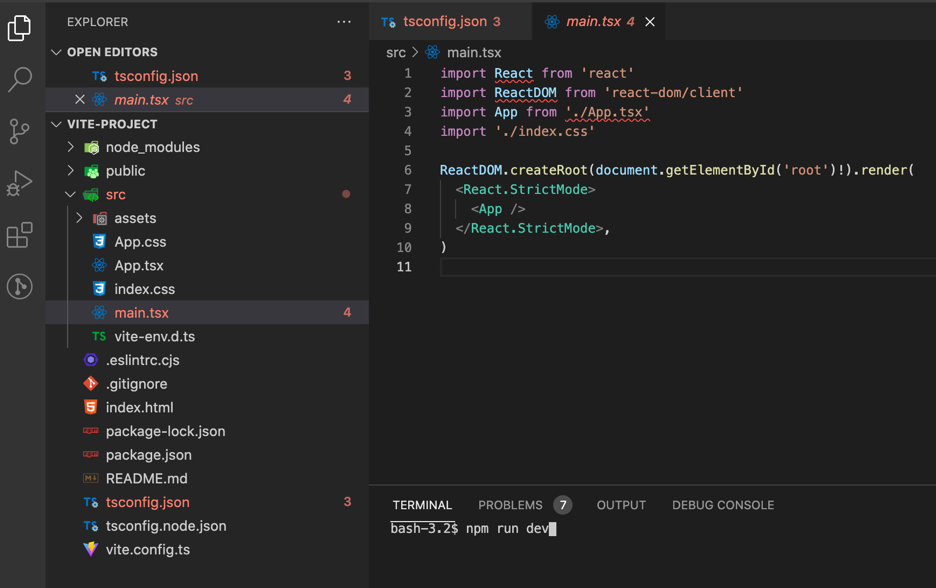 6. Upon npm run dev execution, the localhost development server starts running and opens the application.

Styling With Vite
Working With CSS
Vite gives a few different ways to add CSS.
- We can add
<link>tags as we’ve done for years. - We can import the CSS files from our JavaScript.
Using a <link> Tag
Let’s start with the most boring but straightforward of the bunch. Add the following to your HTML.
<link rel="stylesheet" href="/src/style.css" />Importing a Stylesheet
In counter.js, we can import a stylesheet.
import './counter.css';In both cases, the CSS is loaded globally. The notable difference here is that this CSS file will only be loaded when this module is loaded.
Working With SCSS or Sass
Using SCSS (or Sass) is relatively straightforward. Consider this change to our CSS.
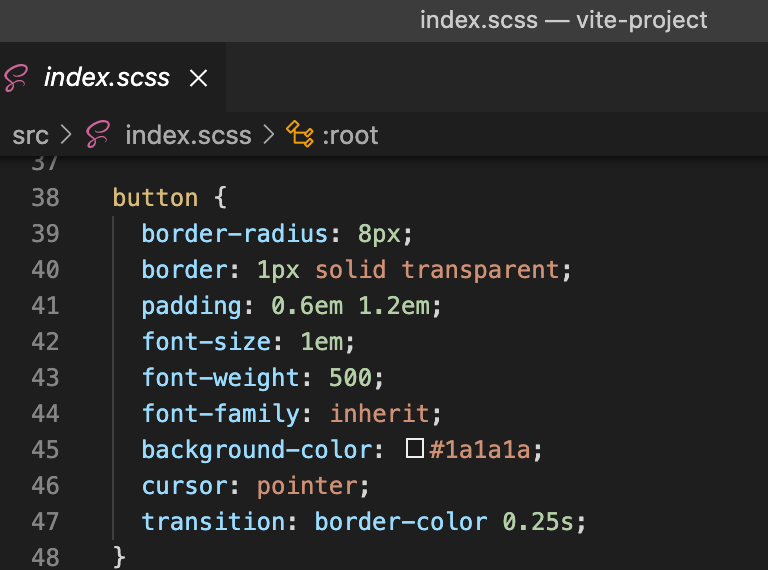 Preprocessor dependency “sass/scss” not found? Try
 npm install -D sass.
Static Assets With Vite
Static file serving is an essential feature in many web development environments, and Vite is no exception. Serving static files means that the server handles requests for static assets (like images, CSS, and JavaScript files) without any additional processing and returns them directly to the client.
The thing about static asset optimization is that we know it’s something we should do, but we know we don’t often do it because it’s often time harder than it ought to be.
To no one’s surprise, that’s not true with Vite. It’s easy with Vite.
Default Behavior
By default, Vite serves static files from the public directory at the root of your project. Files in this directory are served as-is at the root level.
For example, if you have an image in public/vite.svg, it will be available at http://localhost:5173/vite.svg.
Advantages
- Efficient: Vite caches these files and serves them efficiently, enabling faster load times during development.
- No rebuild: Unlike files in src or other source code directories, changes to files in public don’t trigger a rebuild.
- Absolute paths: Files are served at the root level, which means you can reference them using absolute paths.
Limitations
- No import support: Files in the public directory cannot be imported into your source code as modules.
- No pre-processing: These files are not processed or optimized by Vite or any of its plugins.
Serving From Source Code
You can also import and serve static files directly from your source code. This allows them to go through the build process, which can include optimizations like minification or file hashing.
For instance, you can import an image in a JavaScript file:
import viteImage from 'src/images/vite-image.svg';Building Libraries: Webpack 5 Module Federation Support With Vite
Module Federation allows you to dynamically run code from multiple different bundles at runtime, essentially letting different JavaScript applications share code without the need for package installations or versioning conflicts.
Vite doesn’t natively support Module Federation like Webpack 5; plugins are available to enable this functionality.
Adding Module Federation Plugin to Vite
You’ll need to add a Vite plugin to enable Module Federation. One such plugin is vite-plugin-module-federation. Install it as a dependency:
npm install @originjs/vite-plugin-federation --save-devimport { defineConfig } from 'vite';
import ModuleFederation from 'vite-plugin-module-federation';
export default defineConfig({
plugins: [
ModuleFederation({
name: 'very-fancy-components',
filename: 'remoteEntry.js',
exposes: {
'./button': './src/components/button.tsx'
}
})
]
});Consuming a Federated Module
Now that we’ve exposed some modules let’s see how to consume them in another Vite project. Create another Vite project as outlined earlier.
Next, update its vite.config.js to consume the federated module:
import { defineConfig } from 'vite';

import react from '@vitejs/plugin-react';

import federation from '@originjs/vite-plugin-federation';


// https://vitejs.dev/config/

export default defineConfig({

     plugins: [

          react(),

          federation({

               name: 'host-app',

               remotes: {

                     app1: 'http://localhost:4173/assets/remoteEntry.js'

               },

               shared: ['react', 'react-dom']

          })

     ]

});
Importing the Federated Module
In your application code, you can now dynamically import the federated module.
const Button = lazy<ComponentType<ButtonProps>>(() => import(‘App1/button'));


const Application = () => {

     return (

          <React.Suspense fallback="Loading App...">

               <Button dangerous>Button</Button>

          </React.Suspense>

     );

};


export default Application;
Running the Projects
Start both projects with npm run dev and navigate to their respective URLs to see Module Federation in action.
Server Integration: Proxying API Requests
Proxying in Vite allows you to forward certain HTTP requests to another server, usually for the purpose of avoiding CORS (Cross-Origin Resource Sharing) issues during development or routing API requests through the development server. This is extremely useful when you have a separate backend API, and you want to develop both the frontend and backend concurrently.
Basic Configuration
To set up a proxy, you can modify your vite.config.js to include a proxy object inside the server configuration.
Here’s an example:
import { defineConfig } from 'vite';

import react from '@vitejs/plugin-react';


// https://vitejs.dev/config/

export default defineConfig({

     plugins: [react()],

     server: {

          proxy: {

               '/todos': {

                     target: 'http://localhost:5173',

                     changeOrigin: true

               }

          }

     }

});
In this configuration, any request that starts with /api on your development server will be forwarded to http://localhost:5173.
Advanced Configuration
For more advanced use-cases, you can use an object for detailed configuration:
// vite.config.js

export default {

     server: {

          proxy: {

               '/api': {

                     target: 'http://localhost:3001',

                     changeOrigin: true,

                     rewrite: (path) => path.replace(/^/api/, '')

               }

          }

     }

};
In this configuration:
- Target specifies the server to which the request should be proxied.
- ChangeOrigin changes the origin of the host header to the target URL.
- Rewrite allows you to modify the path of the request URL.
Conclusion
In conclusion, This is an in-depth guide to help the next generation of build tools by Vite for front-end engineering web development. If you like this guide and want to know more about Vite, you can visit the official documentation page.
Opinions expressed by DZone contributors are their own.

Comments