MuleSoft Anypoint Platform Complete Setup Guide
In this blog, we are going to look into the Anypoint platform setup. This is a complete end to end guide for setting up the platform.
Join the DZone community and get the full member experience.
Join For FreeIn this blog, we are going to look into the Anypoint platform setup. This is a complete end to end guide for setting up the platform.
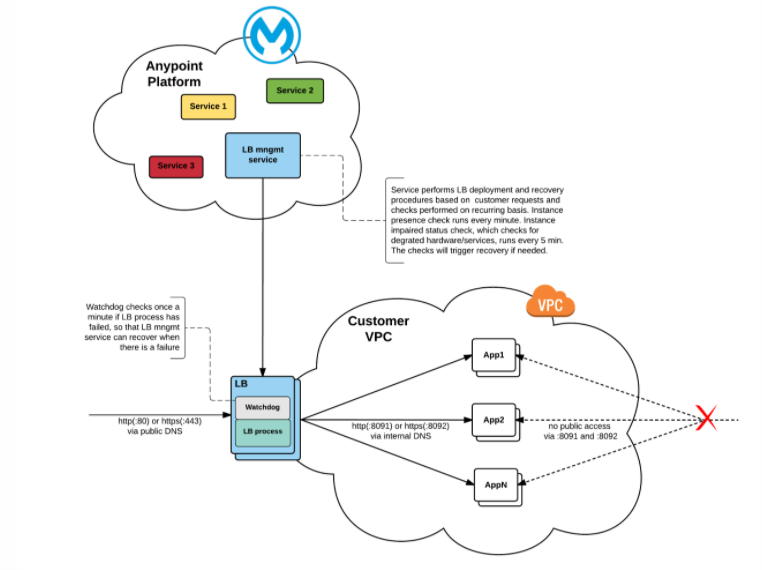
So we are going to look into the below steps:
- Creating Environment
- Creating VPC
- Creating Load balancer
- Creating VPN
Creating Environment:
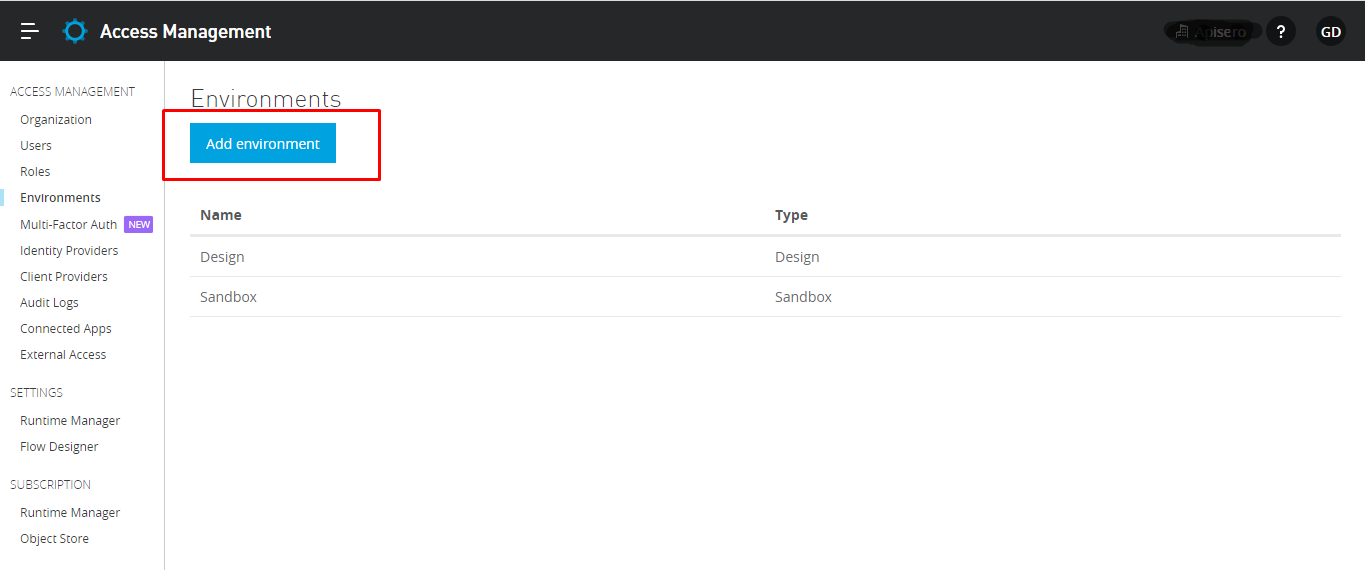
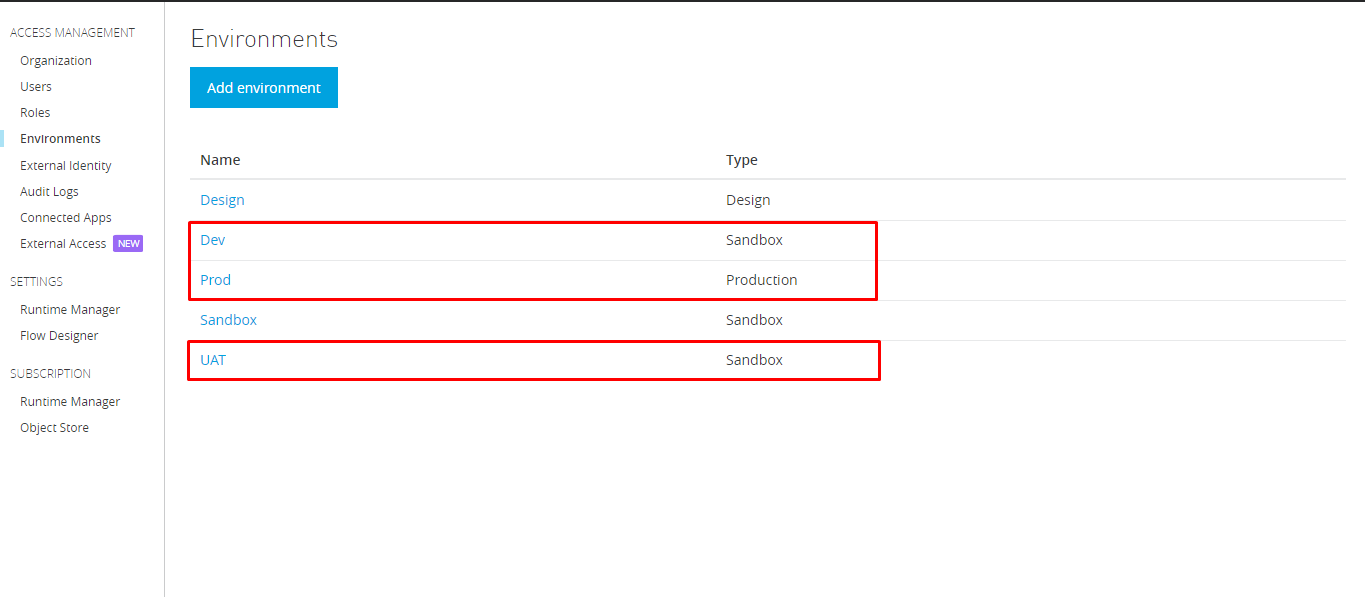
Lets create "dev", "UAT" and "Prod" environment:
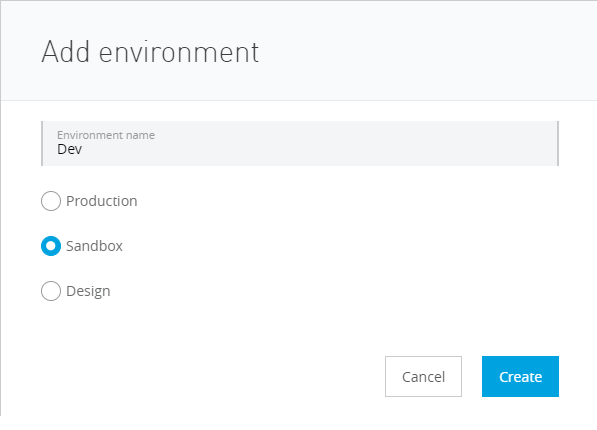
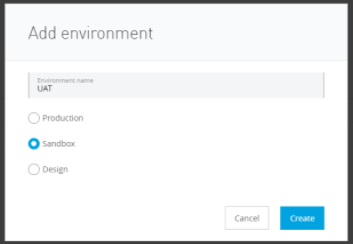
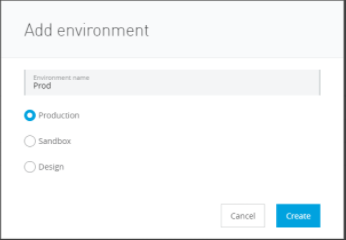
So now we have the below environments:
Creating VPC:
A Virtual Private Cloud (VPC) allows you to create a private and isolated network in the cloud virtually. This ensures that each customer's data remains isolated from other customer's data, both in transit and inside the cloud provider's network.
As a normal practice, we create 2 VPC's for Production and others for all non-production environments.
Now lets create non-prod-vpc VPC , go to Runtime manager --> VPC's
Note: VPC does not come with a trial account.
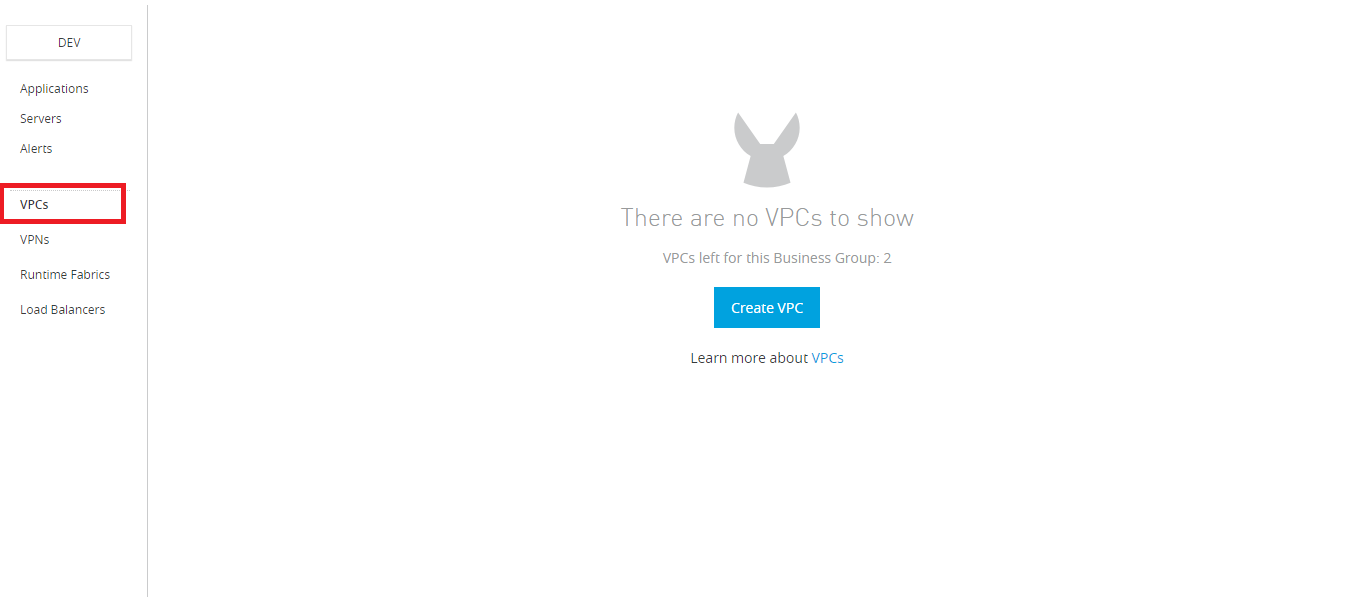
You will need to fill in the below details:
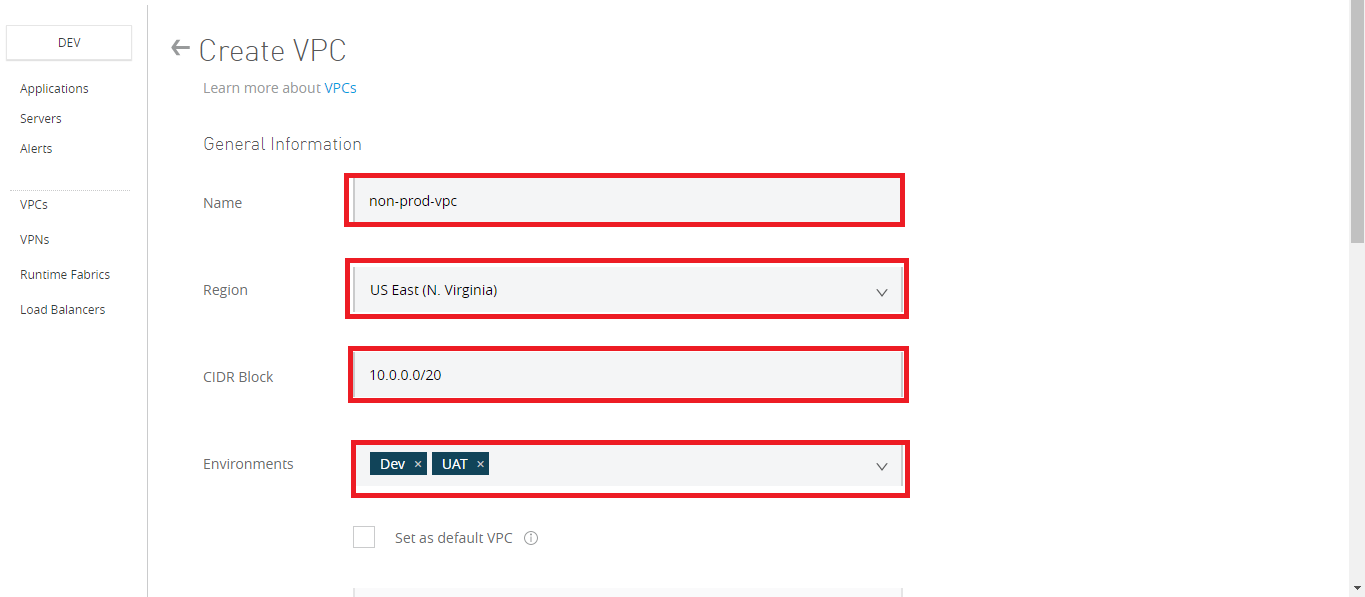
Name: The name to identify your Anypoint VPC. Also, it should be
- Be unique within the organization.
- Between 3 - 42 characters long.
- Contain only lowercase letters, numbers, and dashes
- You cannot change the name of a VPC after you create it. To change the name, delete and recreate the VPC.
Region: The region to which the Anypoint VPC is bound, The recommended region to use might vary depending on how you connect to your Anypoint VPC.
- If you are using a VPN tunnel, you might want to choose the CloudHub region closest to your data center.
- However, if you are peering with your private AWS VPC, you need to create your Anypoint VPC in the same AWS region.
CIDR Block: The size of the Anypoint VPC in Classless Inter-Domain Routing (CIDR) notation.
- CIDR Blocks you choose for the Anypoint VPC come from a private IP space and should not overlap with any other Anypoint VPC’s CIDR Blocks or any CIDR Blocks in use in your corporate network.
- This setting is configurable only during this initial creation of an Anypoint VPC. Once the Anypoint VPC instance is created, you cannot resize it or edit your selected CIDR block.
How to Decide on the Size of CIDR Block
To calculate the proper sizing for your Anypoint VPC, you first need to understand that the number of dedicated IP addresses is not the same as the number of deployed workers.
For each worker deployed to CloudHub, the following IP assignation takes place:
- At least two IP addresses per worker to perform at zero-downtime.
- For better fault tolerance, the VPC subnet may be divided into up to four Availability Zones.
- A few IP addresses are reserved for infrastructure.
- The safe rule of thumb for deciding the size of your Anypoint VPC subnet is to calculate 10 times the maximum number of expected apps to deploy in the VPC.
Note: Due to this structure, the smallest network subnet block you can assign for your Anypoint VPC is /24 and the largest /16.
So you are planned to have 100 APIs in the VPC, then calculations should be as below.
- 100 * 2 = 200
- 200 * 4 (no of Availability Zones) = 800
- 800 + 20% (for infrastructure) = 960
So we should assign at least 960 private IPs, which is almost 10 times the maximum number of expected apps to deploy in VPC.
Environments:
Select an environment to which to bind Anypoint VPC.
- If you don’t select an environment, all applications deployed to the selected region are associated with this Anypoint VPC.
- Don’t associate Anypoint VPC with a design environment. You can deploy apps to the design environment only from Design Center, not from Runtime Manager.
Set as Default VPC:
Select this option to set the Anypoint VPC as the default for the region you set.
- This means that all environments in this region not associated with an Anypoint VPC will be, by default, associated with this Anypoint VPC.
Firewall Rule:
 By default, all inbound traffic is blocked, and you need to configure firewall rules to allow traffic to your worker.
When you create an Anypoint VPC, four firewall rules are created by default:
- Two rules to allow inbound connections from within your local Anypoint VPC through ports 8091 and 8092:
{
"CIDR Block": "10.113.0.0/24", // (Local VPC)
"Protocol": "TCP",
"From port": 8092,
},
{
"CIDR Block": "10.113.0.0/24", // (Local VPC)
"Protocol": "TCP",
"From port": 8091,
}
These firewall rules allow traffic from within the Anypoint VPC to reach your workers through 8091 and 8092. These are the only ports used by your CloudHub-dedicated load balancer to proxy all external communications to your workers.
Two rules to allow inbound connections from anywhere through ports 8081 and 8082:
xxxxxxxxxx
{
"CIDR Block": "0.0.0.0/0", // (Anywhere)
"Protocol": "TCP",
"From port": 8082,
},
{
"CIDR Block": "0.0.0.0/0", // (Anywhere)
"Protocol": "TCP",
"From port": 8081,
}
These rules allow traffic from any host to reach your workers through ports 8081 and 8082. CloudHub’s shared load balancer uses these ports to proxy external requests to your workers. You can remove these rules if you don’t want your internal workers to be reached by the publicly accessible load balancer.
Once this is completed, VPC will be created as below.
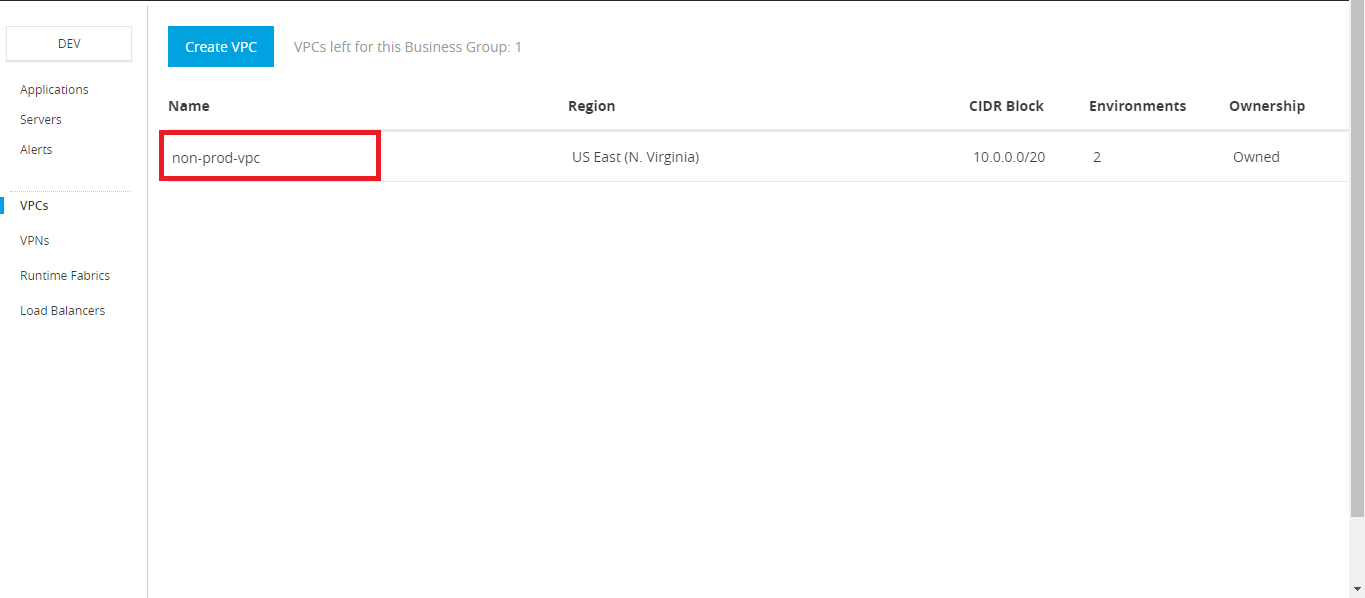
Similarly, we will create a VPC for Production.
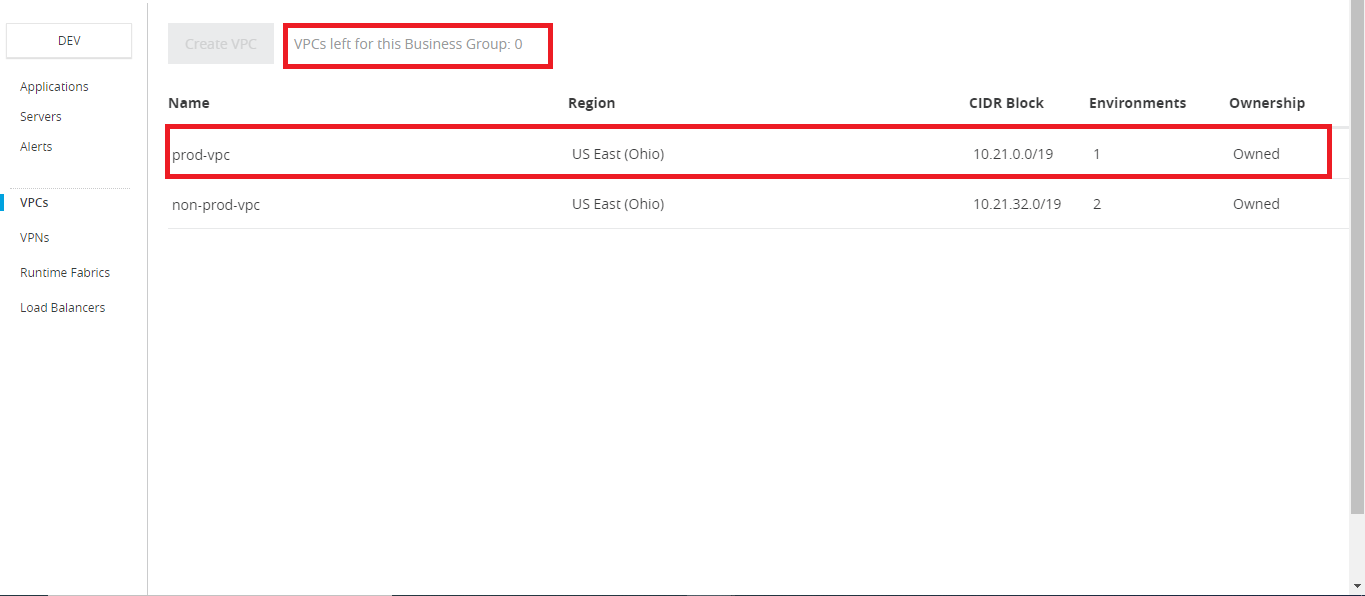
Note: As shown in the above image, we can have only 2 VPC's per business group, so normal practice is to create one VPC for the non-prod environment and another for a production environment.
Creating Load Balancer:
For creating a load balancer, we need to go to Runtime Manager --> Load balancers.
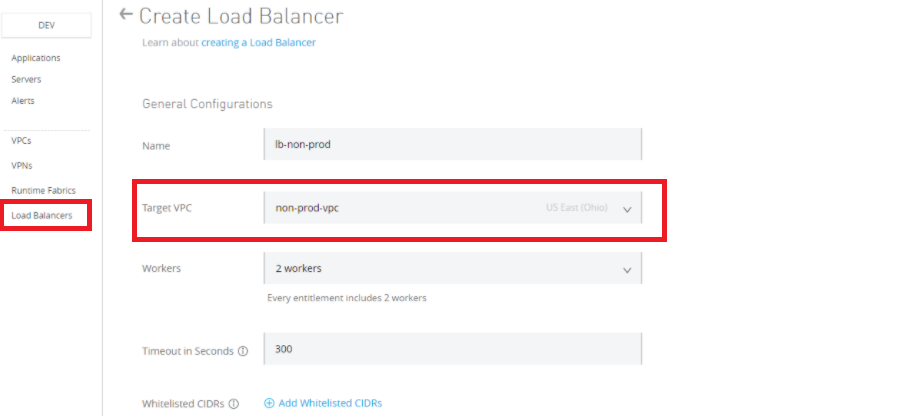
Name: Should be unique across all DLBs defined in Anypoint Platform. (You cannot rename once created, so delete it and create it with a new name).
The domain name for your LB will be as <lb-name>.lb.anypointdns.net
Target VPC: Select target VPC for which this LB should be created
Timeout in Seconds: Specify the amount of time the DLB waits for a Mule application response.
Whitelisted CIDR's: IP addresses which can access this LB, default is 0.0.0.0/0
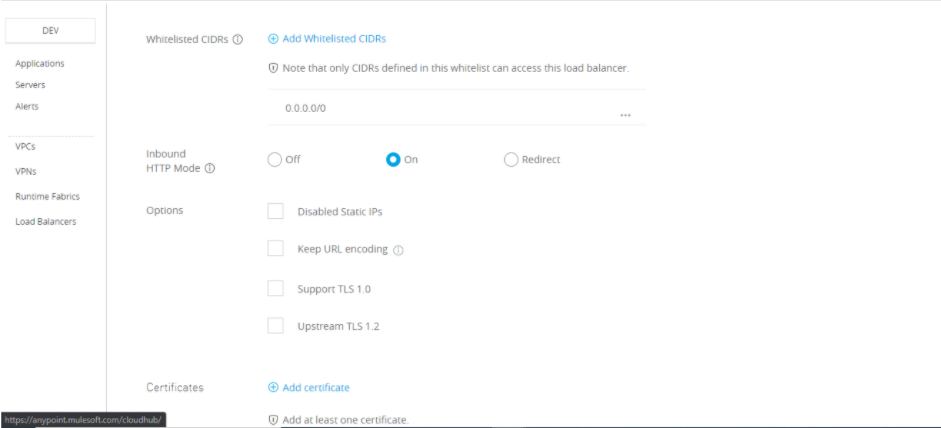
Inbound HTTP Mode: Specifies the behavior of the load balancer when receiving an HTTP request
- Off: Causes the load balancer to silently drop the request.
- On: Accepts the inbound request on the default SSL endpoint using the HTTP protocol.
- Redirect: Redirects the request to the same URL using the HTTPS protocol.
Options :
- Disable static IPs: specifies to use dynamic IPs, which do not persist when the DLB restarts.
- Keep URL encoding: specifies the DLB passes only the %20 and %23 characters as is.
- Support TLS 1.0 specifies to support TLS 1.0 between the client and the DLB.
- Upstream TLS 1.2 specifies to force TLS 1.2 between the DLB and the upstream CloudHub worker.
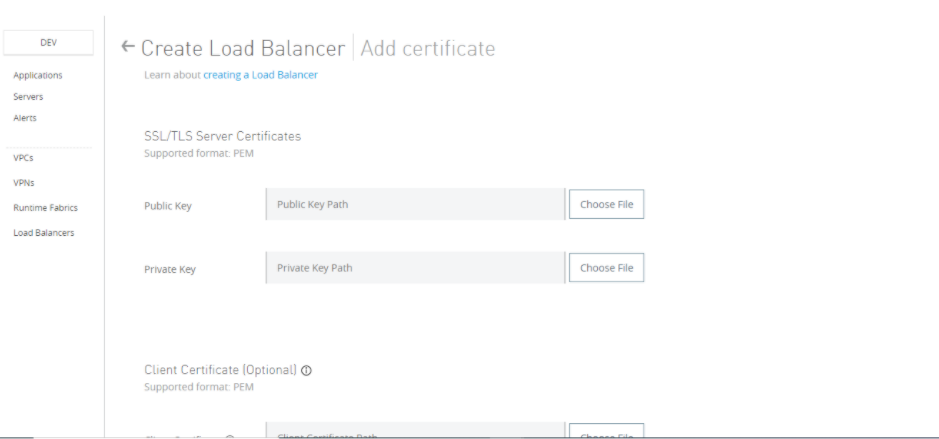
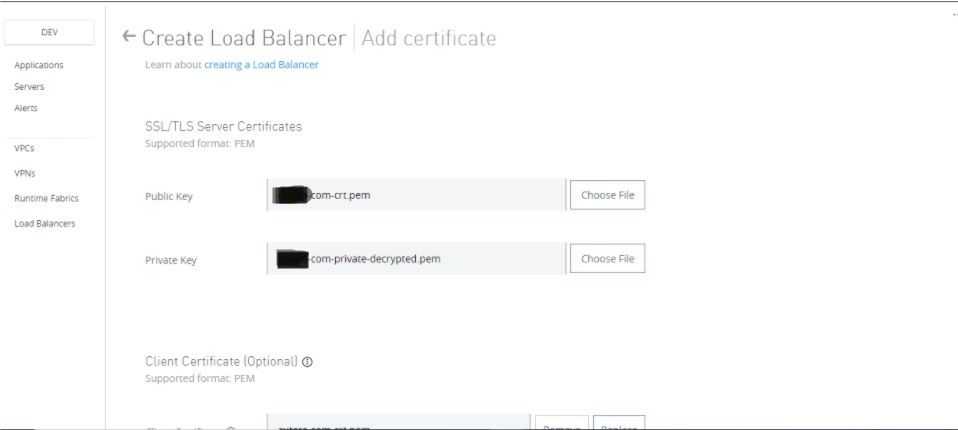
Add certificate: You add the client CA-signed certificate and the private key here.
URL Mapping Rules :
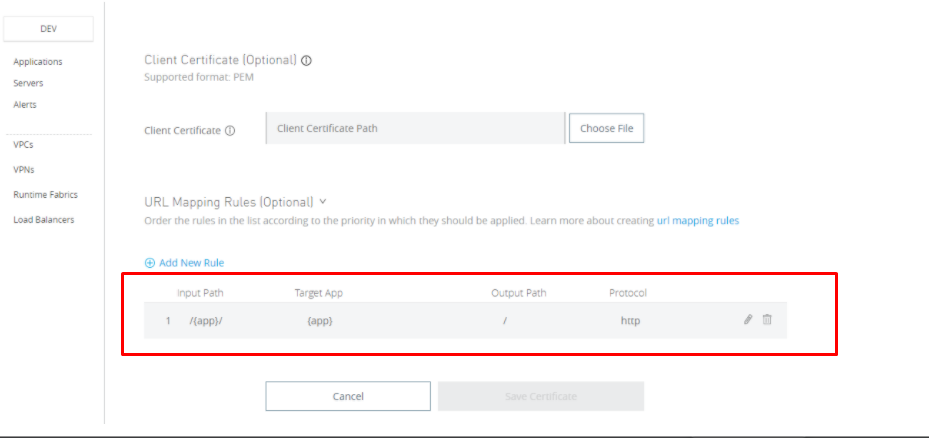
Input path: This will be the path used to invoke the application using LB.
Target app: This will be the app for which this mapping we are maintained.
Output path: This will be an actual path for your application.
Protocol: You can use HTTP or HTTPS.
If you add more than one URL mapping rule, order the list's rules according to the priority in which they should be applied. The one on the top will take precedent to have specific mapping on top and a generic one at the bottom; otherwise generic one will affect all the mappings.
Creating a VPN:
So why we create a VPN connection? We create Anypoint VPN to create a secure connection between your MuleSoft Virtual Private Cloud (VPC) and your on-premises network. You can create multiple site-to-site VPNs if required.
Anypoint VPN supports site-to-site Internet Protocol security (IPsec) connections. A physical or software appliance, called a VPN endpoint, is the terminator on your side of the connection. The MuleSoft side of the connection is an implementation of a virtual private gateway (VGW). The MuleSoft VGW is associated with a single MuleSoft VPC but can support up to 10 VPN connections.
In Anypoint Platform, we can create VPN from Runtime Manager --> VPNs 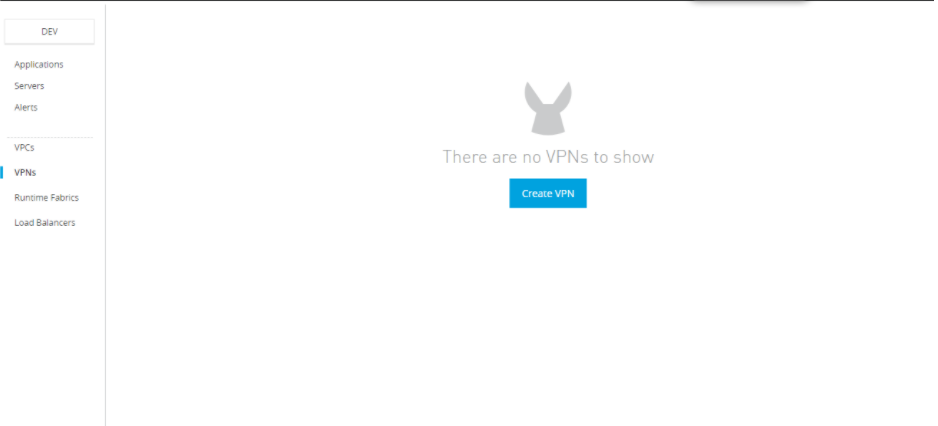
Once you click on Create VPN.
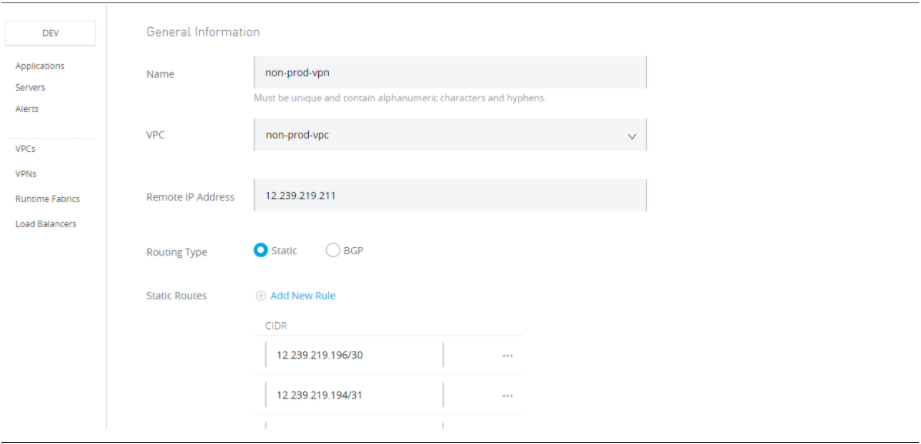
Name: Name must be unique
VPC: Select the VPC for which you want to create a VPN.
Remote IP Address: The public IP address of your VPN endpoint. This must be a single, static IP address.
Routing Type:
- Static: As the name suggests, it will use static routes
- BGP (dynamic routing): BGP is a protocol for dynamic routing which will re-calculate routes after every network change.
Routing type can be decided depending on the device type of router.
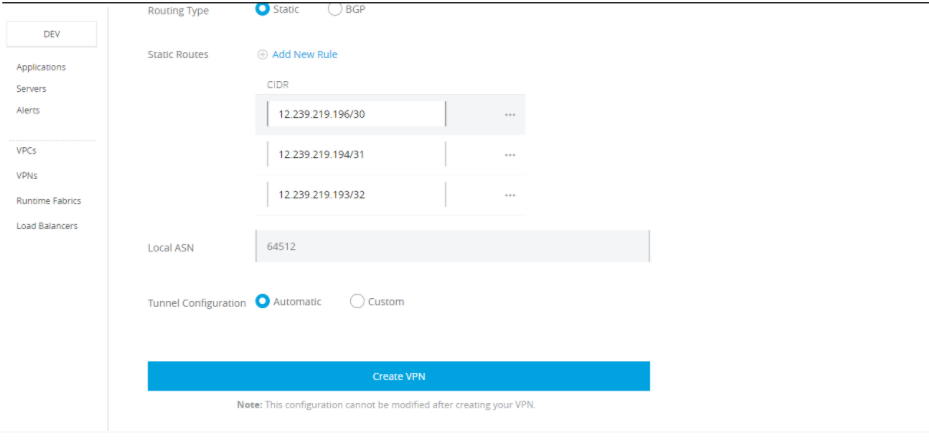
Static Routes: Enter a subnet to make it accessible through the VPN; you can add a maximum of 95 entries per VPC.
![static routes]() Tunnel Configuration:
Tunnel Configuration:
- Automatic: No other inputs are required. This option automatically configures the tunnel settings for your Anypoint VPN. The tunnel settings are visible after VPN creation.
- Custom: If you need a custom configuration for a tunnel.
Click on the Create VPN button.
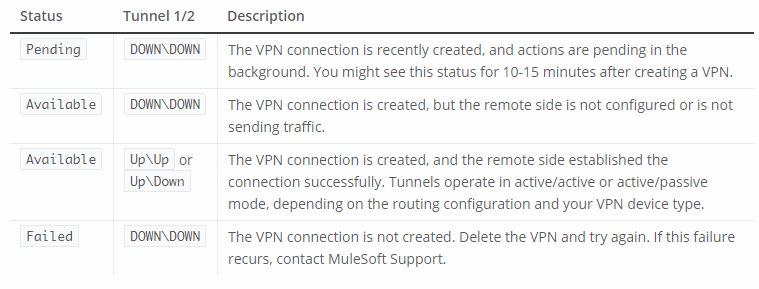
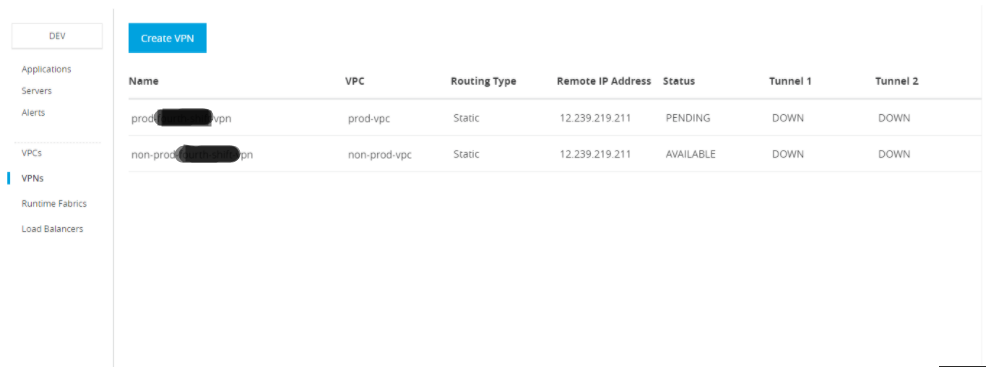
Initially, the VPN's status is Pending; after the status changes to Available, continue with the next steps.
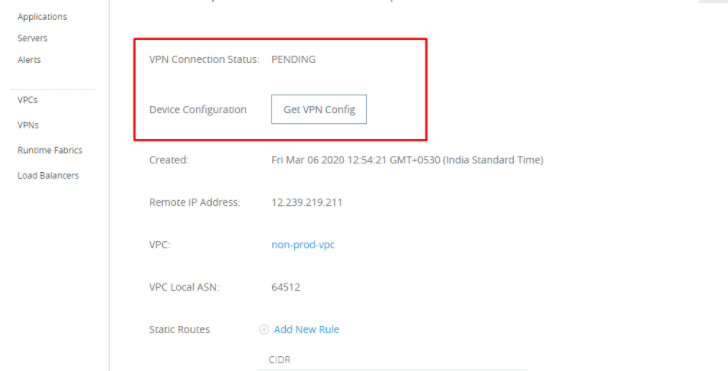
Click on Get VPN config to download the VPN config file; you will need to select the dropdown device type down. If you don't know the device type, then select Generic.
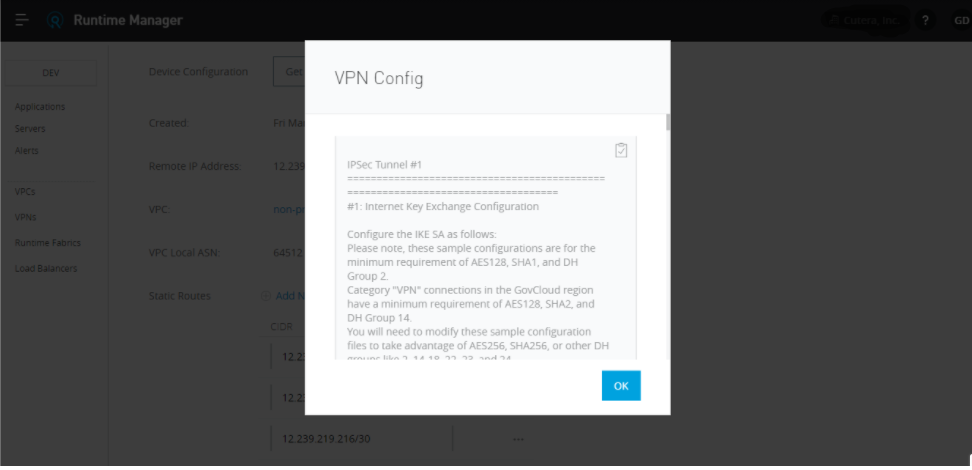
Once done VPN is configured as below.
From the target system, this VPN tunnel will need to be configured, which your network team will do.
We are done with the Anypoint platform setup; now, you can test whether everything is working or not. I normally like to use the Network tool provide here https://help.mulesoft.com/s/article/How-To-Use-Network-Tools-Application. Using this, we can try connectivity to the VPN endpoint.
Also, for other testing, you can use tools such as Postman, SOAPUI, JMeter, and so on.
That's all, Thanks
Opinions expressed by DZone contributors are their own.

 Tunnel Configuration:
Comments