Message-Based Security for SOAP in webMethods: Part I
Learn how to place policies under Integration Server, attach a policy to web service descriptor, and pass message-based authentication credentials with web service.
Join the DZone community and get the full member experience.
Join For FreewebMethods Integration Server provides message-based security for SOAP messages using WS-Security. In contrast to transport-based authentication frameworks such as HTTPS,
which secure the endpoints of a connection against threats, WS-Security secures the
message transmission environment between endpoints.
When using WS-Security, the security information is carried inside header portion of the SOAP envelope. There are many security options that Integration Server supports via WS-Security like signing the message content, encryption, message replay detection, authentication tokens, etc.
In this post, we will see a simple and most basic security option – Username Token. Using this option, we can replace the typical “Basic Authentication”, where credentials are carried over HTTP transport headers, with “Message-Based Authentication”. Here, the credentials are carried inside header portion of the SOAP envelope.
Implementation in webMethods
Starting with Integration Server 8.2, you can implement WS-Security using standard
WS-SecurityPolicy. This policy file is a set of security assertions that describes the security options to be used. So, any web service that attaches a WS-Security policy expects that all the security options that are mentioned in the policy should be validated.
In this post, we will use a simple Username_Token policy that will help us to perform message based authentication.
Creating and Uploading the Username_Token Policy
- Create an empty file using any of your favorite editors.
- Copy the content shown in the above-quoted block into the file.
- Rename the file as Username_Token.policy.
- Now, copy the file and paste it under \IntegrationServer\instances\\config\wss\policies.
Tip: The WS-Policies that you can attach to web service descriptors must reside in this location. The Integration Server provides predefined WS-Policies with settings for a number of standard security configurations. You can use the out-of-the-box policies as is or use them as templates for creating custom WS-Policies. - Once you paste the policy file in above-mentioned location, wait for a second and refresh the folder.
- If you do not see your policy file then check if it is moved to a subfolder named invalid in the same location. If you see it inside invalid folder, then it means there is some issue with your policy file. Either the content is invalid or the security assertions aren’t placed right. Please recheck.
- If your policy does not disappear, then it is good news. Your policy file has been accepted and uploaded by Integration Server.
Attaching the Policy
If you correctly followed the steps in the previous section then your policy is ready. Now, let’s see how to use it when creating web services.
- Open any existing web service provider descriptor or create one if you do not have any.
- Click on the Policies tab as shown in below picture:

- Now, click on the Attach Policy icon from the designer toolbar. Choose the Username_Token policy from all the available policies that are listed.

- Save your web service provider descriptor.
Consuming and Invoking the Service
We will now see how to pass on credentials as part of SOAP message in two clients:
- SOAP UI.
- webMethods Consumer Connector.
Client 1: SOAP UI
- Create a project using the WSDL from web service provider descriptor on Integration Server.
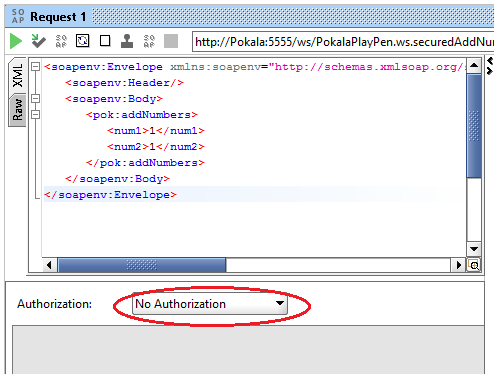
- Open the “Request” from operation you are planning to invoke.
- Do not set any transport header “basic authentication” like you usually do. Leave it as ‘No Authorization’ only.

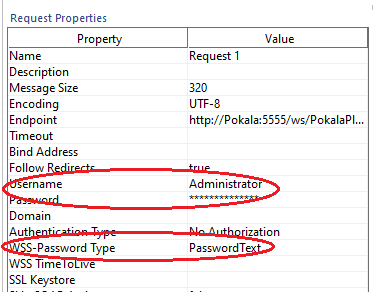
- Navigate and scroll through the “Request Properties” section on the left side panel of SOAP UI. When you find, set below properties with values as shown below
- WSS-Password Type = PasswordText.
- Username = x (Example: Administrator).
- Password = <Password_to_access_Integration_Server>. (Example: manage.)

- Submit your request with valid inputs and it should work smoothly without any “Access Denied” issues.
- Here, you may want to notice how the WS-Security is carrying the credentials in SOAP header. To see that, click on the “RAW” tab on the left side of your request panel as shown below:

- The complete SOAP header in the above message looks like below:
Client 2: webMethods Consumer Connector
- Create a webMethods consumer on any Integration Server using the provider WSDL URL
- After creation, open and run the connector. As usual, an input prompt appears. Fill in the authentication details under auth/message/user and auth/message/password instead of filling under auth/transport.

- Submit the request by clicking on OK.
- You should get the response as expected without any issues.

That’s it. You’ve now learned following things today:
- How to place policies under Integration Server.
- How to attach a policy to web service descriptor.
- How to pass simple message-based authentication credentials with web service using SOAP UI and webMethods Consumer Connector.
Thank you for reading this post. I will publish another one soon as a continuation of this topic. Till then, #HappyIntegration!
Published at DZone with permission of Prasad Pokala, DZone MVB. See the original article here.
Opinions expressed by DZone contributors are their own.

Comments