Mastering BGP Neighborship: Effective Troubleshooting Strategies
This article demonstrates a systematic approach to BGP troubleshooting is essential for maintaining network stability and performance.
Join the DZone community and get the full member experience.
Join For FreeBorder Gateway Protocol (BGP) is the cornerstone of the internet's routing architecture, enabling data exchange between different autonomous systems (AS’s) and ensuring seamless communication across diverse networks. However, the complexity of BGP can make troubleshooting a daunting task, even for experienced network engineers. Whether you're dealing with connectivity issues, session establishment problems, or routing anomalies, a systematic approach to BGP troubleshooting is essential for maintaining network stability and performance.
Topology
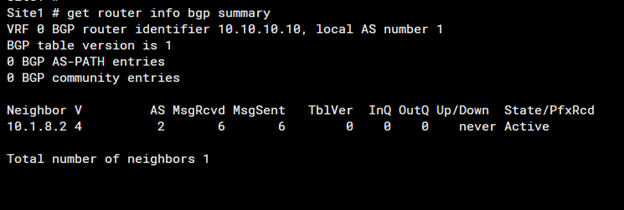
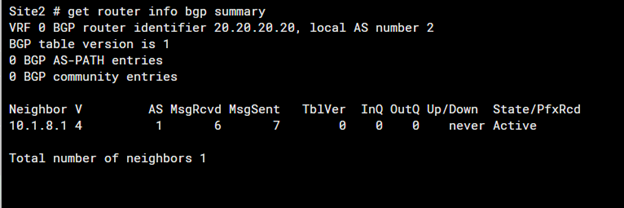
 The two routers have been configured with EBGP but we see that the neighborship did not establish.


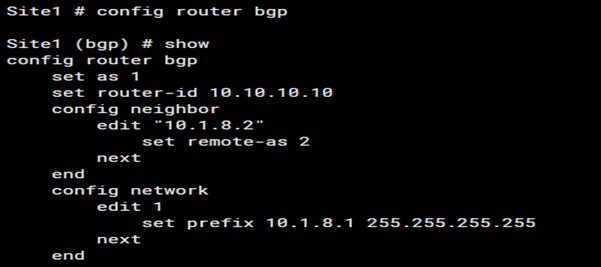
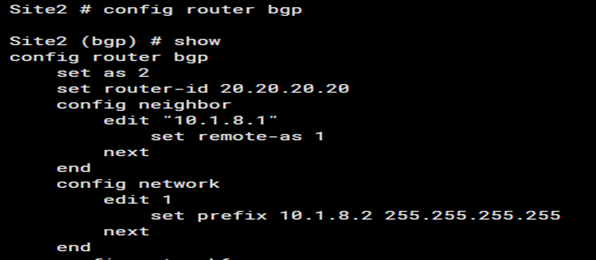
1. Verify BGP Configuration


A. Ensure Router-ID and AS Number Is Configured
The router ID and Autonomous System (AS) number must be correctly configured for BGP to function properly. The router ID is a unique identifier for the BGP router within an AS, typically an IP address. The AS number identifies the administrative boundary of the network.
- Router ID: Choose a stable IP address, often the highest IP address on the router or manually set for consistency.
- AS Number: Ensure the correct AS number is configured, especially in eBGP (External BGP) scenarios, as a mismatch can prevent neighborship formation.
B. Verify the Neighbor Address and the Remote AS Value Is Correct
Ensure the IP address of the neighbor and the remote AS number match the configuration on the peer device. Misconfiguration can lead to the BGP session not establishing.
- Neighbor Address: Verify that the neighbor's IP address is reachable.
- Remote AS: Ensure the remote AS number matches the neighbor's configured AS.
C. If Any Authentication Is Configured Please Ensure the Password Matches on Both Devices
BGP supports MD5 authentication to secure BGP sessions. Ensure the passwords (keys) match on both sides of the BGP connection.
- Authentication: Check for any configured passwords using commands specific to the device vendor and ensure they match on both ends.
D. Verify the BGP Neighbor Timers on Both Devices, Keepalive and Hold Time
BGP uses Keepalive and Hold timers to maintain the session. Ensure these timers are consistent across both devices.
- Keepalive Time: The interval between Keepalive messages sent to the neighbor.
- Hold Time: The maximum time to wait for a Keepalive message before considering the neighbor down.
2. Network Connectivity
Network connectivity is essential for BGP neighborship. The following steps help verify and troubleshoot connectivity:
A. Ping Test
- Check IP connectivity of the neighboring address by pinging it. A successful ping indicates basic connectivity.
- If the ping fails, troubleshoot IP connectivity issues. This includes checking interface statuses, routing configurations, and physical connections.
- Check routing table to verify the path to the neighbor. Ensure the correct route exists to reach the neighbor’s IP address.
B. Ensure Any ACLs or Firewalls Are Configured To Allow BGP Traffic on TCP Port 179
Access Control Lists (ACLs) and firewalls can block BGP traffic if not correctly configured.
- ACLs and Firewalls: Ensure rules allow traffic on TCP port 179, which BGP uses for establishing connections.
3. BGP Session States
Understanding BGP session states helps diagnose issues when a BGP session fails to establish.
A. Check the BGP Summary State Using the ‘Summary’ Command
- BGP Summary Command: Use the command to get an overview of BGP neighbors and their states.
B. The BGP States Idle, Established Active, or Connect Would Give an Idea of the Failure
- Idle: The initial state where BGP is waiting to start.
- Active: BGP is attempting to establish a connection.
- Connect: BGP is waiting for the TCP connection to complete.
- Established: BGP neighborship is formed
C. If It Is Not in an Established State, Investigate Further
- Established: Indicates a successful BGP session. If not in this state, further investigation is required to identify the cause of the issue.
4. Multi-Hop eBGP Neighborship
A. For EBGP Peering, Generally, the Default Hop Count Is 1
- eBGP Peering: Typically involves directly connected peers. If multiple hops are required, update the configuration accordingly.
B. If There Are Multiple Hop Counts the Number Should Be Changed Accordingly
- Multi-hop eBGP: Configure the number of hops with the appropriate commands to ensure the session is established correctly. It is often used when peering with loopback interfaces.
5. Analyze Logs, Debugging Messages, and Packet Capture
Logs and debugging tools are invaluable for diagnosing BGP issues.
A. Perform BGP Debugging and Check for Errors
- Debugging: Enable BGP debugging on the devices to capture real-time data and errors.
B. Review BGP Logs on the Device
- Logs: Check system and BGP-specific logs for any error messages or warnings.
C. Packet Capture Will Be Helpful To Analyze the TCP Connection, MTU, and BGP Communication
- Packet Capture: Use tools like Wireshark to capture and analyze packets, ensuring proper TCP connection establishment, correct MTU settings, and proper BGP message exchange.
Note: Different device vendors have different commands to verify the above steps. The CLI examples provided are based on FortiGate devices. Ensure you use the appropriate commands for your specific devices.
Opinions expressed by DZone contributors are their own.

Comments