Local Continuous Delivery Environment With Docker and Jenkins
If you're looking to set up a CD pipeline but need to get familiar with the tools at hand, you're going to want to read this article.
Join the DZone community and get the full member experience.
Join For FreeIn this article, I'm going to show you how to set up a continuous delivery environment for building Docker images of our Java applications on your local machine. Our environment will consist of GitLab (optional, otherwise you can use hosted GitHub), Jenkins master, Jenkins JNLP slave with Docker, and a private Docker registry. All those tools will be run locally using their Docker images. Thanks to that, you will be able to easily test it on your laptop and then configure the same environment in production deployed on multiple servers or VMs. Let's take a look at the architecture of the proposed solution.

1. Running Jenkins Master
We will use the latest Jenkins LTS image. Jenkins Web Dashboard is exposed on port 38080. Slave agents may connect to the master on the default 50000 JNLP (Java Web Start) port.
$ docker run -d --name jenkins -p 38080:8080 -p 50000:50000 jenkins/jenkins:ltsAfter starting, you have to execute the command docker logs jenkins in order to obtain an initial admin password. Find the following fragment in the logs, copy your generated password and paste it in the Jenkins start page available at http://192.168.99.100:38080.

We have to install some Jenkins plugins to be able to check out the project from the Git repository, build application from the source code using Maven, and finally, build and push a Docker image to a private registry. Here's a list of required plugins:
- Git Plugin - this plugin allows u to use Git as a build SCM.
- Maven Integration Plugin - this plugin provides advanced integration for Maven 2/3.
- Pipeline Plugin - this is a suite of plugins that allows you to create continuous delivery pipelines as a code and run them in Jenkins.
- Docker Pipeline Plugin - this plugin allows you to build and use Docker containers from pipelines.
2. Building the Jenkins Slave
Pipelines are usually run on a different machine than the machine with the master node. Moreover, we need to have the Docker engine installed on that slave machine to be able to build Docker images. Although there are some ready Docker images with Docker-in-Docker and Jenkins client agent, I have never found the image with JDK, Maven, Git, and Docker installed. These are the most commonly used tools when building images for your microservices, so it is definitely worth it to have such an image with a Jenkins image prepared.
Here's the Dockerfile with the Jenkins Docker-in-Docker slave with Git, Maven, and OpenJDK installed. I used Docker-in-Docker as a base image (1). We can override some properties when running our container. You will probably have to override the default Jenkins master address (2) and slave secret key (3). The rest of the parameters are optional, but you can even decide to use an external Docker daemon by overriding the DOCKER_HOST environment variable. We also download and install Maven (4) and create a user with special sudo rights for running Docker (5). Finally, we run the entrypoint.sh script, which starts the Docker daemon and Jenkins agent (6).
FROM docker:18-dind # (1)
MAINTAINER Piotr Minkowski
ENV JENKINS_MASTER http://localhost:8080 # (2)
ENV JENKINS_SLAVE_NAME dind-node
ENV JENKINS_SLAVE_SECRET "" # (3)
ENV JENKINS_HOME /home/jenkins
ENV JENKINS_REMOTING_VERSION 3.17
ENV DOCKER_HOST tcp://0.0.0.0:2375
RUN apk --update add curl tar git bash openjdk8 sudo

ARG MAVEN_VERSION=3.5.2 # (4)
ARG USER_HOME_DIR="/root"
ARG SHA=707b1f6e390a65bde4af4cdaf2a24d45fc19a6ded00fff02e91626e3e42ceaff
ARG BASE_URL=https://apache.osuosl.org/maven/maven-3/${MAVEN_VERSION}/binaries

RUN mkdir -p /usr/share/maven /usr/share/maven/ref \
  && curl -fsSL -o /tmp/apache-maven.tar.gz ${BASE_URL}/apache-maven-${MAVEN_VERSION}-bin.tar.gz \
  && echo "${SHA}  /tmp/apache-maven.tar.gz" | sha256sum -c - \
  && tar -xzf /tmp/apache-maven.tar.gz -C /usr/share/maven --strip-components=1 \
  && rm -f /tmp/apache-maven.tar.gz \
  && ln -s /usr/share/maven/bin/mvn /usr/bin/mvn

ENV MAVEN_HOME /usr/share/maven
ENV MAVEN_CONFIG "$USER_HOME_DIR/.m2"
# (5)
RUN adduser -D -h $JENKINS_HOME -s /bin/sh jenkins jenkins && chmod a+rwx $JENKINS_HOME
RUN echo "jenkins ALL=(ALL) NOPASSWD: /usr/local/bin/dockerd" > /etc/sudoers.d/00jenkins && chmod 440 /etc/sudoers.d/00jenkins
RUN echo "jenkins ALL=(ALL) NOPASSWD: /usr/local/bin/docker" > /etc/sudoers.d/01jenkins && chmod 440 /etc/sudoers.d/01jenkins
RUN curl --create-dirs -sSLo /usr/share/jenkins/slave.jar http://repo.jenkins-ci.org/public/org/jenkins-ci/main/remoting/$JENKINS_REMOTING_VERSION/remoting-$JENKINS_REMOTING_VERSION.jar && chmod 755 /usr/share/jenkins && chmod 644 /usr/share/jenkins/slave.jar

COPY entrypoint.sh /usr/local/bin/entrypoint
VOLUME $JENKINS_HOME
WORKDIR $JENKINS_HOME
USER jenkins
ENTRYPOINT ["/usr/local/bin/entrypoint"] # (6)
Here's the script entrypoint.sh.
#!/bin/sh
set -e
echo "starting dockerd..."
sudo dockerd --host=unix:///var/run/docker.sock --host=$DOCKER_HOST --storage-driver=vfs &
echo "starting jnlp slave..."
exec java -jar /usr/share/jenkins/slave.jar \
-jnlpUrl $JENKINS_URL/computer/$JENKINS_SLAVE_NAME/slave-agent.jnlp \
-secret $JENKINS_SLAVE_SECRET
The source code with the image definition is available on GitHub. You can clone the repository, build the image, and start the container using the following commands.
$ docker build -t piomin/jenkins-slave-dind-jnlp .
$ docker run --privileged -d --name slave -e JENKINS_SLAVE_SECRET=5664fe146104b89a1d2c78920fd9c5eebac3bd7344432e0668e366e2d3432d3e -e JENKINS_SLAVE_NAME=dind-node-1 -e JENKINS_URL=http://192.168.99.100:38080 piomin/jenkins-slave-dind-jnlp
Building it is just an optional step because the image is already available on my Docker Hub account.

3. Enabling Docker-in-Docker Slave
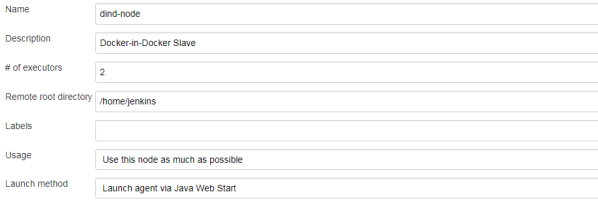
To add a new slave node, you need to navigate to Manage Jenkins -> Manage Nodes -> New Node. Then, define a permanent node with the name parameter filled. The most suitable name is default name declared inside the Docker image definition - dind-node. You also have to set the remote root directory, which should be equal to the path defined inside the container for the JENKINS_HOME environment variable. In my case, it is /home/jenkins. The slave node should be launched via Java Web Start (JNLP).

The new node is visible on the list of nodes as disabled. You should click it in order to obtain its secret key.

Finally, you may run your slave container using the following command containing the secret copied from the node's panel in Jenkins Web Dashboard.
$ docker run --privileged -d --name slave -e JENKINS_SLAVE_SECRET=fd14247b44bb9e03e11b7541e34a177bdcfd7b10783fa451d2169c90eb46693d -e JENKINS_URL=http://192.168.99.100:38080 piomin/jenkins-slave-dind-jnlpIf everything went according to plan, you should see the enabled node dind-node in the node's list.

4. Setting Up the Docker Private Registry
After deploying the Jenkins master and slave, there is one last required element in the architecture that has to be launched — the private Docker registry. Because we will access it remotely (from the Docker-in-Docker container), we have to configure a secure TLS/SSL connection. To achieve it, we should first generate a TLS certificate and key. We can use the openssl tool for it. We begin by generating a private key.
$ openssl genrsa -des3 -out registry.key 1024Then, we should generate a certificate request file (CSR) by executing the following command.
$ openssl req -new -key registry.key -out registry.csrFinally, we can generate a self-signed SSL certificate that is valid for one year using the openssl command as shown below.
$ openssl x509 -req -days 365 -in registry.csr -signkey registry.key -out registry.crtDon't forget to remove the passphrase from your private key.
$ openssl rsa -in registry.key -out registry-nopass.key -passin pass:123456You should copy the generated .key and .crt files to your Docker machine. After that, you may run the Docker registry using the following command.
docker run -d -p 5000:5000 --restart=always --name registry -v /home/docker:/certs -e REGISTRY_HTTP_TLS_CERTIFICATE=/certs/registry.crt -e REGISTRY_HTTP_TLS_KEY=/certs/registry-nopass.key registry:2If a registry has been successfully started, you should able to access it over HTTPS by calling the address https://192.168.99.100:5000/v2/_catalog from your web browser.
5. Creating the Application Dockerfile
The sample application's source code is available on GitHub in the repository sample-spring-microservices-new. There are some modules with microservices. Each of them has a Dockerfile created in the root directory. Here's a typical Dockerfile for our microservice built on top of Spring Boot.
FROM openjdk:8-jre-alpine
ENV APP_FILE employee-service-1.0-SNAPSHOT.jar
ENV APP_HOME /app
EXPOSE 8090
COPY target/$APP_FILE $APP_HOME/
WORKDIR $VERTICLE_HOME
ENTRYPOINT ["sh", "-c"]
CMD ["exec java -jar $APP_FILE"]
6. Building the Pipeline Through Jenkinsfile
This step is the most important phase of our exercise. We will prepare pipeline definition, which combines together all the currently discussed tools and solutions. This pipeline definition is a part of every sample application source code. The change in Jenkinsfile is treated the same as a change in the source code responsible for implementing business logic.
Every pipeline is divided into stages. Every stage defines a subset of tasks performed through the entire pipeline. We can select the node, which is responsible for executing the pipeline's steps, or leave it empty to allow random selection of the node. Because we have already prepared a dedicated node with Docker, we force the pipeline to be built with that node. In the first stage, called Checkout, we pull the source code from the Git repository (1). Then we build an application binary using the Maven command (2). Once the fat JAR file has been prepared, we may proceed to build the application's Docker image (3). We use methods provided by the Docker Pipeline Plugin. Finally, we push the Docker image with the fat JAR file to a secure private Docker registry (4). Such an image may be accessed by any machine that has Docker installed and has access to our Docker registry. Here's the full code of the Jenkinsfile prepared for the module config-service.
node('dind-node') {
    stage('Checkout') { # (1)
      git url: 'https://github.com/piomin/sample-spring-microservices-new.git', credentialsId: 'piomin-github', branch: 'master'
    }
    stage('Build') { # (2)
      dir('config-service') {
        sh 'mvn clean install'
        def pom = readMavenPom file:'pom.xml'
        print pom.version
        env.version = pom.version
        currentBuild.description = "Release: ${env.version}"
      }
    }
    stage('Image') {
      dir ('config-service') {
        docker.withRegistry('https://192.168.99.100:5000') {
          def app = docker.build "piomin/config-service:${env.version}" # (3)
          app.push() # (4)
        }
      }
    }
}
7. Creating the Pipeline in Jenkins Web Dashboard
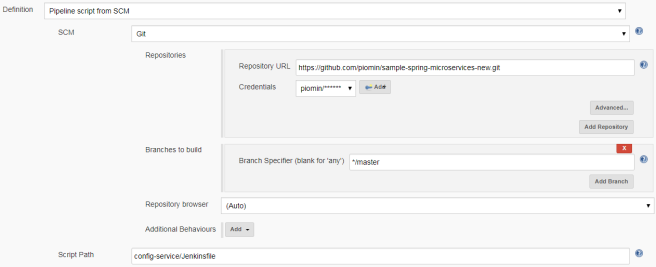
After preparing the application's source code, Dockerfile, and Jenkinsfile, the only thing left is to create the pipeline using the Jenkins UI. We need to select New Item -> Pipeline and type the name of our first Jenkins pipeline. Then, go to the Configure panel and select Pipeline script from SCM in the Pipeline section. In the following form, we should fill in the address of the Git repository, user credentials, and location of the Jenkinsfile.

8. Configure GitLab WebHook (Optional)
If you run GitLab locally using its Docker image, you will be able to configure a webhook, which triggers a run of your pipeline after pushing changes to the Git repository. To run GitLab using Docker, execute the following command.
$ docker run -d --name gitlab -p 10443:443 -p 10080:80 -p 10022:22
gitlab/gitlab-ce:latest
Before configuring the webhook in the GitLab Dashboard, we need to enable this feature for the Jenkins pipeline. To achieve it, we should first install the GitLab Plugin.

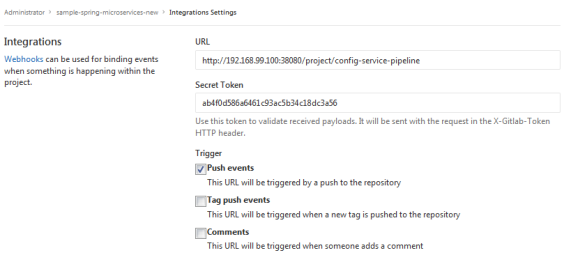
Then, you should come back to the pipeline's configuration panel and enable the GitLab build trigger. After that, the webhook will be available for our sample pipeline, called config-service-pipeline under the URL http://192.168.99.100:38080/project/config-service-pipeline as shown in the following picture.

Before proceeding to configuration of the webhook in the GitLab Dashboard, you should retrieve your Jenkins user API token. To achieve it, go to the profile panel, select Configure, and click the button Show API Token.

To add a new WebHook for your Git repository, you need to go to the section Settings -> Integrations and then fill the URL field with the webhook address copied from the Jenkins pipeline. Then paste Jenkins user API token into field Secret Token. Leave the Push events checkbox selected.

9. Running the Pipeline
Now, we may finally run our pipeline. If you use a GitLab Docker container as a Git repository platform, you just have to push changes in the source code. Otherwise, you have to manually start the build of the pipeline. The first build will take a few minutes because Maven has to download dependencies required for building an application. If everything ends with success, you should see the following result on your pipeline dashboard.

You can check out the list of images stored in your private Docker registry by calling the following HTTP API endpoint in your web browser: https://192.168.99.100:5000/v2/_catalog.

Published at DZone with permission of Piotr Mińkowski, DZone MVB. See the original article here.
Opinions expressed by DZone contributors are their own.

Comments