Create a Load Balancer Using Java
Load balancing server [netflix-eureka-naming-server], Server application [micro-service-server], and Client application [micro-service-client].
Join the DZone community and get the full member experience.
Join For FreeThis Architecture Contains Three Applications
- Load balancing server [netflix-eureka-naming-server]
- Server application [micro-service-server]
- Client application [micro-service-client]
Network Architecture of the System
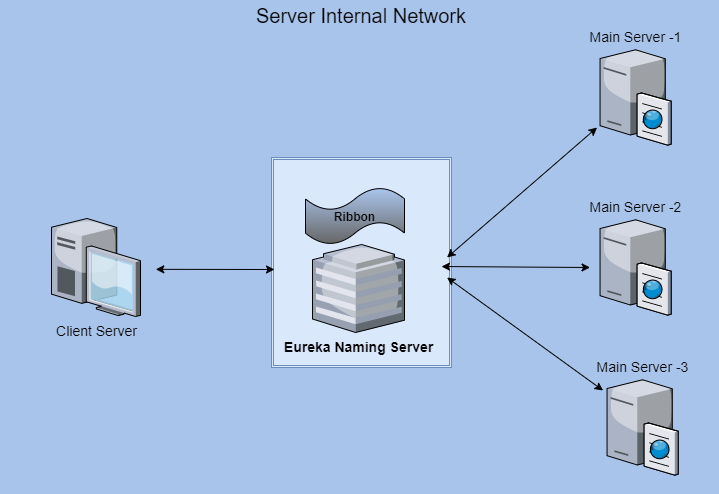
Steps to Run Applications
- Install JDK 11 or the latest.
- Clone git repository of the project into local.
- Github: https://github.com/VishnuViswam/LOAD-BALANCER
- Run Netflix-eureka-naming-server application first.
- Then run a microservice-server application in two ports.
- At last run micro-service-client.
Working and Configurations
1) Load Balancing Server
All client-server communication will be done through this load balancing server.
pom.xml
- We are using Netflix-eureka-server library to enable the communication between client and server.
xxxxxxxxxx
<properties>
<java.version>11</java.version>
<spring-cloud.version>Hoxton.SR4</spring-cloud.version>
</properties>
<dependencies>
<dependency>
<groupId>org.springframework.cloud</groupId>
<artifactId>spring-cloud-starter-config</artifactId>
</dependency>
<dependency>
<groupId>org.springframework.cloud</groupId>
<artifactId>spring-cloud-starter-netflix-eureka-server</artifactId> </dependency>
</dependencies>
application.properties
xxxxxxxxxx
# application unique name
spring.application.name=netflix-eureka-naming-server
# it will be the default port which eureka naming server
server.port=8761
eureka.client.register-with-eureka=false
eureka.client.fetch-registry=false
NetflixEurekaNamingServerApplication.java
- @EnableEurekaServer annotation will allow the eureka server to control this application.
xxxxxxxxxx
// to enable the communication with Eureka server
public class NetflixEurekaNamingServerApplication {
public static void main(String[] args) { SpringApplication.run(NetflixEurekaNamingServerApplication.class, args);
}
}
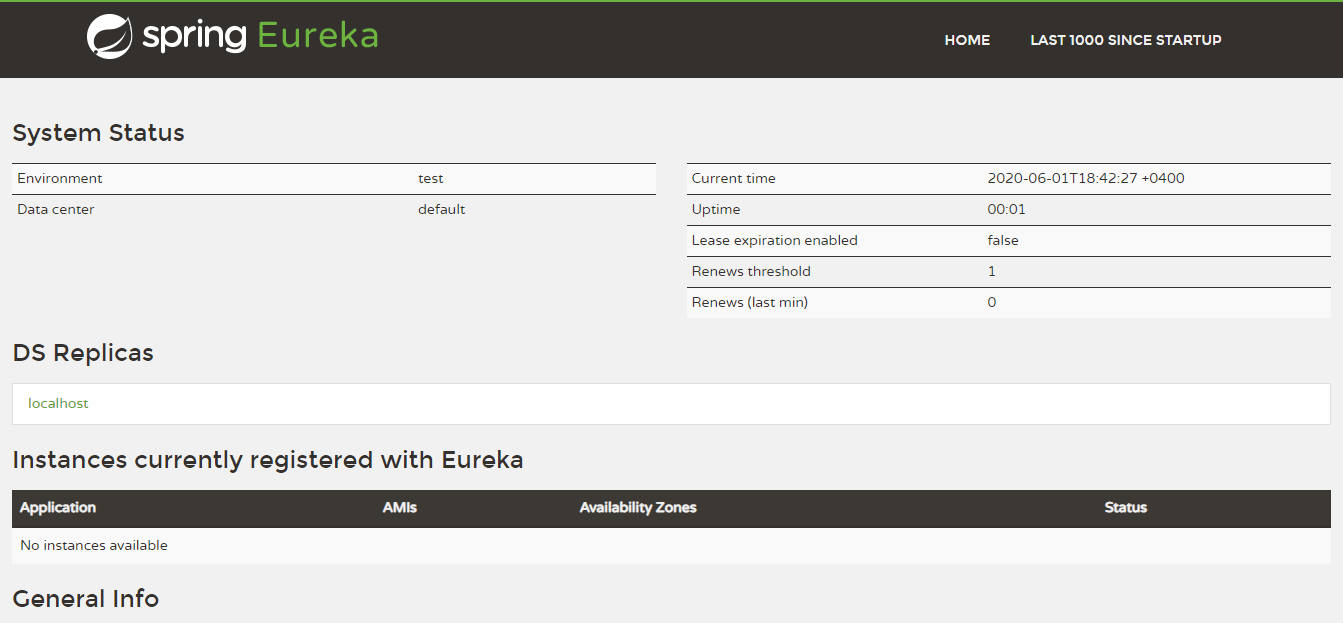
After running this application we can access the Eureka server dashboard in the following URL
Eureka Server Dashboard
2) Server Application
- To perform load distribution, this application needs to run in two instances.
- spring-cloud-starter-Netflix-eureka-client used to enable communication with Eureka naming server
xxxxxxxxxx
<dependency>
<groupId>org.springframework.cloud</groupId>
<artifactId>spring-cloud-starter-netflix-eureka-client</artifactId>
</dependency>
pom. xml
xxxxxxxxxx
<properties>
<java.version>11</java.version>
<spring-cloud.version>Hoxton.SR4</spring-cloud.version>
</properties>
<dependencies>
<dependency>
<groupId>org.springframework.cloud</groupId>
<artifactId>spring-cloud-starter-config</artifactId>
</dependency>
<dependency>
<groupId>org.springframework.cloud</groupId>
<artifactId>spring-cloud-starter-netflix-eureka-client</artifactId> </dependency>
</dependencies>
application. properties
xxxxxxxxxx
# application unique name
spring.application.name=micro-service-server
# application will be running under this port
server.port=4000
# end point of load balancing server
eureka.client.service-url.default-zone=http://localhost:8761/eureka
MicroServiceServerApplication.java
- @EnableDiscoveryClient annotation to register the application with the eureka server.
xxxxxxxxxx
public class MicroServiceServerApplication {
public static void main(String[] args) { SpringApplication.run(MicroServiceServerApplication.class, args);
}
}
ServerController.java
- It is an ordinary rest controller class
xxxxxxxxxx
("/server")
public class ServerController {
private Environment environment;
("/technologyInfo/{platform}")
public ResponseModel retrieveTechnologyInfo(("platform") String platform) {
ResponseModel responseModel = new ResponseModel();
if (platform.equalsIgnoreCase("Java")) {
responseModel.setTittle("Technology Stack");
responseModel.setPlatform("Java");
responseModel.setUsedFor("Secured Web Services");
} else if (platform.equalsIgnoreCase("python")) {
responseModel.setTittle("Technology Stack");
responseModel.setPlatform("python");
responseModel.setUsedFor("Machine Learning");
} else {
responseModel.setTittle("Technology Stack");
responseModel.setPlatform(platform);
responseModel.setUsedFor("Unknown platform");
}
responseModel.setServerPort(Short.parseShort(environment.getProperty("local.server.port")));
return responseModel;
}
;
}
ResponseModel.java
- It is a traditional model class.
xxxxxxxxxx
public class ResponseModel {
private String tittle;
private String platform;
private String usedFor;
private Short serverPort;
/** constructor with getters and setters **/
}
Run Server Application Instance in Two Ports
First, simply run the application as a java application using the main method. To run one more instance in another port we need to edit the Run/Debug Configurations In the IDE.
In IntelliJ
Click on the Edit Configuration option, it will be available on the right top side of the menu bar.
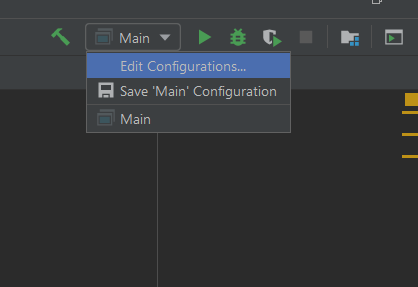
It will open a window as follows. Then enable Allow parallel run and press apply.
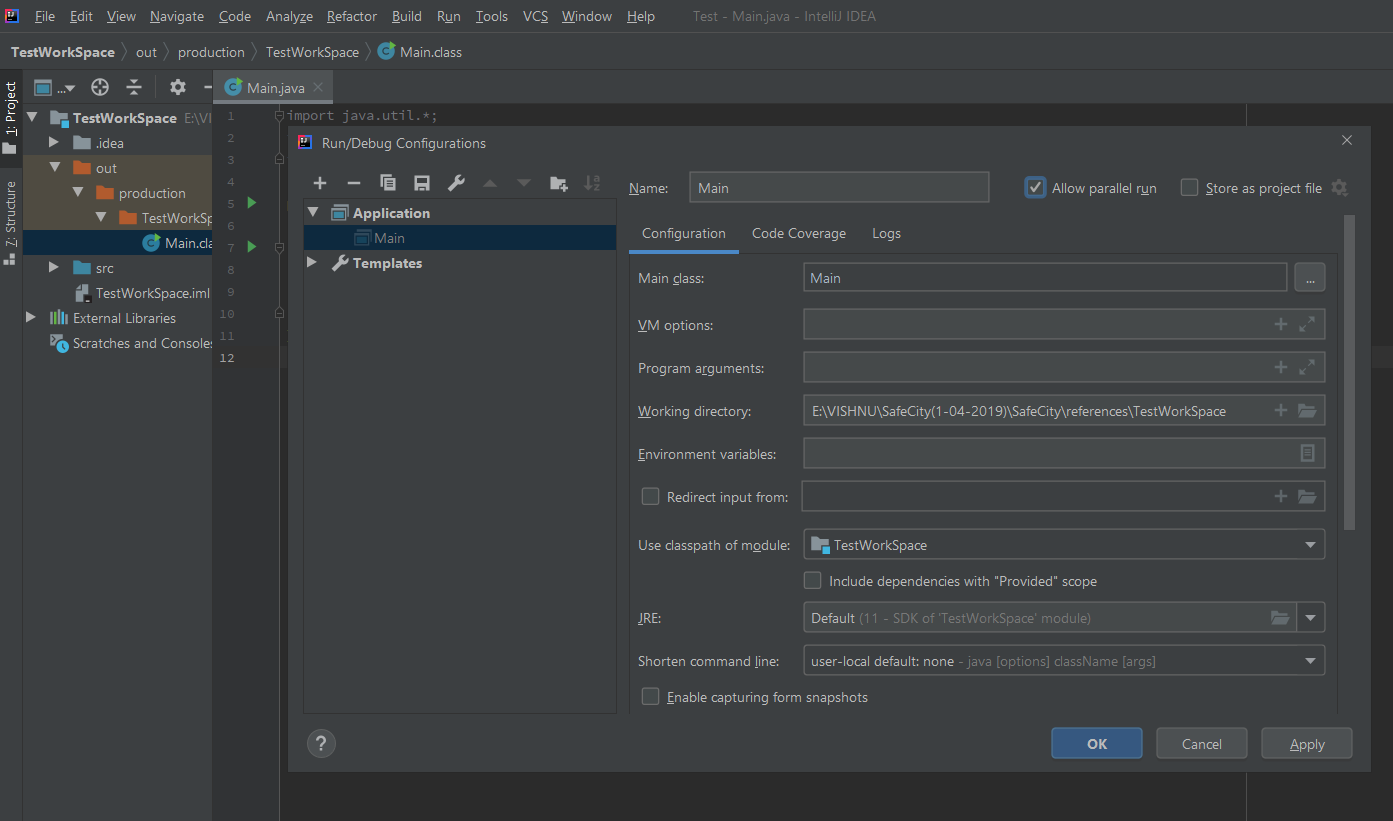
Now change the port in the property file as 4001. Then run once again.
In Eclipse
Right-click on the main class -> click properties -> select main class -> click new button and add -Server. port=4001 in the VM Arguments as shown in the following images.
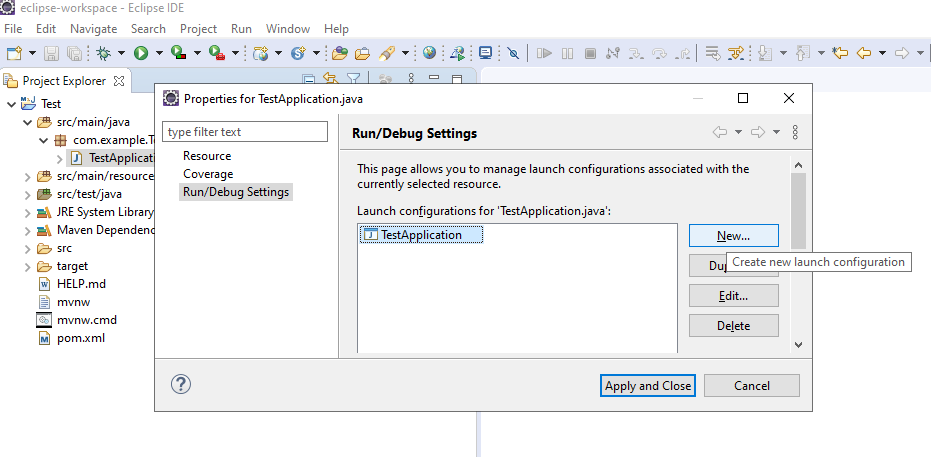
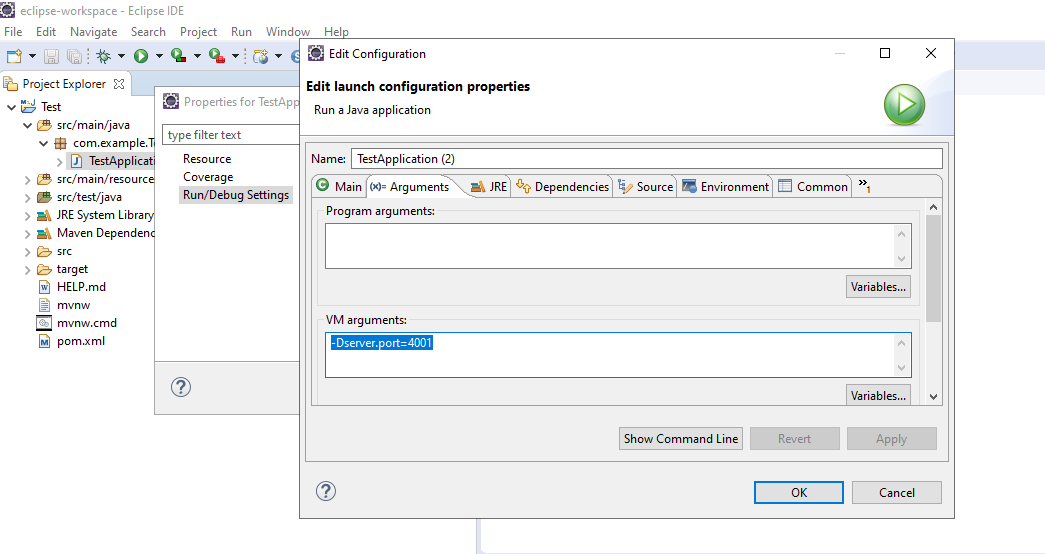
Then select the new configuration and run. Now, these two instances of the server will appear in the eureka server dashboard.
3) Client Application
- This application will perform as a consumer of APIs which is written in the main server.
- It consumes the APIs from both main server instances based on availability through the load balancer.
- We also use the Netflix-eureka-client library to communicate with the load balancer application.
OpenFeign
- We are using OpenFeign to consume APIs rather than using traditional HTTP libraries.
- OpenFeign will act as a proxy in between server and client.
xxxxxxxxxx
<dependency>
<groupId>org.springframework.cloud</groupId>
<artifactId>spring-cloud-starter-openfeign</artifactId>
</dependency>
Eureka Client and Ribbon
- Ribbon will do the automatic switching of servers in the client-side
- Eureka will help us to dynamically add main server instances to the load balancer according to traffic.
xxxxxxxxxx
<dependency>
<groupId>org.springframework.cloud</groupId>
<artifactId>spring-cloud-starter-netflix-ribbon</artifactId>
</dependency>
<dependency>
<groupId>org.springframework.cloud</groupId>
<artifactId>spring-cloud-starter-netflix-eureka-client</artifactId>
</dependency>
pom.xml
xxxxxxxxxx
<properties>
<java.version>11</java.version>
<spring-cloud.version>Hoxton.SR4</spring-cloud.version>
</properties>
<dependencies>
<dependency>
<groupId>org.springframework.cloud</groupId>
<artifactId>spring-cloud-starter-config</artifactId>
</dependency>
<dependency>
<groupId>org.springframework.cloud</groupId>
<artifactId>spring-cloud-starter-openfeign</artifactId>
</dependency>
<dependency>
<groupId>org.springframework.cloud</groupId>
<artifactId>spring-cloud-starter-netflix-ribbon</artifactId>
</dependency>
<dependency>
<groupId>org.springframework.cloud</groupId>
<artifactId>spring-cloud-starter-netflix-eureka-client</artifactId> </dependency>
</dependencies>
application.properties
xxxxxxxxxx
# application unique name
server.servlet.contextPath=/microservice
# application will be running under this port
spring.application.name=micro-service-client server.port=5000
# end point of load balancing server
eureka.client.service-url.default-zone=http://localhost:8761/eureka
MicroServiceClientApplication.java
- @EnableDiscoveryClient annotation used to register the application with the eureka server in the main class.
- @EnableFeignClients annotation used to connect the feign library.
xxxxxxxxxx
("com.microservices.client")
public class MicroServiceClientApplication {
public static void main(String[] args) {
SpringApplication.run(MicroServiceClientApplication.class, args);
}
}
ClientController.java
- It is an ordinary rest controller class
xxxxxxxxxx
("/client")
public class ClientController {
private ApiProxy apiProxy;
("/technologyInfo/{platform}")
public ResponseModel getTechnologyInfo(("platform") String platform) {
/**API calling using proxy interface and mapping into ResponseModel named Object.**/
ResponseModel responseModel = apiProxy.retrieveTechnologyInfo(platform);
return responseModel;
}
}
ApiProxy.java
- Act as a proxy class in between API and client.
- @FeignClient(name = "micro-service-server") annotation will configure the information of the API exposed application name.
- @RibbonClient(name = "micro-service-server") annotation will feed the client application with a load-balanced server name.
xxxxxxxxxx
(name = "micro-service-server")
(name = "micro-service-server")
public interface ApiProxy {
("/server/technologyInfo/{platform}")
ResponseModel retrieveTechnologyInfo(("platform") String platform);
}
ResponseModel.java
- It is a traditional model class.
x
public class ResponseModel {
private String tittle;
private String platform;
private String usedFor;
private Short serverPort;
/** constructor with getters and setters **/
}
- After running client application, an instance of this application also appear in the eureka server dashboard.
- Finally, Eureka Server Dashboard will be as follows.

Result
- All client application API to see the load balancing magic.
URI: http://localhost:5000/microservice/client/technologyInfo/java
- Response:
xxxxxxxxxx
{"tittle":"Technology Stack","platform":"Java","usedFor":"Secured Web Services","serverPort":4000}
- To refresh:
xxxxxxxxxx
{"tittle":"Technology Stack","platform":"Java","usedFor":"Secured Web Services","serverPort":4001}
- From the result, we can understand that the API response is receiving from different servers by identifying port change.
Published at DZone with permission of Vishnu Viswambharan. See the original article here.
Opinions expressed by DZone contributors are their own.

Comments