Kumologica Container Inside AWS ECS Fargate
This tutorial shows the steps to build and run a simple hello world API using Kumologica and running it inside AWS ECS Fargate.
Join the DZone community and get the full member experience.
Join For FreeWe have seen multiple examples and use cases of building a low code API using Kumologica and running it on AWS lambda and on Azure function. In this article, we will be taking through the build and deployment of a simple hello world service Docker container inside AWS Elastic Container Service (ECS) Fargate.
Architecture
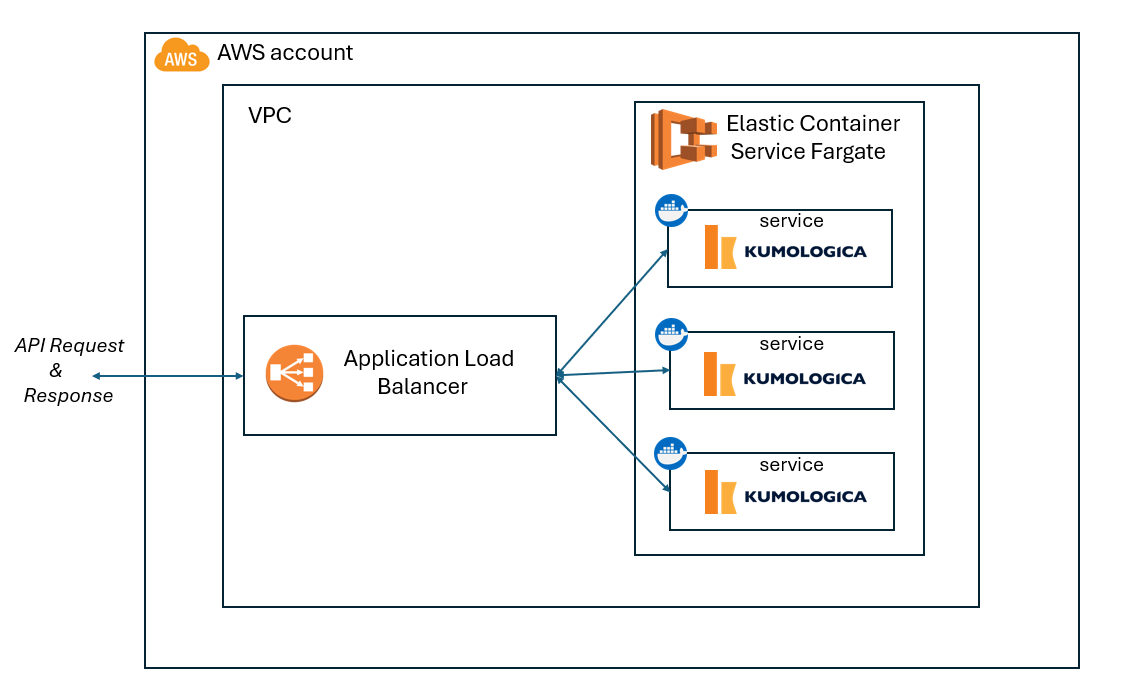
Based on the design defined in the diagram (Figure 1), we will be building Kumologica applications as a Docker container. Once the Docker image is ready, we will push it into the AWS Elastic Container Registry (ECR). ECR holds all the Docker images. The Elastic Container Service is an AWS container management platform. The workload availability, scaling, and network are managed by ECS. In order to deploy a workload to ECS, an ECS task definition needs to be created, which will define the Docker image that needs to be used, the name of the service, and the type of launch. In this case, we will be choosing the launch type as Fargate.

Figure 1: Technical architecture diagram (Author Pranav K)
The incoming request traffic to the deployed containers is balanced by the AWS application load balancer. The scope of this tutorial is limited to exposing the services via application load balancer even though from a standard approach the load balancer can be further attached to an API gateway and API gateway attached to Route53.
Implementation
In this section, we will get into the prerequisites and step-by-step implementation of build and deployment using Kumologica and ECS fargate respectively.
Prerequisites
In order to implement the architecture, we need the following platforms and tooling available.
- Access to an AWS account
- Install AWS CLI on your local machine.
- Download and install Kumologica.
- Download and install Docker.
Once the above prerequisites are met, then we can start the implementation steps.
Steps
Building the Flow
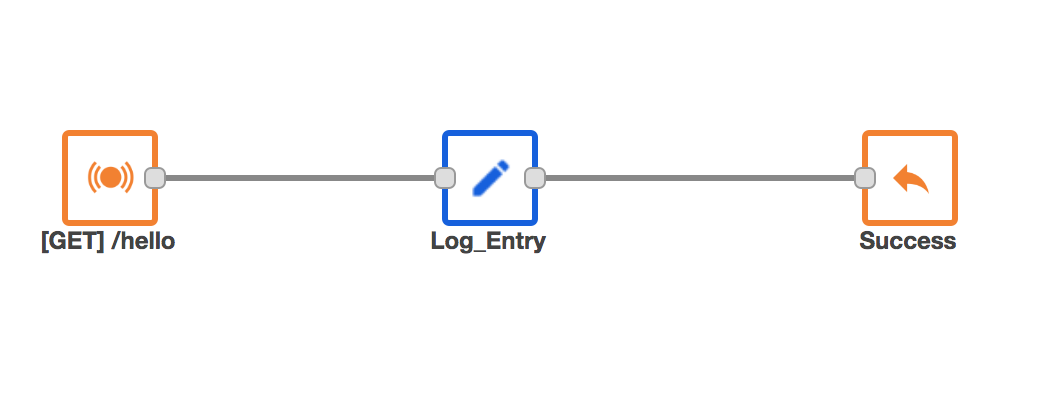
We need to start by building a simple API service flow in Kumologica which we will later Dockerize. To do this, let's open Kumologica Designer.
- File > New Project: This will open the popup for providing the project name and file location. Give the name as
hello-kl. - Drag and drop an Event Listener node from the pallet to the canvas. Click open the node and provide the following settings.
Display Name : [GET] /hello
Provider : AWS
Event Source : Amazon API Gateway
Verb : GET
URL : /hello- Wire the Event Listener node to a Logger node.
Display Name: Log_Entry
Level : INFO
Message : Inside the service
Log format : String- Finally, wire an Event Listener End node to the logger to complete the flow.
Display Name : Success
Response : Http response
Status code : 200
Content-Type : application/json
Payload : {"status" : "HelloWorld"}
The flow would look as shown below in Figure 2.

Figure 2: Hello World API flow
Dockerizing the API Flow
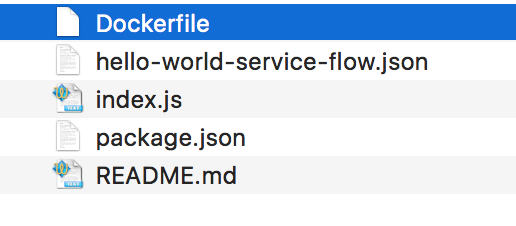
In this section, we will see how to Dockerize the Kumologica flow. Ensure to have the Docker file and index.js file in the root folder of your Kumologica project (Figure 4). These two files are not defaulted in the Kumologica project.

Following is the Docker file.
FROM node:16-alpine
WORKDIR /app
COPY package*.json ./
RUN npm install
ENV PATH /app/node_modules/.bin:$PATH
COPY . .
EXPOSE 1880
CMD ["node","index.js"]
Following is the index.js file. Here, hello-world-service-flow.json is the flow file in the project folder.
const { NodeJsFlowBuilder } = require('@kumologica/runtime');
new NodeJsFlowBuilder('hello-world-service-flow.json').listen();- Now we will do the Docker build with the following command:
docker build . -t hello-kl-docker-app. - Once the Docker build is completed, we need to push the image to AWS ECR. For this, we need to first login to ECR via the Docker client using the following command. The below command is for a private registry. It may vary for the public ECR registry:
aws ecr get-login-password --region <<aws region>> | docker login -u AWS -p $(aws ecr get-login-password --region <<aws region>>) <<aws accountid>>.dkr.ecr.<<aws region>>.amazonaws.com. - Once the client login is established with ECR, we will tag the image using the following command:
docker tag hello-kl-docker-app <<aws accountid>>.dkr.ecr.<<aws region>>.amazonaws.com/hello-kl-docker-app:latest. - Create an ECR private repo in AWS either via console or via command line. The repo name should match when pushing the Docker image.
- Once we have the repo created, let's push the Docker image with the following command:
docker push <<aws accountid>>.dkr.ecr.<<aws region>>.amazonaws.com/hello-kl-docker-app:latest.
Setting up ECS
The first step in setting up the ECS Fargate is creating a cluster by providing the cluster name.

Figure 4: ECS cluster (Author Pranav K)
The next step is to create a task definition to deploy the container. Go to AWS ECS and create a task definition.
- Provide task definition family name.
- Select AWS Fargate as the launch type.
- Select the repo image URI and container name.
- Provide the port mapping with the container port as 1880.
Leave the memory, CPU params, and other parameters as default.

Deploying the Service
To make a deployment to ECS we need to select either a service or a task. In this tutorial, we are deploying an API so we select service.
Create a service under the cluster by selecting the launch type as Fargate.
- Provide service name.
- Provide the launch type as Fargate.
- Select the task definition that was created in the earlier step.
- Leave the execution role as default.
- Select the load balancing:
- Select application load balancer (Since API).
- Provide the listener port as HTTP 80.
- Provide the health port as 1880 and the resource path as the one defined in the KL flow.
- Leave the rest all default.
Ensure that the security group attached to the application load balancer has the inbound traffic opened for HTTP and the listener port allocated in the earlier service creation step.
Once deployed, you can go to the application load balancer section to fetch the ARecord URL DNS generated. Use the path /hello with the DNS to invoke the endpoint. This will return with the message : {"status" : "HelloWorld"}
Conclusion
I hope the tutorial gave you a thorough understanding of how to build and deploy a Kumologica API flow into ECS Fargate. However, it does not include details on script-based provisioning of the ECS cluster, task definition, or ECS service deployment. These topics will be addressed in a separate article.
Published at DZone with permission of Pranav K. See the original article here.
Opinions expressed by DZone contributors are their own.

Comments