Running Serverless Service as Serverful
Dockerizing serverless Kumologica flows to and runs as a serverful container.
Join the DZone community and get the full member experience.
Join For FreeThe most popular use case in current IT architecture is moving from Serverful to Serverless design. There are cases where we might need to design a service in a Serverful manner or move to Serverful as part of operational cost. In this article, we will be showing how to run Kumologica flow as a docker container. Usually, the applications built on Kumologica are focussed on serverless computing like AWS Lambda, Azure function, or Google function but here we will be building the service very similar to a NodeJS express app running inside a container.
The Plan
We will be building a simple hello world API service using a low code integration tooling and wrapping it as a docker image. We will then run the docker container using the image in our local machine. Then test the API using an external client.
Prerequisites
To start the development we need to have the following utilities and access ready.
Implementation
Building the Service
First, let's start the development of Hello World service by opening the designer. To open the designer use the following command kl open.
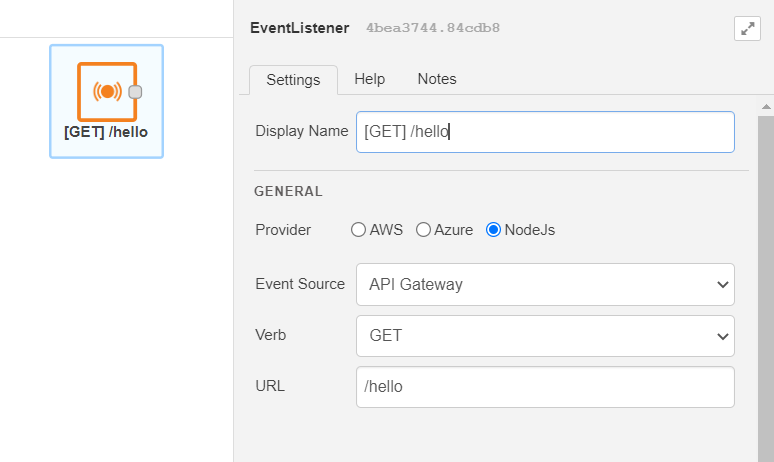
Once the designer is opened, Drag and drop an EvenListener node to the canvas. Click open the configuration and provide the below details.
Provider : NodeJS
Verb : GET
Path : /hello
Display Name : [GET] /hello
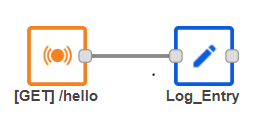
Now drag and drop a logger node from pallet to canvas and wire it after the EventListener node.
Display name : Log_Entry
level : INFO
Message : Inside the service
Log Format : String
Drag and drop the EventListenerEnd node to the canvas wire it to the Logger node and provide the following configuration.
Display Name : Success
Payload : {"status" : "HelloWorld"}
ContentType : application/json
The flow is now completed. Let's dockerize it.
Dockerizing the Flow
To dockerize the flow open the project folder and place the following Docker file on the root project folder (same level as package.json).
FROM node:16-alpine
WORKDIR /app
COPY package*.json ./
RUN npm install
ENV PATH /app/node_modules/.bin:$PATH
COPY . .
EXPOSE 1880
CMD ["node","index.js"] Note: The above Dockerfile is very basic and can be modified according to your needs.
Now we need to add another file that treats Kumologica flow to run as an NodeJS express app.
Create an index.js file with the following Javascript content. Replace the "your-flow.json" with the name of the flow.json in your project folder.
const { NodeJsFlowBuilder } = require('@kumologica/runtime');
new NodeJsFlowBuilder('your-flow.json').listen();
Now let's test the flow locally by invoking the endpoint from Postman or any REST client of your choice.
curl http://localhost:1880/hello
You will be getting the following response:
{"status" : "HelloWorld"} As we are done with our local testing, Now we will build an image based on our Docker file.
To build the image, go to the root of the project folder and run the following command from a command line in Windows or a terminal in Mac.
docker build . -t hello-kl-docker-appNow the Docker image is built. Let's check the image locally by running the following command.
docker imagesLet's test the image running the image locally by executing the following command.
docker run -p 1880:1880 hello-kl-docker-appCheck the container by running the following command:
docker ps -aYou should now see the container name and ID listed. Now we are ready to push the image to any registry of your choice.
Opinions expressed by DZone contributors are their own.

Comments