The Keyword-Driven Test Automation Framework With JSON Format for REST API Testing
In this article, learn how to use the keyword-driven test automation framework to implement and execute REST API testing.
Join the DZone community and get the full member experience.
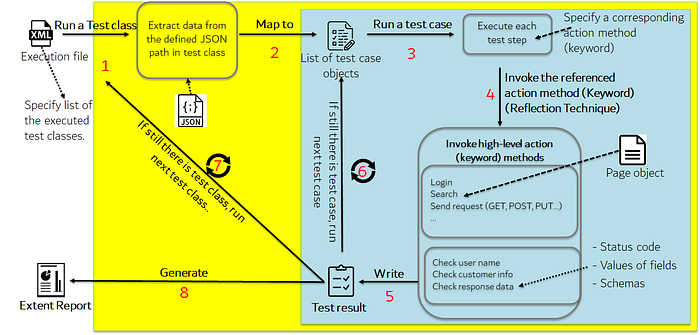
Join For FreeFirst, I’d like to get back a little bit of this framework’s architecture overview.

As the above image and the previous story mentioned, the test suites/cases/steps are formed in a JSON file, and the framework will load and map these JSON files to the list of test suites/cases objects. Then, action steps are executed based on the class and method (keyword) that are specified in each test step (use the reflection technique to invoke the keyword — method). Our responsibility is to write the autotest script inside each keyword.
I coded the core class and keywords for REST API Testing named RestAPIAction.
What you need to use this framework is to define test suites/cases and test steps in the JSON format file.
The source code is located on GitHub here and here. Download or clone it to research more.
The automation libraries used in this framework are as follows:
- TestNG: A testing framework
- REST Assured: A library you can use to test HTTP-based REST services
- Extent Report 4.0: A framework for creating a test report
Next, I’d like to show you the test parameters of the RestAPIAction keyword that will be defined in each REST API test step (please refer to the previous article linked in the introduction to get more detail on the test suite/test case format).
1. GET Method
{
  "name": "Search repository",
  "class": "RestAPIAction",
  "method": "GET",
  "parameters": {
    "request": {
      "url": "https://api.github.com/search/repositories",
      "headers": {
        "Authorization": "@var->authorization@"
      },
      "queryParams": {
        "q": "automationtestingframework",
        "sort": "stars",
        "order": "desc"
      }
    },
    "response": {
      "statusCode": 200,
      "body": {
        "total_count": {
          "greaterThan": 1
        },
        "items.any{it.full_name = 'automationtester304/automationtestingframework'}": {
          "is": true
        }
      }
    }
  }
}
2. POST Method
{
  "name": "Send POST request to create Hello-World repository",
  "class": "RestAPIAction",
  "method": "POST",
  "parameters": {
     "request": {
       "url": "https://api.github.com/user/repos",
       "headers": {
         "Authorization": "@var->authorization@"
       },
       "body": {
         "name": "Hello-World",
         "description": "This is your first repository",
         "homepage": "https://github.com",
         "private": false,
         "has_issues": true,
         "has_projects": true,
         "has_wiki": true
       }
     },
     "response": {
       "statusCode": 201,
       "body": {
         "full_name": {
           "is": "automationtester304/Hello-World"
         }
       }
     }
   }
}
3. PUT/PATCH and DELETE methods
Please refer to CRUDRepository.json.
As you can see, there are two “Request and Response” sections in each REST Action method.
Request Section
This is where you define the parameters’ values for sending a REST Request.
url: Define the URL you want to send for a requestheaders: Where you define the header parameters such asAuthorization,ContentType, etc.queryParams: Define the query parameters for the requestbody: Define the request body for POST/ PATCH methods
Response Section
This is where you define the expected value in the response.
statusCode: Define the expected value of the response status code as200,201,204,400, or501schemaPath: Define the path file that contains the JSON schema format of the responsebody: Define the expected value of the fields, and parameters in the response; it contains the JSON objects where we can define the field name and the query of identifying a specified value from the response
Example:
"body": {
  "total_count": {
    "greaterThan": 1
  },
  "items.any{it.name = 'automationtestingframework'}": {
    "is": true
  }
}
Inside the field name or the query, some Hamcrest matchers are defined to perform its assertion since REST-assured takes advantage of the power of this one.
Please refer to the Hamcrest Tutorial for more information.
4. StoreResponseValue Method
This keyword method is located after the REST method step to store the specified value from the response of the REST request method step right before.
The next step can use the value stored from this method by the string @var->[var name]@ to verify something.
Example:
{
  "name": "Store owner and repoName values of the above response",
  "class": "RestAPIAction",
  "method": "storeResponseValue",
  "parameters": {
    "variables": [
     {
      "varName": "owner",
      "key": "items.find{it.name = 'AutomationTesting'}.owner.login"
     },
     {
      "varName": "repoName",
      "key": "items.find{it.name = 'AutomationTesting'}.name"
     }
    ]
  }
}
{
  "name": "Send GET request to get branches",
  "class": "RestAPIAction",
  "method": "GET",
  "parameters": {
    "request": {
      "url": "@var->githubapi@/repos/@var->owner@/@var->repoName@/branches",
      "headers": {
        "Authorization": "@var->authorization@"
      }
    },
    "response": {
      "statusCode": 200,
      "body": {
        "any{it.name == 'master'}": {
          "is": true
        }
      }
    }
  }
}
5. ValidateReponse Method
As the method name suggests, you can use this method to validate the response of the REST request method.
The situation of using this method is when you want to add some steps to handle the value from the response of the previous REST Request step, and then you’ll use this method to verify the responses’ values.
So the parameters of this method are defined as well as the response section in the REST request step.
Example:
{
  "name": "Validate Response",
  "class": "RestAPIAction",
  "method": "validateResponse",
  "parameters": {
    "statusCode": 404,
    "body": {
      "message": {
        "is": "Not Found"
      }
    }
  }
}
Next Vision
- I’m going to tell you how I apply the combination without repetition of the algorithm to generate a suite of test cases in order to increase the test coverage for REST API testing.
- I’m developing the test tool UI to manage the visually generated test suite/test case JSON file.
Published at DZone with permission of Su Gia. See the original article here.
Opinions expressed by DZone contributors are their own.

Comments