Cypress API Testing: A Detailed Guide
Explore Cypress API testing with this easy-to-follow guide, filled with practical tips and real-code examples. Get started with mastering Cypress API testing today!
Join the DZone community and get the full member experience.
Join For FreeIf you are familiar with Cypress, you might know it's popular for end-to-end UI testing. But it's not just limited to that; you can also use Cypress for API testing. You don't need to worry about using any external tools if you already have Cypress set up as your UI framework. Simply take advantage of its API libraries to build a scalable API testing framework.
In this blog post, we will start off with the fundamentals of Cypress and then slowly dive into creating API tests using the Reqres platform. We will also demonstrate each topic with relevant code examples.
So, let's get started and begin learning Cypress API Testing!
Getting Started With Cypress API Testing
Setting up Cypress
Before we dive into API testing with Cypress, it's important to have the right setup. So, let's begin the installation process and set up our testing environment.
Installation Guide (Including NPM Commands)
Create a new folder (cypress-api) and then install Cypress. Installing Cypress is easy. You can do it using npm commands, as shown below:
npm install cypress --save-dev
This command installs Cypress in your project as a development dependency, equipping you with all the necessary libraries to kickstart your journey.
Opening the Cypress App
Once you have Cypress installed, it's time to open the Cypress app. You can open Cypress from your project root using npx:
npx cypress open
After executing one of these commands, the Cypress Launchpad will open. The Launchpad guides you through various decisions and configuration tasks you need to complete before you start writing your first test.
If you're using Cypress for the first time, it will guide you through the following steps in order:
Choosing a testing type: Decide whether you want to perform E2E Testing, where you run your whole application and visit pages to test them, or Component Testing, where you test individual components of your app in isolation. For our use case, choose E2E Testing.
![Cypress Dashboard Welcome Screen]() Quick configuration: The Launchpad will create a set of configuration files based on your chosen testing type, and list the changes for you to review. You can review the generated config or simply hit "Continue" to proceed.
Quick configuration: The Launchpad will create a set of configuration files based on your chosen testing type, and list the changes for you to review. You can review the generated config or simply hit "Continue" to proceed.![Cypress Dashboard Configuration Screen]()
- Launching a browser: Finally, you will see a list of compatible browsers found on your system. You can choose any of them to start your testing. Remember, we are only focusing on API testing so the options here don't really matter.
- Creating spec file: Once you see the screen below, click on "Create new spec" and enter the path for your new spec:
cypress/e2e/api/basic.spec.cy.js![Cypress Dashboard Spec Creation Screen]()
This will create a sample file to run tests on the browser, which we will update later on.
Understanding the Basics of Cypress
Now that we have our setup ready, let's dive into the core concepts of Cypress.
Exploring the Cypress Architecture
Cypress operates directly in your browser, making it faster and more reliable for testing web applications. It's built on top of the Mocha testing framework, making it quite easy to use.
Understanding API Request and Response
Understanding the request and response cycle is crucial when working with API testing. In Cypress, you can easily create API requests and analyze the responses to ensure your application works as expected.
Learning About Status Codes and Validations
Cypress allows you to validate the responses you receive from the API. You can check the status codes, response times, and even the content of the response to ensure everything is functioning correctly.
Practical Guide to Cypress API Testing
In this section, we will get our hands dirty with some real coding. We will create our first API test using Cypress and the Reqres platform. Let's dive in!
Creating Your First API Test
Creating your first API test with Cypress is an exciting milestone. Let's begin with writing a basic test and running it successfully.
Writing a basic Cypress API test
To start with, let's access our test file
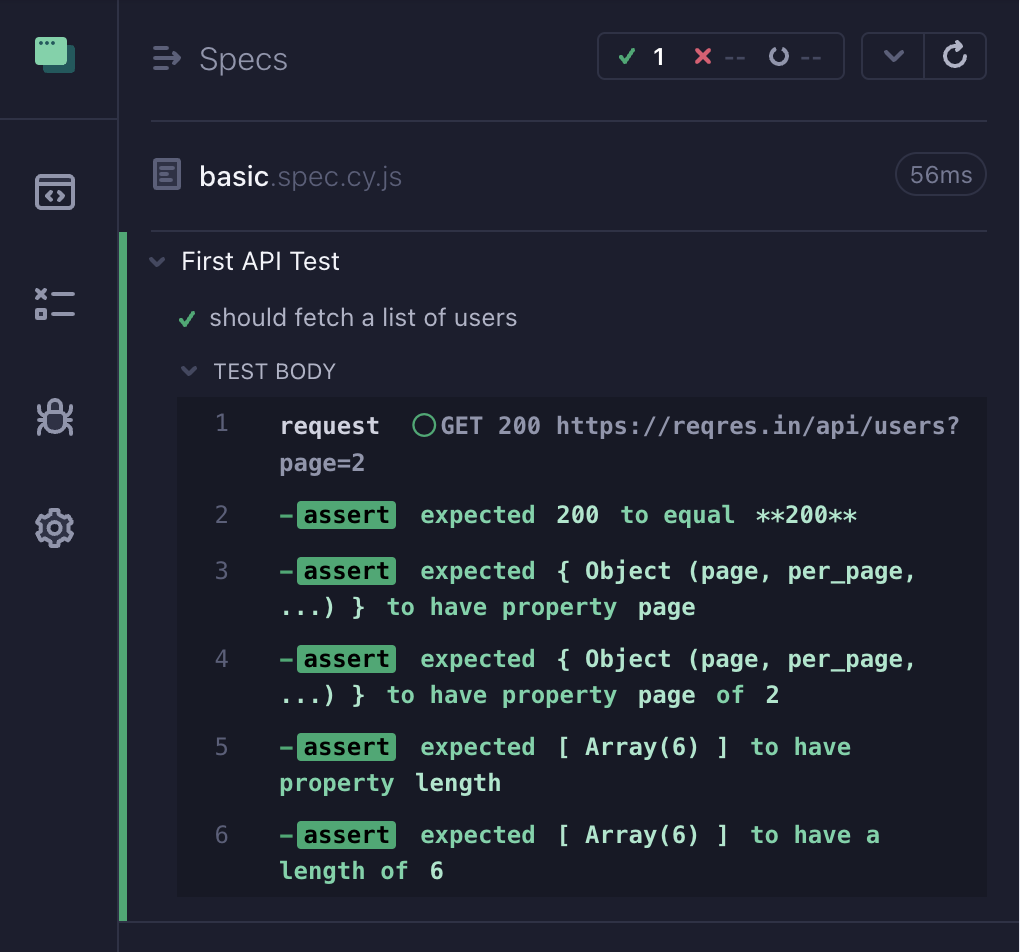
cypress/e2e/api/basic.spec.cy.js. In this file, we will write a simple test to fetch a list of users from the Reqres API. For example:JavaScriptdescribe('First API Test', () => { it('should fetch a list of users', () => { cy.request('GET', 'https://reqres.in/api/users?page=2') .then((response) => { expect(response.status).to.eq(200); expect(response.body).to.have.property('page', 2); expect(response.body.data).to.have.length(6); }); }); });In the above code, we are using the
cy.requestmethod to send a GET request to the Reqres API and then validate the response using assertions.- Running the API test
Now that we have written our first test, it's time to run it and see it in action. You can open the Cypress app using the following command:npx cypress open
Once the app is open, navigate to your test file and click on it to run the test. You will see the test results in the Cypress console, indicating whether the test passed or failed.![Successful Cypress API Test Run]()
Expanding Your Skills With a POST Request Example
After getting the hang of GET requests, let's move a step further and try our hands at creating a POST request. In this section, I will guide you through creating a new user using the Reqres API. Here's how you can do it:
Creating a new user
Now, let's create a new test case in the same file where we will add a new user using a POST request. Let's take a look at an example:
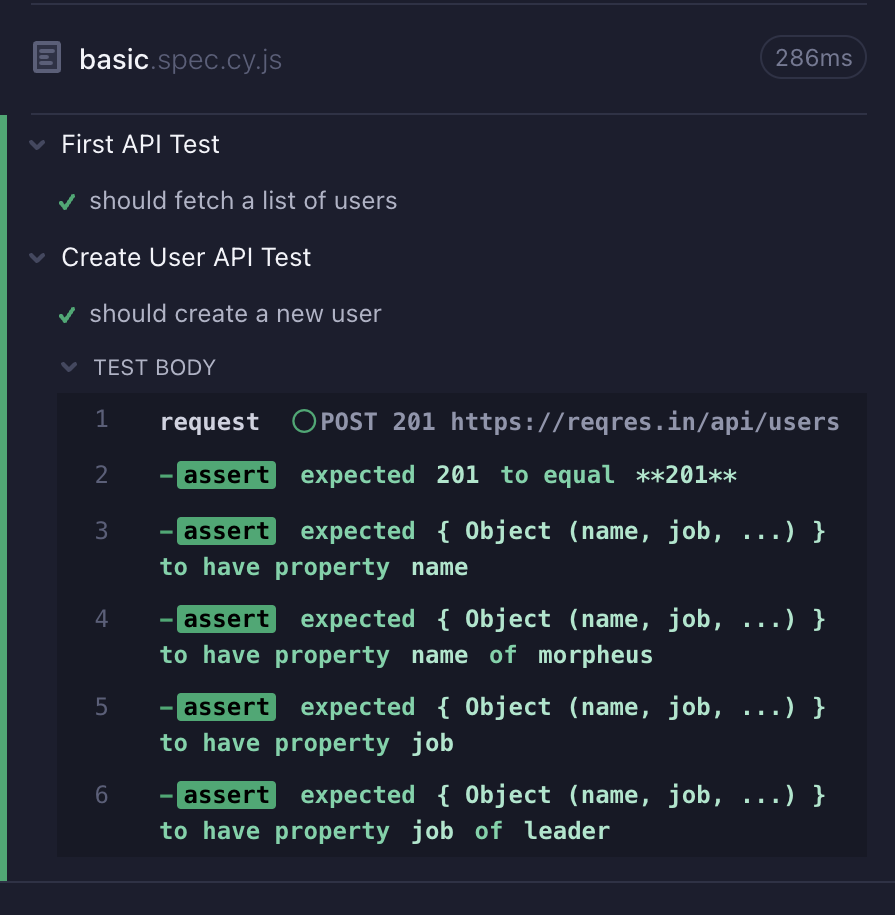
JavaScriptdescribe('Create User API Test', () => { it('should create a new user', () => { cy.request({ method: 'POST', url: 'https://reqres.in/api/users', body: { "name": "morpheus", "job": "leader" } }) .then((response) => { expect(response.status).to.eq(201); expect(response.body).to.have.property('name', 'morpheus'); expect(response.body).to.have.property('job', 'leader'); }); }); });In this code snippet, we are using the
cy.requestmethod again, but this time to send a POST request to the Reqres API. We are sending a JSON body containing the new user's details and then validating the response to ensure the user was created successfully.- Running the POST API test
Running this test is similar to the GET request test we did earlier. If the Cypress window is already open, you will see that this test will automatically get executed now.![Successful Cypress POST Test Run]()
Advanced Concepts in Cypress API Testing
As you progress in your Cypress API testing journey, you'll encounter situations where a basic GET or POST request might not suffice. Cypress offers several advanced features that assist in handling more complex testing scenarios. This section will review some of these advanced topics that can improve your API testing skills.
Integration With Other Tools
Cypress works well with many other tools to extend its capabilities. This section will discuss how you can pair Cypress with different tools to build a stronger testing framework.
- Continuous Integration (CI): Integrating Cypress with a CI tool like Jenkins or Travis CI can help you automate your testing process, allowing you to run tests automatically whenever a code changes.
- Reporting tools: Cypress can integrate with reporting tools like Mochawesome to generate beautiful and comprehensive test reports. These reports can give you insights into your tests, helping you identify areas for improvement.
Handling JSON Responses
Working with APIs often means dealing with JSON responses. Thankfully, Cypress, a JavaScript-based tool, handles JSON responses gracefully, allowing you to directly access and manipulate the JSON data without needing explicit parsing. Here, we will discuss working with and validating JSON responses using Cypress.
Accessing JSON responses
In Cypress, you can directly access the properties of a JSON response, making it easier to extract the information you need from the API responses. Here's an example:
JavaScriptcy.request('GET', 'https://reqres.in/api/users?page=2') .then((response) => { cy.log(response.body.data[0].first_name); });In the above code, we directly access the
first_nameproperty of the first user in the response without needing to parse the response body explicitly.Validating JSON schema
Validating the JSON schema is a good practice to ensure the API returns the data in the expected format. Cypress allows you to validate the JSON schema of the responses easily. You can use libraries like schema-tools to validate the JSON schema in Cypress, ensuring the structure and types of data are as expected.
Best Practices for Cypress API Testing
As you get more involved with Cypress API testing, following some best practices can be quite beneficial in building test suites that are easy to manage and efficient. In this part, we will go through some tried-and-true practices that can make your Cypress API testing efforts more fruitful.
Organizing Your Test Suites
Organizing your test suites effectively can make your testing process smoother and more manageable. Here are some tips to help you organize your test suites better:
- Modularize your tests: Break down your tests into smaller, manageable modules. This approach makes your tests easier to write and maintain and helps isolate issues quickly.
- Consistent naming conventions: Follow consistent naming conventions for your test files and test cases. This practice helps in quickly identifying and navigating to the relevant tests.
- Utilizing fixtures: Cypress fixtures help manage test data effectively. Here's how you can use a fixture to load data:
// Load data from a fixture
cy.fixture('userData.json').as('userData');
Efficient Error Handling
Error handling is a critical part of API testing. Here, we will discuss some practices to handle errors efficiently in Cypress:
- Custom error messages: Provide custom error messages in your assertions to quickly identify the cause of the failure. It helps in debugging and fixing issues faster.
expect(response.status, 'Status code should be 200').to.eq(200); - Handling API failures: Implement strategies to handle API failures gracefully. You can set up retries or fallback mechanisms to ensure your tests are robust and can handle unexpected API failures.
Optimizing Test Performance
Here are some tips to optimize your test performance:
- Parallel test execution: Utilize Cypress's capability to run tests in parallel. It helps in reducing the overall test execution time, providing quicker feedback. You can even integrate Cypress with CI and speed up your testing workflow.
- Avoiding unnecessary waits: Avoid using arbitrary waits in your tests. Instead, use Cypress's built-in wait mechanisms to wait for specific conditions, making your tests more reliable and faster.
- Utilizing hooks: Make use of hooks like
beforeEachandafterEachto set up preconditions and clean up after your tests. It helps in avoiding repetition and keeping your tests clean and organized.
Conclusion
Getting started with Cypress API testing is easier than you might think. In this blog, we've seen how Cypress comes packed with features that simplify API testing, making it both easy and efficient. Whether you're setting up your first test or adopting best practices, Cypress is great at building strong and trustworthy API test suites.
Remember that the real learning in Cypress API testing comes from hands-on experience. Begin with straightforward tests and gradually explore more advanced features as you get comfortable.
So, Good luck, get your Cypress setup ready, and start creating your API tests today.
Happy testing!
Opinions expressed by DZone contributors are their own.

 Quick configuration: The Launchpad will create a set of configuration files based on your chosen testing type, and list the changes for you to review. You can review the generated config or simply hit "Continue" to proceed.


Comments