K8s Knowhow - Using Secrets
Take a look at how you can work with Secrets and learn how to create a Secret from two different data formats.
Join the DZone community and get the full member experience.
Join For FreeIn this article, I am going to demonstrate how to use Secret in the application. In the last article, I went through ConfigMap in detail. We have seen how to use ConfigMap to externalize the configuration. Technically, ConfigMap and Secrets are alike; however, there is a striking difference. ConfigMaps are used to store the general configuration, whereas Secrets are stored encoded as Base64. Other than the encoding or masking aspect, Secrets are akin to ConfigMaps. Base64 encoding is not an encryption mechanism and its considered equivalent to plain text. In K8s, encryption is provided using EncyprionConfig object and it’s beyond the scope of this article. In this article, we will see how to use Secret to encode and decode environment variables or files. This comes in handy when you are dealing with systems or applications in which data masking (for instance, to meet GDPR requirements) is desired.
Technically speaking, such information can be stored in the pod specification or in an image. However, that option does not give flexibility as the configuration is embedded inside a pod or inside an image. That’s why K8s provides Secret object.
In our "Hello World" Spring Boot application, we are using two confidential properties – user_name and access_token. There are two ways to create a Secret:
- From literal
- From file
Creating Secret From Literal
Now, the first step is to create a Secret object from the literal. The following snippet illustrates how to create a Secret from literal.

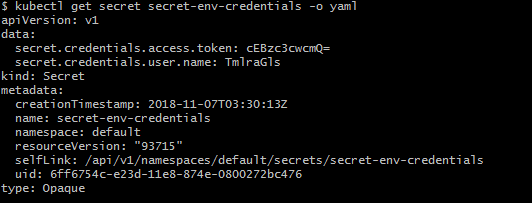
Let's see how this Secret can be stored in the K8s cluster. It is evident from the output that these properties are encoded and values are not plain text.

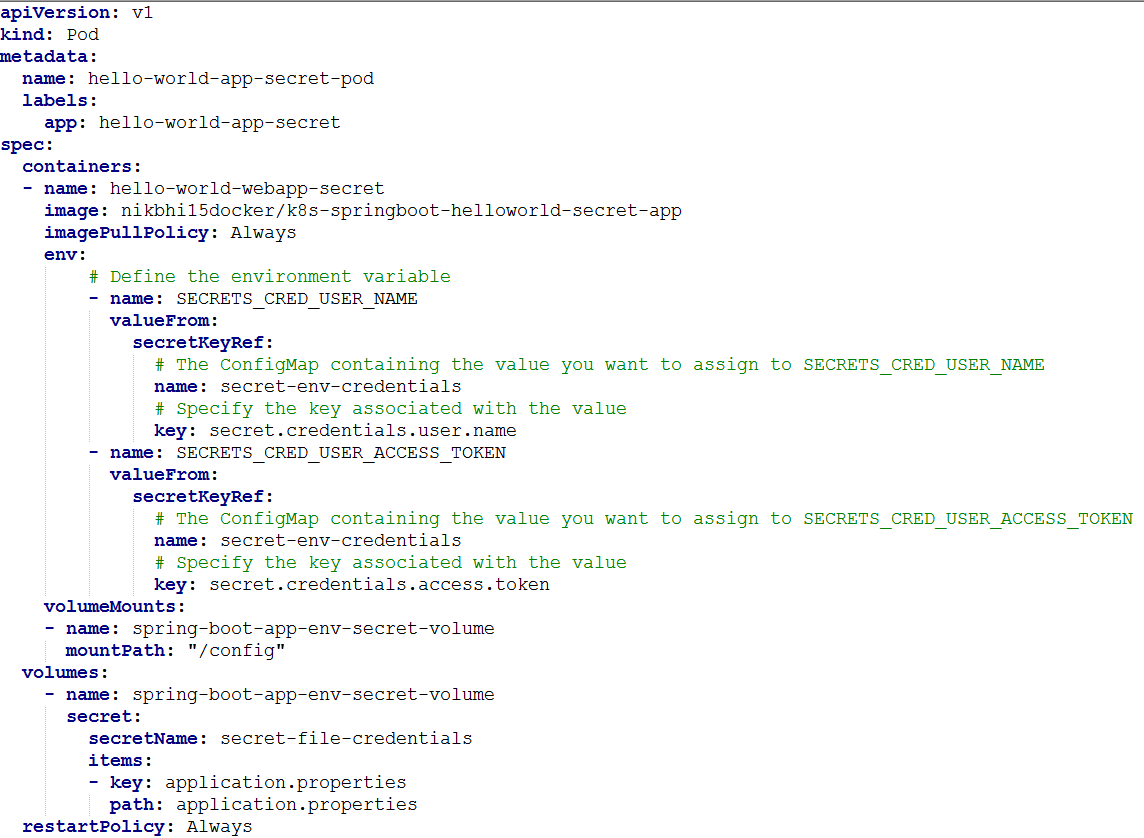
In order to use it with a pod, we need to change our pod specification so that container can use these secrets.

Look at the env section. We have defined two K8s environment variables. One is SECRETS_CRED_USER_NAME and other one is SECRETS_CRED_USER_ACCESS_TOKEN. The key question is how these variables are being populated. The answer lies in the secret secret-env-credentials that we created in the step above. This is evident from the configuration file itself in which key refers to literal used in creating the secret.
The name of the property is the key and the value of the property is the value. Application code requires to just lookup for these key-value pairs.
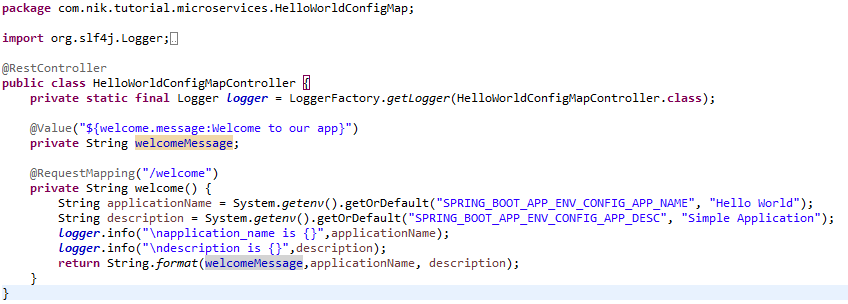
In order to use this environment variable in Java code, we simply write following code.
 Like environment variable, secret can be used in the application using System.getenv(String) api.
Creating Secret From File
Through Secret, we will mount the application.properties file into K8s cluster and it can be used in the application. Notice that the data section contains the contents of application.properties, and the key is the file name.


Now, in order to override the default configuration file, we need to mount the application.properties (through Secret) in the classpath of the application. Spring Boot provides this capability by providing different options. SpringApplication loads properties from application.properties files in the following locations and adds them to the Spring Environment:
- A /config subdirectory of the current directory
- The current directory
- A classpath /config package
- The classpath root
You can visit the Spring official page for more deets.
The simplest and best way is to mount application.properties in the “ /config ” directory.

Carefully, take a look at the mount path. Notice that the name of the Secret should be exactly the same that we created above that is secret-file-credentials. The key should be the name of file. Also, ensure that the name of the volume mount configuration references that of volume configuration.

The above snippet explains how any property defined in the application.properties file can be used in the application. It is a no-brainer as we are using the standard way recommended by Spring that is using @Value annotation to inject property value into a variable.
Now we are good to go ahead with our Secret sample application. Let us take a look at entire code snippet.

The following is the entire pod configuration.

It's similar ConfigMap with few exceptions. Section of configMapRef is replaced with secretKeyRef. Under Volumes section, instead of ConfigRef, there is Secret.
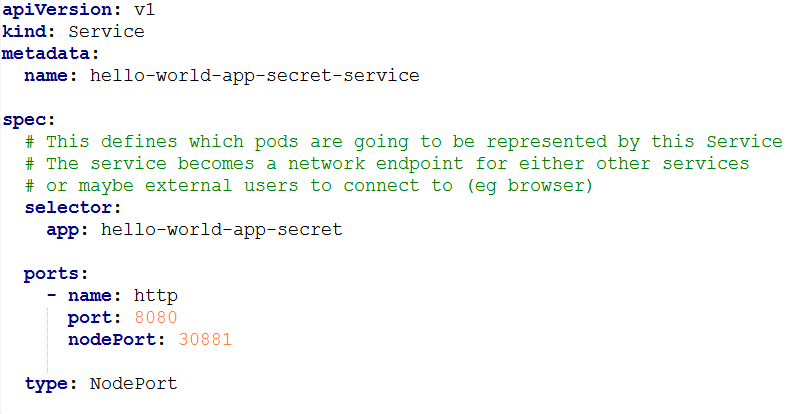
Let us also create the service with a NodePort service type so that the welcome service can be used from outside the K8s cluster.

Now let's apply these changes to K8s.


Navigate to the browser and access http://<minikube_ip>:<service_node_port>/welcome. In my case, it's: http:// 192.168.99.100:30882/welcome.
Carefully observe the output. The returned string is from the application.properties that we mounted through a Secret object. This is "Secret from a file" in an action. In addition, if you observe the traces then you will find that environment variables SECRETS_CRED_USER_NAME and
SECRETS_CRED_USER_ACCESS_TOKEN are loaded from the Secret object. This is "Secret from a literal" in action. You can check the default values of environment variables hardcoded in the code and default value of property in application.properties wrapped inside jar.
You might have observed that the values retrieved from secrets are decoded and this decoding is done by K8s internally. Just revisit the data section of each of the secret to find out the encoded value. Plain text value is not accessible from outside of pod and when the secret is used inside a pod, then the value is decoded by K8s behind the scenes. That’s it for now! You can find the project on my GitHub.
Opinions expressed by DZone contributors are their own.

Comments