Step-By-Step Guide: Configuring IPsec Over SD-WAN on FortiGate and Unveiling Its Benefits
This article outlines the steps for implementing IPSec over SD-WAN and its advantages, and use cases in today's modern network with a focus on security.
Join the DZone community and get the full member experience.
Join For FreeFirst, let's explore the practical applications and advantages of deploying IPSec over SD-WAN.
1. Branch Office Connectivity
- Secure branch-to-branch communication: Securely connects branch offices to each other and to the headquarter using IPSec tunnels over SD-WAN, IPSec provides encrypted and reliable communication.
- High availability: Multiple ISP links (WAN) will ensure high availability and failover capabilities for critical branch office applications.
2. Remote Workforce
- Secure remote access: Employees can have secure access to their office network from home or remote locations, the connections are encrypted to corporate resources.
- Performance optimization: SD-WAN optimizes the network by routing traffic across the most effective paths
3. Cloud Connectivity
- Secure cloud access: Connectivity to the cloud is secure using IPSec tunnels with data encryption and security being its key features
- Hybrid cloud environment: SD-WAN can manage traffic between on-premise data centers and multiple cloud environments, providing reliable and secure data transfer.
4. IoT and Edge Devices
- Secure IoT communications: Data is transmitted securely from IoT devices through IPSec tunnels, protecting sensitive data.
- Edge computing: SD-WAN and IPSec facilitate data transfer to edge computing sites, ensuring proper handling of data with secure transfer.
Steps To Implement FortiGate for IPSec Over SD-WAN
- Consider the following scenario
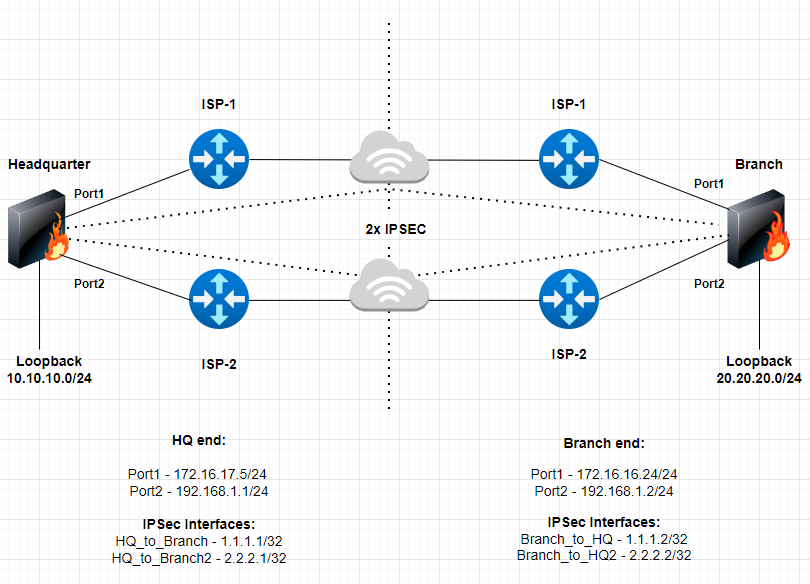
Overview of the Setup
- FortiOS version 7.2.x on Headquarter and Branch FortiGate's (can be implemented on 6.4.x).
- Two FortiGate’s in a Headquarter and Branch setup
- 2 x ISP connections on each site
- 2x IPSec tunnels on each site
- Loopback’s interface (subnets) used to exchange routes between the two sites
1. Steps to Configure VPN Interface on Headquarter and Branch Fortigate’s
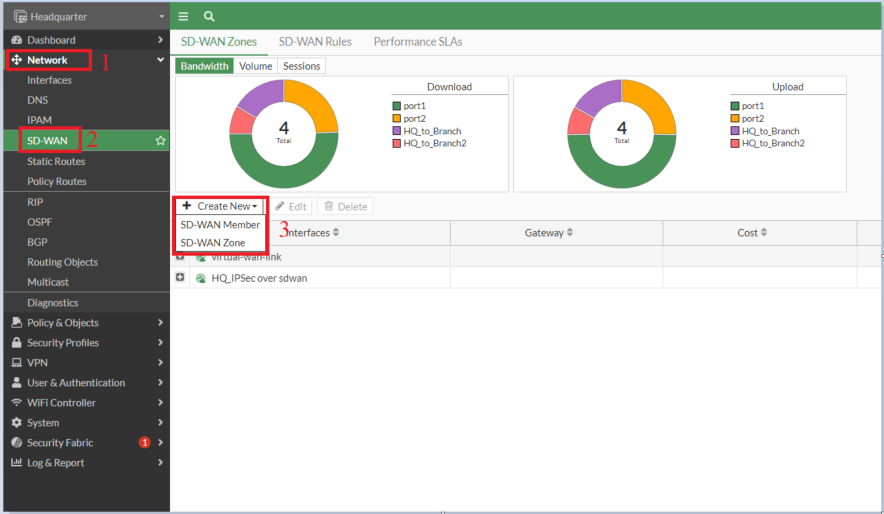
- Create the VPN interface using SD-WAN VPN.
- Navigate to Network -> SD-WAN, and select 'Create New'-> SD-WAN Member
- Select Interface -> +VPN button -> Create IPSec VPN for SD-WAN interface
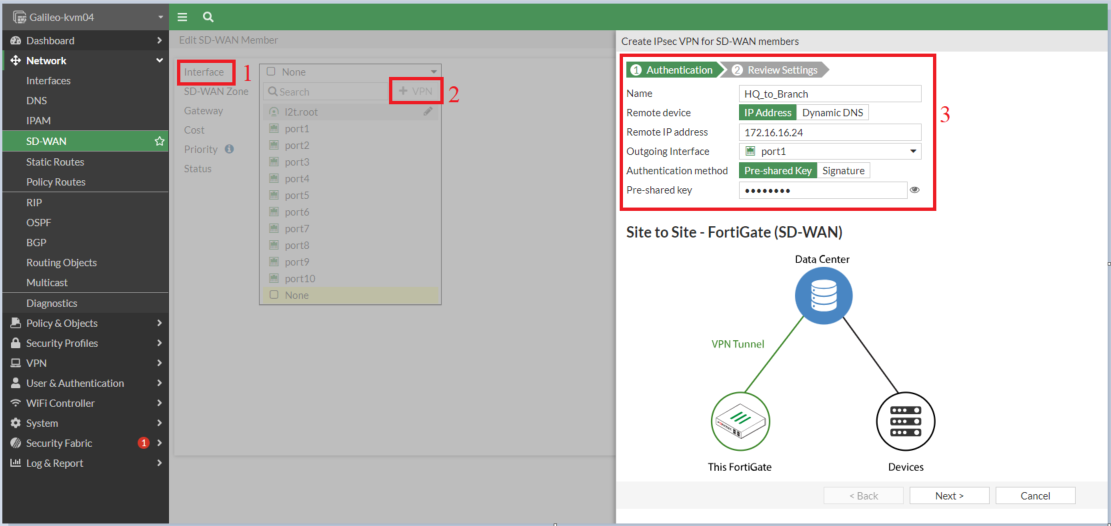
Note: In the above screenshot, outgoing interface port1 is the WAN interface
- Now remember we are creating two IPSec tunnels over Port1 and Port2, so create another IPSec tunnel interface using the same steps
- Create a SD-WAN Zone
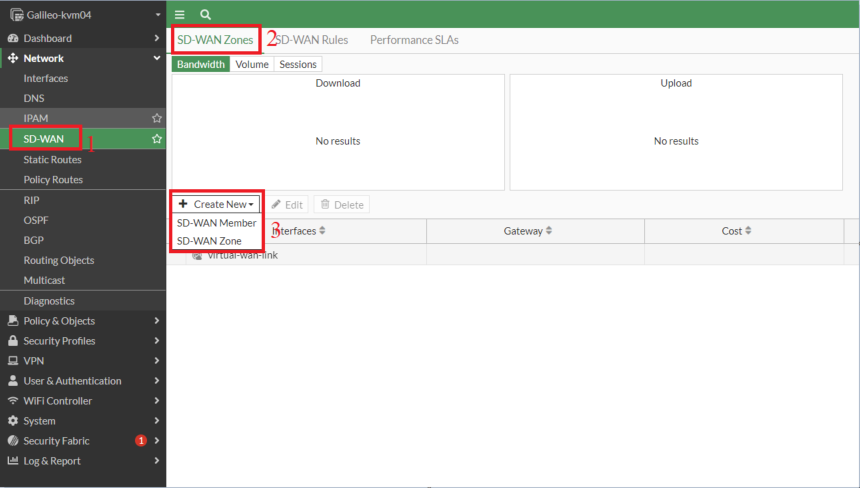
- Add the two IPSec tunnel interfaces
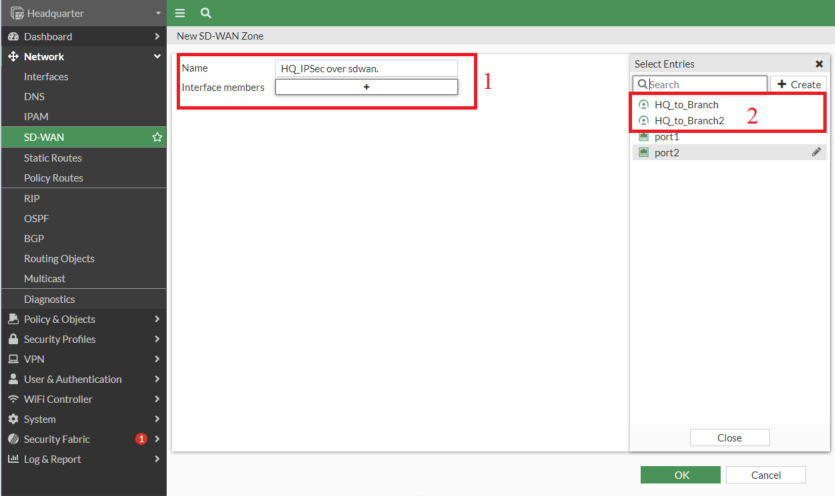
- All the above steps need to be repeated on the Branch FortiGate as well
IMP: We do not utilize the IPSec Wizard to create tunnel interfaces because it cannot be invoked within the SD-WAN member context. The IPSec Wizard generates routes, policies, and addresses that are appended to the configuration, necessitating their removal to integrate the tunnel interface into the SD-WAN member.
2. Configure Phase 2 Selectors for Headquarter and Branch FortiGate's
- Creating address on Headquarter for "Branch_remote address": 20.20.20.0/24
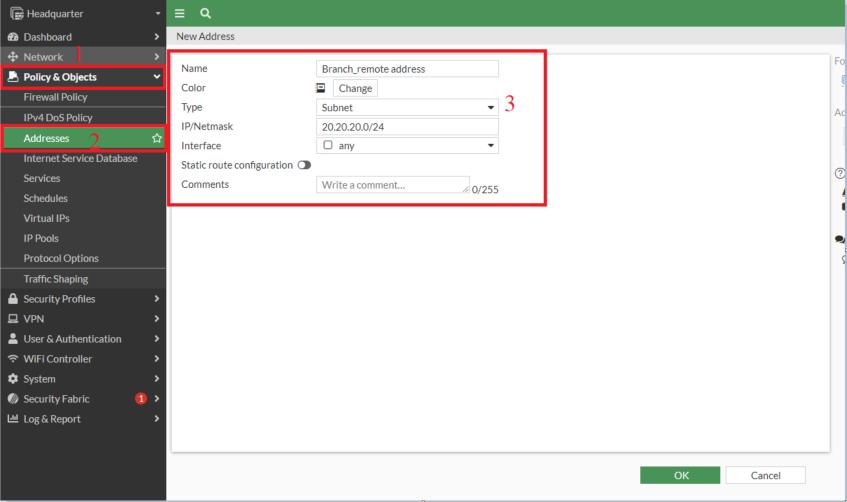
- Creating address on Headquarter for "HQ_local address" : 10.10.10.0/24
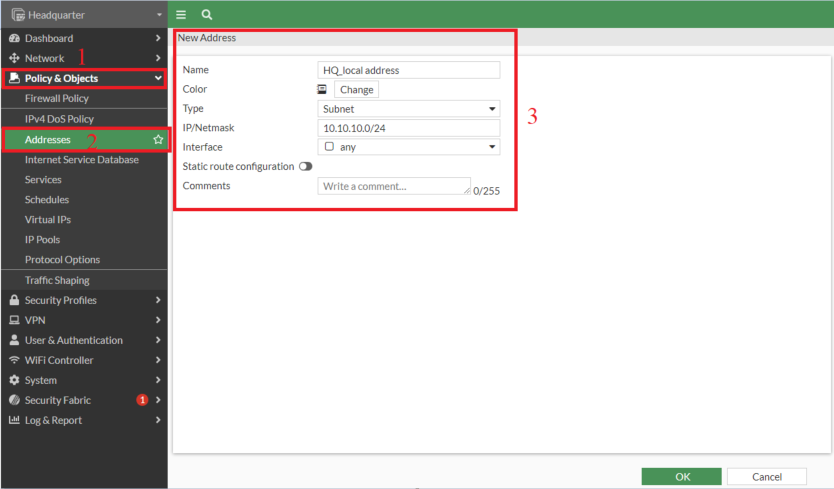
- Adding the addresses in Phase2 Selectors
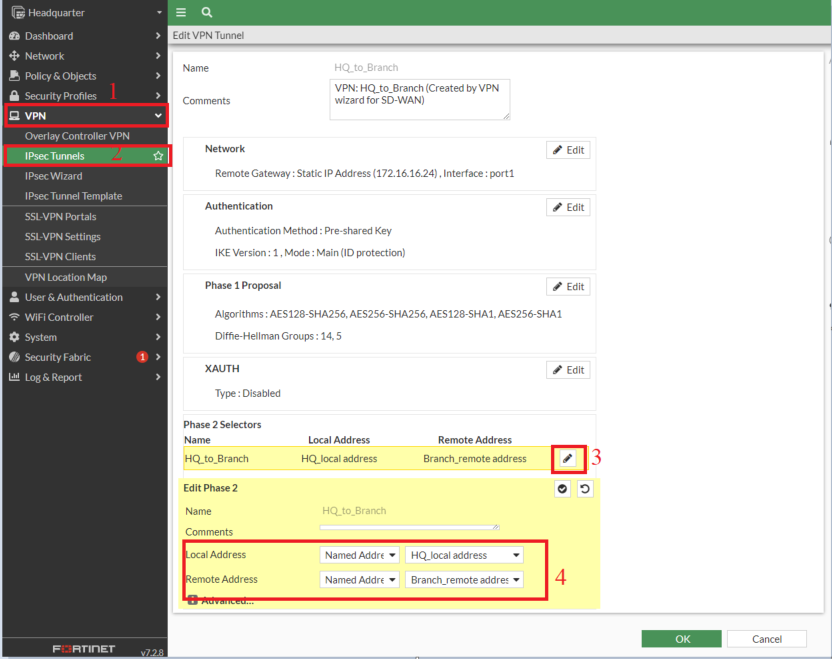
- The same steps need to be implemented on the Branch FortiGate but ensure the below
- Branch_remote address: 10.10.10.0/24
- HQ_local address: 20.20.20.0/24
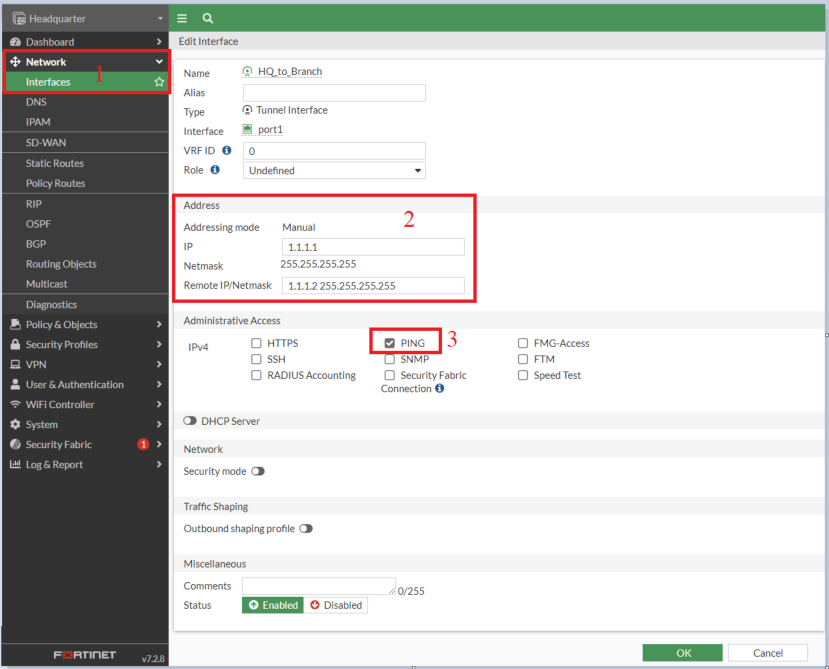
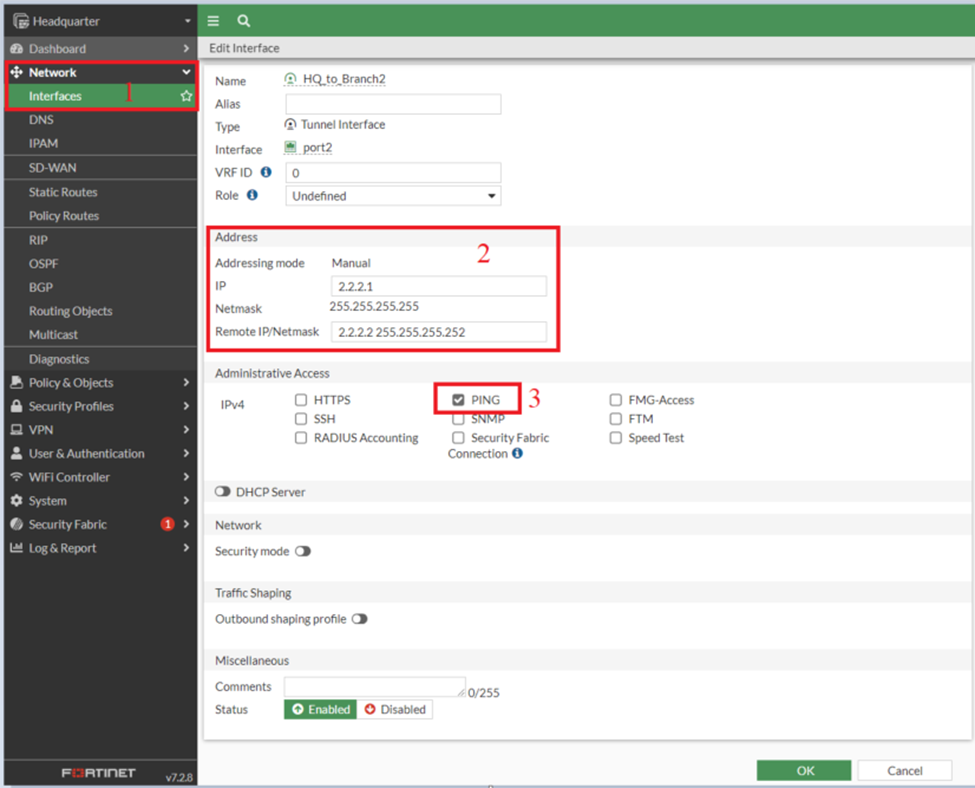
3. Assign IP Addresses to the IPSec Interfaces for Both Tunnels on Headquarter and Branch
Interface: HQ_to_Branch
Interface: HQ_to_Branch2
On Branch Fortigate
Interface Branch_to_HQ
- IP: 1.1.1.2/32
- Remote IP: 1.1.1.1/32
Interface Branch_to_HQ2
- IP: 2.2.2.2/32
- Remote IP: 2.2.2.1/32
4. Create Static Routes
- Static Routes need to be created for the VPN traffic using VPN SD-WAN zone for FortiOS running v7.0 and above
Note: In FortiOS v6.4.x, you can configure static routes for specific VPN interfaces or for the entire SD-WAN interface, but not for individual VPN SD-WAN zones. Support for creating static routes specifically for individual VPN SD-WAN zones is available starting from FortiOS v7.0.
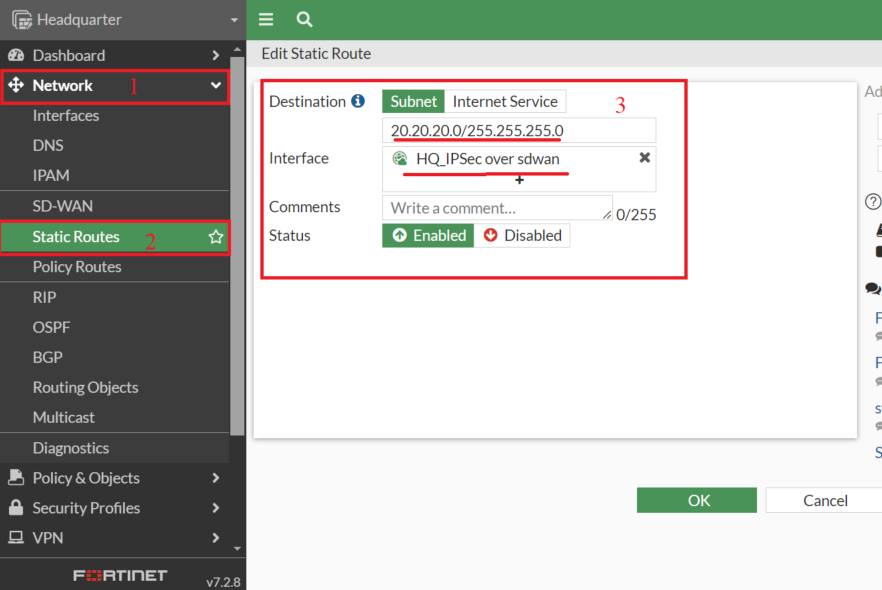
- Similarly on the Branch end
Destination: 10.10.10.0/24
Interface: Branch_IPSec over sdwan (SD-WAN Zone)
5. Create Firewall Policies
- Create a firewall policy for the VPN traffic using the VPN SD-WAN Zone
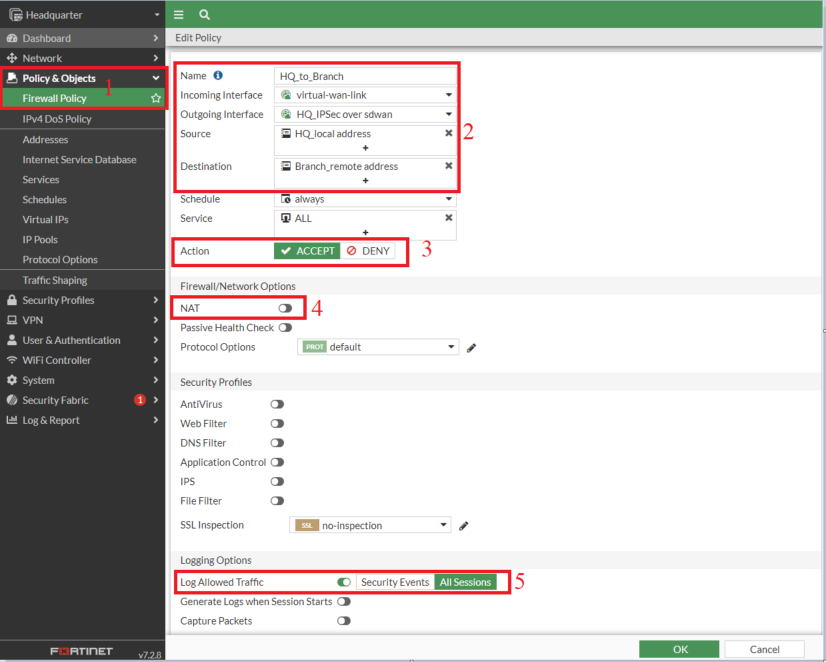
Note: Make sure NAT is turned off in the policy settings; otherwise, traffic will be routed through the tunnel interface IP.
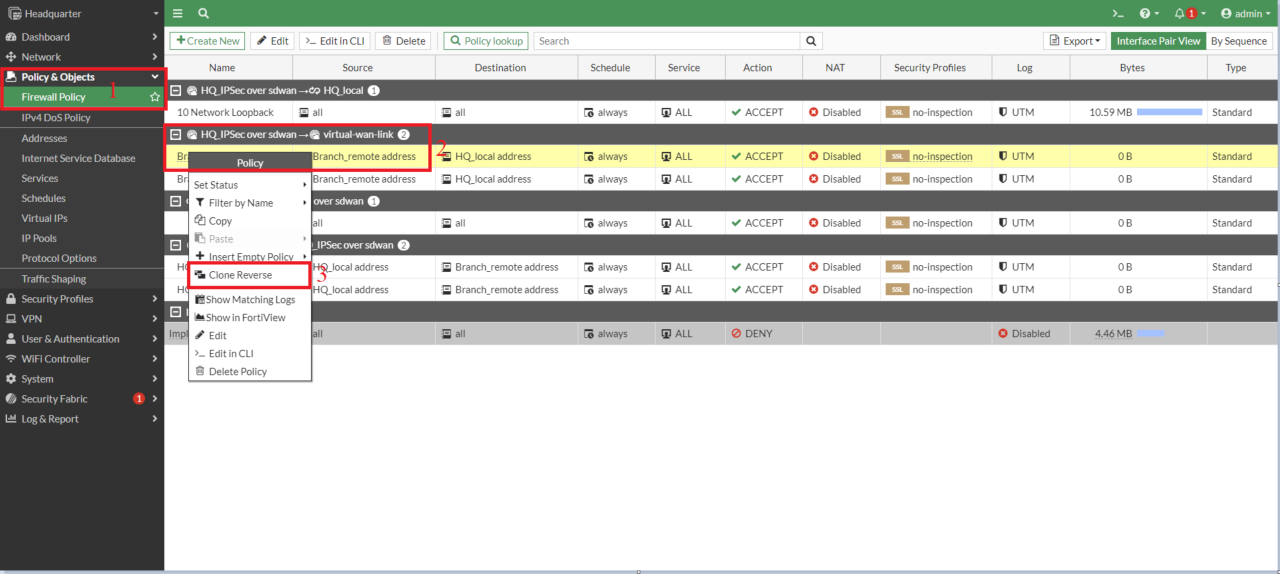
- Now create a second policy for traffic direction from Branch to Headquarter. You can duplicate it using the clone feature, rename the copy, and then enable it.
![enable copy]() Now same way create firewall policies for tunnel HQ_to_Branch2 on Headquarter end and for Branch IPSec tunnels
Now same way create firewall policies for tunnel HQ_to_Branch2 on Headquarter end and for Branch IPSec tunnels
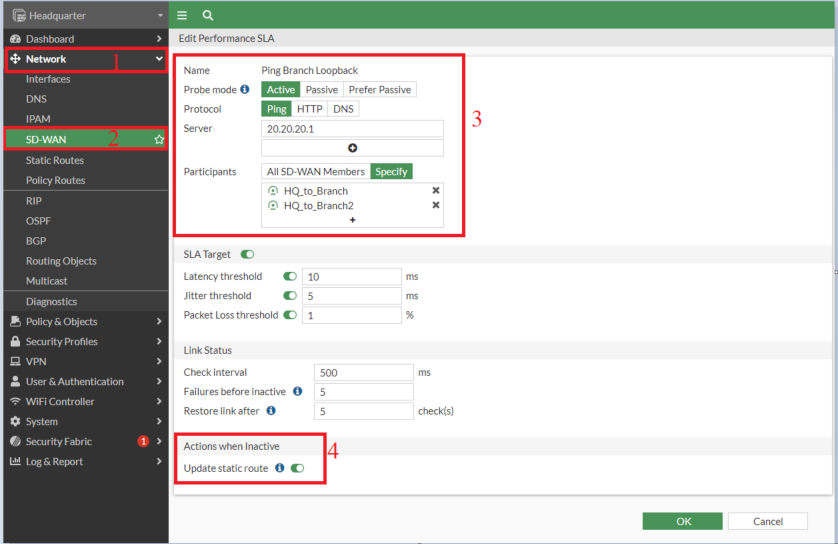
6. Setting up Performance SLA on Headquarter and Branch for VPN Interfaces in SD-WAN
- The peer IP used is the loopback interface of the branch 20.20.20.1
- We have selected ICMP (ping)
- We have enabled the "Update Static Route" option. It is used to disable static routes for inactive interfaces, and restores upon recovery.
![edit sla]()
- Now add the source IP in SD-WAN VPN member from the CLI to make it work. (given below)
- The peer end configuration needs to be completed for the SLA to be up and working, the SLA relies on the tunnel configuration to reach the peer end.
- The source IP needs to be an interface IP and it will work only when it is added to the Phase 2 selectors. In our configuration, Headquarter Loopback — 10.10.10.1/24 and Branch Loopback — 20.20.20.1/24
Headquarter Fortigate
config system sdwan
config members
edit 3
set interface "HQ_to_branch"
set zone "HQ_IPSec_over_sdwan"
set source 10.10.10.1 <----- Added Loopback interface IP.
next
edit 4
set interface "HQ_to_branch2"
set zone "HQ_IPSec_over_sdwan"
set source 10.10.10.1 <----- Added Loopback interface IP.
next
end- Similarly, on the branch add source ip 20.20.20.1
7. Create SD-WAN rule
- The SD-WAN rule would include the performance SLA
- We are going to use lowest lowest-cost SLA, but you can use any other based on your network requirements.
Note: Latency, Best Quality, and Lowest Cost SLAs utilize one interface at a time, whereas Maximum Bandwidth SLA load-balances traffic across interfaces.
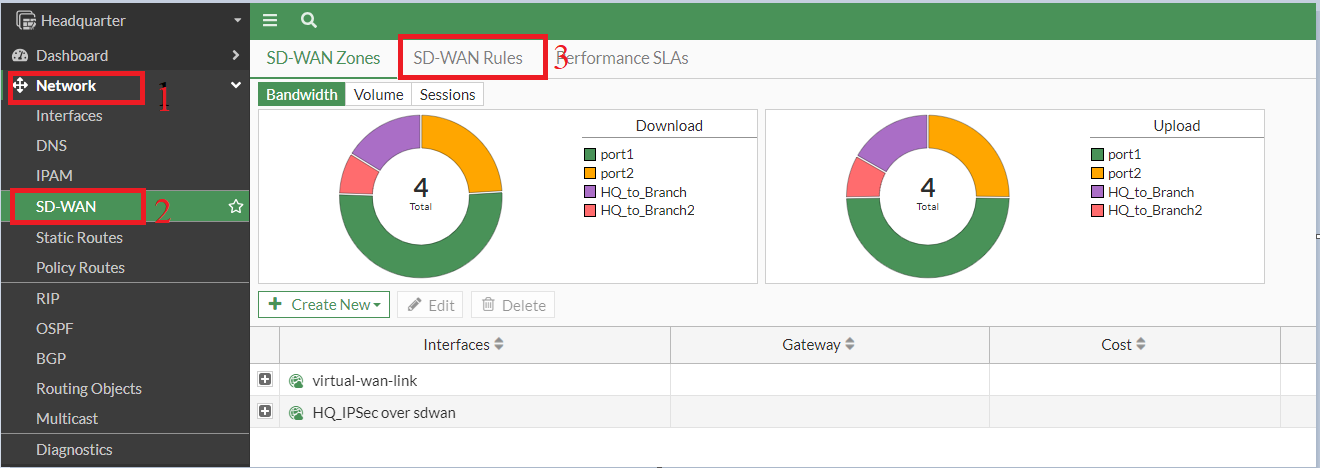
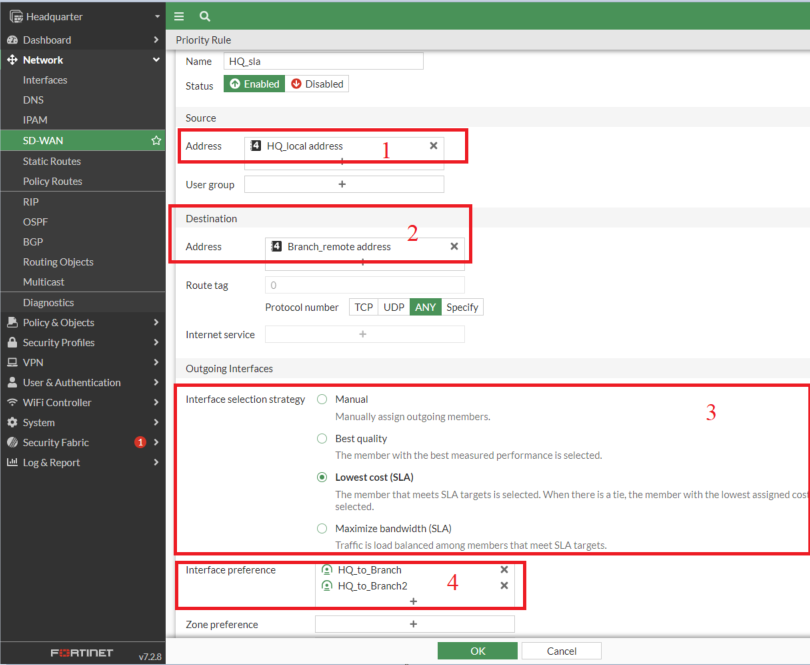
- Ensure the VPN rule is positioned above the all-to-all rule, as rules are processed from top to bottom.
8. Create a Blackhole Route
- To prevent traffic from being routed to the ISP link when both tunnels are down, we need to create a blackhole route for the destination subnets. Otherwise, even if the tunnels recover, existing sessions will continue to use the ISP link until their timeout or manual clearing, ignoring the tunnels.
Config Router Static
edit 3

set dst 20.20.20.0 255.255.255.0

set distance 15

set blackhole enable

set vrf 0

next

end
Note: Ensure that the administrative distance (AD) value set for the blackhole route is higher than that of any configured static routes.
9. Verify IPSec Tunnel Status
#get vpn ipsec tunnel summary

GUI

10. Verify SD-WAN Status
#diag sys sdwan member
#diag sys sdwan service
#diag sys sdwan health-check
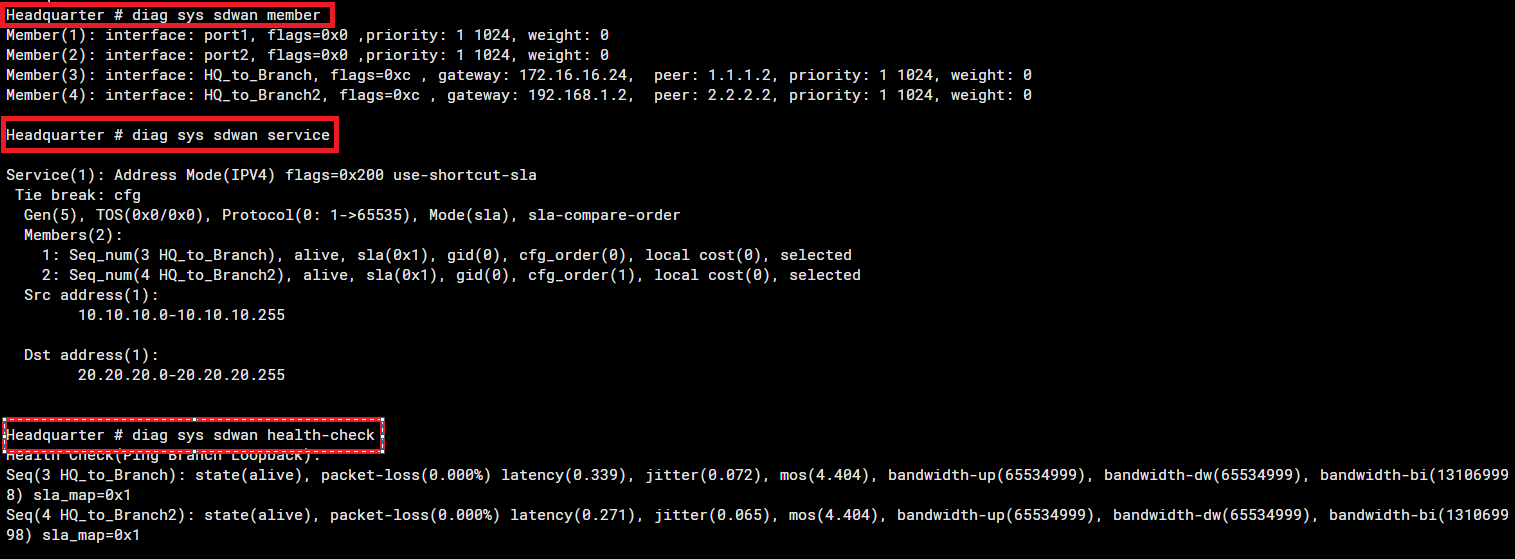
GUI
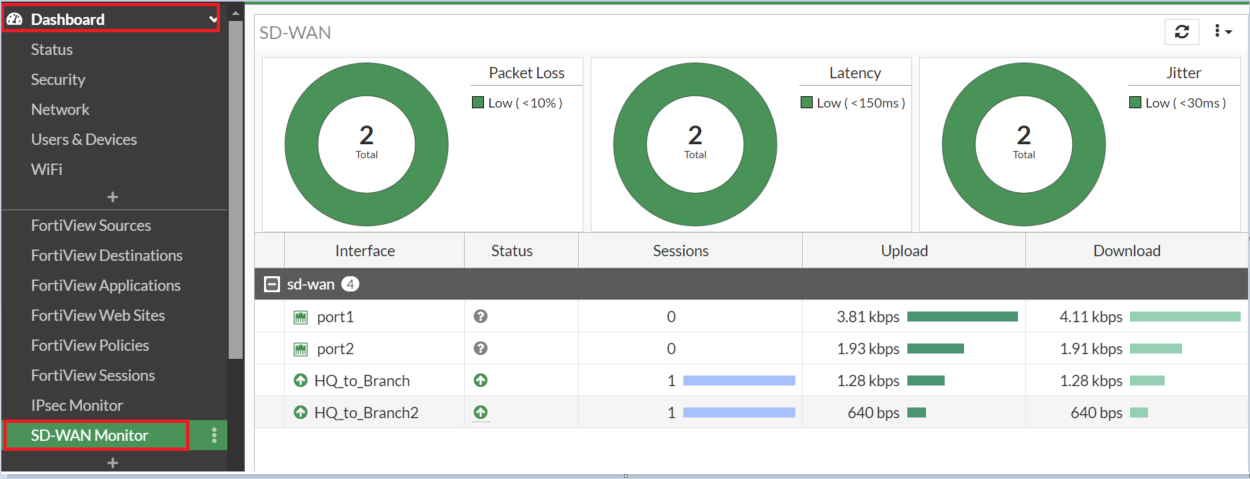
Conclusion
As cyber threats continue to evolve, adopting such advanced configurations ensures that your network remains resilient, efficient, and secure. Investing the time and effort to configure IPsec over SD-WAN on FortiGate not only fortifies your network but also this solution is scalable, requires less time and effort to set up, and is easy to diagnose for any problems, this also future-proofs your network infrastructure. Feel free to ask any questions in the comments.
Opinions expressed by DZone contributors are their own.

 Now same way create firewall policies for tunnel HQ_to_Branch2 on Headquarter end and for Branch IPSec tunnels
Comments