Integrating With Jira APIs in Python
Connecting to Jira in Python.
Join the DZone community and get the full member experience.
Join For FreeOverview
Continuing in the series of articles about newest cloud connections in Zato 3.2, this episode covers Atlassian Jira from the perspective of invoking its APIs to build integrations between Jira and other systems.
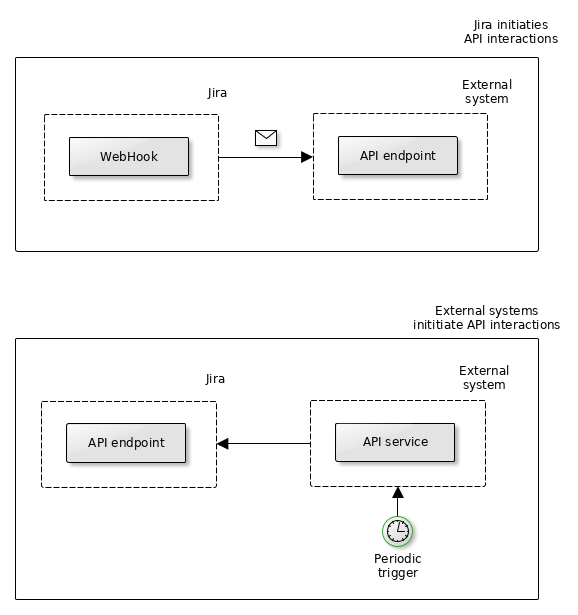
There are essentially two use modes of integrations with Jira:
- Jira reacts to events taking place in your projects and invokes your endpoints accordingly via WebHooks. In this case, it is Jira that explicitly establishes connections with and sends requests to your APIs.
- Jira projects are queried periodically or as a consequence of events triggered by Jira using means other than WebHooks.

The first case is usually more straightforward to conceptualize - you create a WebHook in Jira, point it to your endpoint and Jira invokes it when a situation of interest arises, e.g. a new ticket is opened or updated. I will talk about this variant of integrations with Jira in a future installment as the current one is about the other situation, when it is your systems that establish connections with Jira.
The reason why it is more practical to first speak about the second form is that, even if WebHooks are somewhat easier to reason about, they do come with their own ramifications.
To start off, assuming that you use the cloud-based version of Jira (e.g. https://example.atlassian.net), you need to have a publicly available endpoint for Jira to invoke through WebHooks. Very often, this is undesirable because the systems that you need to integrate with may be internal ones, never meant to be exposed to public networks.
Secondly, your endpoints need to have a TLS certificate signed by a public Certificate Authority and they need to be accessible on port 443. Again, both of these are something that most enterprise systems will not allow at all or it may take months or years to process such a change internally across the various corporate departments involved.
Lastly, even if a WebHook can be used, it is not always a given that the initial information that you receive in the request from a WebHook will already contain everything that you need in your particular integration service. Thus, you will still need a way to issue requests to Jira to look up details of a particular object, such as tickets, in this way reducing WebHooks to the role of initial triggers of an interaction with Jira, e.g. a WebHook invokes your endpoint, you have a ticket ID on input and then you invoke Jira back anyway to obtain all the details that you actually need in your business integration.
The end situation is that, although WebHooks are a useful concept that I will write about in a future article, they may very well not be sufficient for many integration use cases. That is why I start with integration methods that are alternatives to WebHooks.
Alternatives to WebHooks
If, in our case, we cannot use WebHooks then what next? Two good approaches are:
- Scheduled jobs
- Reacting to emails (via IMAP)
Scheduled jobs will let you periodically inquire with Jira about the changes that you have not processed yet. For instance, with a job definition as below:


Now, the service configured for this job will be invoked once per minute to carry out any integration works required. For instance, it can get a list of tickets since the last time it ran, process each of them as required in your business context, and update a database with information about what has been just done — the database can be based on Redis, MongoDB, SQL or anything else.
Integrations built around scheduled jobs make the most sense when you need to make periodic sweeps across a large swath of business data, these are the “Give me everything that changed in the last period” kind of interactions when you do not know precisely how much data you are going to receive.
In the specific case of Jira tickets, though, an interesting alternative may be to combine scheduled jobs with IMAP connections:


The idea here is that when new tickets are opened, or when updates are made to existing ones, Jira will send out notifications to specific email addresses and we can take advantage of it.
For instance, you can tell Jira to CC or BCC an address. Now, Zato will still run a scheduled job but instead of connecting with Jira directly, that job will look up unread emails for its inbox (“UNSEEN” per the relevant RFC).
Anything that is unread must be new since the last iteration which means that we can process each such email from the inbox, in this way guaranteeing that we process only the latest updates, dispensing with the need for our own database of tickets already processed. We can extract the ticket ID or other details from the email, look up its details in Jira, and then continue as needed.
All the details of how to work with IMAP emails are provided in the documentation but it would boil down to this:
# -*- coding: utf-8 -*-

# Zato
from zato.server.service import Service

class MyService(Service):

    def handle(self):
        conn = self.email.imap.get('My Jira Inbox').conn

        for msg_id, msg in conn.get():

            # Process the message here ..
            process_message(msg.data)

            # .. and mark it as seen in IMAP.
            msg.mark_seen()
The natural question is - how would the “process_message” function extract details of a ticket from an email?
There are several ways:
- Each email has a subject of a fixed form - “[JIRA] (ABC-123) Here goes description”. In this case, ABC-123 is the ticket ID.
- Each email will contain a summary, such as the one below, which can also be parsed:
Summary: Here goes description
             Key: ABC-123
             URL: https://example.atlassian.net/browse/ABC-123
         Project: My Project
      Issue Type: Improvement
Affects Versions: 1.3.17
     Environment: Production
        Reporter: Reporter Name
Assignee: Assignee Name- Finally, each email will have an “X-Atl-Mail-Meta” header with interesting metadata that can also be parsed and extracted:
X-Atl-Mail-Meta: user_id="123456:12d80508-dcd0-42a2-a2cd-c07f230030e5",
                 event_type="Issue Created",
                 tenant="https://example.atlassian.net"
The first option is the most straightforward and likely the most convenient one - simply parse out the ticket ID and call Jira with that ID on input for all the other information about the ticket. How to do it exactly is presented in the next chapter.
Regardless of how we parse the emails, the important part is that we know that we invoke Jira only when there are new or updated tickets — otherwise there would not have been any new emails to process. Moreover, because it is our side that invokes Jira, we do not expose our internal system to the public network directly.
However, from the perspective of the overall security architecture, email is still part of the attack surface so we need to make sure that we read and parse emails with that in view. In other words, regardless of whether it is Jira invoking us or our reading emails from Jira, all the usual security precautions regarding API integrations and accepting input from external resources, all that still holds and needs to be part of the design of the integration workflow.
Creating Jira Connections
The above presented the ways in which we can arrive at the step of when we invoke Jira and now we are ready to actually do it.
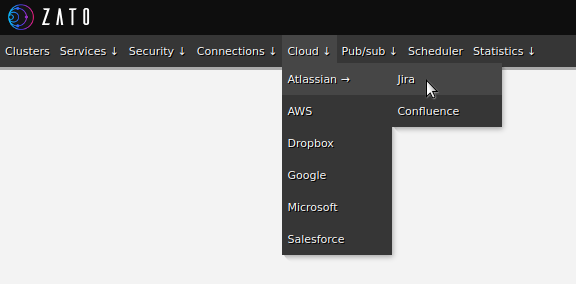
As with other types of connections, Jira connections are created in Zato Dashboard, as below. Note that you use the email address of a user on whose behalf you connect to Jira but the only other credential is that user’s API token previously generated in Jira, not the user’s password.


Invoking Jira
With a Jira connection in place, we can now create a Python API service. In this case, we accept a ticket ID on input (called “a key” in Jira) and we return a few details about the ticket to our caller.
This is the kind of service that could be invoked from a service that is triggered by a scheduled job. That is, we would separate the tasks, one service would be responsible for opening IMAP inboxes and parsing emails and the one below would be responsible for communication with Jira.
Thanks to this loose coupling, we make everything much more reusable - that the services can be changed independently is but one part and the more important side is that, with such separation, both of them can be reused by future services as well, without tying them rigidly to this one integration alone.
# -*- coding: utf-8 -*-

# stdlib
from dataclasses import dataclass

# Zato
from zato.common.typing_ import cast_, dictnone
from zato.server.service import Model, Service

# ###########################################################################

if 0:
    from zato.server.connection.jira_ import JiraClient

# ###########################################################################

@dataclass(init=False)
class GetTicketDetailsRequest(Model):
    key: str

@dataclass(init=False)
class GetTicketDetailsResponse(Model):
    assigned_to: str = ''
    progress_info: dictnone = None

# ###########################################################################

class GetTicketDetails(Service):

    class SimpleIO:
        input  = GetTicketDetailsRequest
        output = GetTicketDetailsResponse

    def handle(self):

        # This is our input data
        input = self.request.input # type: GetTicketDetailsRequest

        # .. create a reference to our connection definition ..
        jira = self.cloud.jira['My Jira Connection']

        # .. obtain a client to Jira ..
        with jira.conn.client() as client: # type: JiraClient

            # Cast to enable code completion
            client = cast_('JiraClient', client)

            # Get details of a ticket (issue) from Jira
            ticket = client.get_issue(input.key)

        # Observe that ticket may be None (e.g. invalid key), hence this 'if' guard ..
        if ticket:

            # .. build a shortcut reference to all the fields in the ticket ..
            fields = ticket['fields']

            # .. build our response object ..
            response = GetTicketDetailsResponse()
            response.assigned_to = fields['assignee']['emailAddress']
            response.progress_info = fields['progress']

            # .. and return the response to our caller.
            self.response.payload = response

# ###########################################################################
Creating a REST Channel and Testing It
The last remaining part is a REST channel to invoke our service through. We will provide the ticket ID (key) on input and the service will reply with what was found in Jira for that ticket.

We are now ready for the final step - we invoke the channel, which invokes the service which communicates with Jira, transforming the response from Jira to the output that we need:
$ curl localhost:17010/jira1 -d '{"key":"ABC-123"}'
{
    "assigned_to":"zato@example.com",
    "progress_info": {
        "progress": 10,
        "total": 30
    }
}
$
And this is everything for today — just remember that this is just one way of integrating with Jira. The other one, using WebHooks, is something that I will go into in one of the future articles.
Opinions expressed by DZone contributors are their own.

Comments