Implementing EKS Multi-Tenancy Using Capsule (Part 2)
Learn how to create single or multiple tenants on EKS cluster with single or multiple AWS IAM users as tenant owners using the Capsule framework.
Join the DZone community and get the full member experience.
Join For FreeIn the first part, we learned what multi-tenancy is, different types of tenant isolation models, challenges with Kubernetes native services, and how to install the capsule framework on AWS EKS.
We will now dive further into creating tenants using the Capsule framework.
Capsule Tenant creation requires an owner (s) assignment. Though we can create local Kubernetes users as tenant owners, we will be using IAM users as tenant owners. This process involves following steps:
How To Set Up Capsule Tenants With AWS EKS
Step 1: Create IAM Policy
The first step in creating a read-only user in EKS is to create an IAM policy that grants read-only access to the EKS cluster. We will create an IAM policy “t-CapsuleDescribeCluster' which only describes permissions on the cluster.
- Sign in to the AWS Management Console and navigate to the IAM dashboard
- In the left-hand menu, select “Policies”
- Click the “Create policy” button
- Choose “JSON” tab for editing policies
- Apply the below IAM policy that allows read-only access to an EKS cluster
{
    "Version": "2012-10-17",
    "Statement": [
        {
            "Sid": "Statement1",
            "Effect": "Allow",
            "Action": [
                "eks:DescribeCluster"
            ],
            "Resource": "*"
        }
    ]
}- Click Next. Enter the policy name as “t-CapsuleDescribePolicy” and click ‘Create’
Step 2: IAM User Group
We will create an IAM user group that is associated with the IAM policy created in step 1
- Log in to the AWS Management Console and go to the IAM dashboard
- Click “User groups” in the left-hand menu and then click “Create group”
- Enter name as “capsule.clastix.io”. Click Next
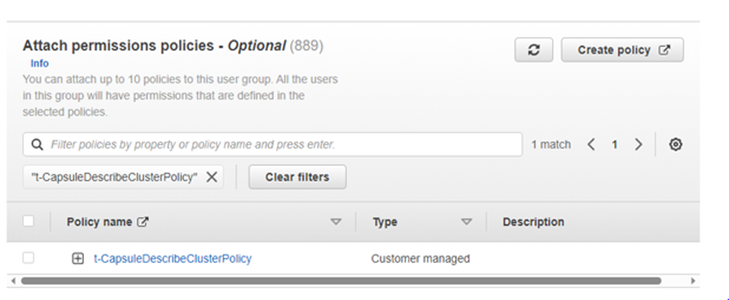
- In the “Attach Permission policies” select, search for “t-CapsuleDescribePolicy” and select the IAM policy created in step 1

- Review the user group details and click “Create user group.”
Step 3: Create IAM Users and Add to the IAM User Group
Follow the below steps to create two IAM users (shiva and ganesha).
- Log in to the AWS Management Console and go to the IAM dashboard
- Click “Users” in the left-hand menu and then click “Add user”
- Enter a name for the user
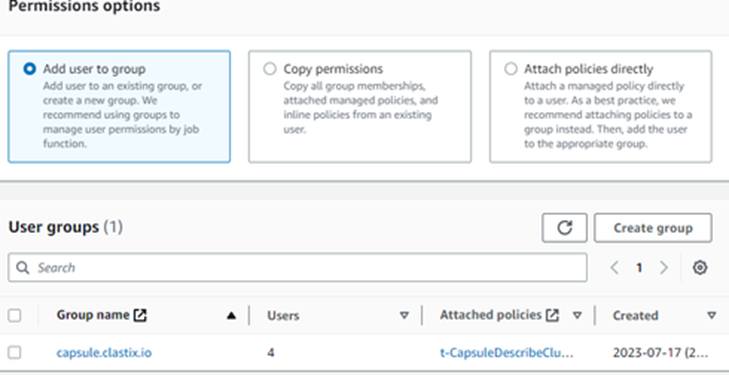
- Select “Add Users to the group” and select “capsule.clastix.io” group. Click Next

- Review the user details and click “Create user.”
Step 4: Create a ClusterRole and ClusterRoleBinding
We will create a new “k8s-read.yaml” file with below code:
---
apiVersion: rbac.authorization.k8s.io/v1
kind: ClusterRole
metadata:
  name: k8s-read
rules:
- apiGroups:
  - '*'
  resources:
  - deployments
  - pods
  - pods/log
  - configmaps
  - secrets
  - services
  - virtualservices
  - horizontalpodautoscalers
  - gateways
  - namespaces
  verbs:
  - get
  - list
  - watch
---
apiVersion: rbac.authorization.k8s.io/v1
kind: ClusterRoleBinding
metadata:
  name: k8s-read
roleRef:
  apiGroup: rbac.authorization.k8s.io
  kind: ClusterRole
  name: k8s-read
subjects:
- apiGroup: rbac.authorization.k8s.io
  kind: Group
  name: k8s-read
Apply the above manifest file using kubectl.
kubectl apply -f k8s-read.yamlStep 5: Map User in aws-auth Config Map
We will need to add these users in aws-auth configmap to grant read access to EKS cluster.
Open the aws-auth configmap for editing by running the below command.
kubectl -n kube-system edit configmap aws-authGo to the IAM Dashboard. Navigate to the users section and copy the userarn for shiva and ganesha. These will be used to update the mapUsers section in the config map.
userarn: arn:aws:iam::<account-number>>:user/shiva
userarn: arn:aws:iam::<<account-number>>:user/ganesha
Add user in mapUsers section. Here is a sample code:
    - groups:
      - k8s-read
      - capsule.clastix.io
      userarn: arn:aws:iam::<account-number>:user/<user-name>
      username: shiva
Step 6: Create Access Keys for the IAM Users (shiva and ganesha)
Repeat the below steps to create access keys for IAM users (shiva and ganesha)
- Go to IAM Dashboard and navigate to the users section
- Select the user. Click the “security credentials” tab
- From the Access Keys section, click create Access Keys
- Select the use case ”Command Line Interface (CLI)” option and confirm

- Copy the access key and secret access key generated for both the users.
Step 7: Configure AWS CLI for IAM Users (shiva and ganesha)
Configure AWS CLI for the shiva profile. Enter the shiva access key and secret access key from the above table.
aws configure --profile shivaConfigure AWS CLI for the ganesha profile. Enter the ganesha access key and secret access key from the above table.
aws configure --profile ganeshaCapsule Tenant’s Creation and Verification
Create Single Tenant With Single Tenant Owner
As a cluster administrator, in the "eks-cluster1" cluster, create a new tenant oil with IAM user ‘shiva’ as the owner — as shown in the below yaml file:
aws eks --region us-east-1 update-kubeconfig --name eks-cluster1
kubectl apply oil.yaml
Oil.yaml file is as follows:
apiVersion: capsule.clastix.io/v1beta2
kind: Tenant
metadata:
  name: oil
spec:
  owners:
  - kind: User
    name: shiva
As a cluster admin, get the available tenants in the cluster.
kubectl get tenants
The result will have a namespace count as '0'.
Login as tenant owner, shiva, and verify if shiva can access tenants.
aws eks --region us-east-1 update-kubeconfig --name eks-cluster1 --profile shiva
kubectl get tenants
Shiva should get the below error:

As a tenant owner, shiva, create a new namespace within the oil tenant by running the below command.
kubectl create ns oil-productionNow, as a cluster admin, verify that the created namespace is mapped to the oil tenant.
aws eks --region us-east-1 update-kubeconfig --name eks-cluster1
kubectl get tenants
The results show the namespace count is increased to '1'.
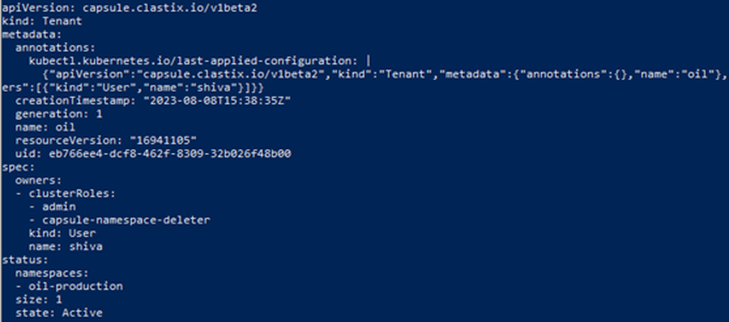
As a cluster admin, verify the tenant ‘oil’ description.
kubectl get tenant oil -o yamlThe results show that the namespace ‘oil-production’ is mapped to the tenant ‘oil’.

Create Single Tenant With Multiple Tenant Owners
As a cluster administrator, in the "eks-cluster1" cluster, create a new tenant oil with IAM user ‘shiva’ as the owner as shown in the below yaml file:
aws eks --region us-east-1 update-kubeconfig --name eks-cluster1
kubectl apply oil_multi_owners.yamloil_multi_owners.yaml file is as follows:
apiVersion: capsule.clastix.io/v1beta2
kind: Tenant
metadata:
  name: oil
spec:
  owners:
  - name: shiva
    kind: User
  - name: ganesha
    kind: User
Now, log in as a tenant owner ‘ganesha’, and create a new namespace within the oil tenant by running the below command.
kubectl create ns oil-developmentNow, as a cluster admin, verify that the created namespace is mapped to the oil tenant.
aws eks --region us-east-1 update-kubeconfig --name eks-cluster1
kubectl get tenants
The results show the namespace count is increased to '2'.
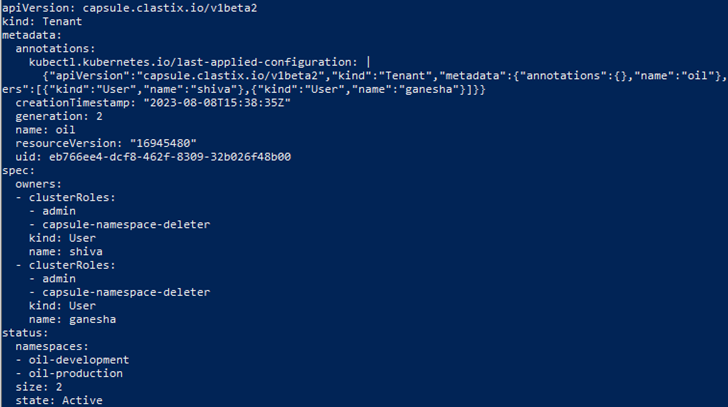
As a cluster admin, verify the tenant ‘oil’ description.
kubectl get tenant oil -o yamlThe results show that the namespace ‘oil-development’ is mapped to the tenant ‘oil’ in the namespaces section shown below.

Create Multiple Tenants With Single Tenant Owner
As a cluster administrator, in the "eks-cluster1" cluster, create two new tenants — oil and gas — with the same IAM user ‘shiva’ as the owner as shown in the below yaml file:
kubectl apply -f oil.yaml
kubectl apply -f gas.yaml
The oil and gas yaml files would look like the following:
apiVersion: capsule.clastix.io/v1beta2
kind: Tenant
metadata:
  name: oil
spec:
  owners:
  - name: shiva
    kind: User

# gas.yaml
apiVersion: capsule.clastix.io/v1beta2
kind: Tenant
metadata:
  name: gas
spec:
  owners:
  - name: shiva
    kind: User
As tenant owner ‘shiva’, create two new namespaces — ‘oil-production' and 'gas-production’.
Note: As shiva has access to all namespaces belonging to both the oil and gas tenants, namespace will not be created by running the command “kubectl create ns oil-production” or “kubectl create ns gas-production.“
Running these commands, Capsule will deny with the following message: Unable to assign namespace to tenant. Please use capsule.clastix.io/tenant label when creating a namespace.
The tenant owner has to specify the “tenant name” as a label — capsule.clastix.io/tenant=<desired_tenant> — in the namespace manifest and has to be applied using kubectl command.
The sample manifest for gas-production looks like the below:
# gas-production.yaml
kind: Namespace
apiVersion: v1
metadata:
  name: gas-production
  labels:
    capsule.clastix.io/tenant: gas
The tenant owner has to apply the manifest file to create the namespaces.
# Create namespace gas-production
kubectl apply -f gas-production.yaml

# Create namespace oil-production
kubectl apply -f oil-production.yaml
Create Multiple Tenants With Different Tenant Owners
As a cluster administrator, in the "eks-cluster1" cluster, create a new tenant oil with IAM user ‘shiva’ as the owner, as shown in the below yaml file:
apiVersion: capsule.clastix.io/v1beta2
kind: Tenant
metadata:
  name: oil
spec:
  owners:
  - kind: User
    name: shiva
As a cluster administrator, create a new tenant gas with IAM user ‘ganesha’ as the owner, as shown in the below yaml file:
apiVersion: capsule.clastix.io/v1beta2
kind: Tenant
metadata:
  name: gas
spec:
  owners:
  - kind: User
    name: ganesha
Expose Service and Verify “Block” Network Access Between Tenant namespaces
As the oil tenant owner, run the following commands to create a namespace and resources in the given tenant.
aws eks --region us-east-1 update-kubeconfig --name eks-cluster1 --profile shiva
kubectl create ns oil-production
kubectl -n oil-production run webserver --image nginx:latest
kubectl -n oil-production expose pod webserver --port 80
As the gas tenant owner, run the following commands to create a namespace and resources in the given tenant.
aws eks --region us-east-1 update-kubeconfig --name eks-cluster1 --profile ganesha
kubectl create ns gas-production
kubectl -n gas-production run webserver --image nginx:latest
kubectl -n gas-production expose pod webserver --port 80
As a cluster admin, get the services in the namespaces created. One would note that the services are exposed as type “ClusterIP” by default. ClusterIP is used for pod-to-pod communication within the same Kubernetes cluster.
kubectl -n oil-production get svc
kubectl -n gas-production get svc
As the first tenant owner, verify you can access the service within the tenant namespace but not the second tenant namespace.
kubectl -n oil-production exec webserver -- curl http://webserver.oil-production.svc.cluster.local
kubectl -n gas-production exec webserver -- curl http://webserver.gas-production.svc.cluster.local
As the second tenant owner, verify you can access the service within the tenant namespace but not the first tenant namespace.
kubectl -n oil-production exec webserver -- curl http://webserver.oil-production.svc.cluster.local
kubectl -n gas-production exec webserver -- curl http://webserver.gas-production.svc.cluster.local
Summary
In this part, we have learned how to create single or multiple tenants with single or multiple AWS IAM users as tenant owners. In the next part of the series, we will further dive into how to configure namespace options, resource quotas, and limit ranges.
Opinions expressed by DZone contributors are their own.

Comments