Implementing Data-Driven Testing Using Google Sheets
Learn how to use Google Sheets to enable Data-Driven Testing (DDT) and create automated tests for your applications.
Join the DZone community and get the full member experience.
Join For FreeData-Driven Testing (DDT) is an approach, or in other words an architecture, for creating automated tests. In the previous post, "How to Implement Data-Driven Testing in your JMeter Test", DDT implementation was described using Excel spreadsheets. In this post, we will talk about how to implement DDT using Google Sheets with Apache JMeter™.
For this purpose, the Google Sheets API will be used. This API will allow us to read and write data from the Google spreadsheet. We will read the input parameter values for the tested API (this API will be described below) from the spreadsheet and write the result in the same spreadsheet.
Let's say that we have an API that accepts the LOGIN and the PASSWORD of the user as incoming values. For the API, the following requirements exist: The user login must contain only English characters. Otherwise, return the following error message in the API response: "The user login was entered incorrectly".
In order to implement DDT for Google Sheets, we will... But first, let's create a service account for testing.
Create a Service Account and Key
The service account is a kind of user, on behalf of which our test will perform the following actions: authorization, access the use of the Google Sheets API, and access the data in the spreadsheet. This is the service we will be testing with JMeter.
1. Go to Google API Console -> Sign in to a Google account.
2. Click "Create Project" -> "Create" -> Enter any project name -> "Create".
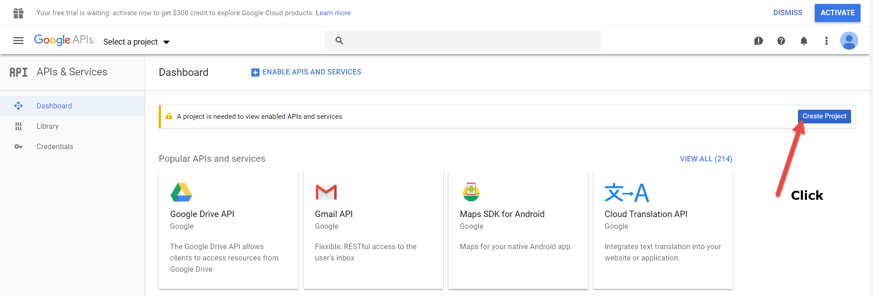
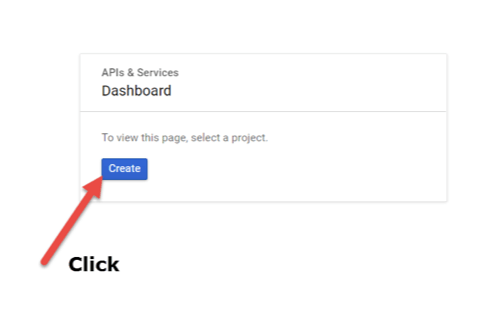
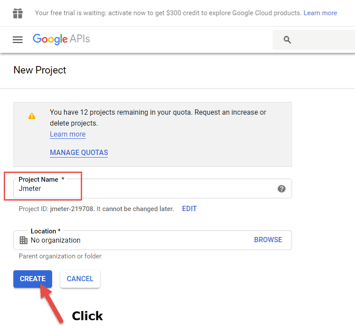
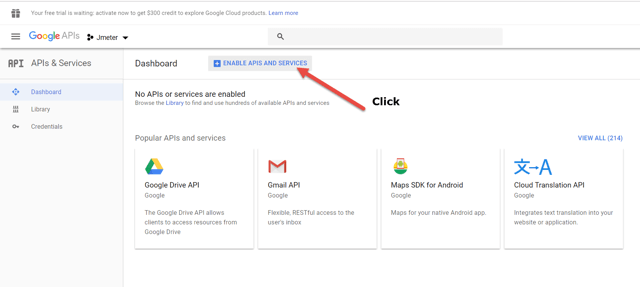
3. Click "Enable APIpis and Services" -> search API Google Sheets -> "API Google Sheets" -> click "Enable".
This step enables the use of the Google Sheets' API.
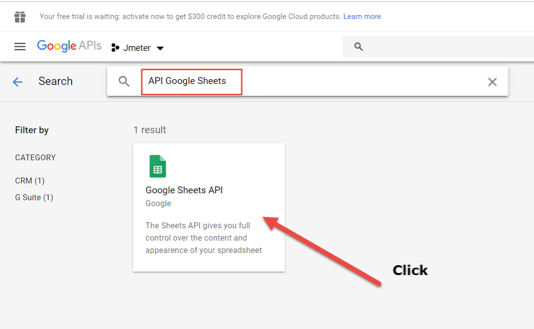
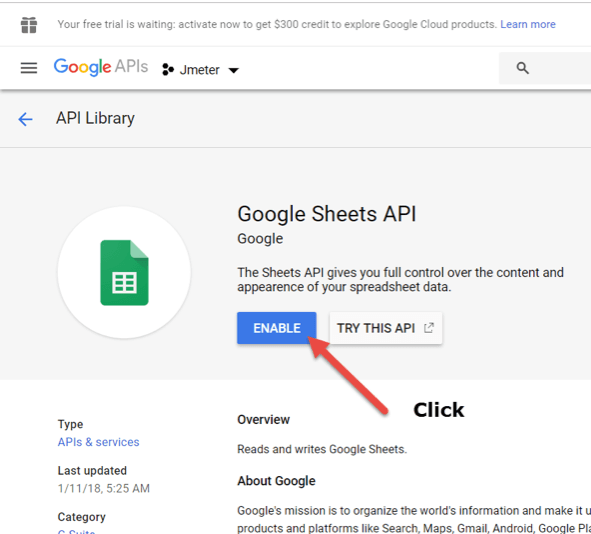
4. Click "Credential" -> "Credentials in APIs & Services" - > "Service account key" -> "Select" -> "New service account" - > Set "Service account name" -> "Select a role" -> "Project" -> "Owner" -> "Create" -> Save file with "json" extension to any directory
This step creates a key to the service account that will enable making a request to the Google Sheets API and retrieving data from the spreadsheet.
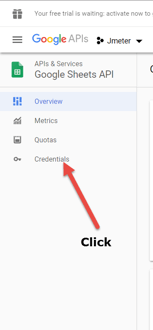
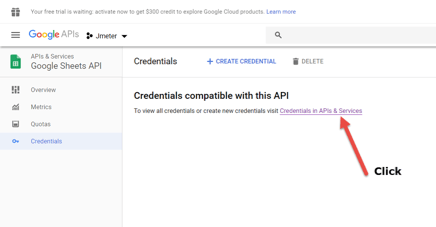
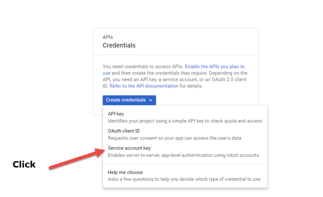
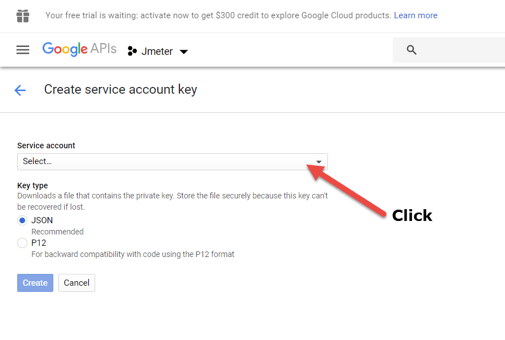
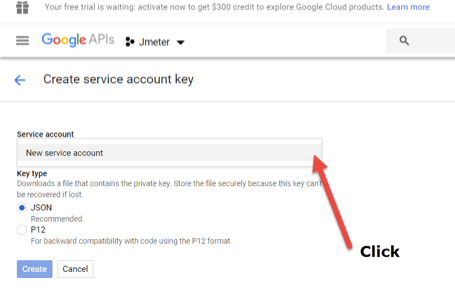
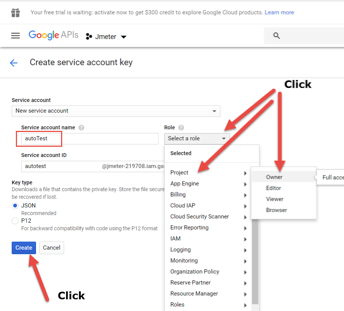
5. After clicking "Create", you will be prompted to save the generated key (file with the extension "json"). This key can be saved to any directory. In our case, the key will be saved to the "D:\google" directory.
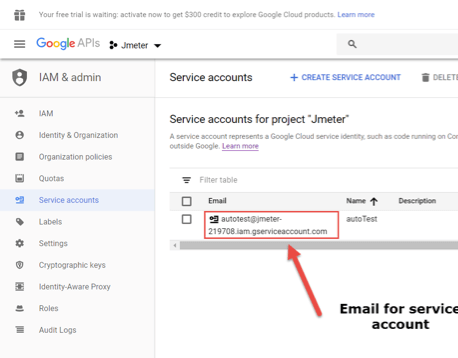
After creating the service account and key, an email is automatically created for the service account. This email will be given access to the spreadsheet we will create soon. In order to get an email for the service account, you need to do the following:
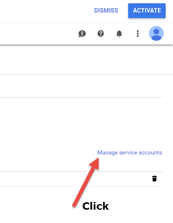
6. Click "Manage service accounts" after creating the service account key.
7. Download the following jar files:
- Google APIs Client Library For Java » 1.25.0
- Google Sheets API V4 Rev549 1.25.0 » v4-rev549-1.25.0
- Google HTTP Client Library For Java » 1.25.0
- Jackson 2 Extensions to The Google HTTP Client Library For Java. » 1.25.0
- Google OAuth Client Library For Java » 1.25.0
- Jackson Core » 2.9.7
These downloaded jar files should be added to the folder ... .. \ apache-jmeter-3.3 \ lib when JMeter is closed.
8. Create a Google spreadsheet, as shown below:

In this file, each row, starting with the second row, is our test case. Fill in the following fields:
- Description of the test case - To be filled in manually.
- Login - the values for the "login" parameter, with which the request to the API will be formed.
- Password - the values for the "password" parameter, with which the request to the API will be generated.
- Request - in this column JMeter will write a request to the API.
- Actual Result - in this column JMeter will write a response from the API.
- Expected Result is the result we expect from the API. To be filled in manually.
- Status - in this column JMeter will record the status of passing or not passing of the test case.
Based on the Google Sheets above, we will perform 5 test cases. For each test case, we expect the following response from the API: "{" message ":" User login is not entered correctly "}", because the logins do not contain only English characters, as per our requirement.
9. Provide access and the right to edit the created spreadsheet to the email of the service account.
The spreadsheet created in the step # 3 -> Right click -> Share -> In the "Enter name or email address" field set "autotest@jmeter-219708.iam.gserviceaccount.com" -> Edit files directly -> Can edit -> Send
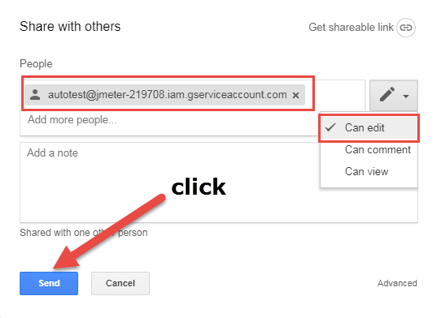
autotest@jmeter-219708.iam.gserviceaccount.com - This is the email address created in step # 1.
Now let's move on to creating our performance test in JMeter.
Create Your JMeter Script
As mentioned, our JMeter script will read the input parameter values for the tested API (this API will be described below) from the spreadsheet and write the result in the same spreadsheet.
10. Add a Thread Group
Right Click -> Add -> Threads(Users) -> Thread Group11. Add a JSR223 Sampler
Thread Group -> Right Click -> Add -> Sampler -> JSR223 Sampler JSR223 Sampler -> Language GroovyThis JSR223 sampler will perform the following action: Google authorization and retrieving all rows from the spreadsheet created in step #3.
12. In the JSR223 Sampler, add the following code example.
import com.google.api.client.auth.oauth2.Credential;
import com.google.api.client.googleapis.auth.oauth2.GoogleCredential;
import com.google.api.services.sheets.v4.SheetsScopes;
import com.google.api.client.googleapis.javanet.GoogleNetHttpTransport;
import com.google.api.client.json.jackson2.JacksonFactory;
import com.google.api.services.sheets.v4.Sheets;
import com.google.api.services.sheets.v4.SheetsRequestInitializer;

import java.nio.file.Files;
import java.nio.file.Paths;
import java.util.Arrays;
import java.util.List;

GoogleCredential credential = GoogleCredential.fromStream(Files.newInputStream(Paths.get("D:\\google\\Jmeter-adb2fb5d0f49.json")))
			.createScoped(Arrays.asList(SheetsScopes.DRIVE));

Sheets.Spreadsheets spreadsheets = new Sheets.Builder(GoogleNetHttpTransport.newTrustedTransport(),
                    JacksonFactory.getDefaultInstance(),
                    credential)
                    .setApplicationName(" ")
                    .build()
                    .spreadsheets();

vars.putObject("spreadsheets", spreadsheets);

List<List<Object>> sheet = spreadsheets.values().get("1q-sL5vDJ1NbThKyO54tlZxkCg2WzpxuSaJTcVeBpPiY", "Sheet1")
                    .setMajorDimension("ROWS")
                    .setValueRenderOption("UNFORMATTED_VALUE")
                    .setDateTimeRenderOption("FORMATTED_STRING")
                    .execute()
                    .getValues();

vars.putObject("sheet", sheet);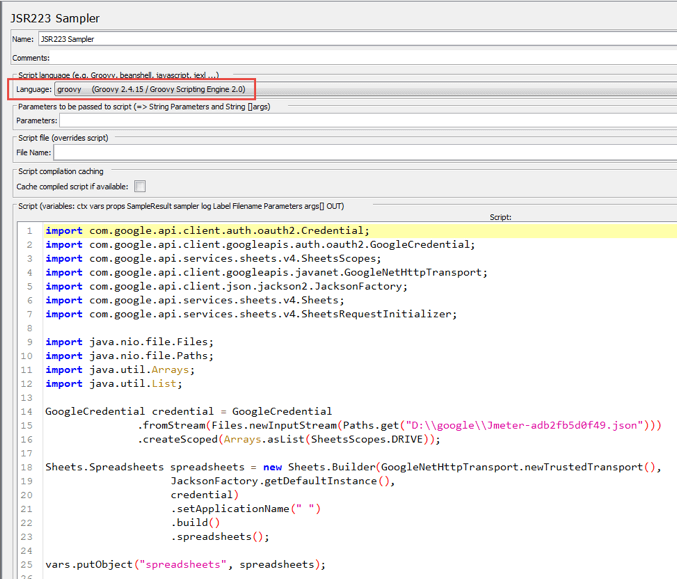
This code does the following:
import com.google.api.client.auth.oauth2.Credential;import com.google.api.client.googleapis.auth.oauth2.GoogleCredential;
import com.google.api.services.sheets.v4.SheetsScopes;
import com.google.api.client.googleapis.javanet.GoogleNetHttpTransport;
import com.google.api.client.json.jackson2.JacksonFactory;
import com.google.api.services.sheets.v4.Sheets;
import com.google.api.services.sheets.v4.SheetsRequestInitializer;
import java.nio.file.Files;
import java.nio.file.Paths;
import java.util.Arrays;
import java.util.List;
This is the import of classes that are necessary for writing code. The class data is imported from the Jar files we added to JMeter.
GoogleCredential credential = GoogleCredential.fromStream(Files.newInputStream(Paths.get("D:\\google\\Jmeter-adb2fb5d0f49.json"))).createScoped(Arrays.asList(SheetsScopes.DRIVE));
- Creating a GoogleCredential object based on the file with the key to the service account that was received after creating the service account. This object will be used for Google authorization.
- D:\\google\\Jmeter-adb2fb5d0f49.json" - Absolute path to the file with the key.
- SheetsScopes.DRIVE - The level of access to files that will be provided for our test. In our case, full access to all files on the Google disk will be provided. There are also other levels of access that can be found by clicking on the link.
- Creating the Sheets.Spreadsheets object, based on data obtained from the spreadsheet created in the step # 3.
- setApplicationName(" ") - Setting the name of the application that will access files on Google Drive. In our case, the name of the application does not matter and you can use any name.
- Creating the variable List <List <Object >> sheet, which will contain all the rows from the spreadsheet created in step # 3.
- 1q-sL5vDJ1NbThKyO54tlZxkCg2WzpxuSaJTcVeBpPiY - The unique ID for the table that was created in step # 3. This ID is contained in the URL of the spreadsheet.
- "Sheet1" - A1 notation, that refers to a group of cells in the spreadsheet. In our case, "Sheet1" means that all cells from the "Sheet1" sheet will be received, which is contained in the created spreadsheet in step # 3
- More information about Spreadsheet ID and A1 notation can be found at the following link.
- setMajorDimension("ROWS") - The method that establishes that data from a table should be obtained as strings. In other words, if you take, for example, row # 2 from the created table in the step # 3, then the variable List <List <Object> sheet will contain a variable with the data type List <Object>, and the variable List <Object> will contain sequence of values: Entering an incorrect login, 1, 1A2V3X, , , {"message":"User login is not entered correctly"}
- More information about values for setMajorDimension() can be found at the following link.
- setValueRenderOption("UNFORMATTED_VALUE") - The method that sets the display format of the received values from the cells. In our case, the values will not have any format. In other words, if for a value in a spreadsheet cell, for example, "Currency" format is set and the value is represented as $ 1.23, then in JMeter such values will be represented as 1.23 without the "$" symbol.
- More information about values for setValueRenderOption() be found at the following link.
- setDateTimeRenderOption("FORMATTED_STRING") - The method that sets the date display format. In our case, if the cell value is a date (for example, 10/24/2018), then in JMeter the value will be displayed as a string in the form "10.24.2018".
- More information about values for setDateTimeRenderOption() be found at the following link.
13. Add a While Controller.
The While Controller will be used to send requests to the API as many times as the number of rows of the incoming data our spreadsheet contains. In our case, this is six times.
${__javaScript("${stopWhile}" != "OK")}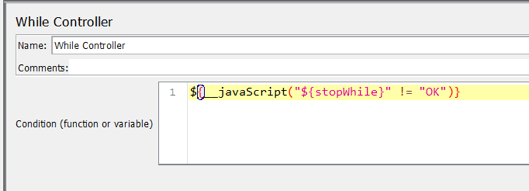
14. In the While Controller, add the following code.
This code is used to stop the While Controller.
While Controller -> Add -> Config Element -> Counter15. Add a Counter
- Starting value = "1" is the initial value that is assigned to the variable "counter" before sending the first request to the API.
- Increment = "1" is the value that is added to the value of the variable "counter" before sending the second request to the API.
- Exported Variable Name = "counter" is the name of the variable.
16. Set the following parameters:
While Controller -> Right Click -> Add -> Pre Processors -> JSR223 PreProcessor JSR223 PreProcessor -> Language Groovy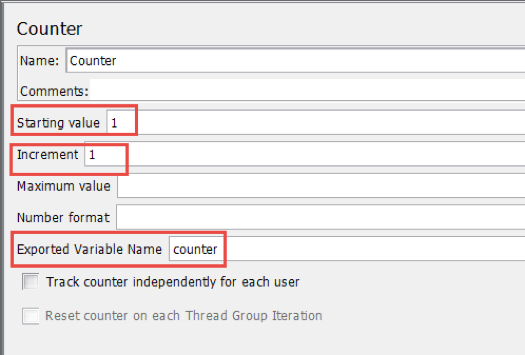
17. Add a JSR223 PreProcessor
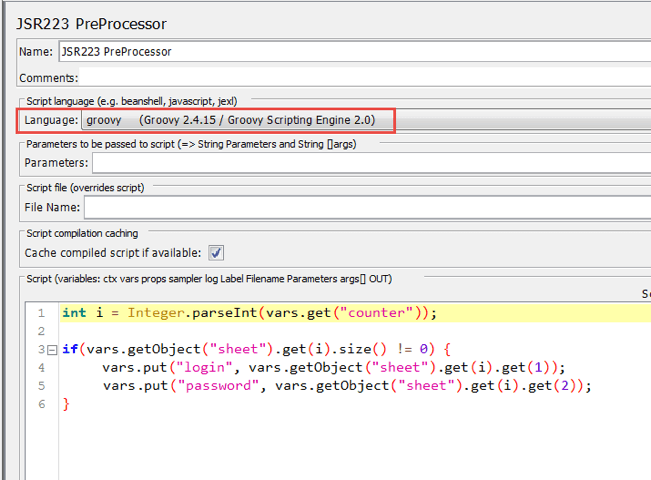
In this step, we will read the values from the spreadsheet and assign the obtained values to the variables, which will later be used in the API request.
18. In the JSR223 PreProcessor, add the following code example.
int i = Integer.parseInt(vars.get("counter"));
if(vars.getObject("sheet").get(i).size() != 0) {
vars.put("login", vars.getObject("sheet").get(i).get(1));
vars.put("password", vars.getObject("sheet").get(i).get(2));
} This code does the following:
vars.put("login", vars.getObject("sheet").get(i).get(1));
vars.put("password", vars.getObject("sheet").get(i).get(2));
}
int i = Integer.parseInt(vars.get("counter")); - Getting the variable "counter" with the data type String and converting this variable to the data type int
vars.getObject("sheet").get(i).size() != 0
Getting the size of the row from the spreadsheet created in step # 3 and comparing the resulting value with 0. If the row size is 0 (all cells in the row do not contain values), then the methods in the body of the IF operator will not be executed.
vars.put("login", vars.getObject("sheet").get(i).get(1))
Getting the value of cell # 2 from the row, creating the "login" variable, and assigning the cell value to the created variable. In other words, at the first iteration of While Controller we will get row # 2 from the created spreadsheet in step # 3, get the value of cell # 2 from the row and assign the resulting value to the "login" variable. In the second iteration of the While Controller, we will get row # 3 from the created spreadsheet in the step # 3, get the value of cell # 2 from the row and assign the received value to the "login" variable, etc.
vars.put("password", vars.getObject("sheet").get(i).get(2)
Getting the value of cell # 3 from the row, creating the "password" variable, and assigning the cell value to the created variable. In other words, in the first iteration of the While Controller we will get row # 2 from the created spreadsheet in the step # 3, get the value of cell # 3 from the row and assign the resulting value to the "password" variable. In the second iteration of the While Controller, we will get row # 3 from the created spreadsheet in the step # 3, get the value of cell # 3 from the row and assign the received value to the "password" variable, etc.
Furthermore, the values of the "login" and "password" variables will be sent to the HTTP request for our test API at each iteration of the While Controller.
While Controller -> Add -> Sampler -> jp@gc - Dummy Sampler19. Add a Dummy Sampler
{"login":"${login}", "password":"${password}"}{"message":"User login is not entered correctly"}
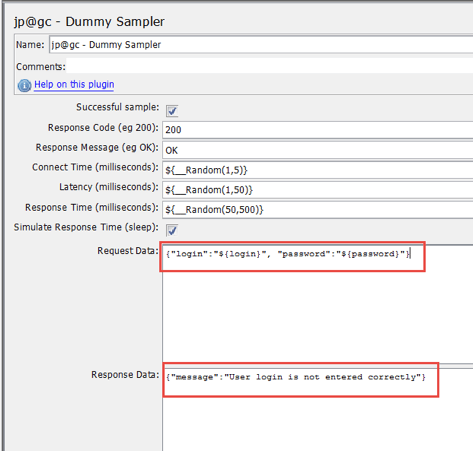
The purpose of this step is to simulate the tested service. In the Dummy Sampler, add the following data:
Dummy Sampler -> Right Click -> Add -> Assertions -> JSR223 Assertion JSR223 Assertion -> Language Groovy20. Add a JSR223 Assertion
This part compares the actual and expected response from the API and records the Request, Response and Status in the spreadsheet that was created in step #2.
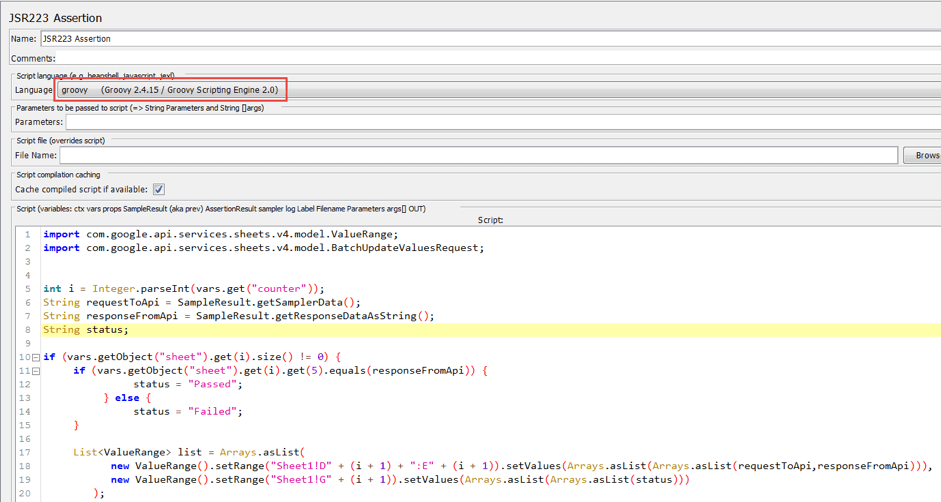
21. In the JSR223 Assertion, add the following example code:
import com.google.api.services.sheets.v4.model.ValueRange;
import com.google.api.services.sheets.v4.model.BatchUpdateValuesRequest;


int i = Integer.parseInt(vars.get("counter"));
String requestToApi = SampleResult.getSamplerData();
String responseFromApi = SampleResult.getResponseDataAsString();
String status;

if (vars.getObject("sheet").get(i).size() != 0) {
	if (vars.getObject("sheet").get(i).get(5).equals(responseFromApi)) {
			status = "Passed";
		} else {
			status = "Failed";
	}
	List<ValueRange> list = Arrays.asList(
           new ValueRange().setRange("Sheet1!D" + (i + 1) + ":E" + (i + 1)).setValues(Arrays.asList(Arrays.asList(requestToApi,responseFromApi))),
           new ValueRange().setRange("Sheet1!G" + (i + 1)).setValues(Arrays.asList(Arrays.asList(status)))
        );

	vars.getObject("spreadsheets").values().batchUpdate("1q-sL5vDJ1NbThKyO54tlZxkCg2WzpxuSaJTcVeBpPiY",
                    new BatchUpdateValuesRequest().setData(list).setValueInputOption("RAW"))
                    .execute();
}

if (i + 1 == vars.getObject("sheet").size()) {
	vars.put("stopWhile","OK");
}
This code does the following:
String requestToApi = SampleResult.getSamplerData(); - Getting the API request (from the Dummy Sampler in this case) and assigning the value of the variable.
String responseFromApi = SampleResult.getResponseDataAsString(); - Getting a response from the API and assigning a value to a variable.
String status; - Creating a variable that will be contain the result of passing the test.
if (vars.getObject("sheet").get(i).size() != 0) {
if (vars.getObject("sheet").get(i).get(5).equals(responseFromApi)) {
status = "Passed";
} else {
status = "Failed";
}
If the row size from the spreadsheet created in the step # 3 is not equal to 0 and the actual response from the API is equal to the expected response specified in the spreadsheet, then the "status" variable is assigned the "Passed" value. Otherwise, if the size of the row from the spreadsheet is not equal to 0 and the actual response from the API is not equal to the expected response specified in the spreadsheet, then the "status" variable is assigned the "Failed" value.
List<ValueRange> list = Arrays.asList(
new ValueRange().setRange("Sheet1!D" + (i + 1) + ":E" + (i + 1)).setValues(Arrays.asList(Arrays.asList(requestToApi,responseFromApi))),
new ValueRange().setRange("Sheet1!G" + (i + 1)).setValues(Arrays.asList(Arrays.asList(status)))
);
Creating a list ( "list" variable) from "ValueRange" objects. Each "ValueRange" object describes a range of cells and values that need to be written to these cells. In other words, the first iteration of While Controller will create 2 "ValueRange" objects, the first object will contain the range of cells "Sheet1! D2: E2" and values equal to the value of the "requestToApi" and "responseFromApi" variable. The value of the "requestToApi" variable will be written in cell D2, the value of the "responseFromApi" variable will be written in cell E2.
The second object "ValueRange" will contain a range of cells "Sheet1! G2" and a value equal to the value of the "status" variable. At the second iteration of the While Controller, 2 "ValueRange" objects will be created, the first object will contain the range of cells "Sheet1! D3: E3" and values equal to the value of the "requestToApi" and "responseFromApi" variable. The value of the "requestToApi" variable will be written in cell D3, the value of the "responseFromApi" variable will be written in cell E3. The second object "ValueRange" will contain the range of cells "Sheet1! G3" and the value equal to the value of the variable "status", etc.
vars.getObject("spreadsheets").values().batchUpdate("1q-sL5vDJ1NbThKyO54tlZxkCg2WzpxuSaJTcVeBpPiY",
new BatchUpdateValuesRequest().setData(list).setValueInputOption("RAW"))
.execute();
}
The method that performs writing values to the created spreadsheet in step # 3. "spreadsheets" - the variable created in step # 5
1q-sL5vDJ1NbThKyO54tlZxkCg2WzpxuSaJTcVeBpPiY - ID of the created spreadsheet in step # 3
list - variable that contains "ValueRange" objects
if (i + 1 == vars.getObject("sheet").size()) {
vars.put("stopWhile","OK");
}
This code stops the While Controller when the last row in the created spreadsheet in step # 3 is reached. In our case, the last row is row # 6.
After running our test and writing all the test case results in the spreadsheet created in step # 3, it will look like the one below.
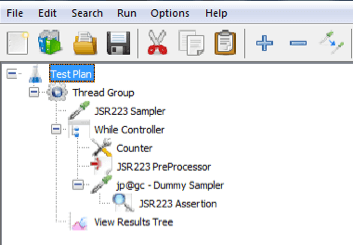
 The overall structure of the test is shown in the image below.
That's it! Now, you can also run your JMeter script in BlazeMeter to scale your test, collaborate on results and store your advanced analytics for months.
Published at DZone with permission of Sergey Horban, DZone MVB. See the original article here.
Opinions expressed by DZone contributors are their own.

Comments