Implementing AWS Virtual Private Cloud (VPC) Infrastructure with Terraform
Here's how you can make an Internet-connected VPC service using Terraform.
Join the DZone community and get the full member experience.
Join For FreeIn this article, I’d like to show how you can take advantage of one of the best standards of Infrastructure-as-Code, Terraform, to launch your own isolated network environment which is VPC.
AWS is changing the way we deploy, manage and implement software and infrastructure. From application services such as ECS, Elastic Beanstalk, and EKS to fundamental software-defined networking elements like VPC and Subnets, AWS provides us the whole package for everything we need in today's’ world of software.
On the other hand, Terraform is making its way to become the standard for managing, configuring and implementing infrastructure not just on AWS, but from major clouds like Google Cloud and Azure to minor service providers out there in the market.
From my personal hands-on experience with it, I can honestly say that it’s such a breeze and joy to work and develop with Terraform with any kind of infrastructure you want! When I need a quick instance to test something out, I just fire it up within couple of seconds with Terraform. Or let’s say I need to set up a whole new account where I’ll need my own custom networking environment; no problem, I can implement and execute the whole thing with Terraform within minutes.
That being said, let’s roll up our sleeves and start implementing our VPC infrastructure!
Setting AWS Credentials

Before we start working on our AWS VPC implementation, we need to make sure we have our AWS credentials set up properly for the environment we will be working on.
There are several ways to achieve this of course and I’ll be showing you two different approaches. You can choose whichever suits you best.
With AWS CLI
With this way — assuming you have AWS CLI Tools installed — it's pretty straightforward to set your AWS credentials.
All you have to do is run the aws configure command and you’ll be asked to provide following information:
· AWS Access Key ID — Your AWS Access Key ID
· AWS Secret Access Key — Your AWS Secret Access Key
· AWS Region — AWS Region that you intend to work on
· CLI Output Format — This is only useful for working with CLI; can leave it blank
You can see the output from my execution of the command below:
With Environment Variables
Providing proper environment variables, you can also work with AWS using the language you desire. To achieve this, all you have to do is provide the following environment variables.
AWS_ACCESS_KEY_IDAWS_SECRET_ACCESS_KEYAWS_REGION
You can export these environment variables on Linux and MacOS or if you’re on Windows then you can edit your environment variables under:
Computer -> Properties -> Edit Environment Variables and put them under either User Variables or System Variables.
IDE for Terraform
To work and develop with Terraform, it’s always better to work with an IDE, preferably having a Terraform Plugin set up. For that purpose, there are several options out there that you can use. I’ll mention couple of those and then we’ll be good to go.
Visual Studio Code
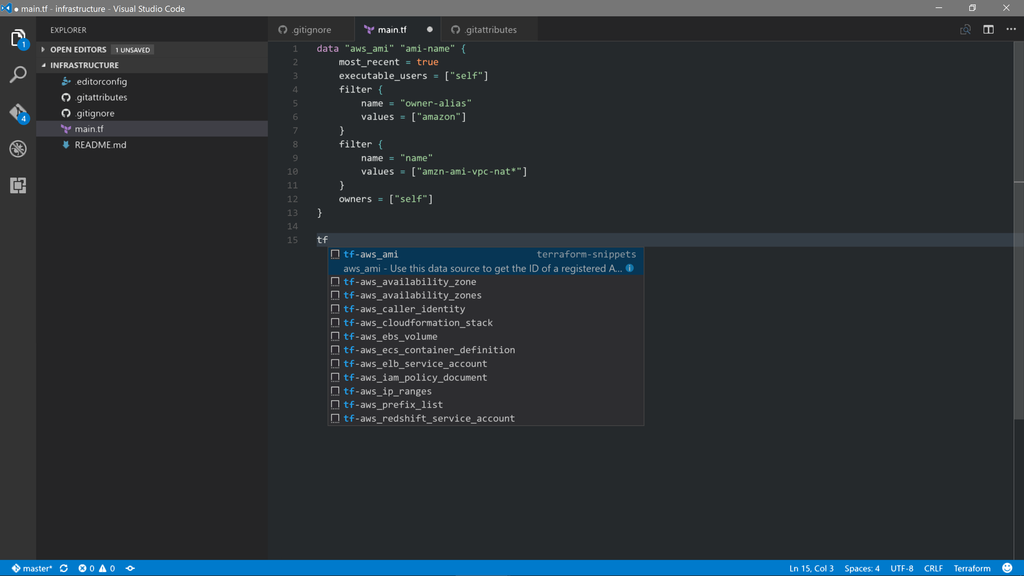
Visual Studio Code has gained good traction amongst developers from all backgrounds lately and they’re not wrong. It offers nice features, integrations, plugins and on top of all, a very sleek UI and a performant IDE to implement with practically any language you want.
As you can guess, Visual Studio Code offers a couple of Terraform plugins apart from the original one provided by the Hashicorp. You can not only get auto-complete but with the help of these plugins, you can even get code snippets to get started with.
IntelliJ IDEA
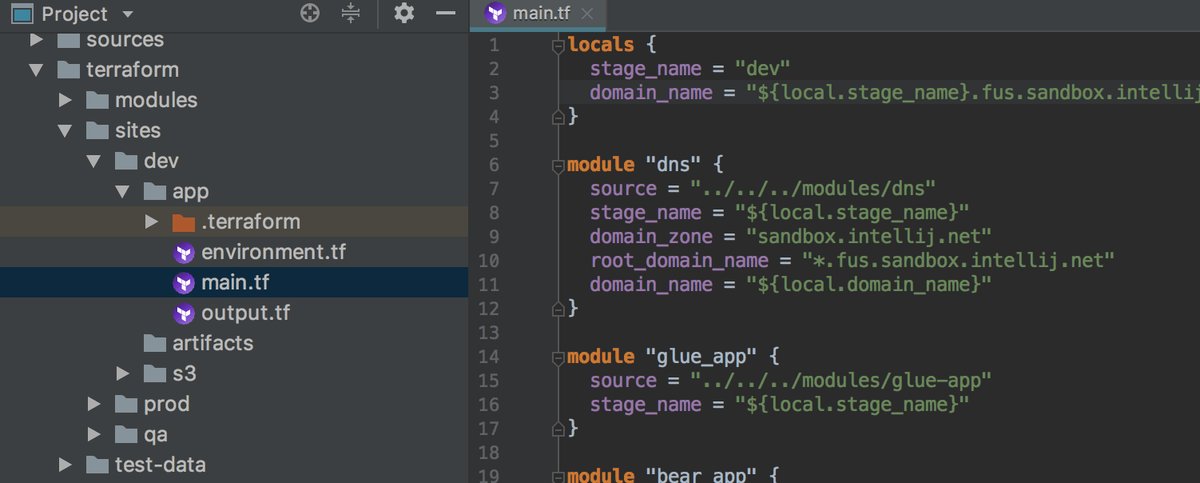
You might ask yourself why I've included this one; isn’t this a Java IDE? Well, to be honest, I’ve been developing Java with IntelliJ for almost a decade now and the Terraform Plugin provided by Hashicorp is just beautiful! It auto-completes almost everything that you need and provides all these with a stable IDE. Of course, this is my personal opinion but if you have the chance, definitely give it a try!
These two IDEs are just the ones that I use every day; if your favorite one is not amongst these then I believe there must be a Terraform plugin for that, too!
Getting Started With VPC Implementation

So now it’s time that we start implementing our VPC networking infrastructure and we’ll be using Terraform to do so.
Let’s first create our project and some of the files so we can start working on it. I prefer to create my folders and files mostly from the command line for Terraform projects so here I’ll follow that same tradition. You can create them however you like it.
If you’re on Linux or MacOS, open up a Terminal window and go to a directory where you want to host your project; if there’s no such directory then create it as below:
cd YOUR/PROJECT/PATHor
mkdir YOUR_PROJECT_FOLDERAfter that, you can cd into the project folder and then we can create our project files. I’ll create three files for the start: touch main.tf, variables.tf, and values.tfvars.
main.tf will be holding our AWS resource configurations such as VPC, Subnets and so on
variables.tf as you can guess will hold the variables that we’ll use throughout the project
values.tfvars is where we’ll set the actual values for our variables
Creating VPC
Let’s first define our AWS region in variables.tf:
variable "region" {
  default = "eu-west-1"
}
Now let’s open up our main.tf and define the provider for AWS:
provider "aws" {
  region = "${var.region}"
}
Our first resource is VPC. But before creating it, we need to define and reserve ourselves a CIDR block to use. For that purpose, I’m going to create a variable as following:
variable "vpc_cidr" {
  description = "CIDR Block for VPC"
}
As you can see, I’m not giving it a default CIDR block, I’ll provide that later with values.tfvars. Now let’s create our VPC:
resource "aws_vpc" "production-vpc" {
  cidr_block           = "${var.vpc_cidr}"
  enable_dns_hostnames = true

  tags {
    Name = "Production-VPC"
  }
}
There are two things to note here; first is the enable_dns_hostnames flag which will allow EC2 resources in our VPC to be able to obtain DNS hostname apart from their public and private IP addresses. And second is the tags where I’m passing in Name as key and Production-VPC as value. Remember, if you don’t add the name tag to your VPC, it simply won’t have a name.
Creating Public Subnets and Public Route Table
In order to have a highly-available networking infrastructure, we’ll have three subnets spanning all the availability zones within our region. Essentially we’ll span them to eu-west-1a, eu-west-1b, and eu-west-1c.
In order to create our subnets, again we need to assign them CIDR blocks for the resources we’ll launch within these subnets. The important thing is to have these CIDR blocks defined within the range of our VPC CIDR block, please remember that and of course we’ll get to that when we’re providing tfvars.
Let’s create variables for public subnets CIDR blocks:
variable "public_subnet_1_cidr" {
  description = "CIDR Block for Public Subnet 1"
}

variable "public_subnet_2_cidr" {
  description = "CIDR Block for Public Subnet 2"
}

variable "public_subnet_3_cidr" {
  description = "CIDR Block for Public Subnet 3"
}
Now let’s create our public subnets:
resource "aws_subnet" "public-subnet-1" {
  cidr_block        = "${var.public_subnet_1_cidr}"
  vpc_id            = "${aws_vpc.production-vpc.id}"
  availability_zone = "eu-west-1a"

  tags {
    Name = "Public-Subnet-1"
  }
}

resource "aws_subnet" "public-subnet-2" {
  cidr_block        = "${var.public_subnet_2_cidr}"
  vpc_id            = "${aws_vpc.production-vpc.id}"
  availability_zone = "eu-west-1b"

  tags {
    Name = "Public-Subnet-2"
  }
}

resource "aws_subnet" "public-subnet-3" {
  cidr_block        = "${var.public_subnet_3_cidr}"
  vpc_id            = "${aws_vpc.production-vpc.id}"
  availability_zone = "eu-west-1c"

  tags {
    Name = "Public-Subnet-3"
  }
}
What's important here is that again we spanned our subnets between availability zones a, b and c for eu-west-1.
Let’s create the route table that we’ll use with our public subnet networking:
resource "aws_route_table" "public-route-table" {
  vpc_id = "${aws_vpc.production-vpc.id}"
  tags {
    Name = "Public-Route-Table"
  }
}
Nothing special here, we just defined the resource and now we need to associate our public subnets with this route table:
resource "aws_route_table_association" "public-route-1-association" {
  route_table_id = "${aws_route_table.public-route-table.id}"
  subnet_id      = "${aws_subnet.public-subnet-1.id}"
}

resource "aws_route_table_association" "public-route-2-association" {
  route_table_id = "${aws_route_table.public-route-table.id}"
  subnet_id      = "${aws_subnet.public-subnet-2.id}"
}

resource "aws_route_table_association" "public-route-3-association" {
  route_table_id = "${aws_route_table.public-route-table.id}"
  subnet_id      = "${aws_subnet.public-subnet-3.id}"
}
Using the aws_route_table_association resource, we’ve associated our public subnets with public route table. The public route table is not terribly useful right now as you can see and we’ll fix that in a minute when we create the Internet Gateway.
Creating Private Subnets and Private Route Table
We’ll follow the same principles with public subnets and also span our private subnets between availability zones a, b and c.
First, let’s create the variables for CIDR blocks:
variable "private_subnet_1_cidr" {
  description = "CIDR Block for Private Subnet 1"
}

variable "private_subnet_2_cidr" {
  description = "CIDR Block for Private Subnet 2"
}

variable "private_subnet_3_cidr" {
  description = "CIDR Block for Private Subnet 3"
}
Now we can create private subnets using these CIDR blocks:
resource "aws_subnet" "private-subnet-1" {
  cidr_block        = "${var.private_subnet_1_cidr}"
  vpc_id            = "${aws_vpc.production-vpc.id}"
  availability_zone = "eu-west-1a"

  tags {
    Name = "Private-Subnet-1"
  }
}

resource "aws_subnet" "private-subnet-2" {
  cidr_block        = "${var.private_subnet_2_cidr}"
  vpc_id            = "${aws_vpc.production-vpc.id}"
  availability_zone = "eu-west-1b"

  tags {
    Name = "Private-Subnet-2"
  }
}

resource "aws_subnet" "private-subnet-3" {
  cidr_block        = "${var.private_subnet_3_cidr}"
  vpc_id            = "${aws_vpc.production-vpc.id}"
  availability_zone = "eu-west-1c"

  tags {
    Name = "Private-Subnet-3"
  }
}
Let’s create the route table for our private networking:
resource "aws_route_table" "private-route-table" {
  vpc_id = "${aws_vpc.production-vpc.id}"
  tags {
    Name = "Private-Route-Table"
  }
}
Nothing special yet again and we’ll fix that when we create the NAT Gateway in a minute.
But now, let’s associate private subnets with private route table:
resource "aws_route_table_association" "private-route-1-association" {
  route_table_id = "${aws_route_table.private-route-table.id}"
  subnet_id      = "${aws_subnet.private-subnet-1.id}"
}

resource "aws_route_table_association" "private-route-2-association" {
  route_table_id = "${aws_route_table.private-route-table.id}"
  subnet_id      = "${aws_subnet.private-subnet-2.id}"
}

resource "aws_route_table_association" "private-route-3-association" {
  route_table_id = "${aws_route_table.private-route-table.id}"
  subnet_id      = "${aws_subnet.private-subnet-3.id}"
}
With this way — managing private resources on its own routing table — we are fine-tuning our networking infrastructure and controlling whoever can see what resource.
Allocating an Elastic IP for NAT Gateway
Elastic IP addresses gives you the flexibility to use them with dynamic networking resources so that you always know what IP address you have and even associate it with certain resources like EC2 and NAT Gateway in this case.
So let’s create our Elastic IP:
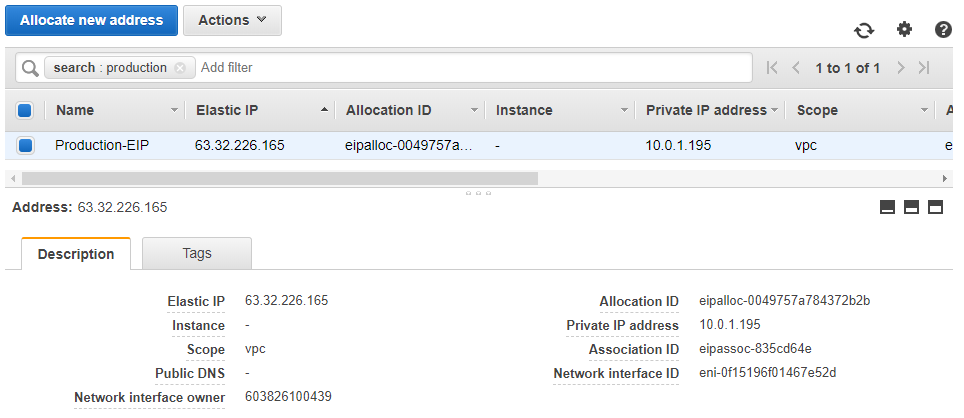
resource "aws_eip" "elastic-ip-for-nat-gw" {
  vpc                       = true
  associate_with_private_ip = "10.0.0.5"

  tags {
    Name = "Production-EIP"
  }
}
vpc indicates I’ll simply link this elastic IP with the VPC so I’ll use it solely for the resources within VPC.
associate_with_private_ip simply means that I want to associate this elastic IP with private resources within my VPC but I also want to be able to reach the internet through it. How will that even be possible? That’s where the NAT Gateway comes in.
Creating NAT Gateway and Adding to Route Table
Now is time to create the NAT Gateway. In case you’re unclear about the purpose of it, below is what you need to know.
NAT Gateway will be part of our private subnet and private route table and the reason is mainly that we want our private resources to access internet through it, but not the other way around. So in short, we will allow internet egress but not ingress hence no one will be able access our resources from the internet but we will access the internet from them.
We can count and name a number of reasons to make this happen. Firstly, we might need to update our OS packages over the internet and how are we exactly going to achieve this without a NAT Gateway or Instance? Secondly, we’ll most probably launch our backing instances and resources into private subnets and we might talk to other web services and systems on the web for numerous purposes. NAT Gateway is just going to give us that.
Let’s create the NAT Gateway as follows:
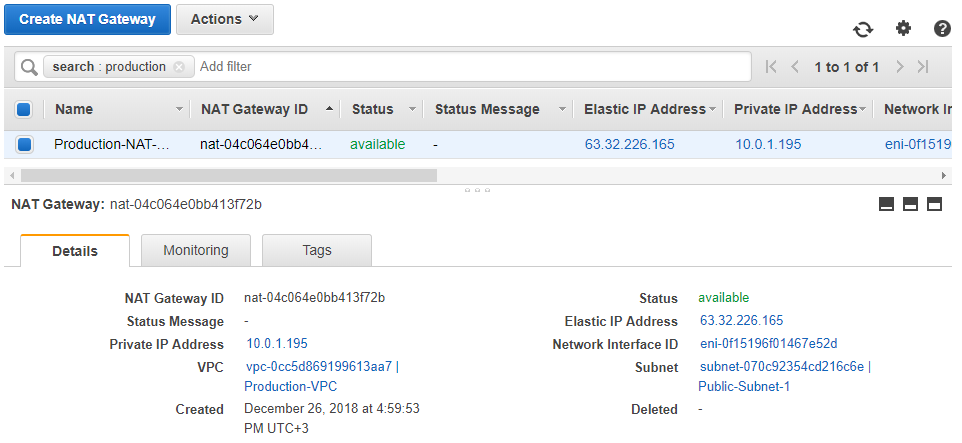
resource "aws_nat_gateway" "nat-gw" {
  allocation_id = "${aws_eip.elastic-ip-for-nat-gw.id}"
  subnet_id     = "${aws_subnet.public-subnet-1.id}"

  tags {
    Name = "Production-NAT-GW"
  }

  depends_on = ["aws_eip.elastic-ip-for-nat-gw"]
}
Now let’s break it down to pieces: we’re using the Elastic IP we created earlier and also passing one of our public subnets so it can find its way to the internet to serve us. Lastly, we have the dependency to elastic IP address creation so the creation of NAT Gateway will have to wait for it.
In the last part for the NAT Gateway, we’ll have to actually make use of it so we’re going to add it to our private route table:
resource "aws_route" "nat-gw-route" {
  route_table_id         = "${aws_route_table.private-route-table.id}"
  nat_gateway_id         = "${aws_nat_gateway.nat-gw.id}"
  destination_cidr_block = "0.0.0.0/0"
}
Here we provided destination_cidr_block as “0.0.0.0/0” so this will allow our NAT Gateway to exchange internet traffic in and out on itself.
Creating Internet Gateway and Adding to Route Table
A final important cornerstone of our VPC infrastructure is the Internet Gateway. Unless we’re implementing a completely isolated networking infrastructure, we cannot reach the internet from within the VPC without using an Internet Gateway. Hence it’s crucial to have it set up properly for our applications and services we might deploy onto this infrastructure.
Let’s now go and create the Internet Gateway:
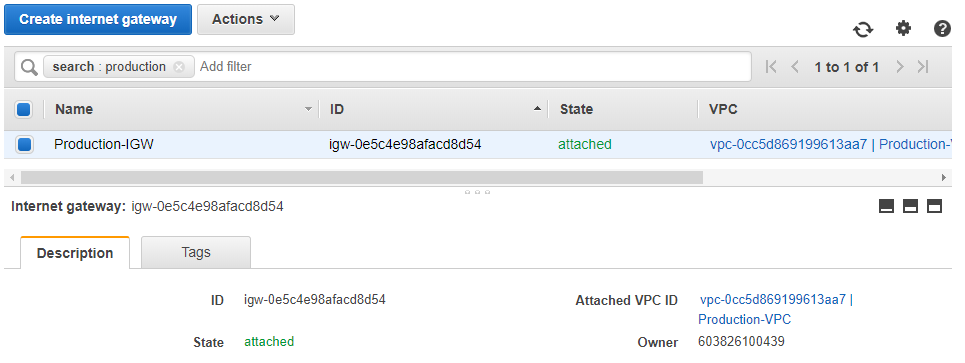
resource "aws_internet_gateway" "production-igw" {
  vpc_id = "${aws_vpc.production-vpc.id}"
  tags {
    Name = "Production-IGW"
  }
}
Now let’s attach it to the route table:
resource "aws_route" "public-internet-igw-route" {
  route_table_id         = "${aws_route_table.public-route-table.id}"
  gateway_id             = "${aws_internet_gateway.production-igw.id}"
  destination_cidr_block = "0.0.0.0/0"
}
As you can see, we’re adding it to the public route table and using “0.0.0.0/0” as the destination_cidr_block . This will allow both ingress and egress to the internet from the resources within public subnets.
Putting It All Together and Executing
Now it's time to execute our Terraform and see everything in action.
If you’ve followed up until now, you must have your AWS credentials ready to work with. In case if you don’t already yet, please do so now.
Now open up a Terminal window on Linux or MacOS or Command Prompt on Windows and cd into the directory where we have our project Terraform files:
cd PATH/TO/PROJECT Let’s start by initializing Terraform:
terraform init Now let’s plan out the whole infrastructure using plan command to see everything that will be created on AWS by Terraform:
terraform plan -var-file=values.tfvars
As you can see, we’re passing in the values.tfvars as an argument to the plan command. Once we execute it, you should have a similar output like below:

As you notice, we have 20 AWS resources to create, nothing to change or destroy since there’s no such infrastructure yet.
Now let’s execute Terraform apply command and create everything we’ve implemented:
terraform apply var-file=values.tfvars -auto-approve Once we execute it, we’ll have similar output like below:

There we go! We have successfully launched our VPC infrastructure with all the network elements we need using Terraform! Now is time to check them out on AWS if all good and integrated as we implemented.
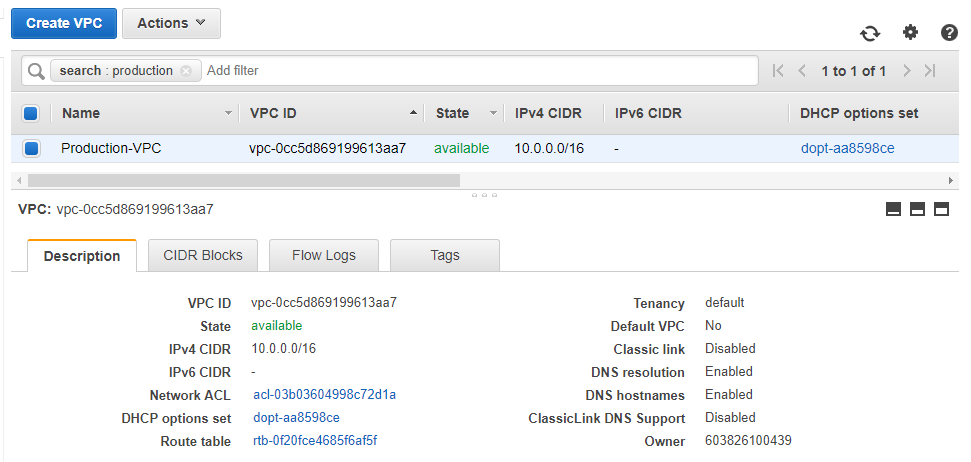
Here’s my VPC dashboard and you should have a similar one:
Let’s check out the subnets:

Route Tables:

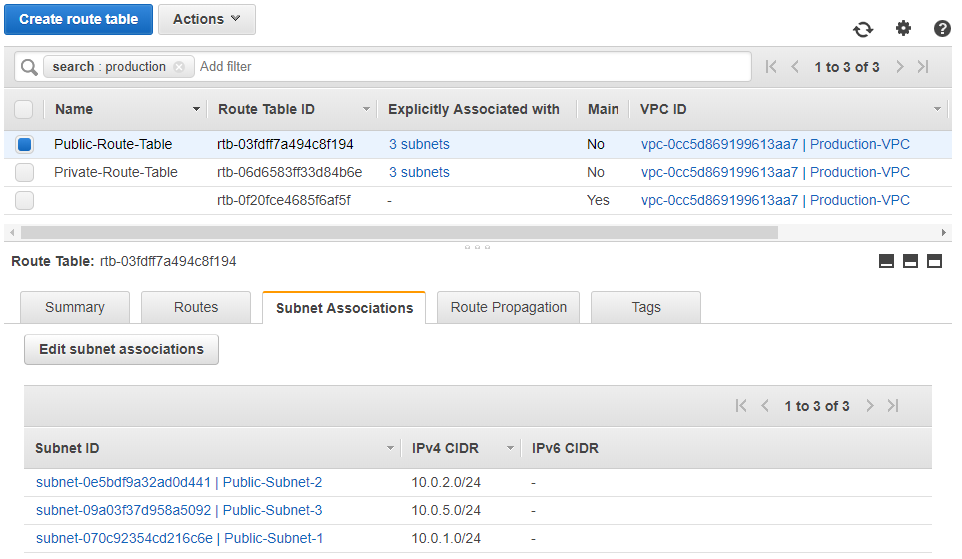
Let’s take a closer look at Public Route Table and Associations:
Now for the Private Route Table and Associations:
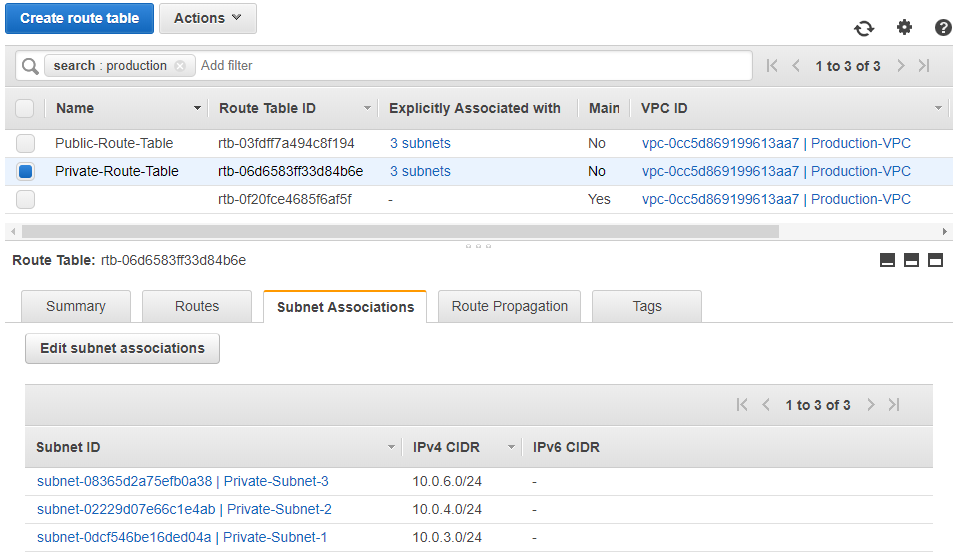
Let’s take a look at the NAT Gateway:
Now to the Elastic IP Address:
And finally, the Internet Gateway or IGW:
Perfect! Everything is in the right place and integrated as we implemented with Terraform!
There you have a VPC infrastructure that you can even use for your Production environments with minor changes here and there!
I hope you’re still with me until this point and enjoyed it! If you’re hungry for more Terraform + AWS and want to launch EC2 Instances using Auto-Scaling Groups, Load Balancers and much more, take a look at my course on Udemy: VPC Solutions with EC2 for Production: AWS with Terraform.
Hope to see you on the next one, have a nice day!
Opinions expressed by DZone contributors are their own.

Comments