How To Implement CI/CD for Multibranch Pipeline in Jenkins
In this guide, explore the process of creating a Jenkins multibranch pipeline project and configuring it with the Git repo.
Join the DZone community and get the full member experience.
Join For FreeJenkins is a Continuous Integration (CI) server that can fetch the latest code from the version control system (VCS), build it, test it, and notify developers. Jenkins can do many things apart from just being a Continuous Integration server. Originally known as Hudson, Jenkins is an open-source project written by Kohsuke Kawaguchi. As Jenkins is a Java-based project, before installing and running Jenkins on your machine, you need to install Java 8.
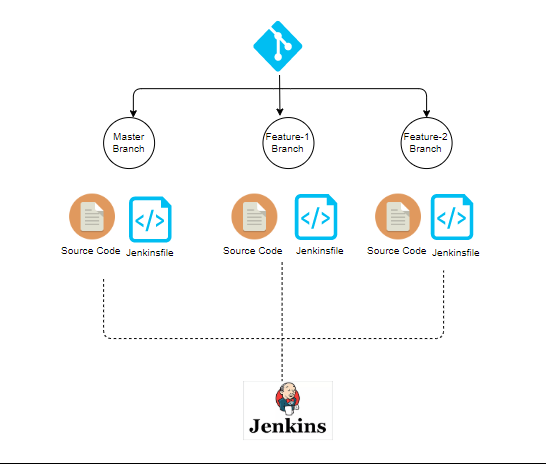
The Multibranch Pipeline allows you to automatically create a pipeline for each branch on your Source Code Management (SCM) repository with the help of Jenkinsfile.
What Is a Jenkinsfile?
Jenkins pipelines can be defined using a text file called Jenkinsfile. You can implement pipeline as code using Jenkinsfile, and this can be defined by using a domain-specific language (DSL). With Jenkinsfile, you can write the steps needed for running a Jenkins pipeline.
You may also enjoy: Building a Continuous Delivery Pipeline Using Jenkins
What Is a Multi-Branch Pipeline?
The Multibranch Pipeline project type enables you to implement different Jenkinsfiles for different branches of the same project. In a Multibranch Pipeline project, Jenkins automatically discovers, manages, and executes Pipelines for branches that contain an in-source control.
5 Steps To Create a Multibranch Pipeline Project
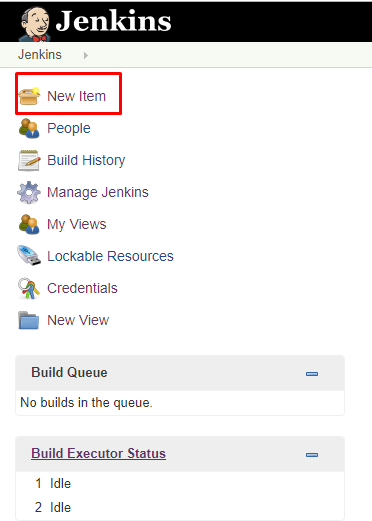
- Open the Jenkins homepage in the local environment (such as http://localhost:8080). Click New Item in the top left corner of the Jenkins dashboard.
![New Item Jenkins homepage menu with 'new item' selected]() New item
New item - Enter the name of your project in the Enter an item name field, scroll down, select Multibranch Pipeline, and click the OK button.
![Multibranch pipeline Selection of Multibranch pipeline in project settings]() Multibranch pipeline
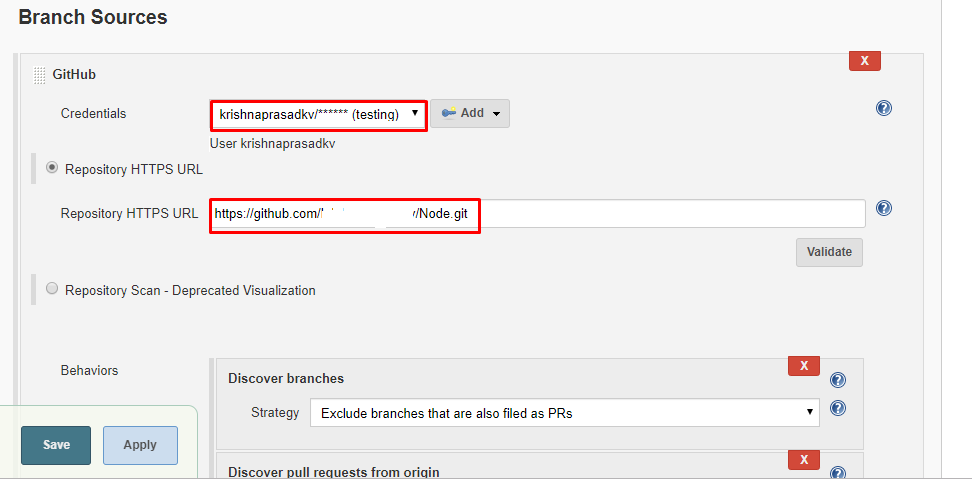
Multibranch pipeline - In the configure page, we need to configure the GitHub repo source. Scroll down to the Branch sources and select the source from the Add Source dropdown. We will be using GitHub in this demonstration example, so select GitHub from the dropdown.
- Enter the location of the repository using the following steps:
- Select the Add button to add credentials and click Jenkins.
- Enter the GitHub username, Password, ID, and Description
- Select dropdown to add credentials in the credentials field.
- Click the Save button.
![Branch sources Steps of entering repository location in branch sources]() Branch sources
Branch sources
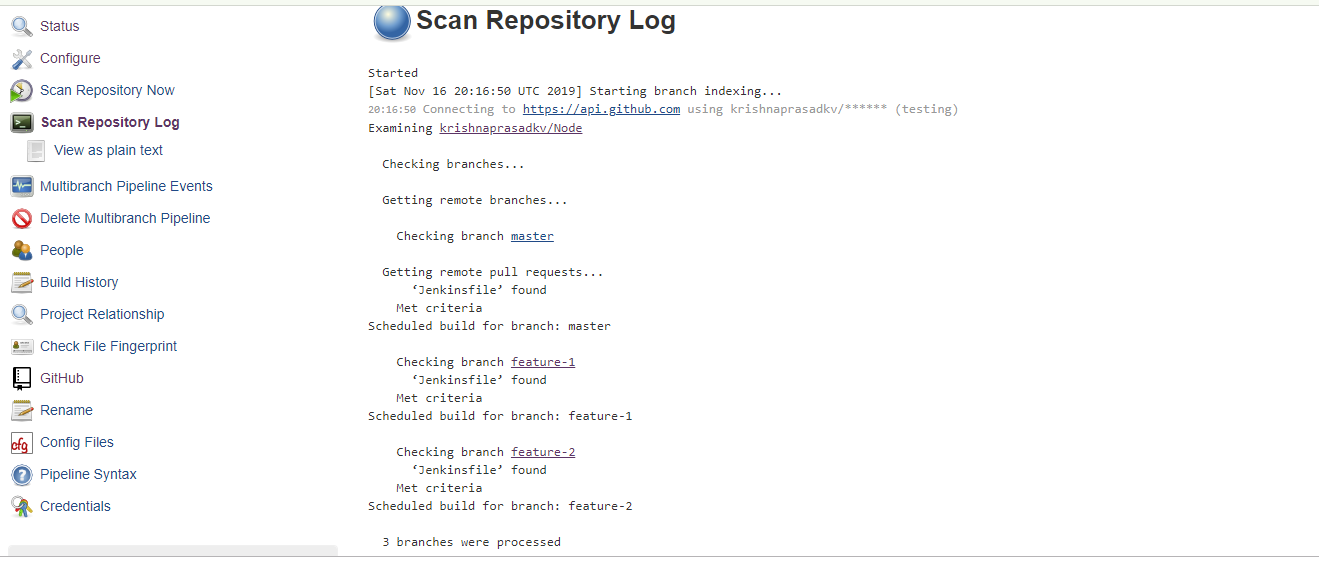
- On saving, Jenkins automatically scans the designated repository and does some indexing for organization folders. Organization folders enable Jenkins to monitor an entire GitHub Organization or Bitbucket Team/Project and automatically create new Multibranch Pipelines for repositories that contain branches and pull requests containing a Jenkins file.
![scan repository log Scan repository log]() Scan repository log
Scan repository log
Currently, this functionality exists only for GitHub and Bitbucket, with functionality provided by the GitHub Organization Folder and Bitbucket Branch Source plugins. Once jobs are created, the build gets triggered automatically.

Configuring Webhooks for Multibranch Pipeline Project
In the next step, we have to configure our Jenkins machine to make it able to communicate with our GitHub repository. For that, we need to get the Hook URL of the Jenkins machine. Mentioned below are the steps to set up Jenkins webhooks on the GitHub repo.
- Go to Manage Jenkins and select the Configure System view.
- Find the GitHub Plugin Configuration section and click on the Advanced button.
- Select the Specify another hook URL for GitHub configuration. Copy the URL in the text box field and unselect it. Then click on Save. It will redirect to the Jenkins dashboard.
![Webhooks selection of specify another hook URL for GitHub configuration]() Webhooks
Webhooks - Now navigate to the GitHub tab on the browser and select your GitHub repository.
- Click on Settings. It will navigate to the repository settings.
![Settings Settings]() Settings
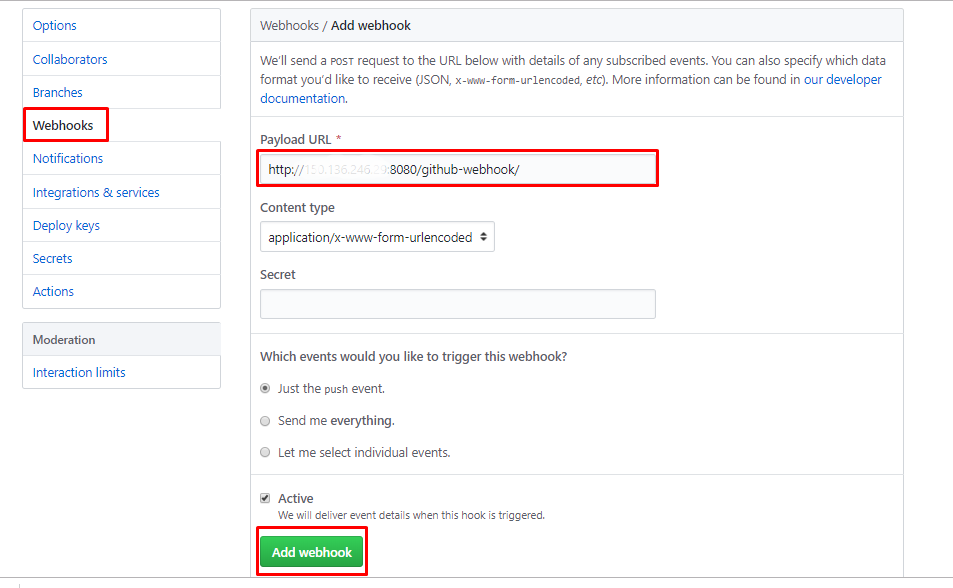
Settings - Under the Settings, click on the Webhooks option and then click on the Add Webhook button. Paste the Hook URL on the Payload URL field. Make sure the trigger webhook field has Just the push event option selected.
![Add webhook Steps for adding the webhook]() Add webhook
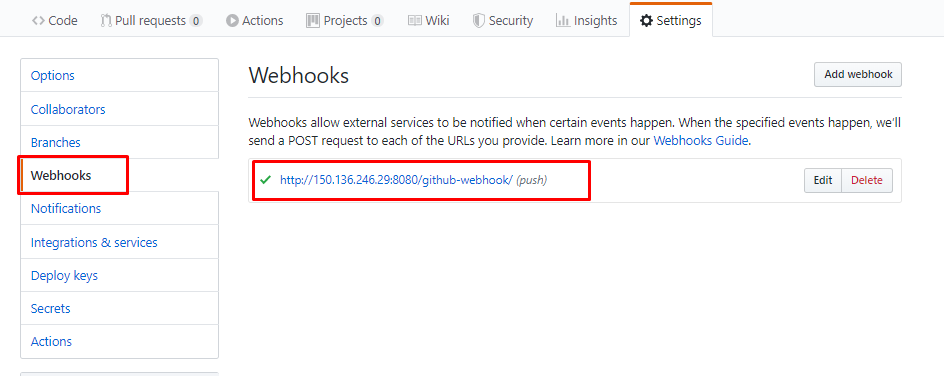
Add webhook - Click Add webhook and it will add the webhook to your repository. Once you've added a webhook correctly, you can see the webhook with a green tick as depicted in the following image.
![Added webhook Webhook added confirmation]() Added webhook
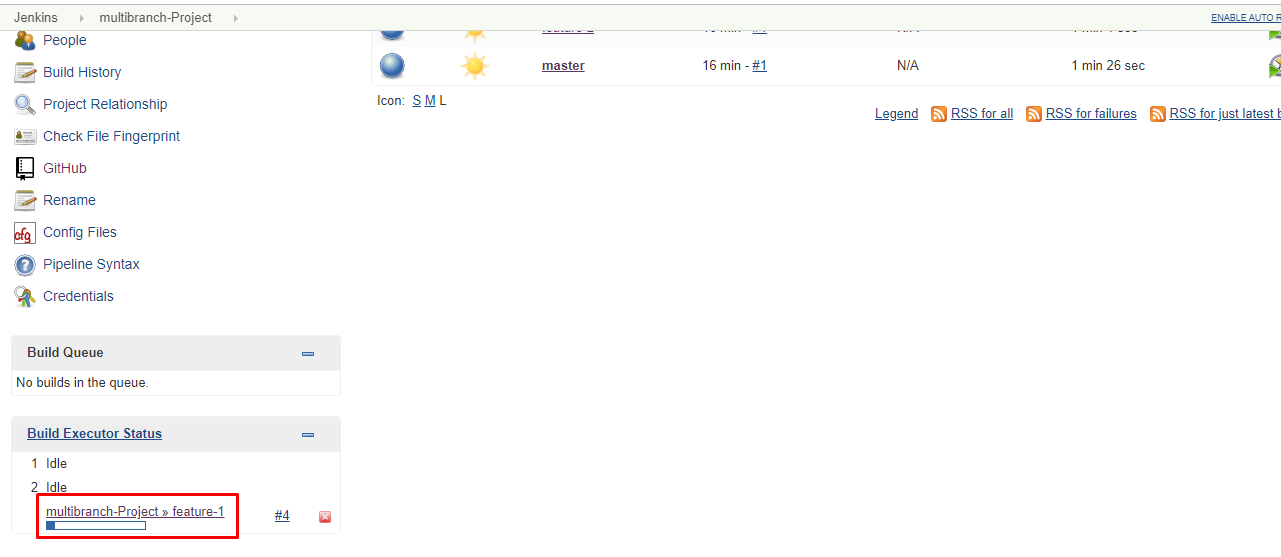
Added webhook - Now go back to the repository, change the branch, and update any of the files. In this scenario, we will update the README.md file. In the image below, we can see that the Jenkins job is getting triggered automatically.
![CI triggers changing the branch and updating files through CI triggers]() CI Triggers
CI Triggers - After pipeline execution is completed, we can verify the history of the executed build under the Build History by clicking the build number. On clicking the build number, select Console Output. From there, you can see the outputs in each step.
![Console Output verifying the history of the executed build in Console Output]() Console output
Console output
Conclusion
With this, we have learned the process of creating a Jenkins multibranch pipeline project and configuring it with the Git repo. You saw how easy it is to create a multibranch pipeline project where Jenkins creates a new independent job automatically every time you create a new branch. Jenkins even takes care of branch maintenance, it can remove the job automatically when you remove the branch. Hope you found this article useful.
Further Reading
Opinions expressed by DZone contributors are their own.





Comments