Ignite UI for Angular Drawer Menu and Angular Routings
The Ignite UI for Angular Navigation Drawer component is a side navigation container. In this post, we will work with Ignite UI Navigation Drawer and Angular Routings.
Join the DZone community and get the full member experience.
Join For FreeIgnite UI for Angular is a material-based library to speed up the development process of Angular web apps. There are more than 30 components available in Ignite UI for Angular, which help you to write high-performance applications faster. You can learn more about Ignite UI for Angular here.
In this article, we will follow a step-by-step approach to work with Ignite UI Navigation Drawer and Angular Routings. The Ignite UI for Angular Navigation Drawer component is a side navigation container. It can rest on content and slide in/out of view or be pinned to expand/collapse components within the content.
See the official documentation for Ignite UI Navigation Drawer here.
This article will help you add Ignite UI for Angular Navigation Drawer to your existing project. However, if you are starting with a new project, you do not have to follow all these steps and use Ignite UI CLI, you can achieve all this in 3 simple commands. Before we go into a step-by-step explanation, let us see how we can work with Ignite UI Navigation Drawer and Angular Routing using Ignite UI CLI.
Using Ignite UI CLI
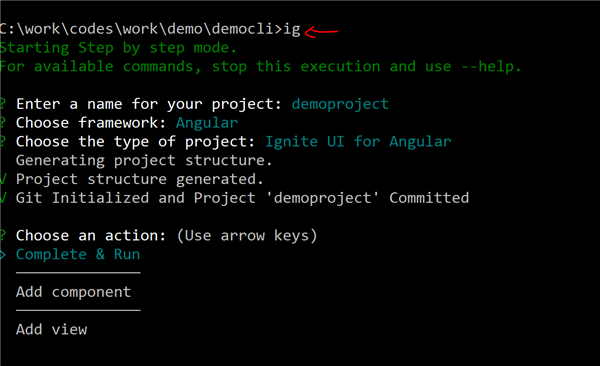
To use Ignite UI CLI, install Ignite UI CLI and run the command ig on the command prompt. After that Ignite UI CLI will ask you to fill in options such as:
- Name of the project.
- Framework: choose Angular.
- Type of project: choose Ignite UI for Angular to work with native Ignite UI for Angular components. Another option is Ignite UI for Angular wrappers which is a jQuery-based library.
Refer the image below:

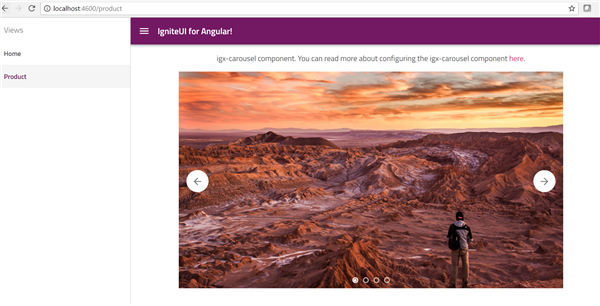
After the project is created, let us add an Angular component to the project. To add this, use the arrow key. There are three type options for the component, choose any. In last select option, Complete and Run using the arrow key. After this step, Ignite UI will install dependencies using npm. Once all dependencies are installed, change the directory and run the command ng serve to run the application created using Ignite UI CLI. You should get an application running as shown in the image below:

This application has the following components:
- Ignite UI for Angular navigation drawer.
- Ignite UI for Angular Carousel.
So, creating an application like above is as easy as that. If you are working with an existing project and wish to add Ignite UI for Angular navigation drawer, read on.
Using Ignite UI for Angular Navigation Drawer in an Existing Project
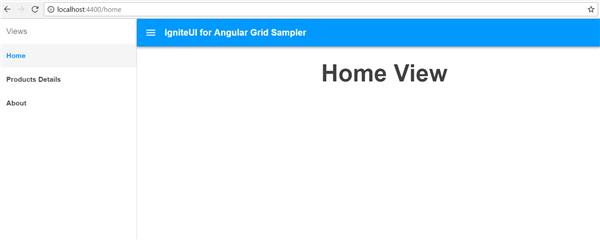
To conclude this article, we will create an application using Angular Routing and Ignite UI for Angular Navigation Drawer as shown in the image below,

Step 1: Project Setup
Let us create an Angular project using Angular CLI. In the application, add a few components. We have added three components for routing. They are as follows:
- Home Component
- About Component
- Product Component
Additionally, there is a file called app-routing.module.ts in the project for the routing module.

I have kept these components very simple. They all have one property title and that is displayed in the template. For your reference, the components are as follows:
product.component.ts
import { Component } from '@angular/core';

@Component({
    selector: 'app-product',
    templateUrl: './products/product.component.html'
})
export class ProductComponent {
    title = 'Product View';
}
product.component.html
<h1 class='text-center'>{{title}}</h1>Other components are the same as ProductComponent.
Step 2: Create Routes
In this step, we will create routing to navigate from one component to another component in our application. It is a simple Angular route with path, component, and data properties set to some values.
app-routing.module.ts
import { NgModule } from '@angular/core';
import { Routes, RouterModule } from '@angular/router';
import { AboutComponent } from './about/about.component';
import { ProductComponent } from './products/product.component';
import { HomeComponent } from './home/home.component';

export const routes: Routes = [
    { path: '', redirectTo: '/home', pathMatch: 'full' },
    { path: 'home', component: HomeComponent, data: { text: 'Home ' } },
    { path: 'banking', component: ProductComponent, data: { text: 'Products Details' } },
    { path: 'about', component: AboutComponent, data: { text: 'About' } }

];
@NgModule({
    imports: [RouterModule.forRoot(routes)],
    exports: [RouterModule]
})
export class AppRoutingModule {
}
I would like to draw your attention to the data text property of the route. We will use this as the value of the navigation links in Ignite UI for Angular drawer.
Step 3: Importing Routes and Components
We have created routes and components. In this step, add those in the main application module. For that import route module and component, pass the route module as one of the values of the imports array and components as one of the values of declaration array.
app.module.ts
import { BrowserModule } from '@angular/platform-browser';
import { NgModule } from '@angular/core';
import { BrowserAnimationsModule } from '@angular/platform-browser/animations';
import { AppRoutingModule } from './app-routing.module';

import { AppComponent } from './app.component';
import { AboutComponent } from './about/about.component';
import { ProductComponent } from './products/product.component';
import { HomeComponent } from './home/home.component';

@NgModule({
    declarations: [
        AppComponent, AboutComponent, ProductComponent, HomeComponent
    ],
    imports: [
        BrowserModule, AppRoutingModule, BrowserAnimationsModule
    ],
    providers: [],
    bootstrap: [AppComponent]
})
export class AppModule { }
I have also imported BrowserAnimationModule. You need it to work with Ignite UI for Angular components and directives.
Step 4: Add Ignite UI for Angular to the Project
Let us start by adding Ignite UI for an Angular library in the project. We can use npm to do this. So run the command shown below to install Ignite UI for Angular:
npm install igniteui-angular
After installing Ignite UI for Angular, we need to install hammer.js. To install hammer.js, run the below command:
npm install hammerjs
After installing Ignite UI for Angular, let's make sure that the project references Ignite UI for Angular styles and the hammer.js library in the angular-cli.json file. Modify angular-cli.json as shown below:
angular-cli.json
"prefix": "app",
    "styles": [
        "styles.css",
        "../node_modules/igniteui-angular/styles/igniteui-angular.css"
    ],
        "scripts": ["../node_modules/hammerjs/hammer.min.js"],
            "environmentSource": "environments/environment.ts",
Ignite UI for Angular styles uses the Material Icons. Let us import those into the styles.css file as shown below:
@import url('https://fonts.googleapis.com/icon?family=Material+Icons');After that, import hammer.js in to main.ts as shown below:
import 'hammerjs';
import { AppModule } from './app/app.module';
import { environment } from './environments/environment';
Step 5: Configure Ignite UI Navigation Drawer
In this step, we will configure Ignite UI Navigation Drawer to use the Angular routes we created in Step 2. Let us start by importing the following into AppComponent.
import { Component, OnInit, ViewChild } from '@angular/core';
import { NavigationStart, Router } from '@angular/router';
import 'rxjs/add/operator/filter';
import { routes } from './app-routing.module';
import { IgxNavigationDrawerComponent } from 'igniteui-angular/navigation-drawer';
We have imported NavigationStart and Router from the router module to iterate through the routes and push a navigation link. In addition, we have imported ViewChild so that we can read IgxNavigationDrawerComponent as ViewChild and call its events, methods, and properties in the component class.
Let us create two properties in the AppComponent class:
- A property to hold navigation links.
- A
ViewChildproperty for Ignite UI navigation drawer.
You can create these two properties as listed below:
public topNavLinks: Array < {
    path: string,
    name: string
} > = [];
@ViewChild(IgxNavigationDrawerComponent) public navdrawer: IgxNavigationDrawerComponent;
Next, in the constructor, we need to create navigation links from routes. That can be done as shown in the listing below:
constructor(private router: Router) {
    for (const route of routes) {
        if (route.path && route.data && route.path.indexOf('*') === -1) {
            this.topNavLinks.push({
                name: route.data.text,
                path: '/' + route.path
            });
        }
    }
}
We also need to make sure that drawer is closed when viewing on the site on a mobile device. This can be done in the ngOnInit() lifecycle hook as shown in the listing below :
ngOnInit() {
    this.router.events
        .filter((x) => x instanceof NavigationStart)
        .subscribe((event: NavigationStart) => {
            if (event.url !== '/' && !this.navdrawer.pin) {
                // Close drawer when selecting a view on mobile (unpinned)
                this.navdrawer.close();
            }
        });
Putting everything together, the AppComponent class with Ignite UI navigation drawer configuration will look like below:
app.component.ts
import { Component, OnInit, ViewChild } from '@angular/core';
import { NavigationStart, Router } from '@angular/router';
import 'rxjs/add/operator/filter';
import { routes } from './app-routing.module';
import { IgxNavigationDrawerComponent } from 'igniteui-angular/navigation-drawer';

@Component({
    selector: 'app-root',
    templateUrl: './app.component.html',
    styleUrls: ['./app.component.css']
})
export class AppComponent implements OnInit {
    public topNavLinks: Array<{
        path: string,
        name: string,
        icon: string
    }> = [];
    @ViewChild(IgxNavigationDrawerComponent) public navdrawer: IgxNavigationDrawerComponent;

    constructor(private router: Router) {
        for (const route of routes) {
            if (route.path && route.data && route.path.indexOf('*') === -1) {
                this.topNavLinks.push({
                    name: route.data.text,
                    path: '/' + route.path,
                    icon: route.data.icon
                });
            }
        }
    }

    public ngOnInit(): void {
        this.router.events
            .filter((x) => x instanceof NavigationStart)
            .subscribe((event: NavigationStart) => {
                if (event.url !== '/' && !this.navdrawer.pin) {
                    // Close drawer when selecting a view on mobile (unpinned)
                    this.navdrawer.close();
                }
            });
    }
}
Step 6: Configure Ignite UI Navigation Drawer
Next, in the AppComponent template, we will use ig-nav-drawer and set various properties such as:
- Header
- igxFlex
- navbar
- the content area which would be router-outlet
We are using various directives such as igxLayout, igxDrawerItem, igxRipple to create the drawer. Besides directives, we are using components such as igx-nav-drawer and igx-navbar. You can read more about them in the official documentation here.
Putting everything together, the AppComponent template will look like the below listing:
<div class="main" igxLayout>
    <igx-nav-drawer #nav id="project-menu" isOpen="false" [enableGestures]='true' width="280px">
        <ng-template igxDrawer>
            <header igxDrawerItem isHeader="true">Views</header>
            <span *ngFor="let route of topNavLinks" igxDrawerItem igxRipple routerLinkActive="igx-nav-drawer__item--active" routerLink="{{route.path}}">
                {{route.name}}
            </span>
        </ng-template>
    </igx-nav-drawer>
    <div igxFlex>
        <igx-navbar title="IgniteUI for Angular Grid Sampler" actionButtonIcon="menu" (onAction)="nav.toggle()" igxFlex>
        </igx-navbar>
        <div class="content" igxLayout igxLayoutJustify="center">
            <router-outlet></router-outlet>
        </div>
    </div>
</div>
You can see that we are iterating routes and then adding the router link and router name to the drawer.
Step 7: Run application
On running the application, you will see Ignite UI for Angular navigation drawer in action working with Angular Routing as shown in the image below:

You can navigate between components by clicking on header items in the drawer.
Conclusion
In this post, we learned about using Ignite UI for Angular Navigation drawer in existing Angular project. We also saw how easy it is to create applications using use Ignite UI CLI. If you like this post, please share it. In addition, if you haven't checked out Infragistics Ignite UI for Angular Components, be sure to do so! They've got 30+ material based Angular components to help you code speedy web apps faster.
Published at DZone with permission of Dhananjay Kumar, DZone MVB. See the original article here.
Opinions expressed by DZone contributors are their own.

Comments