Building an Angular Bot With AWS Lex
Here's an in-depth guide to building your own Angular chatbot.
Join the DZone community and get the full member experience.
Join For FreeIntroduction
In this article, I will explain the Amazon Lex service and how you can use it to develop automated bots for your application. Using Lex, it is to develop automated support in your application to collect information from the user using text or voice and address the user’s concerns. I will create a sample application using Angular, and then we will integrate it to Amazon Lex to create an appointment.
Prerequisites
This article assumes that you have a basic understanding of web application development. This article doesn’t require you to have advanced skills using Angular or Amazon Web Services, but having familiarity with these technologies will help you get the most out of this. Here is a list of tools technologies I have used in this article.
- Node.js CLI
- Angular
- Visual Studio code
- Amazon AWS console
- Amazon Amplify CLI
What Is Amazon Lex?
Amazon Lex uses deep learning and natural language processing to create conversational applications. Lex enables developers to create applications with text/voice-based conversations that can be seamlessly integrated with Amazon Alexa or other AWS services for implementing automated workflows. Amazon Lex uses automated speech recognition (ASR) to convert from voice to text, then uses natural language processing (NLP) to understand the intent of the speech to create engaging applications. Using Amazon Lex, you can create anything from a simple website support chatbot to a complex contact center application or an automated booking system.
Why Use Amazon Lex?
Below are some of the benefits Amazon Lex provides:
- Amazon Lex is easy to understand and provides easy navigation through the console to create applications.
- Amazon Lex made available complex deep learning algorithms to the developer by just using their service to achieve business goals.
- Amazon Lex makes it very easy to develop test and deploy chatbots using the console.
- Amazon Lex chatbots are serverless and can scale massively without the need for overhead.
- Amazon Lex chatbots are very cost-effective and don’t require any upfront cost for deployment and you pay as you go.
- Built-in integration with other AWS services like AWS Lambda, Cognito, CloudWatch, and other services.
- Easy integration with external messaging platforms and web applications.
Amazon Lex Concepts
You need to understand a few concepts in order to build a Lex application. Below are some of the important one
Intents
An intent represents an action that the user wants to take. You use one or more related intents to create a bot. For example, you might create a bot that takes user details and travel details to create a hotel reservation.
Utterances
Utterances are the typed or spoken phrases that invoke an intent. You specify one or more utterances so that your intent can be invoked in many ways. For example: "Reserve a room."
Slots
The slot is the data that your user must provide to fulfill an intent. A slot requires you to supply a prompt message, slot type, and a variable value where you want to store the user-supplied value. You can specify more than one slot to collect all data points. For example: What is your name?
Confirmation Prompt
A confirmation prompt specifies a message playing back to the user to confirm the data that is collected in slots. The user can provide confirmation of their intent, or they can cancel it in the confirmation prompt.
Fulfillment
The fulfillment section specifies the AWS Lambda code to be executed to actually perform the business logic required to complete the user's intent.
Response
The response section specifies the closure of the intent. Here, can respond with a message, or you can invoke another intent.
Clarification Prompts
In the error handling section, you can specify a clarification prompt where the bot can ask the user a clarification question if the user’s response or question isn’t matching the expected behavior by the bot.
Channels
Amazon Lex easily integrates with some of the popular messaging channels like Facebook Messenger, Kik, Slack, and Twilio SMS. In the channels section, you can specify different settings to enable your chatbot on these platforms. In our example application here, we will be integrating this chatbot in a sample webpage, which you can use either in a mobile app or on a website.
Development Tools
To get started with the development of this application, we will need a code editor, I am using visual studio code as it is free, supports typescript syntax highlighting and easy to use, but you can use any source code editor to follow this article. We also need the node package manager to be available in your development environment and up to date.
We will be using AWS Amplify CLI to configuring AWS LEX in our application, AWS Amplify is a utility provided by amazon to easily integrate java-script based applications and also provides utilities to automatically provision AWS backend using simple commands.
Functionality
In this application, I will create a web page with a read-only text area to display the conversation. Then, there will be a text input where I will add my input to the chatbot. Once I click the send button, my input will be sent to Amazon Lex to get a response back.
We will create a chatbot to guide a user through the process to create a hotel reservation. Our bot will take details from the user about what city and date they need a booking for, and then we will create the reservation (a dummy one) and inform the user.
Getting Started
Now let’s start writing our application. First, open a terminal window. I assume at this point you already have node package manager installed on your machine and it is up to date.
- Install Angular CLI:
npm install -g @angular/cli

- Create a new Angular application
Angular CLI allows you to create a new application by just typing a command and creating a template web application, which you can modify and customize to serve your need.
ng new lex-demo-app

Once you type the command above, it will ask you a few questions to customize your application.
Would you like to add Angular routing? Yes
Which stylesheet format would you like to use? CSS
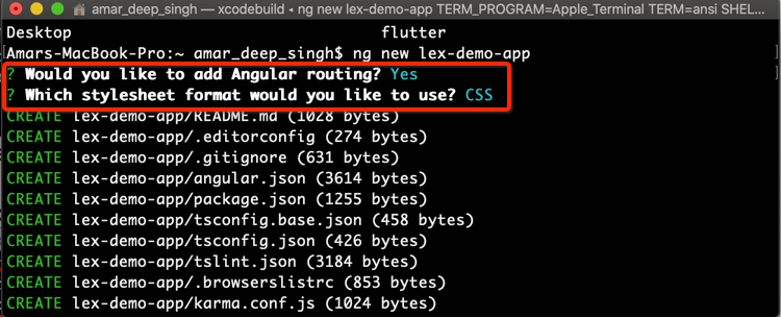
Answer these questions as shown in the above screenshot. Here, we are enabling routing in our application and using CSS to beautify our application. Once you hit enter, this will create your application and add all Angular and node dependencies you need to start the application.
- Start the Angular web application.
Now we have our application created, so let’s go to the application directory using the command below and start the node server.
cd lex-demo-app/

To start the node application, type the command below and hit enter. Here, we are staring our server in SSL mode, which ensures that our communication to the backend services is happening on a secure channel.
ng serve --ssl=true
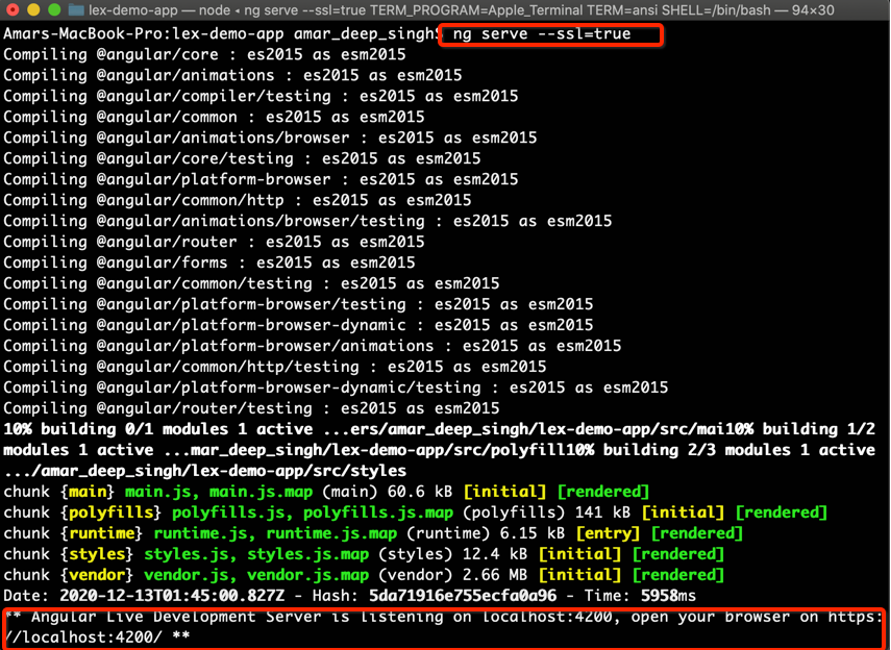
Now since the application is started, let’s type the address below in your browser and see our sample application.
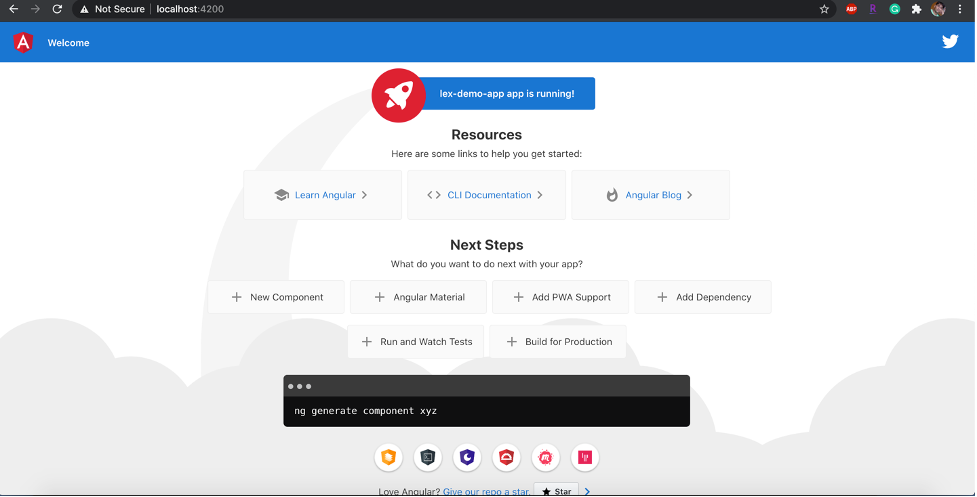
You can see that Angular CLI has created the basic skeleton for the application. Now, we will customize it to serve our needs.
Let’s press ctrl/cmd + C on the console to stop the ng server.
Code Structure
Now open your project with your code editor. I am using Visual Code, which is lightweight and provides code syntax correction for TypeScript. The screenshot below shows the structure of the code.
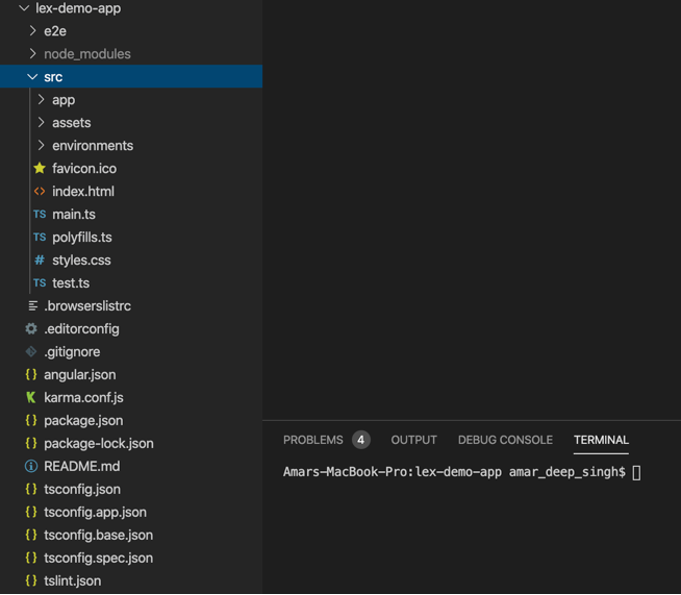
The src directory contains your source code. Here are some of the import files/directories we need to understand.
- package.json: This JSON file describes all your application dependencies.
- Index.html: This HTML file serves as the basis of your application and defines your single page application.
- styles.css: This CSS file is the application’s main style sheet file and contains your application-level CSS classes.
- app-routing.module.ts: This file is located in src/app/app-routing.module.ts and contains your application flow and how a user navigates through your application.
- polyfills.ts: Polyfills in Angular are few lines of code that make your application compatible with different browsers.
- app.module.ts: This file is located under src/app/app.module.ts and defines different Angular modules and components. It is also used to configure AWS Amplify in your application.
- app.component.html: This file contains the application structure; you can define headers/footers and a routing outlet in this file. The contents will be replaced based on the page you navigate to.
User Interface
Now that we are familiar with our code structure, let’s get started making changes to our project.
Now open the styles.json file and copy the CSS code below to the file. Here, we are taking the default Angular CSS for the template and separating it in the application-level CSS file.
xxxxxxxxxx
:host {
font-family: system, BlinkMacSystemFont, "Segoe UI", Roboto, Helvetica, Arial, sans-serif, "Apple Color Emoji", "Segoe UI Emoji", "Segoe UI Symbol";
font-size: 14px;
color: #333;
box-sizing: border-box;
font-smoothing: antialiased;
osx-font-smoothing: grayscale;
}
h1,
h2,
h3,
h4,
h5,
h6 {
margin: 8px 0;
}
p {
margin: 0;
}
.spacer {
flex: 1;
}
.toolbar {
position: absolute;
top: 0;
left: 0;
right: 0;
height: 60px;
display: flex;
align-items: center;
background-color: #1976d2;
color: white;
font-weight: 600;
}
.toolbar img {
margin: 0 16px;
}
.toolbar #twitter-logo {
height: 40px;
margin: 0 16px;
}
.toolbar #twitter-logo:hover {
opacity: 0.8;
}
.content {
display: flex;
margin: 82px auto 32px;
padding: 0 16px;
max-width: 960px;
flex-direction: column;
align-items: center;
}
svg.material-icons {
height: 24px;
width: auto;
}
svg.material-icons:not(:last-child) {
margin-right: 8px;
}
.card svg.material-icons path {
fill: #888;
}
.card-container {
display: flex;
flex-wrap: wrap;
justify-content: center;
margin-top: 16px;
}
.card {
border-radius: 4px;
border: 1px solid #eee;
background-color: #fafafa;
height: 40px;
width: 200px;
margin: 0 8px 16px;
padding: 16px;
display: flex;
flex-direction: row;
justify-content: center;
align-items: center;
transition: all 0.2s ease-in-out;
line-height: 24px;
}
.card-container .card:not(:last-child) {
margin-right: 0;
}
.card.card-small {
height: 16px;
width: 168px;
}
.card-container .card:not(.highlight-card) {
cursor: pointer;
}
.card-container .card:not(.highlight-card):hover {
transform: translateY(-3px);
box-shadow: 0 4px 17px rgba(0, 0, 0, 0.35);
}
.card-container .card:not(.highlight-card):hover .material-icons path {
fill: rgb(105, 103, 103);
}
.card.highlight-card {
background-color: #1976d2;
color: white;
font-weight: 600;
border: none;
width: auto;
min-width: 30%;
position: relative;
}
.card.card.highlight-card span {
margin-left: 60px;
}
svg#rocket {
width: 80px;
position: absolute;
left: -10px;
top: -24px;
}
svg#rocket-smoke {
height: calc(100vh - 95px);
position: absolute;
top: 10px;
right: 180px;
z-index: -10;
}
a,
a:visited,
a:hover {
color: #1976d2;
text-decoration: none;
}
a:hover {
color: #125699;
}
.terminal {
position: relative;
width: 80%;
max-width: 600px;
border-radius: 6px;
padding-top: 45px;
margin-top: 8px;
overflow: hidden;
background-color: rgb(15, 15, 16);
}
.terminal::before {
content: "\2022 \2022 \2022";
position: absolute;
top: 0;
left: 0;
height: 4px;
background: rgb(58, 58, 58);
color: #c2c3c4;
width: 100%;
font-size: 2rem;
line-height: 0;
padding: 14px 0;
text-indent: 4px;
}
.terminal pre {
font-family: SFMono-Regular,Consolas,Liberation Mono,Menlo,monospace;
color: white;
padding: 0 1rem 1rem;
margin: 0;
}
.circle-link {
height: 40px;
width: 40px;
border-radius: 40px;
margin: 8px;
background-color: white;
border: 1px solid #eeeeee;
display: flex;
justify-content: center;
align-items: center;
cursor: pointer;
box-shadow: 0 1px 3px rgba(0, 0, 0, 0.12), 0 1px 2px rgba(0, 0, 0, 0.24);
transition: 1s ease-out;
}
.circle-link:hover {
transform: translateY(-0.25rem);
box-shadow: 0px 3px 15px rgba(0, 0, 0, 0.2);
}
footer {
margin-top: 8px;
display: flex;
align-items: center;
line-height: 20px;
}
footer a {
display: flex;
align-items: center;
}
.github-star-badge {
color: #24292e;
display: flex;
align-items: center;
font-size: 12px;
padding: 3px 10px;
border: 1px solid rgba(27,31,35,.2);
border-radius: 3px;
background-image: linear-gradient(-180deg,#fafbfc,#eff3f6 90%);
margin-left: 4px;
font-weight: 600;
font-family: system,BlinkMacSystemFont,Segoe UI,Helvetica,Arial,sans-serif,Apple Color Emoji,Segoe UI Emoji,Segoe UI Symbol;
}
.github-star-badge:hover {
background-image: linear-gradient(-180deg,#f0f3f6,#e6ebf1 90%);
border-color: rgba(27,31,35,.35);
background-position: -.5em;
}
.github-star-badge .material-icons {
height: 16px;
width: 16px;
margin-right: 4px;
}
svg#clouds {
position: fixed;
bottom: -160px;
left: -230px;
z-index: -10;
width: 1920px;
}
/* Responsive Styles */
@media screen and (max-width: 767px) {
.card-container > *:not(.circle-link) ,
.terminal {
width: 100%;
}
.card:not(.highlight-card) {
height: 16px;
margin: 8px 0;
}
.card.highlight-card span {
margin-left: 72px;
}
svg#rocket-smoke {
right: 120px;
transform: rotate(-5deg);
}
}
@media screen and (max-width: 575px) {
svg#rocket-smoke {
display: none;
visibility: hidden;
}
}
Now replace the contents of app.component.html with the code below. In this, we are just deleting the default code that has been generated by Angular for us. We are just keeping the header, but if you need to make any changes to it, feel free to.
x
<div class="toolbar" role="banner">
<img
width="40"
alt="Angular Logo" src="data:image/svg+xml;base64,PHN2ZyB4bWxucz0iaHR0cDovL3d3dy53My5vcmcvMjAwMC9zdmciIHZpZXdCb3g9IjAgMCAyNTAgMjUwIj4KICAgIDxwYXRoIGZpbGw9IiNERDAwMzEiIGQ9Ik0xMjUgMzBMMzEuOSA2My4ybDE0LjIgMTIzLjFMMTI1IDIzMGw3OC45LTQzLjcgMTQuMi0xMjMuMXoiIC8+CiAgICA8cGF0aCBmaWxsPSIjQzMwMDJGIiBkPSJNMTI1IDMwdjIyLjItLjFWMjMwbDc4LjktNDMuNyAxNC4yLTEyMy4xTDEyNSAzMHoiIC8+CiAgICA8cGF0aCAgZmlsbD0iI0ZGRkZGRiIgZD0iTTEyNSA1Mi4xTDY2LjggMTgyLjZoMjEuN2wxMS43LTI5LjJoNDkuNGwxMS43IDI5LjJIMTgzTDEyNSA1Mi4xem0xNyA4My4zaC0zNGwxNy00MC45IDE3IDQwLjl6IiAvPgogIDwvc3ZnPg=="/>
<span>Lex Demo App</span>
<div class="spacer"></div>
<a aria-label="Angular on twitter" target="_blank" rel="noopener" href="https://twitter.com/teach_me_more" title="Twitter">
<svg id="twitter-logo" height="24" data-name="Logo" xmlns="http://www.w3.org/2000/svg" viewBox="0 0 400 400">
<rect width="400" height="400" fill="none"/>
<path d="M153.62,301.59c94.34,0,145.94-78.16,145.94-145.94,0-2.22,0-4.43-.15-6.63A104.36,104.36,0,0,0,325,122.47a102.38,102.38,0,0,1-29.46,8.07,51.47,51.47,0,0,0,22.55-28.37,102.79,102.79,0,0,1-32.57,12.45,51.34,51.34,0,0,0-87.41,46.78A145.62,145.62,0,0,1,92.4,107.81a51.33,51.33,0,0,0,15.88,68.47A50.91,50.91,0,0,1,85,169.86c0,.21,0,.43,0,.65a51.31,51.31,0,0,0,41.15,50.28,51.21,51.21,0,0,1-23.16.88,51.35,51.35,0,0,0,47.92,35.62,102.92,102.92,0,0,1-63.7,22A104.41,104.41,0,0,1,75,278.55a145.21,145.21,0,0,0,78.62,23" fill="#fff"/>
</svg>
</a>
</div>
<div class="content" role="main">
</div>
<router-outlet></router-outlet>
Angular uses the <router-outlet></router-outlet> tag to dynamically replace the content with whatever page you are on. The other things defined here will remain the same.
Now let’s bring up the node server and see that our application is still functioning and that we have removed the unnecessary Angular documentation. The other links from the application and our application page are looking much simpler.

Now we will make changes to app.component.html and add a text area in read-only mode to keep our conversation. Then, we will add an input text to ask questions or supply text input to lex service, we will have a send button so that when we click on that it takes our input and makes a call back to AWS lex service and our chatbot can respond.
We will be adding the code below to our app.component.html inside the content div.
xxxxxxxxxx
<div class="content" role="main">
<textarea readonly="readonly" name="conversation" rows="10" cols="80"></textarea>
<br/>
<span><input type="text" size="60" name="message" style="line-height:2.0em;" enterkeyhint=""/>
<button type="button" style="line-height: 2em;">Send</button></span>
</div>
Our application will now look like:

Now let’s make some changes to this page and add the code highlighted below. 
xxxxxxxxxx
<div class="content" role="main">
<textarea readonly="readonly" name="conversation" [(ngModel)]="conversation" rows="10" cols="80"></textarea>
<br/>
<span><input type="text" size="60" name="message" [(ngModel)]="message" style="line-height:2.0em;" enterkeyhint=""/>
<button (click)="startChat()" type="button" style="line-height: 2em;">Send</button></span>
</div>
Using the [(ngModel)] directive, we are binding these fields to our component properties, which we will be defined later. In a similar way, we have defined a click event on the Send button, which will invoke the startChat function within our app.component.ts, which we still have to define.
Now our application user interface is ready and we are good to make changes to the application logic to make this page functional.
AWS Amplify Installation
Before we make more changes to the page, we need to install the AWS Amplify dependency.
Let’s switch to terminal and install AWS Amplify by typing npm install aws-amplify. AWS Amplify is a JavaScript CLI that provides capabilities to connect to AWS services and provision required services for you to use. It also allows provides utility methods to integrate with Amazon Lex.

Now since you have installed AWS Amplify, let’s initialize it using the command below.
amplify init

This will ask you some questions to configure the project to utilize AWS Amplify. Answer these question as shown below:
Enter a name for the project lexdemoapp
Enter a name for the environment dev
Choose your default editor: Visual Studio Code
Choose the type of app that you are building : javascript
What javascript framework are you using: angular
Source Directory Path: src
Distribution Directory Path : dist
Build Command: npm run-script build
Start Command : ng serve
Do you want to use an AWS profile? (Y/n) n
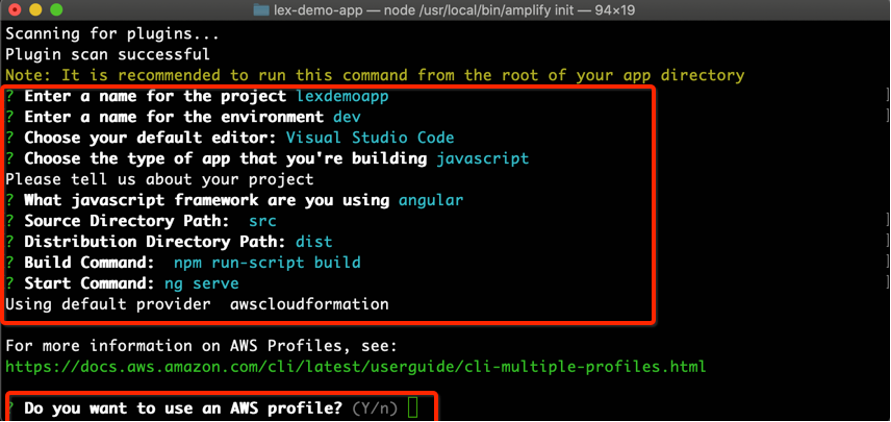
Now, this CLI will ask you for your AWS user access key and secret key to connect to your AWS account to provision your AWS resources. If you don’t have one, you can go ahead and log in to your AWS management console, navigate to IAM, and create a new AWS user with administrator privileges and generate access/a secret key for programmatic access. This step is only required if you want to provision your AWS Lex Chatbot using a CLI. If you want to create a chatbot and intent using the AWS management console, then you can ignore the following configuration.
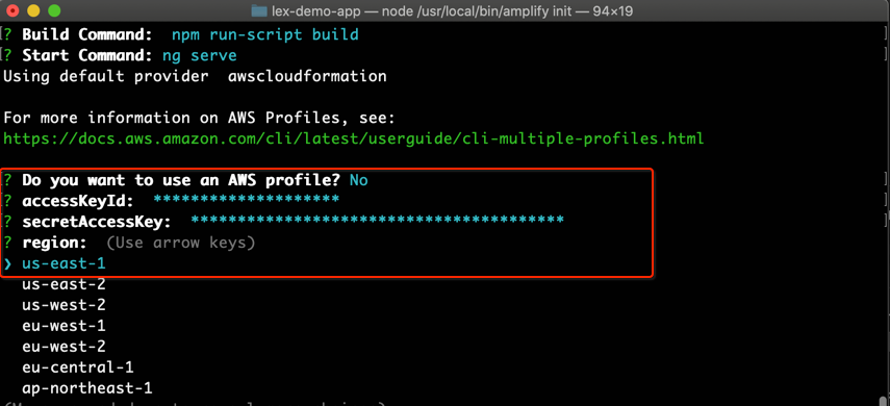
Once you have provided your access key and secret, and selected your preferred AWS region, AWS Amplify will run the CloudFormation template in the background and create the required role it needs to interact.
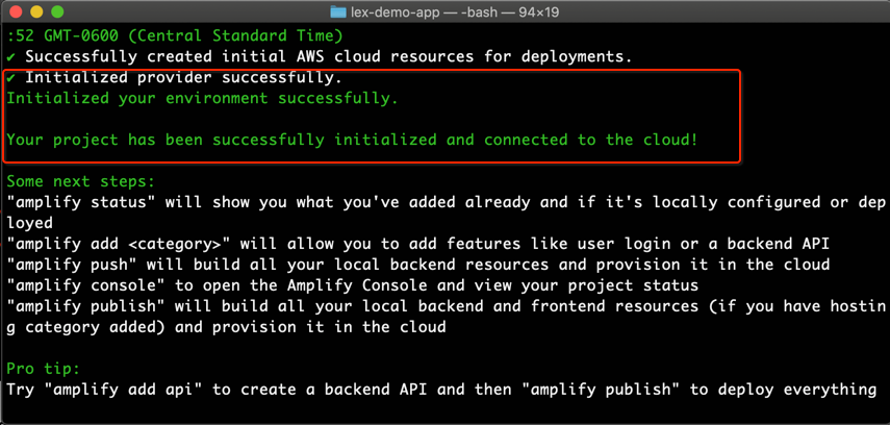
Now we have our AWS amplify installed and configured, so let’s add the Lex module to enable Amazon Lex in our project and create a chatbot. Type the command below to the console:
amplify add interactions

Amplify will ask you to configure your chatbot and go through a bunch of configurations, which you will be able to update using the AWS console as well.
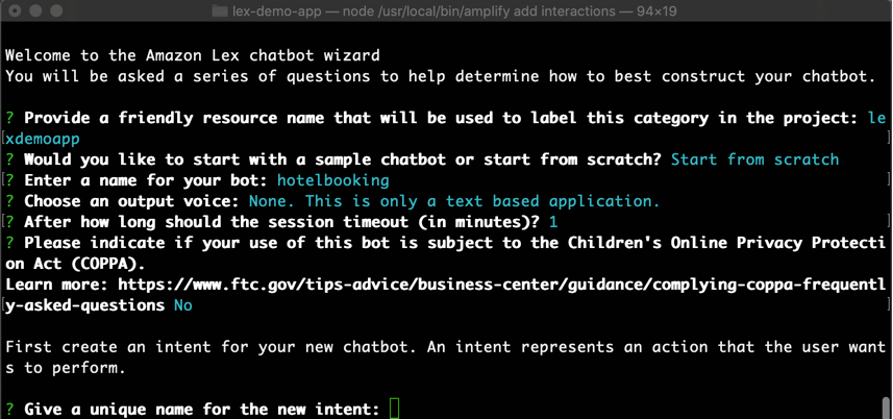
Now it is asking us to create a new intent. Here, we are going to create a hotel room booking intent so that our users can book a hotel reservation.
? Provide a friendly resource name that will be used to label this category in the project: lexdemoapp
? Would you like to start with a sample chatbot or start from scratch? Start from scratch
? Enter a name for your bot: hotelbooking
? Choose an output voice: None. This is only a text-based application.
? After how long should the session timeout (in minutes)? 1
? Please indicate if your use of this bot is subject to the Children's Online Privacy Protection Act (COPPA).
Learn more: https://www.ftc.gov/tips-advice/business-center/guidance/complying-coppa-frequentl
y-asked-questions No

Now we have provided a name to our intent, so it is time to provide different utterances or phrases upon which our chatbot can take action.
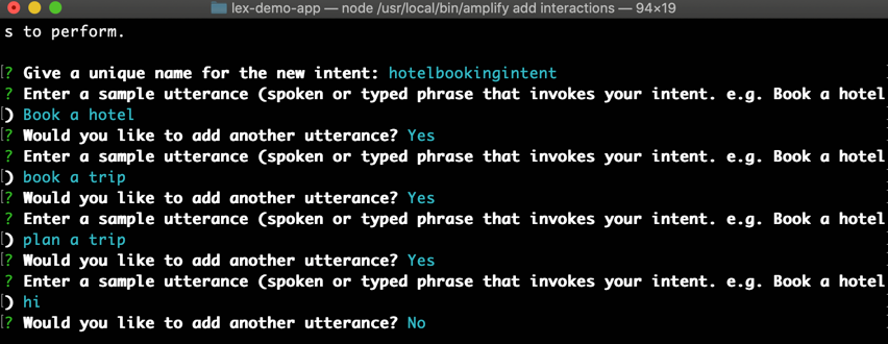
In this application, we have provided four utterances, so if the user types or says anything matching these utterances, our hotel-booking chatbot will respond.
Now it is time to start adding slots to collect some data from the user. We are adding our first slot here and specifying what the CLI required us to supply to collect: the user’s first name.

The CLI ask us to provide a name for the slot in which it will store the data, and we can access it using {firstName}. The CLI also asks for a slot type. We can either create our slot type or use Amazon's existing data types. Here we are using AMAZON.US_FIRST_NAME to collect a user’s first name. A slot type is a kind of data type so that Lex can validate the data. Then, we are specifying a question that will be asked to the user to provide input, as well as whether it should be required.
Now we have created a slot to collect the user's first name. Using these steps, we will create a few more slots to collect the user’s last name, the city user is planning to travel to, and the dates of reservation. 


Now we have added all the slot types that we need from the user, so now let’s add a confirmation prompt to our intent so that we can confirm the user-provided details.

In the above screenshots, we provided a confirmation prompt configuration to the intent where we are showing user-provided details using slot name in {} brackets. Similarly, a cancellation message can be provided if the user decides not to proceed.
Now we will ask for a final configuration to fulfill a confirmed user request. We have the option to either execute a Lambda function, which can actually create the reservation in a database, or connect to a third-party service. For this demo, we are just displaying back client-provided details and not connecting to Lambda. The CLI gives us an option to add more intents, and then we can relate them, but for this demo, we are good with just one intent.

Now that we have created our Amplify configuration, it is time to push these changes to the AWS backend so that a CloudFormation template can create the required backend resources.
amplify push
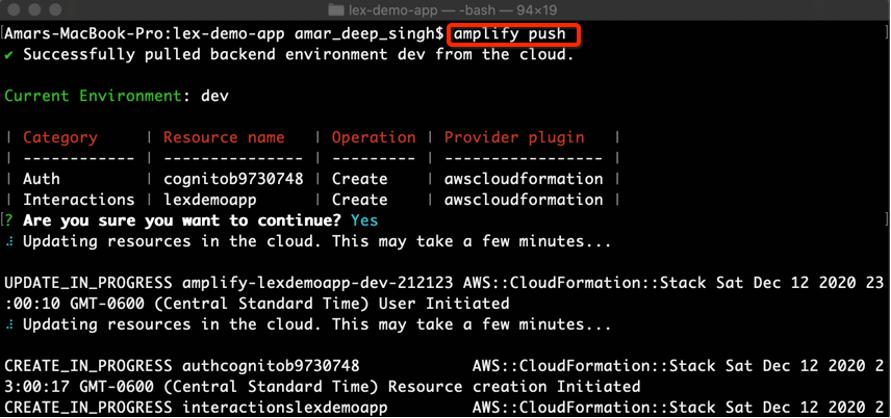
Once you push the Amplify command and the required roles and resources have been created in your AWS account, you will see a confirmation message.
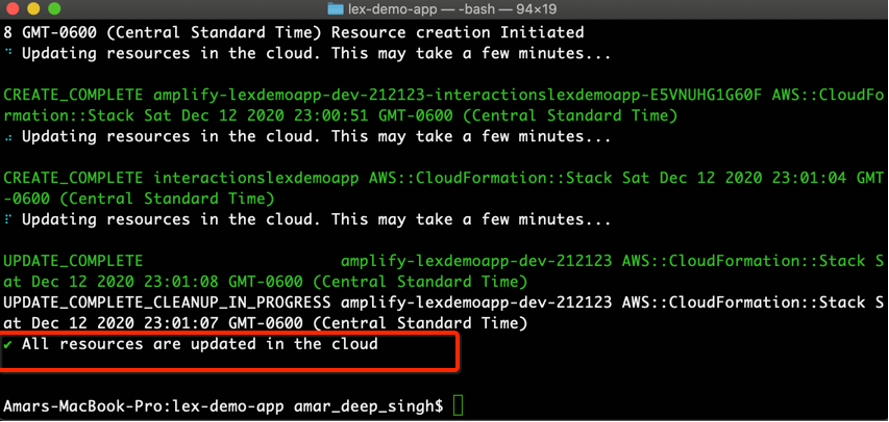
At this point, all the backend resources are ready and you can log in to your AWS account and see/tweak the configuration.
Amazon Lex Chatbot Configuration
Login to AWS Console and Go to the Lex service.

Now click on the hotelbooking_dev chatbot we have created to look at different intents and configurations.
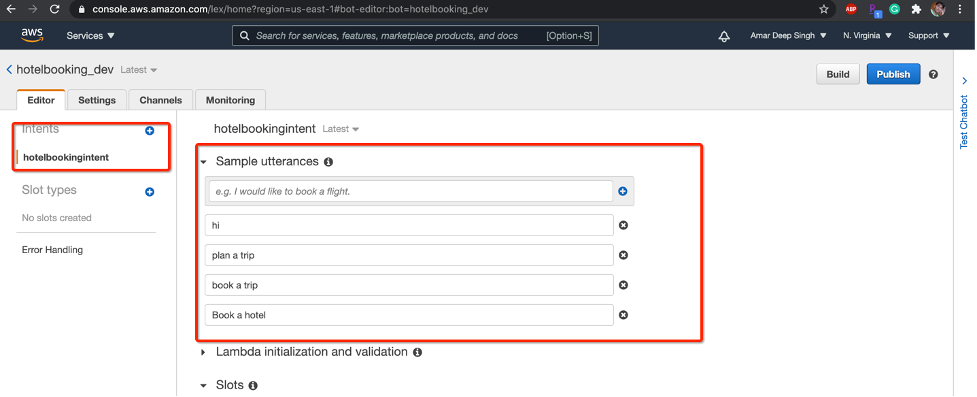
Here we can see our intent is listed on the left side and the different utterances we provided are listed in the main content area. The screenshot below shows the different slots where we configured all the questions that will be asked, in the order defined.

The Confirmation section displays details about the prompt that will be presented to the user when all slot data is collected. You can refer slot inputs as dynamic data as shown below, like {firstName}.
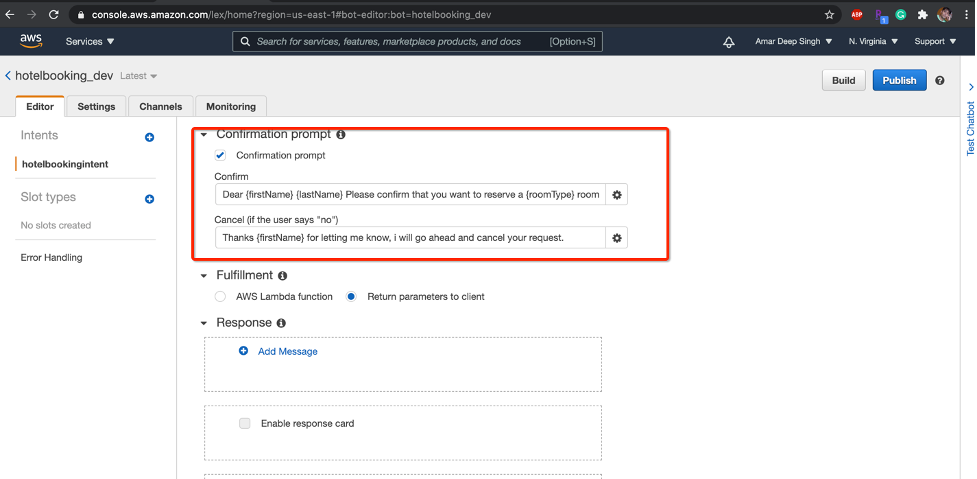
Similar to a confirm message, a cancel message will be presented to the user when the user answers the confirmation prompt with "No."
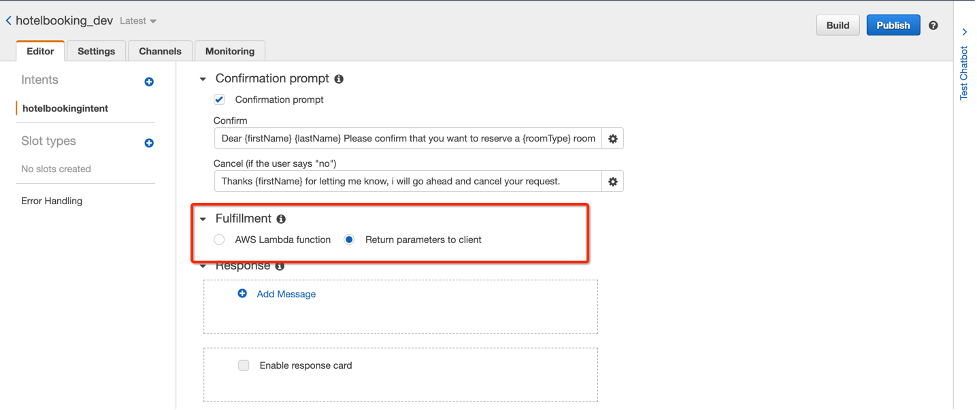
You can choose to execute a Lambda function on the confirmation, or you can just return parameters back to the client for a non-production application. This section is used to fulfill the user’s intent by invoking a Lambda function.
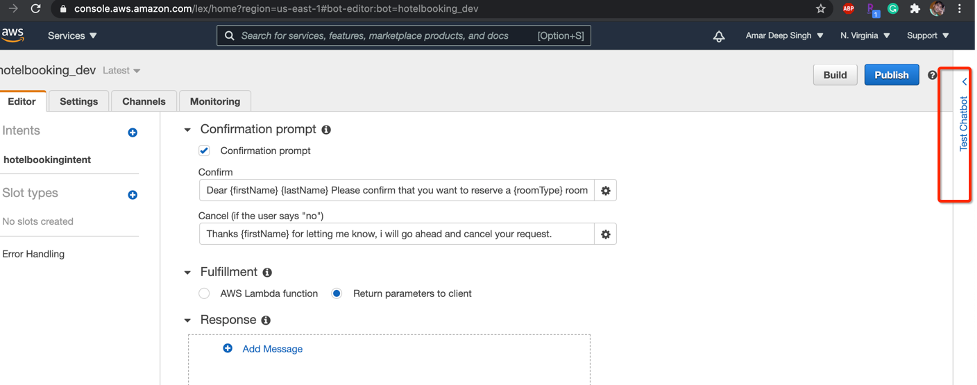
You can click on the right-side Test Chatbot link to actually test the chatbot you have created.
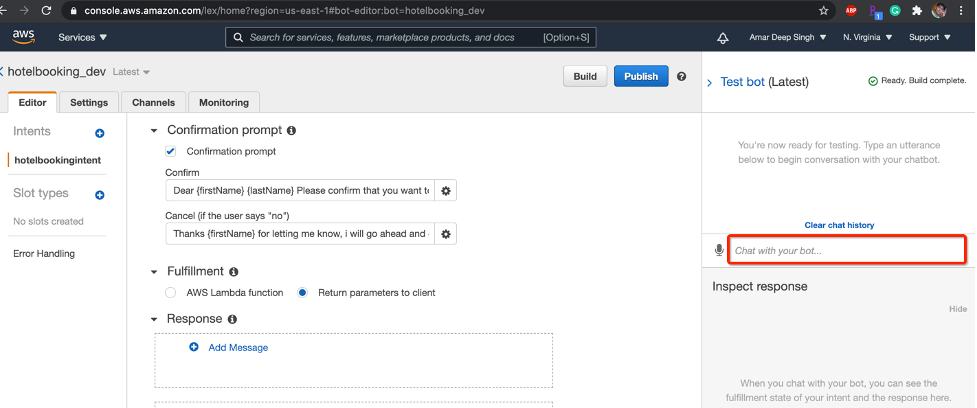
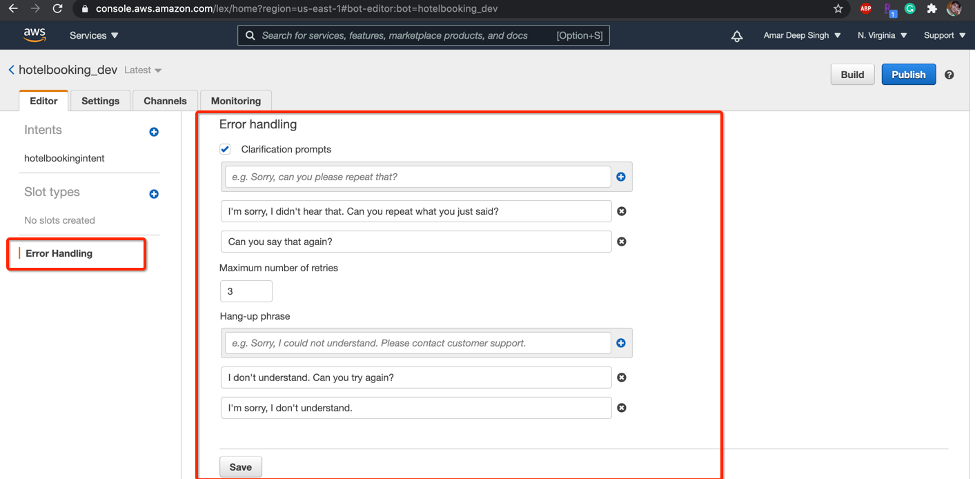
You can configure error handling details in the left panel and specify clarification prompts to the user in case something doesn’t match the utterances you have specified.
If you make any change to the configuration, you can click on the build button at the top to apply these changes to your bot, and you can create different versions of your bot by clicking the publish button. You can navigate to different tabs to configure more details.
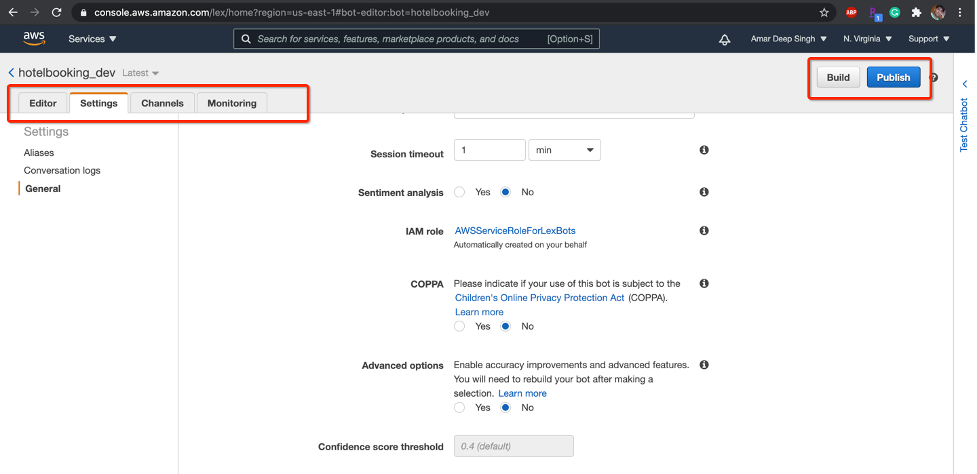
In the Setting tabs, you can specify if your chatbot is just text-based or if you have a voice-based chatbot as well. The Channels tab provides a mechanism to configure and deploy your chatbot to different channels like Facebook, Kik, Slack, or Twilio.

In the screen above, you can provide details on how your chatbot will integrate with Facebook. For that, you need to create a Facebook application on the Facebook developer portal, but here we aren’t going to configure anything, as we are going to integrate this bot with our web application.
Monitoring tabs have CloudWatch metric details that show how users are interacting with our bot.

Now since we have configured all our details, let’s move back to our code editor to configure our front end to connect to this bot.
In your code editor, open the polyfills.ts file. This file has a single import line. Paste the code below after that.
xxxxxxxxxx
(window as any).global = window;
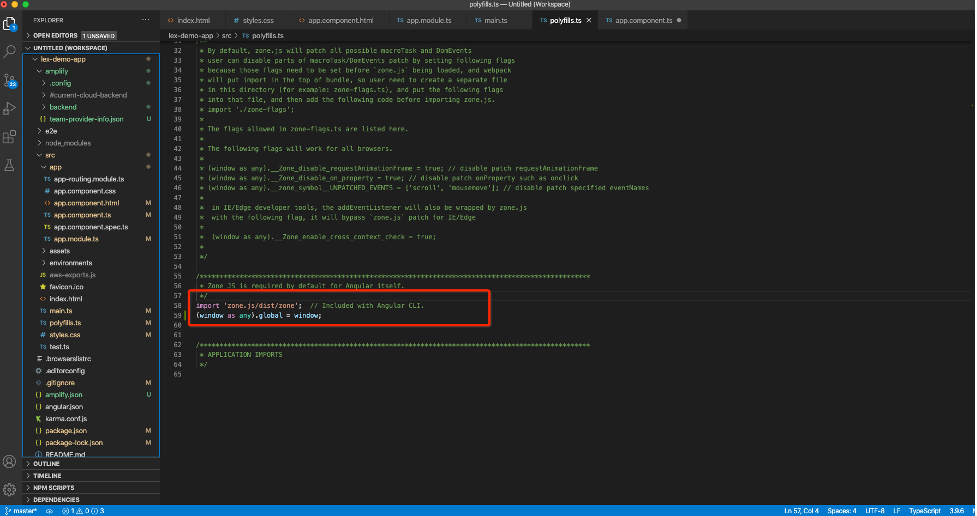
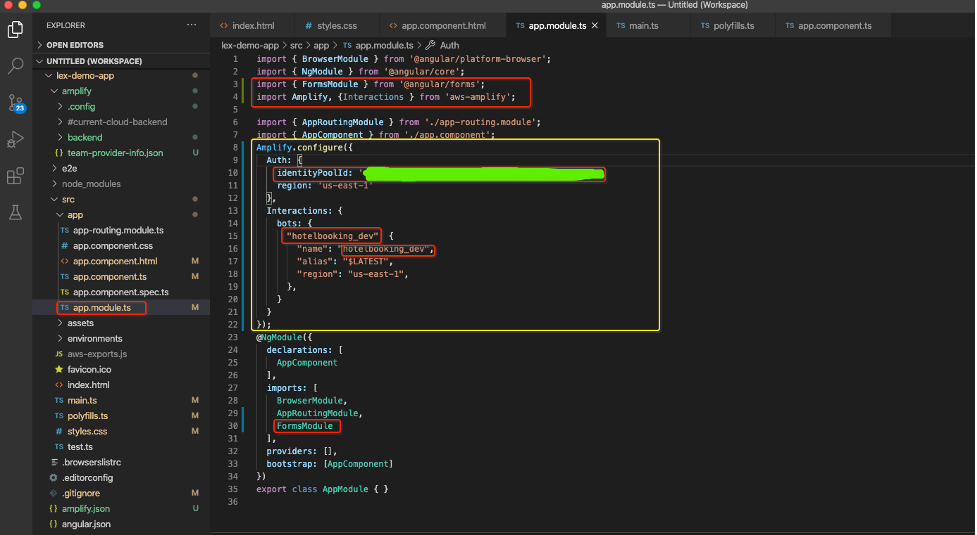
Now go the app.module.ts and copy-paste the code below:
xxxxxxxxxx
import { BrowserModule } from '@angular/platform-browser';
import { NgModule } from '@angular/core';
import { FormsModule } from '@angular/forms';
import Amplify, {Interactions } from 'aws-amplify';
import { AppRoutingModule } from './app-routing.module';
import { AppComponent } from './app.component';
Amplify.configure({
Auth: {
identityPoolId: 'YOUR_IDENTITY_POOL',
region: 'us-east-1'
},
Interactions: {
bots: {
"hotelbooking_dev": {
"name": "hotelbooking_dev",
"alias": "$LATEST",
"region": "us-east-1",
},
}
}
});
@NgModule({
declarations: [
AppComponent
],
imports: [
BrowserModule,
AppRoutingModule,
FormsModule
],
providers: [],
bootstrap: [AppComponent]
})
export class AppModule { }
We are doing a couple of things here.
- We are importing the Interactions module from the AWS Amplify library here.
- We are configuring AWS amplify here so that it can communicate server-side. We need to use our identityPoolId value that you can get from the aws-exports.js file in your project, or you can get it from the AWS console inside federated identities. This setting enables this client application to connect to AWS services in a secure way using the Cognito service.
- We are also importing FormModule so that we can use form binding in our Angular forms.
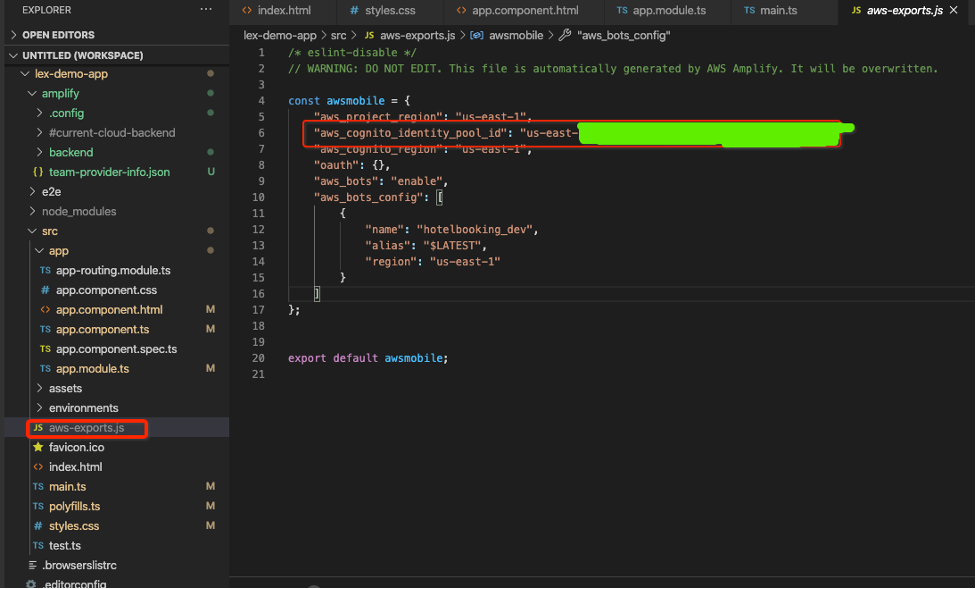
At this point, we are done configuring AWS Amplify for Lex, so let’s make a change to our app.component.ts file to implement our startChat() method. Open the app.component.ts file and copy/paste the code below. Let's look at a few things here.
xxxxxxxxxx
import { Component, OnInit, Input, inject, Inject } from '@angular/core';
import { Interactions } from 'aws-amplify';
import { Router } from '@angular/router';
@Component({
selector: 'app-root',
templateUrl: './app.component.html',
styleUrls: ['./app.component.css']
})
export class AppComponent implements OnInit {
title = 'aws-demo-chatbot';
conversation: string = '';
message: string;
constructor(private router: Router) { }
ngOnInit(): void {
}
async startChat() {
// Provide a bot name and user input
this.conversation = this.conversation + "\nYou::" + this.message;
var response = await Interactions.send("hotelbooking_dev", this.message.toString());
//Log chatbot response
console.log(response);
this.message = '';
if(response && response.message){
this.conversation = this.conversation + "\nBot::" + response.message
}
if(response && !response.message){
this.conversation = this.conversation + "\nBot::" + "Your Hotel Room Booking is complete."
}
}
}
- We have imported Interactions from aws-amplify to make a call to Lex for chatbot interactions.
- We have added the startChat method to be called from our main UI when the user clicks on the send button.
- We have two properties, message and conversation, in our component, which are boundto the UI input field and text-area fields, respectively.
- We are asynchronously calling the Interactions.send method and passing the user-typed text to the hotel-booking chatbot. This method will call the AWS Lex service, and the chatbot will respond with an appropriate response. Once we have the response from the service, we are extracting Lex service response and appending that to the text area field.
Work in Action
We are done writing our application, so now it is time to see things in action. Let’s start the application using the command below:
ng serve --ssl=true
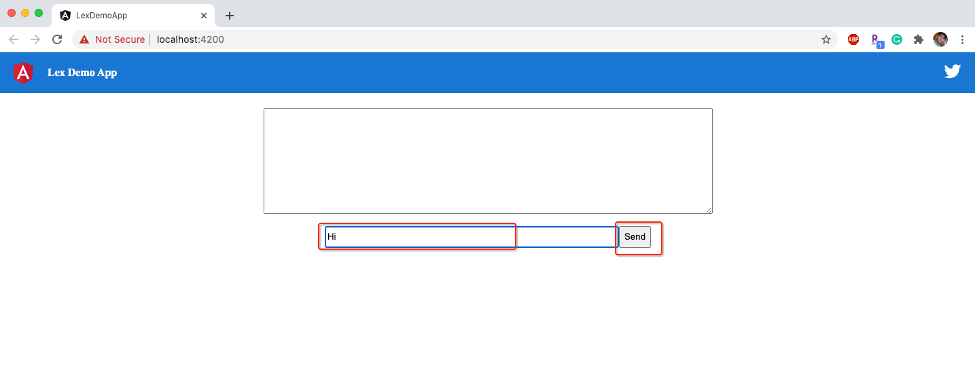
Now let’s load the application in our browser, type "hi" in the input field, and click the send button. You will see that your text is sent to the chatbot and the bot has responded to by asking for your information to start the booking process.
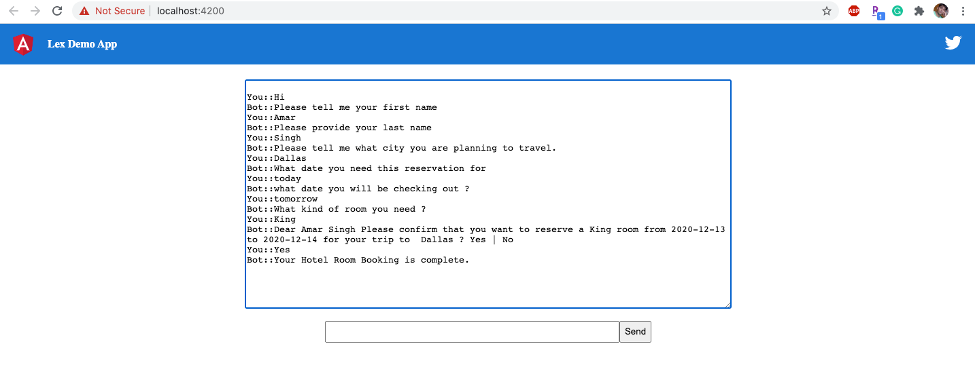
Once you supply all the required data, you will see that chatbot has completed your hotel room reservation here.
Now let’s log in to the AWS console back and see if we start seeing any metrics for our chatbot in the monitoring tab. You can see that we have some metrics published here for our application.
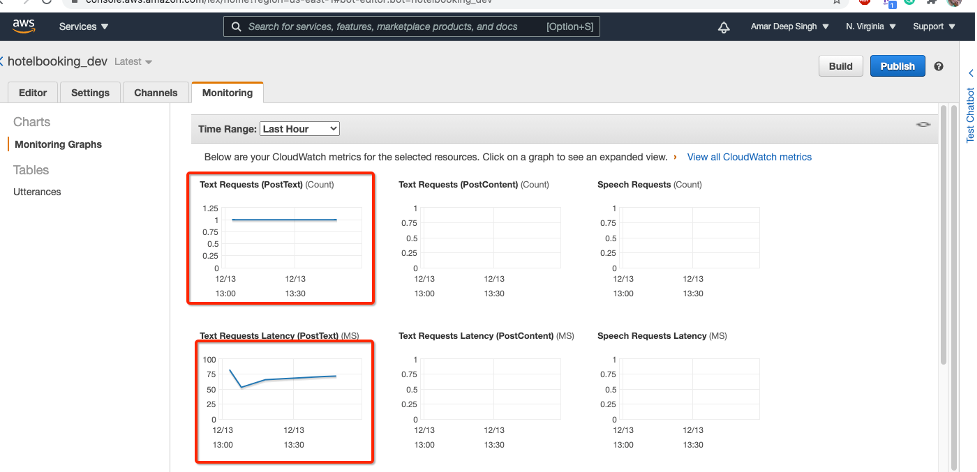
These metrics can be delayed a bit, as they are not real-time, but you can also see what utterances people are using to interact with your bot. Amazon Lex uses those for deep learning and improves the algorithms.
Conclusion
Now we are done creating our application, and you can see how easy it was using AWS Lex to create a chatbot and integrate it with your application. Amazon Lex is very cost-effective and has a pay-as-you-go pricing model. Amazon provides 10,000 text requests and 5,000 speech requests free for the first year, and after that, the cost for each text request is $0.004 and $0.00075 for each speech request. With a little configuration, you can embed the power of machine learning and natural language processing into your application.
Source Code
You can download the source code from https://github.com/teach-me-more/lex-tutorial/
Opinions expressed by DZone contributors are their own.

Comments