How to Set up and Run Your Gatling Tests with Eclipse
Since some developers may prefer to use Eclipse IDE to run their testing environments, here is a screenshot-packed tutorial to guide you along the way.
Join the DZone community and get the full member experience.
Join For FreeIn one of our previous articles we went over the required steps to setup your own Gatling test's implementation environment. We used an IDEA IDE development environment as the main target example of the tool to be used as an environment for test creation. At the same time, there is another IDE that is widely used by many developers who create performance tests using the Gatling framework—Eclipse IDE.
Eclipse has a much longer history than IDEA and many people use it and love it. If you haven't used any of these tools, you shouldn't find any big differences between them if you just need them for Gatling tests implementation. Personally, I prefer using IDEA in all cases just because it perfectly fits my daily needs (for example, my favorite programming language is Kotlin which has a much better integration with IDEA rather than with Eclipse). But I truly respect the opinion of other developers who prefer using Eclipse. I strongly believe that you should choose tools that you are comfortable to work with, if you have such an option.
Gatling is based on the Scala programming language and you need to use Scala to write tests. However, Eclipse doesn't have built-in Scala support and sometimes even experienced programmers have trouble running Gatling tests using their favorite Eclipse IDE. That's why I thought that a step by step tutorial will be useful for those who might experience the same troubles in future. In this article we are going to cover all the steps required to use the Eclipse IDE as your main development tool for Gatling tests' implementation and execution: setting up, configuration and running the tests.
First, in order to use the Scala programming language in Eclipse, you need to install a separate plugin called "Scala IDE". You can find it in the 'Eclipse Marketplace', which makes its installation pretty easy. To open the 'Eclipse Marketplace' just open the Eclipse application and go to 'Help -> Eclipse Marketplace':
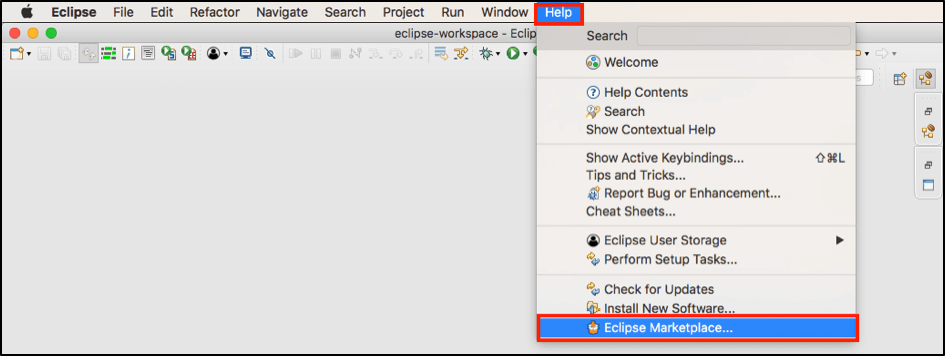
In the 'Eclipse Marketplace' you can use the 'Find' field to find all the Scala related plugins. We are looking for the one that starts with "Scala IDE":
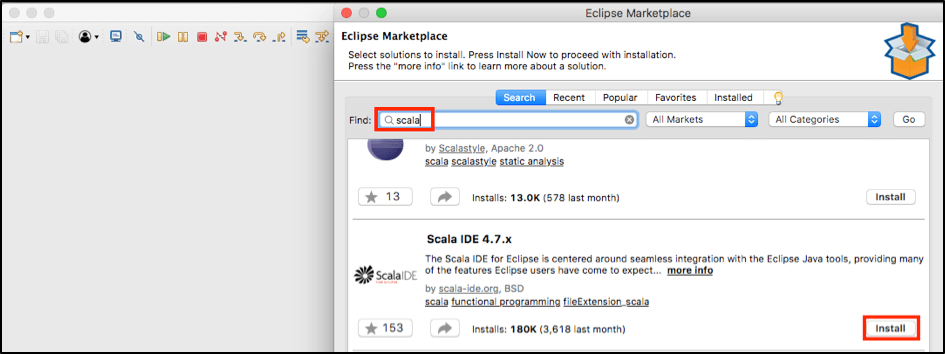
If you haven't installed this plugin before then you should see the 'Install' button on the right. Just click and proceed with couple of trivial installation steps. You can use the default selection for all the windows that you will get during the installation process.
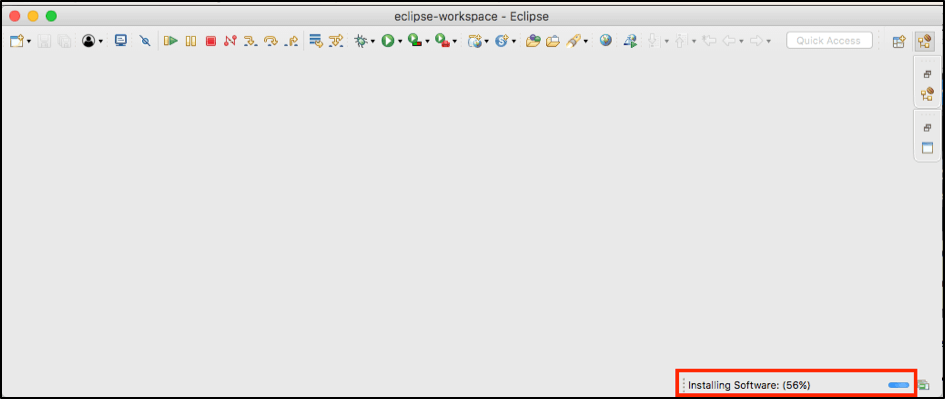
After you go over the installation steps, Eclipse will take some time to finish the installation in background mode. You can track the progress in the bottom right corner:
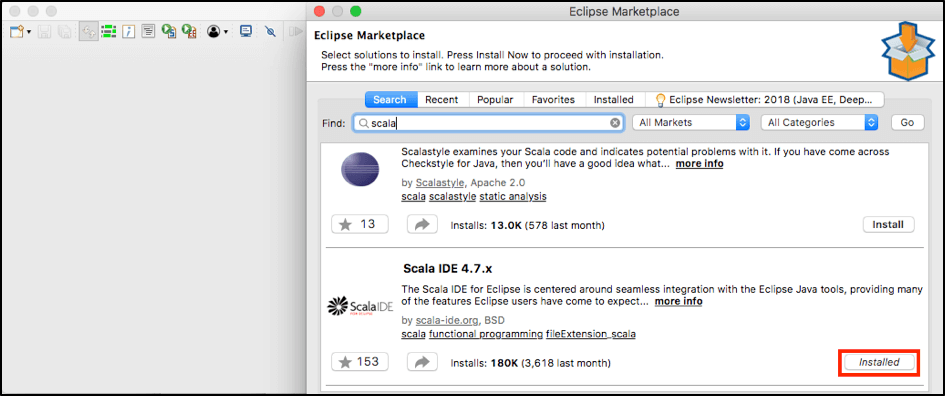
After installation is complete, in order to be 100% sure that the plugin is installed, you can open the marketplace again and recheck the 'Scala IDE' row. Now it should have an inactive 'Installed' button instead of the active 'Install' we had before:
Next, you need to take a configured Maven test project with the Gatling framework and some tests, or you can use the one we have created for testing purposes in this blog post.
Let's import the project into Eclipse IDE by clicking on 'File -> Import':
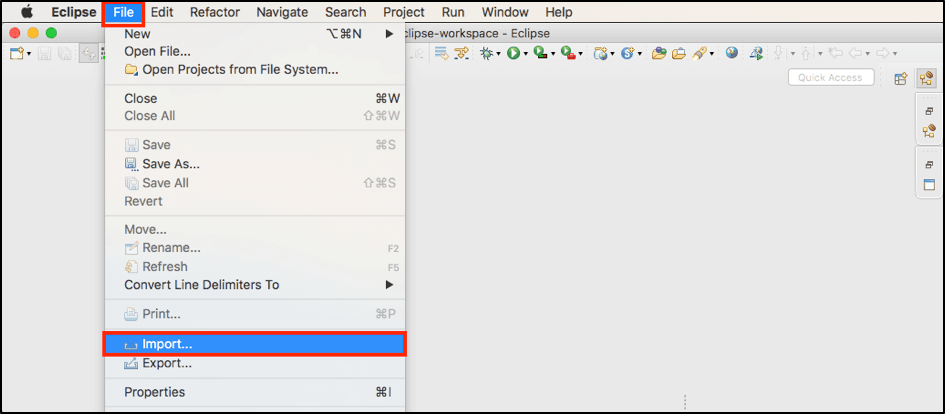
After a couple of popups where you just need to accept the default configuration, we will get such an error notification:
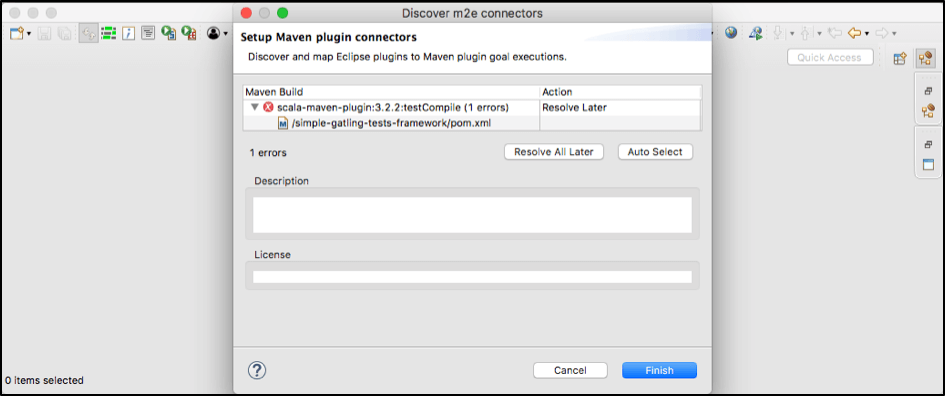
It might look confusing but you don't need to worry at this point. You can not do anything with this error during the project import but you can easily fix it right afterwards.
As soon as the import is complete, you will get tons of errors in all Scala classes, which are related to the error that we got during the project import:

By default, the Eclipse IDE environment treats your project like a Java project that produces a ton of errors because there is Scala instead of Java. As we mentioned before, the fix is pretty easy. All you need is to click on the project root directory and execute 'Configure -> Add Scala Nature', which will enforce your Eclipse IDE to treat this project as Scala based:
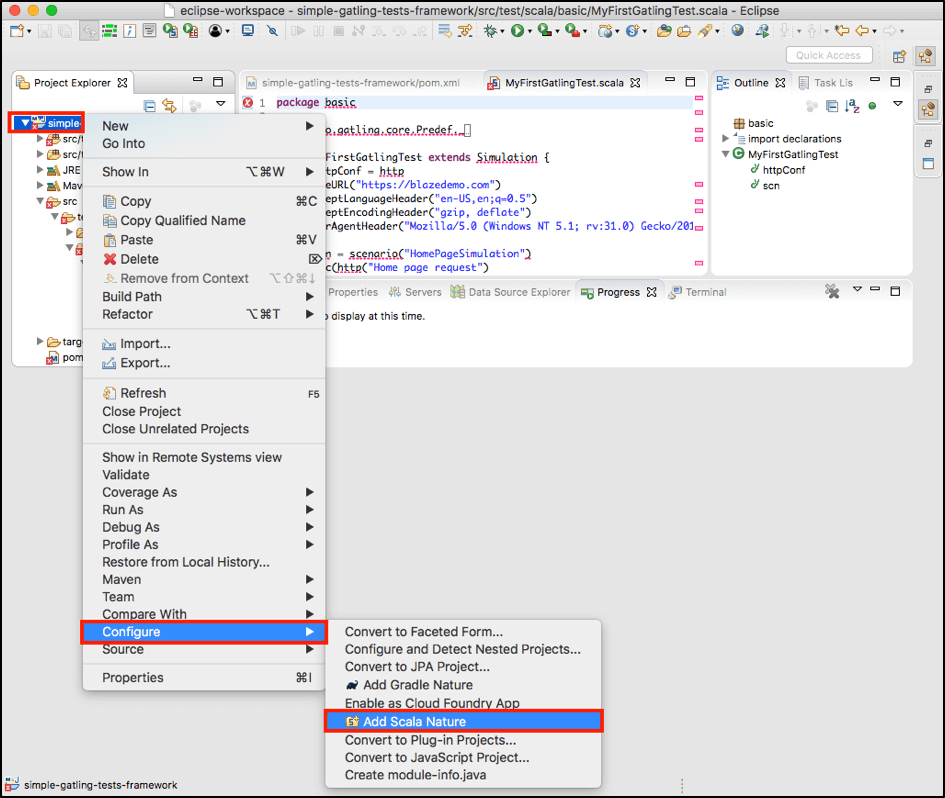
Right after this action you should get rid of tons of the errors and all the Scala files should be error free from this moment.
But at the same time, you might get other errors, for example this one that says:
"More than one scala library found in the build path:/Applications/Eclipse.app/Contents/Eclipse/plugins/org.scala-lang.scala-library_2.12.3.v20170725-052526-VFINAL-6ac6da8.jar, /Users/ybushnev/.m2/repository/org/scala-lang/scala-library/2.11.7/scala-library-2.11.7.jar). At least one has an incompatible version. Please update the project build path so it contains only one compatible scala library"
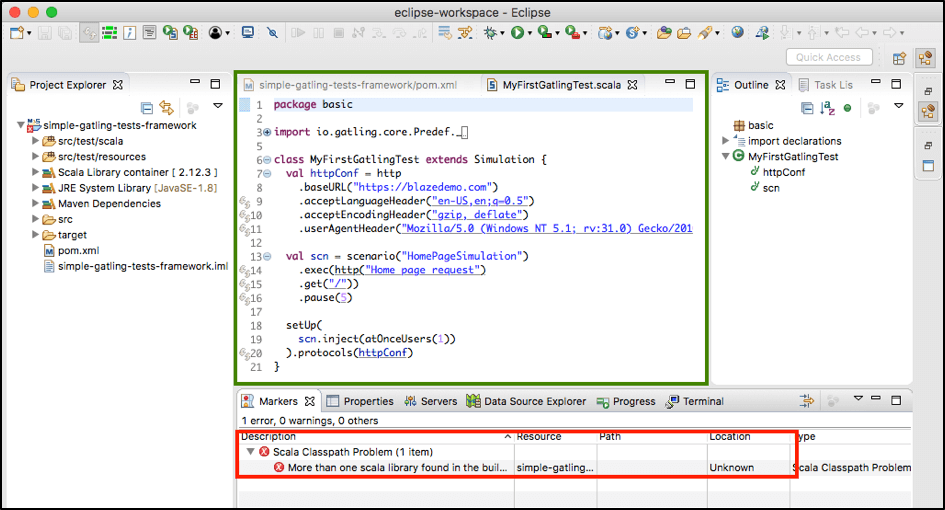
Ideally, if you see an error inside your project, you should deal with it right away. Even if the error doesn't produce a negative impact and you still can run your tests without visible issues, you need to take care of all the errors first, as they might produce some unexpected results.
The issue above states there is a difference between the Scala library that is used for the framework and the one that is used as default in the Scala plugin. Each new version of the Scala plugin uses new versions of the Scala library. That's why if you want to update your Eclipse IDE as soon as there are some new updates, you need to update the Scala library in your pom.xml (which is responsible for project dependencies) appropriately. To fix this issue, first, you need to update the Scala version to the latest one that is used in the Scala (you can find the exact version from the error message you got inside Eclipse):
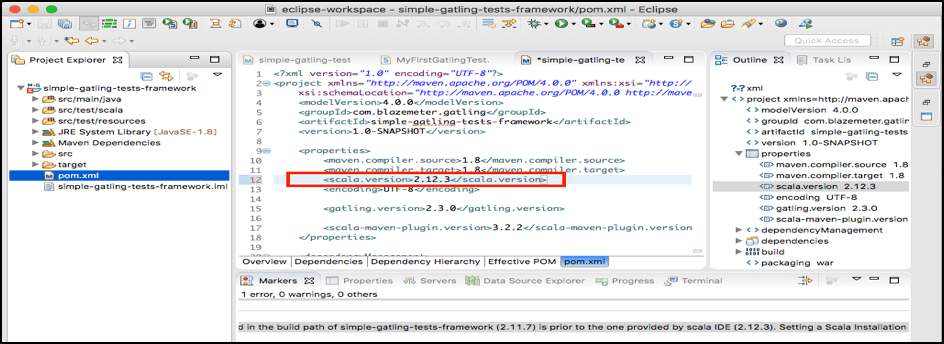
Second, you need to update Maven to apply configuration changes. For this just click on the project root folder and go to 'Maven -> Update Project':
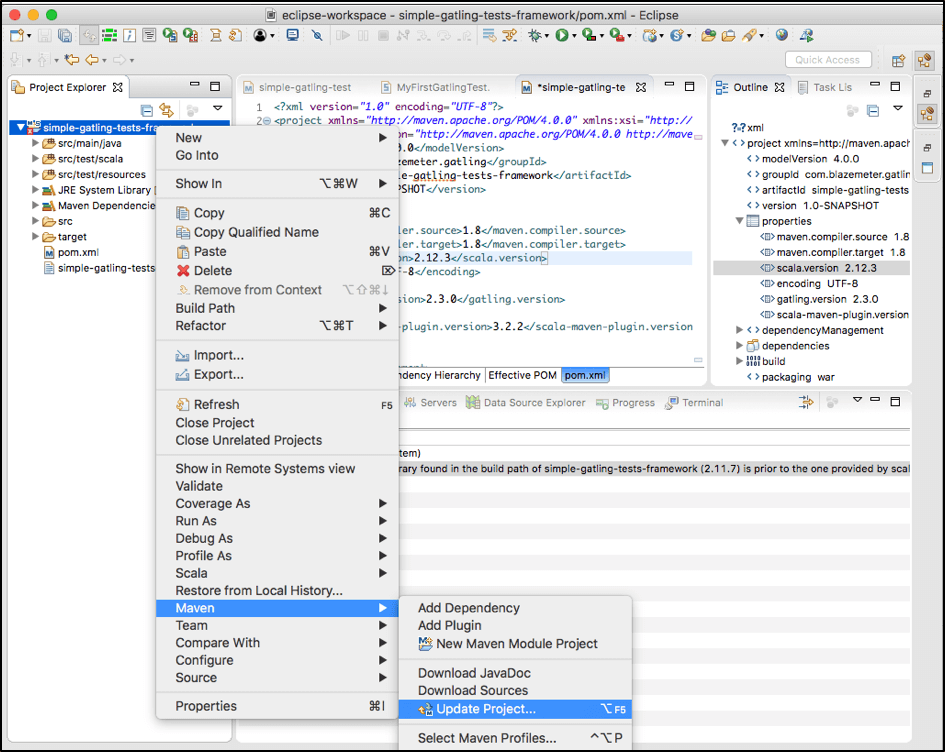
Right after this we will find that the issue is gone! But right after this fix you might still get an additional issue that will hit you right after you fix the previous one:
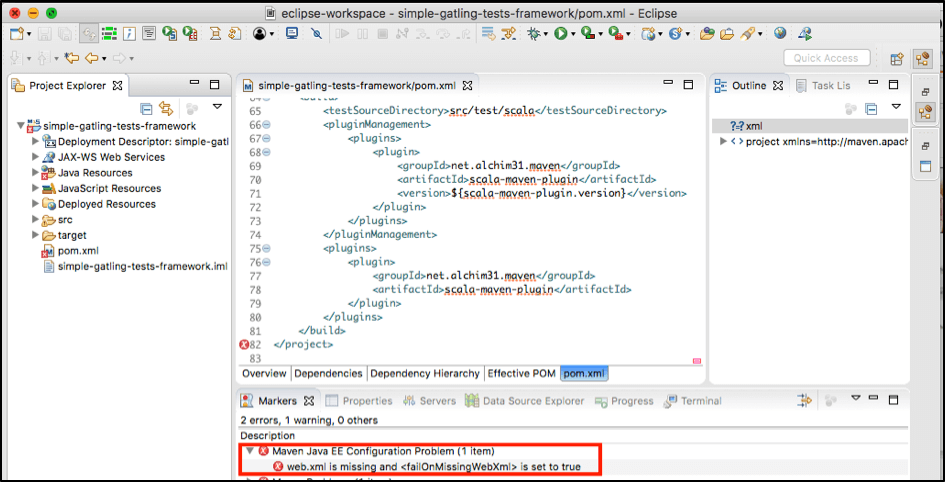
This is a pretty common Maven issue that is related to outdated application structure conventions that are not relevant anymore, but Eclipse still catches this as a real issue (you will not get the same errors if you go with IDEA). But the good news is that the fix is also very simple. Just click on the root of the project and execute 'Java EE Tools -> Generate Deployment Descriptor Stub':
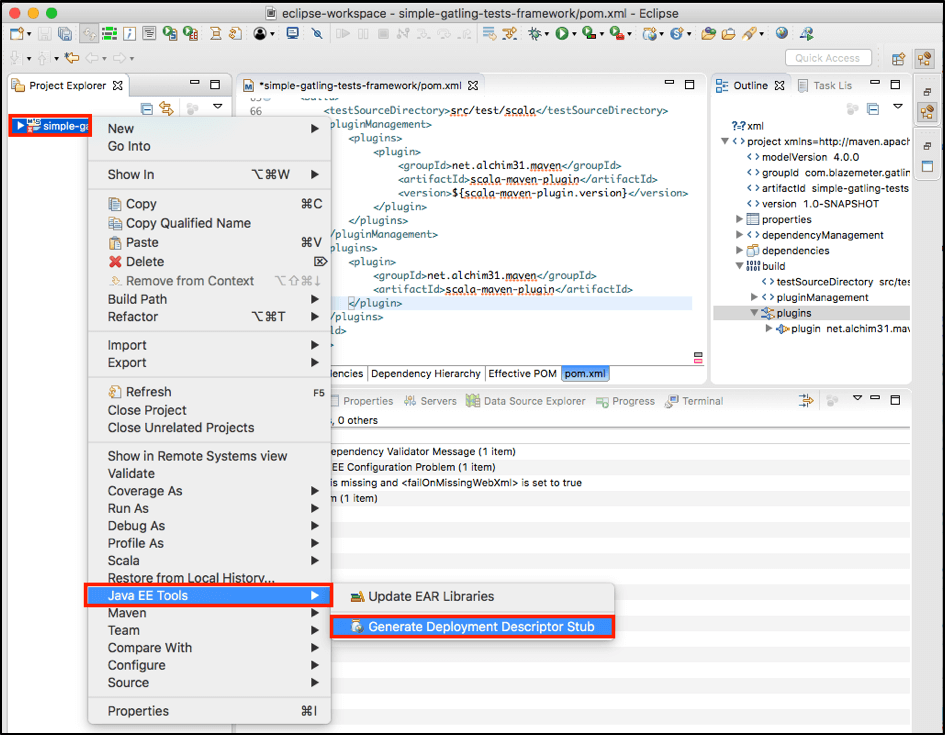 Right after we have executed this action and updated maven by executing 'Maven -> Update Project...' (we already did this some time ago so now you just need to do it again) then you should see a complete error-free Eclipse project:
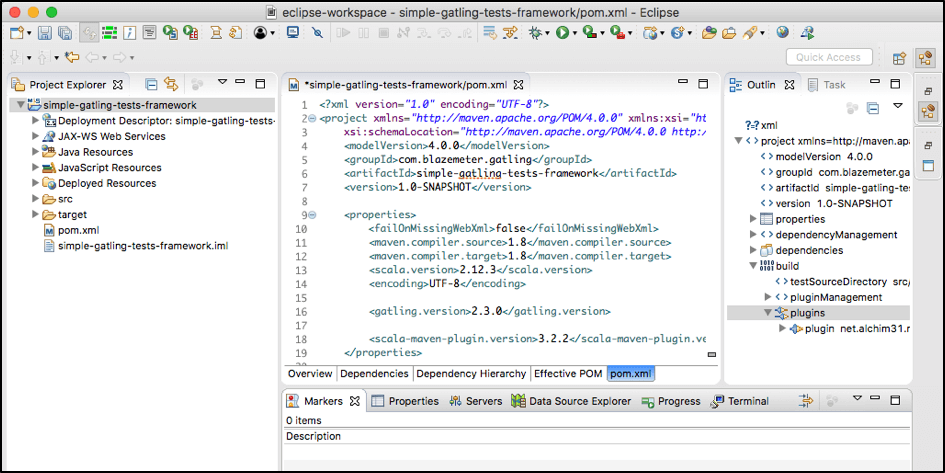
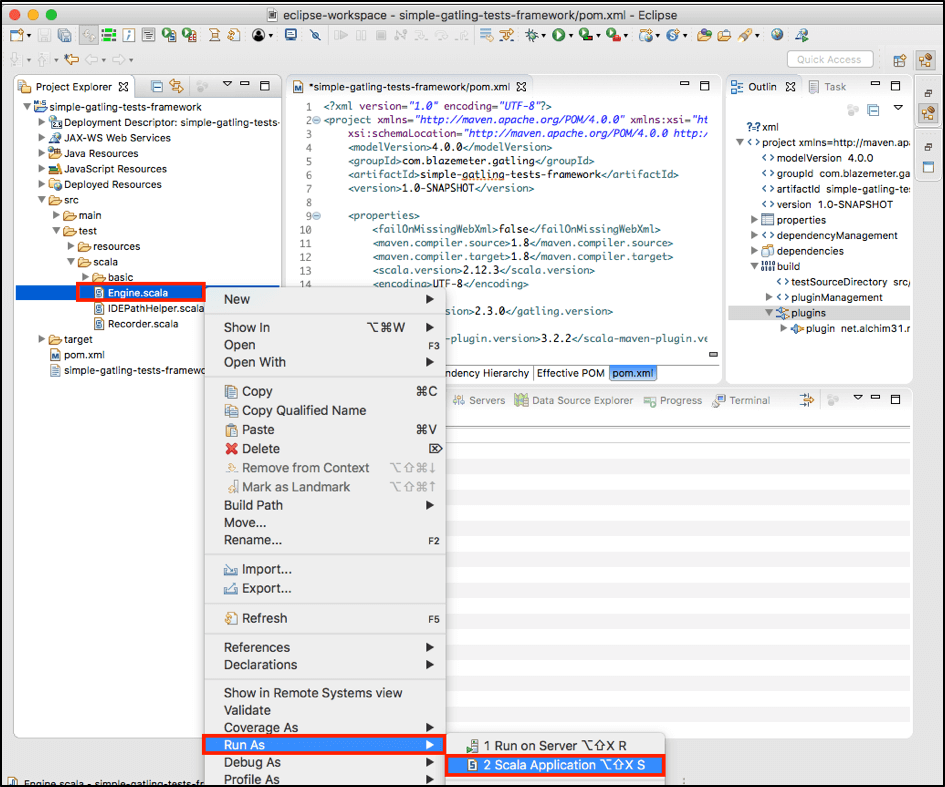
At this point you are ready to use your Eclipse for tests implementation and execution. To run the tests execution just click on 'Engine.scala' class which you will find inside the 'test/scala' folder and execute 'Run As -> Scala Application':
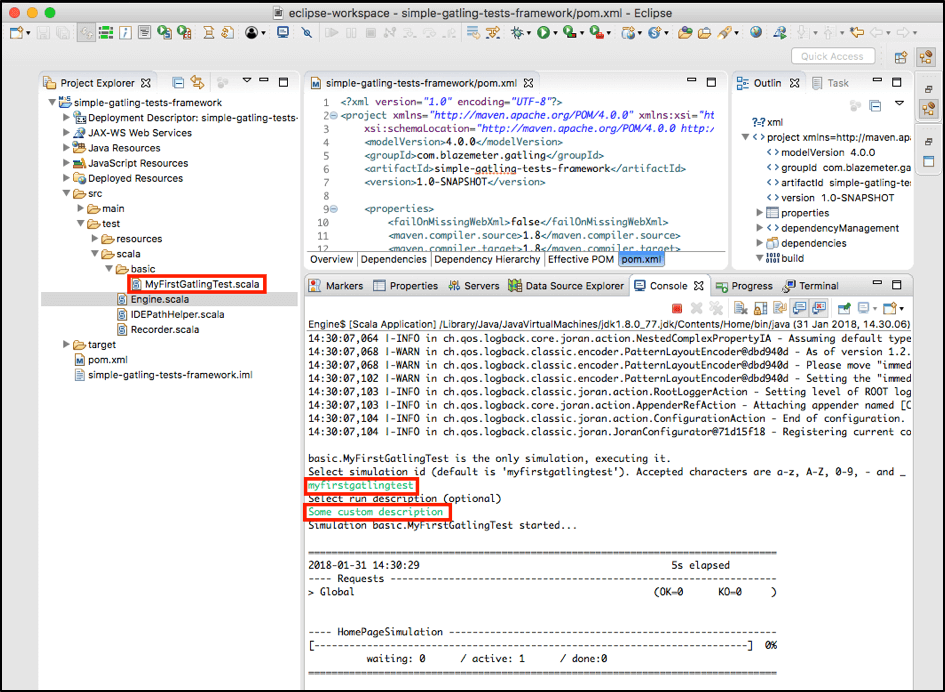
Right after this, in the IDE console that appears, you will be asked about which tests you want to run and right after that you should see the tests execution in progress:
That's it! We just installed all the required prerequisites, fixed a couple of trivial issues and we are ready to use the Eclipse IDE as the ultimate tool for Gatling test's creation. I hope this article was useful for those Eclipse lovers who did or will struggle with the configuration of Eclipse IDE for Gatling performance testing needs.
You can also run your Gatling load test in BlazeMeter, and enjoy cloud scaling and advanced reporting. Try us out by putting your URL in the box below. Or, request a demo.
Published at DZone with permission of Yuri Bushnev, DZone MVB. See the original article here.
Opinions expressed by DZone contributors are their own.

Comments