How to Ramp Down in JMeter
Learning how your system can handle fluctuating loads is an important part of performance testing. Read on to learn how to use JMeter to this end.
Join the DZone community and get the full member experience.
Join For FreeWhen performance testing, it is important to mimic real-life scenarios, to ensure your real website performance will be at its peak. Almost every scenario should have ramp-up and ramp-down time. We already have a great blog post about ramping-up. So let's talk about ramping-down in this blog post.
Ramp-down in Apache JMeter™ is the amount of time it will take JMeter to stop all running users.
Unfortunately, JMeter doesn't have a default ramp-down feature. Therefore, the default ramp-down time is 0 seconds for each scenario that is implemented using the regular Thread Group. This can be changed with the additional JMeter plugins, which we will explore later on in this blog post. But first, let's consider a test scenario with the default ramp-down.
Let's create a simple test: 100 virtual users; 10 seconds long; ramp-up time is 0 seconds. Let's also add a random delay before the request to the website to simulate real user behavior.
1. Add a Thread Group to the Test plan.
Test plan -> Add -> Thread (Users) -> Thread Group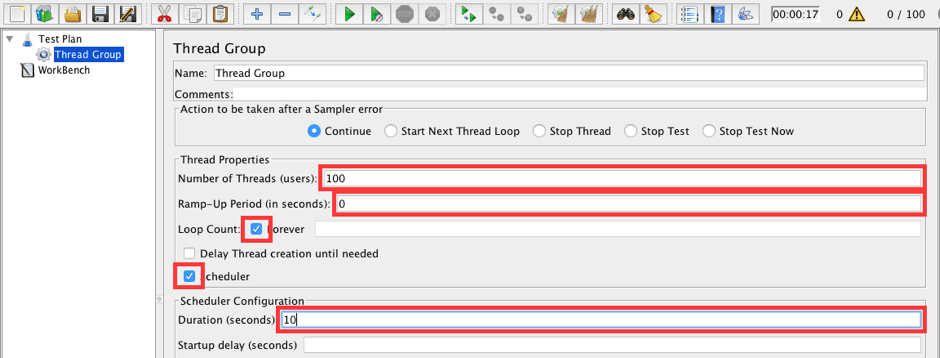
Fill in the following values:
- Number of Threads: 100
- Ramp-up: 0
- Loop Count: forever
- Scheduler: true
- Duration (seconds): 10
2. As usual, let's use the BlazeDemo website ( http://blazedemo.com/) to run our performance test. This web-application is available to anyone who wants to try out JMeter.
Add an HTTP Request that opens the landing page of the test web app.
Thread Group -> Add -> Sampler -> HTTP Request
Fill in the following values:
- Name: Landing page
- Server Name or IP: blazedemo.com
3. Add a Gaussian Random Timer to the HTTP Request that adds a random delay to our request.
HTTP Request (Landing page) -> Add -> Timer -> Gaussian Random Timer
Change values:
- Deviation: 5000
- Constant Delay Offset: 5000
You can find comprehensive information about timers in another one of our blog posts here.
4. The script is ready, but we need one more thing. We need to understand how many virtual users are running during each period of time. JMeter doesn't have this capability by default. Fortunately, it is available with plugins and calls the 'Active Threads Over Time' listener.
Install the JMeter Plugin Manager (instructions here), if you haven't already done so, and add the 'jpgc - Standard Set ' plugin.
Options -> Plugins Manager -> Available Plugins -> jpgc - Standard Set -> Apply Changes and Restart JMeter
This plugin adds a lot of useful elements along with the Active Threads Over Time listener.
Add an 'Active Threads Over Time' listener.
Thread Group -> Add -> Listener -> jp@gc - Active Threads Over Time
5. Run the script.
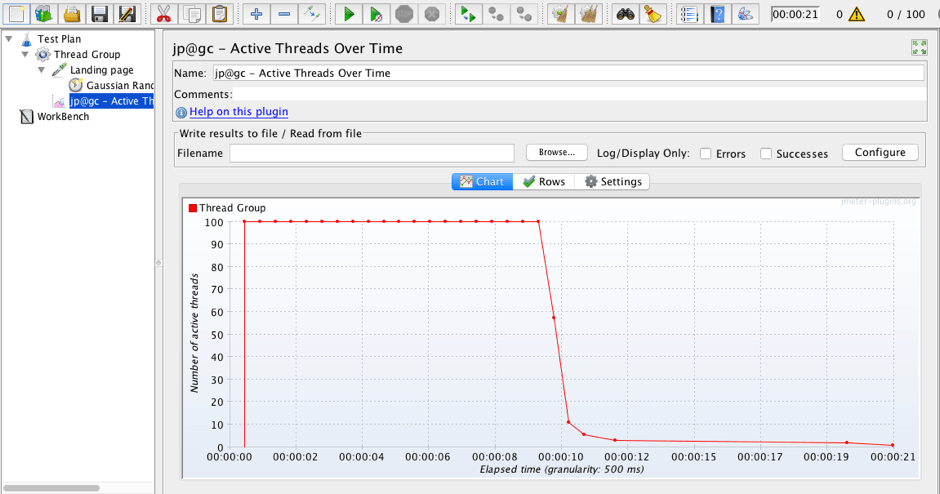
As you can see in the graph above, 90% of our virtual users finished running in less than a second after the 10-second mark was reached, while about 10% of the users finished later.
This depends on the request duration since JMeter allows the current request to finish before stopping virtual users. In a real test, each request has a different duration, so each test has a 'natural' ramp-down time, even if the Ramp-down time is 0 seconds.
In the vast majority of scenarios, a 'natural' ramp-down isn't enough to mimic the real behavior of website visitors. So let's consider more options to ramping-down your scenario.
The installed 'Standard Set' plugin also has another useful element, which is called the 'Stepping Thread Group.' The Stepping Thread Group enables you to configure ramping-down in step, i.e stop a group of users at each specified interval.
Let's add it to the script and see how it works.
Our goal is to create a script: 100 virtual users; 10 seconds long; ramp-up time of 0 seconds; stepping ramp-down; ramp-down time of 30 seconds.
Let's stop 25 users each step, and the duration of each step will be 10 seconds. The time between stopping users is a good time to check how the system copes with fluctuations in the load. Of course, in real scenarios, the step duration could be much larger.
1. Add a Stepping Thread Group to Test plan.
Test plan -> Add -> Thread (Users) -> jp@gc - Stepping Thread Group
Set the following values:
- This group will start 100 threads.
- First, wait for 0 seconds.
- Then start 0 threads.
- Next, add 0 threads every 0 seconds, using ramp-up 0 seconds.
- Then hold load for 10 seconds.
- Finally, stop 25 threads every 10 seconds.
As you can see, the 'Stepping Thread Group' is a powerful element. It provides a 'Threads Scheduling Parameters' area which allows us to create stepping ramp-up and ramp-down scenarios. The most remarkable thing is the 'Expected Active Uses Count' graph, which shows the expected load distribution before running the script and without keeping a pattern in mind.
2. Copy and paste the 'Landing page' request and 'Active Threads Over Time' listener from the initial Thread Group to the current 'Stepping Thread Group.'
3. Run the script!

The 'Active Threads Over Time' listener really shows how the ramp-down was stepped. Isn't that cool?
Another way to set the correct ramp-down is the 'Ultimate Thread Group' element. This element will be installed along with the 'Standard Set ' plugin also. Now it's time to test how it works.
Our goal is to create a script: 100 virtual users; 10 seconds long; ramp-up time is 0 seconds; linear ramp-down; ramp-down time is 30 seconds.
Linear ramp-down means gradual and uniform stopping of virtual users during the ramp-down period.
1. Add an Ultimate Thread Group to the Test Plan.
Test plan -> Add -> Thread (Users) -> jp@gc - Ultimate Thread Group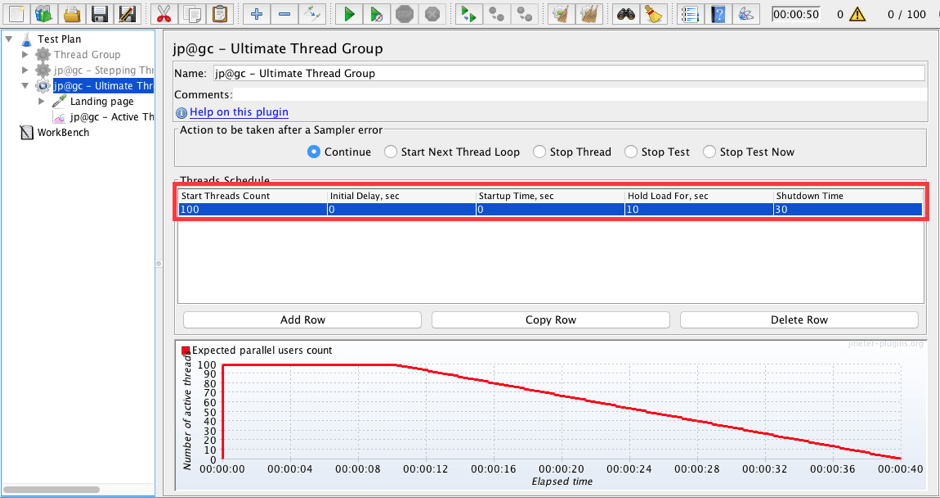
Add a row with the following values:
- Start Threads Count: 100
- Initial Delay, sec: 0
- Startup Time, sec: 0
- Hold Load For, sec: 10
- Shutdown Time: 30
As you can see the 'Ultimate Thread Group' is also a powerful element. It provides a 'Threads Schedule' table which allows us to create various ramp-up and ramp-down scenarios. This element also contains an awesome graph for the visualization of future load distributions.
2. Copy and paste the 'Landing page' request and 'Active Threads Over Time' listener from the initial 'Thread Group' to our current 'Ultimate Thread Group.'
3. Push the Start button!
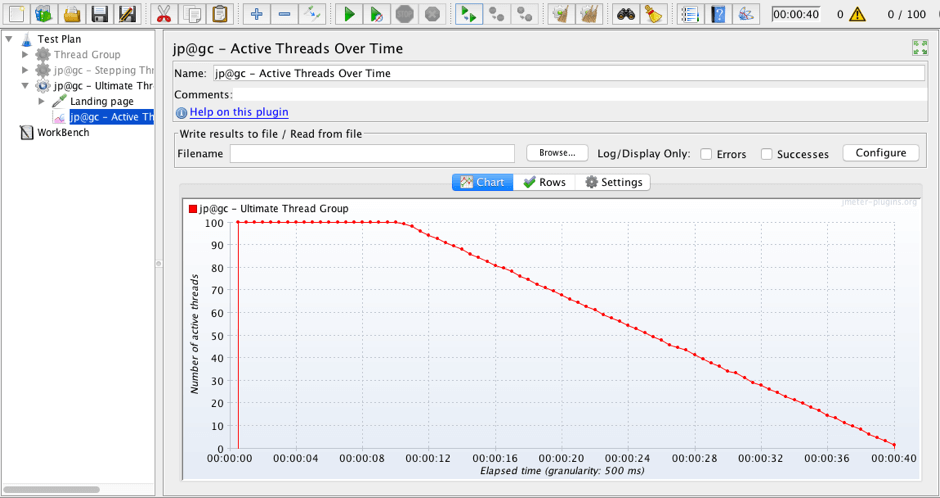
The 'Active Threads Over Time' listener shows how linear ramp-down works in real life. A gradually decreasing number of virtual users is a great option for a proper ramp-down.
The 'Ultimate Thread Group' is flexible, so we can create a stepping ramp-down scenario with this element too.
Our goal is to create a script: 100 virtual users; 10 seconds long; ramp-up time is 0 seconds; stepping ramp-down; ramp-down time is 30 seconds.
4. Update the 'Ultimate Thread Group.'
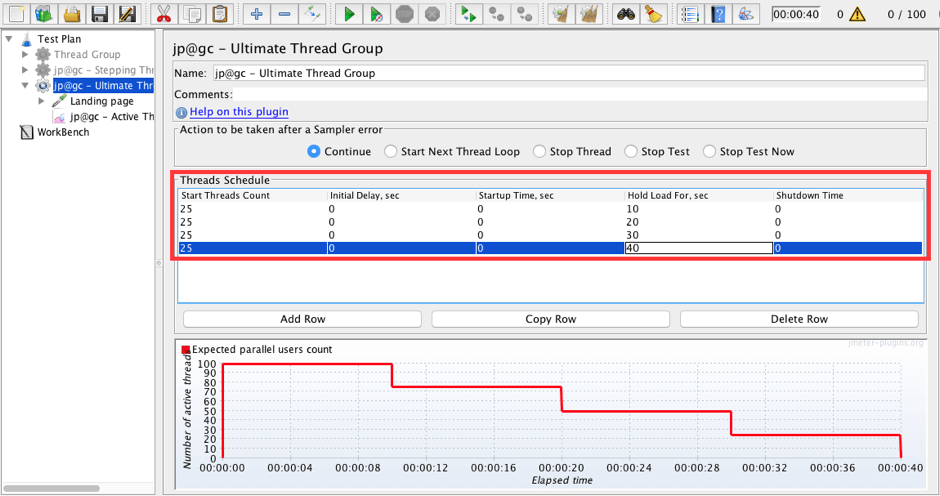
Update the existing row in 'Threads Schedule' and add 3 more rows:
- 1st row: Start threads Count: 25, Initial delay: 0, Startup Time: 0, Hold load for: 10, Shutdown time 0.
- 2nd row: Start threads Count: 25, Initial delay: 0, Startup Time: 0, Hold load for: 20, Shutdown time 0.
- 3rd row: Start threads Count: 25, Initial delay: 0, Startup Time: 0, Hold load for: 30, Shutdown time 0.
- 4th row: Start threads Count: 25, Initial delay: 0, Startup Time: 0, Hold load for: 40, Shutdown time 0.
The 'Expected parallel users count' graph shows the expected load distribution which is similar to the scenario with the 'Stepping Thread Group' element.
5. Clear the results and push the Start button again!
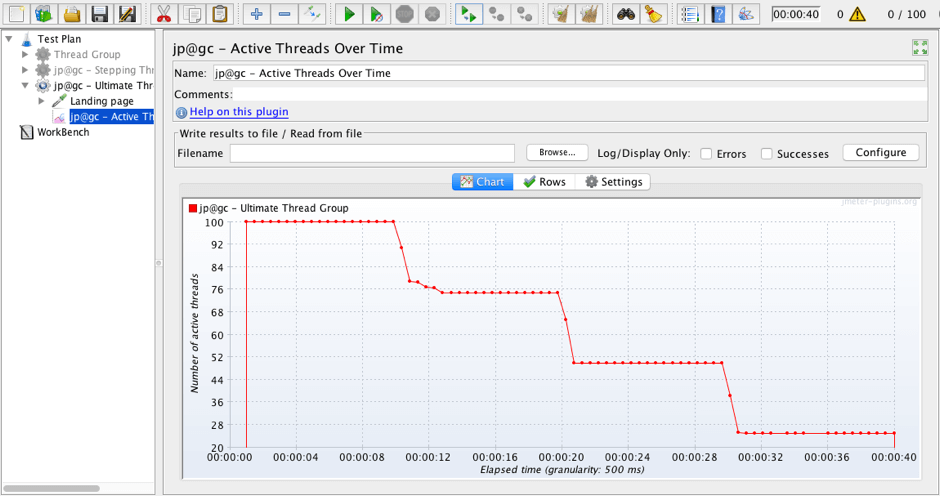
Done!
Let's summarize a bit.Why should we ramp-down at the end of the test?
The purpose is to allow the system to recover from high load levels. And test how the system copes with fluctuations in the load.
When is ramp-down unnecessary?
Ramp-down isn't necessary if the goal of the test is to verify a high number of concurrent virtual users in a short period of time. A good example of this is Spike Testing.
When is ramping-down a good practice?
Ramp-down is good to use when you need to check the performance of a system at a specific load level.
Which is better: linear or stepping ramp-down?
Good question. The best way to find the right load pattern is to look into real user behavior in production. In many cases, a linear ramp-down will suffice.
That's it! As always, let us know if you have any questions in the comments section!
Published at DZone with permission of George Maksimenko, DZone MVB. See the original article here.
Opinions expressed by DZone contributors are their own.

Comments