How to Pick Different CSV Files at JMeter Runtime
A CSV file is a file that enables users to represent data in a table format. Learn how to manipulate CSV files using the open source tool JMeter.
Join the DZone community and get the full member experience.
Join For FreeA CSV file is a type of file that enables users to represent data in a table format, in which the comma defines columns and each line is a row. CSV means comma separated value because this is the most common separator, but you can use different separators.
In performance tests with multiple virtual users, we often want each user to use different data in the test. To achieve this, we can get the data from an external CSV file. Each virtual user would get a row with all the necessary data for execution.
For example, if we want to test a login with 10 VUs, we should use a CSV with two columns, username and password, and 10 rows with different usernames. This way, each user would have a different username and password.
Apache JMeter™ has a CSV Data Set Config element, which allows us to set the configurations of the CSV file to be used in the load test. These include the filename (it can be the full path or relative to the path of the active test plan), the separator and how the columns of the CSV would be referenced in the script, among other things.
So taking the parameters of the previous example, the CSV Data Set Config would look like this.

But what happens when we have a set of CSV files and need to use one but we don't know which one?
For example, when we want to test an e-bank application in which each user has their own bank account, and our test case has to check the balance of each account.
Suppose our application has the following three users and their account numbers:
- John: 00000010, 00000011
- James: 00000021
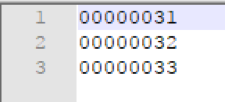
- Jane: 00000031, 00000032, 00000033
We can see this in a table format:
| User Id | User Name |
| user1 | John |
| user2 | James |
| user3 | Jane |
| User Id | Account Number |
| user1 | 00000001 |
| user1 | 00000011 |
| user2 | 00000021 |
| user3 | 00000031 |
| user3 | 00000032 |
| user3 | 00000033 |
One option for load testing these users could be using two different CSVs: one for users and the other for accounts. But if we do that, we would have to add logic to manage the correlation between the different files, users, and accounts, in the script.
For example, after selecting the user from the users' CSV, we could iterate the accounts' CSV with a Loop Controller and check if the account corresponds to the user with the If Controller.
Another option is to use one CSV file with all the data. So we should have one column per account, but each user probably has a different number of accounts. This generates two problems, first, the users with fewer accounts would have empty values in some of the columns. The other, and more complex, problem is that if we need to add a new user with more accounts than columns, we have to modify the structure of the CSV by adding a new column, and this would probably impact the script.
The best option is to have one CSV file for the login data and another one for each user with their accounts. This way, we don't need to add logic or modify the script when a new data set is coming, we only have to add the new users to the users' CSV and the CSV with his/her accounts. But, we need still to solve the problem of defining which CSV file should be used in the script and how to pick it during runtime.
The CSV Data Set Config loads the file from the computer at the beginning of the test. Therefore, it needs to know the filename before starting the test. But as we said, we don't always know the name of the file we will need. To make a detour around this, JMeter has the function __CSVRead, which allows us to open a CSV at any time in the test.
So if we want to implement the script for the previous banking example we need to combine these two JMeter features.
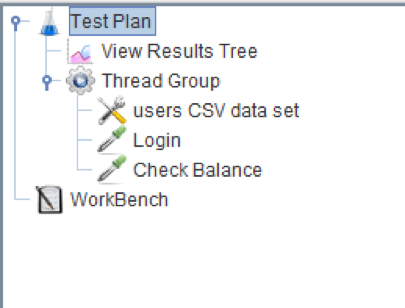
Our test plan will look like this. The first HTTP Request Sampler will execute the login and the second will check the account's balance. We are going to use the CSV Data Set Config element like in the first example to provide the data for the login.
The login file will be specified in the "Filename." The other files that we will create (further on) will be referenced in the CSVRead function.

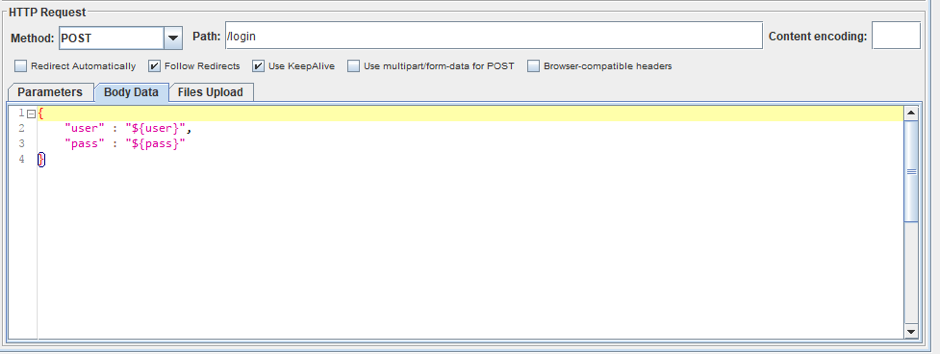
The following image shows how to use the CSV's variables in the body of the request. Here we have the payload in a JSON format. There are two parameters: user and password. Both are set with a reference to the CSV. The way to make a reference to a variable on JMeter is to use the variable name enclosed in brackets and with a $ at the start.

But now, in the second sampler, we have to provide only the accounts data related to the user. Here is where we are going to use the function __CSVRead in order to select which file to use in the script during runtime.
In the following image, we can see the HTTP Request Sampler with this function.

We have to set the parameter accountNumber. In order to do this, we have created one CSV for each user, named with the username and with a .csv extension. So we should have these three files, on the same computer as the script.
user1.csv

user2.csv

user3.csv

The __CSVRead function requires two parameters. The first one is the filename and the second one is the column number. In our example, we are going to use a variable in the filename like this ${user}.csv. This way we can define which csv is going to be used. We use the 0 column because in our example we only have one piece of data per user.
In the example, we can see we are calling the function two times. This is because in the second call we are indicating to continue to the next row the next time the function is executed.
Now, the function __CSVRead will take the data from the CSV with the same name of the user we use for the login. This way we can use different CSVs and pick them correctly at runtime.
This is the complete flow:
- In each execution, the "CSV Data Set Config" picks a new user and pass from the users.csv.
- Then the "Login" request is executed with the data picked before.
- After that, in the "Check Balance" sampler the function
__CSVReadis executed with the first parameter userX.csv (this depends on the data picked by the "CSV Data Set Config") and second parameter 0 (column number). This opens the userX.csv and picks the first column, then the__CSVReadis executed again with the same first parameter but the second parameter is "next"; this is used to advance to the next row on the userX.csv. - And finally, the request is executed.
The number of users for which the tests runs is configured in the Thread Group.
In the results of this execution, we can see how the second request takes the parameter accountNumber from one of the three CSVs depending on the user that has been used for the login.
So in the following image, we can see that the login is done with user1 and the second request uses the account 00000001.


The second login is done with the user2 so the account used for the second Check Balance uses data from user2.csv. Like we can see in the following images.


The same happens with the following requests, the parameter from the Check Balance is picked from a CSV depending on the user used for the login.
Now we know how to pick different CSV files at JMeter runtime. Let us know if you have any questions in the comments section below.
Make more of your JMeter testing with our free JMeter Academy.
Published at DZone with permission of Sebastian Lorenzo, DZone MVB. See the original article here.
Opinions expressed by DZone contributors are their own.

Comments