How to Load Test Async Requests with JMeter
Check out these four solutions that Blazemeter presents for developers who encounter issues when performing asynchronous requests.
Join the DZone community and get the full member experience.
Join For FreeIn this article we will cover the main issues that developers face when they need to load test async requests with Apache JMeter and learn to overcome them. But first of all, let's look at what an async request is.
An asynchronous request is a request that is executed in the background without interrupting or preventing users' interaction with a page or application. The request does not wait for аn immediate response from the server. You send the request, and your application continues to work. Users can enter data into forms, press other buttons, and even leave the form. There is no load spinner or a rotating sandglass, and there are no large freezes of the application until an answer is received. When the processing of your request on the Server is completed, it will let the requestor know about it, for instance, data in a table will be updated. As a result, we have an application that is sensitive, interactive and fast. On the web, asynchronous requests are most often associated with AJAX and XHR technologies.
Accordingly, we need to solve two tasks:
- Perform other actions while waiting for a response to an async request.
- Get the response to our request.
The Solution: Running Parallel Requests
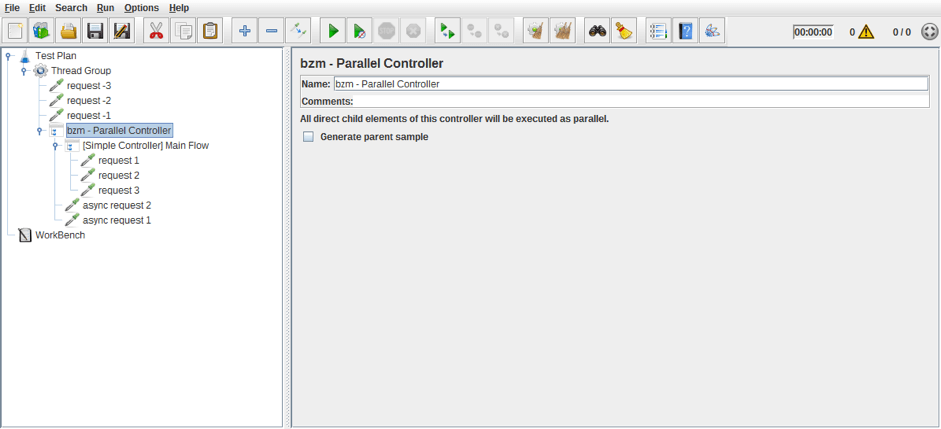
We can solve the first task by using the Parallel Controller. You can install it via JMeter Plugins. All elements inside the Parallel Controller will be executed parallel to each other. This way, you will have one main flow and other flows with asynchronous requests, which will be executed in a parallel way.
The scenario will be the following:

async request 1 and async request 2 will run in parallel to samplers that are in the "[Simple Controller] Main Flow" controller.
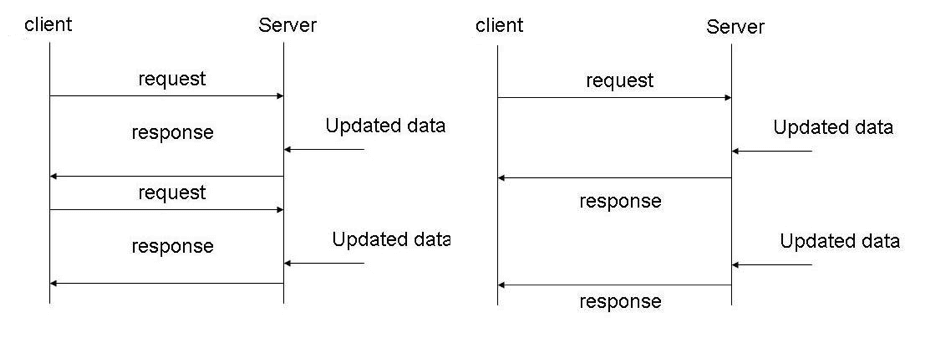
The mechanism of asynchronous data exchange between the client and the server can have different behaviors. The left part of the picture below shows one of implementations: the client sends a request and receives a response only when the data is updated on the server, and then sends a request again. The next implementation, on the right side of the picture, works as an event subscription: The client sends only one message and after it the server sends requests when the data is updated.

Now we will consider the technologies by which you can implement these types of data exchanges in JMeter.
Solution 1: Long-Polling
In long-polling, the client initializes a HTTP connection and does not close it until an event occurs. Upon the occurrence of an event, the client receives data and re-opens the connection. This technology is suitable for implementing the first type of client-server interaction.
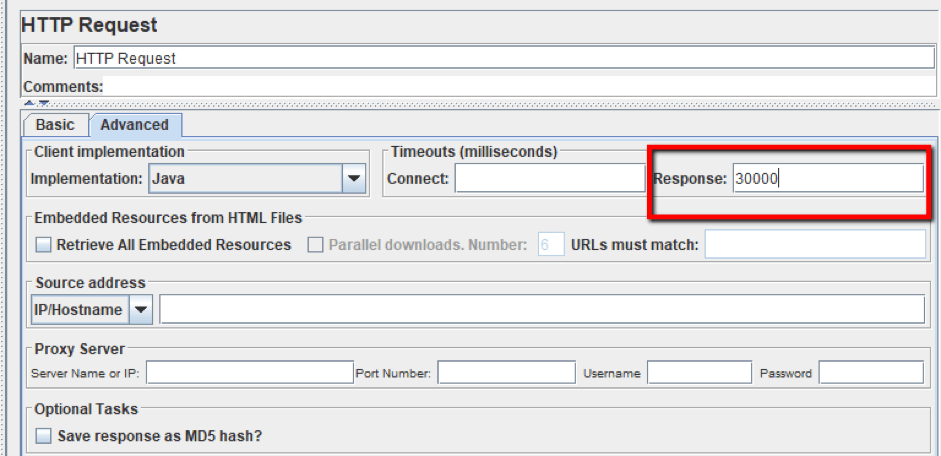
In JMeter, for long-polling request simulation, we can use HTTP Request Sampler. This sampler has Response Timeout field. This field causes the server to not break the connection ahead of time and we can use it to wait for a server event. However, this solution is lacking because it configures a fixed maximum of response time waiting, and the response might take longer than the time set (thus marking the request as unsuccessful).

Solution 2: SSE (Server-Sent Events)
SSE can be used to implement the second type of data exchange: the client establishes a HTTP connection to the server and receives data from it, which is updated periodicity. Unfortunately, at the moment, there is no good solution for working with SSE in JMeter. Maybe someone should think about extension developing. In the meantime, you can use Gatling, which supports working with SSE.
Solution 3: WebSockets
WebSockets are suitable for both types of data exchange. This technology allows you to create an interactive connection between the client and the server for real-time messaging. That is, we can send a message that will give us a subscription to receive any data, or send a message and wait for a response as long as necessary. Here the situation is much better than with SSE. JMeter has 2 Plugins for testing WebSocket connections: JMeter WebSocket Sampler by Maciej Zaleski and JMeter WebSocket Samplers by Peter Doornbosch, and you can read about how to use them from the blog posts.
Solution 4: HTTP Server in Client Application
And the last option in this article, which is suitable for both types of exchanging, too, is using a HTTP server on the client side (a rarely used option). This option can be used in a case where we ask the server to perform an operation that takes a very long time. This prevents a situation when we ask the server for a status of the operation every 5 minutes. For example, the client asks to build a large report and when it is built, send it to a specific address (http server on the client).
That is, the client sends a request to the server being tested and receives a response that the server has started to perform some work. Accordingly, we have no open connections and we do not check the progress on the server every minute. When the server finishes the work, it sends the request with information about it to its HTTP server.
As an example, you can review this plugin. It is not in the Plugin Manager, because it is developed for a certain implementation of tested server and it will have to be changed for your needs. It deploys a small http server, when the sampler starts and waits for a response from the server.
The plugin works as follows (A is our client, B is a tested server):
- A : NotificationReceiverCreation sampler starts and notifies NanoHTTPD that it is waiting for an answer from B
- A : Any sampler sends a request to B for initialization of action
- A : NotificationReceiverWait sampler starts and waits for the response
- B : B sends the answer to A (to our NanoHTTPD)
- A : NanoHTTPD notifies NotificationReceiverWait sampler that the answer has arrived
- A : NotificationReceiverWait Sample is closed, the time is recorded
Accordingly, our task is to process the flow described above. We wrote a little demo server to demonstrate the working of the plugin. It uses NanoHTTPD too and you can download it from here. It works as follows:
A client sends a GET request to localhost:8085/build address with a reportId parameter. This parameter must equal the Functional Identifier in NotificationReceiverCreation and NotificationReceiverWait. Using this parameter, we will be able to track the chain of requests and understand that the message with the report is the answer to our request and not to some other one.
- Server sends response with information that it has started building the report.
- Server waits 3 seconds.
- Server sends request to our NanoHTTPD Server in JMeter.
Now we can proceed with the demonstration:
1. Compile the source code of the plugin and put it in the /lib/ext folder
2. You also need to download nanohttpd lib and put it in /lib folder.
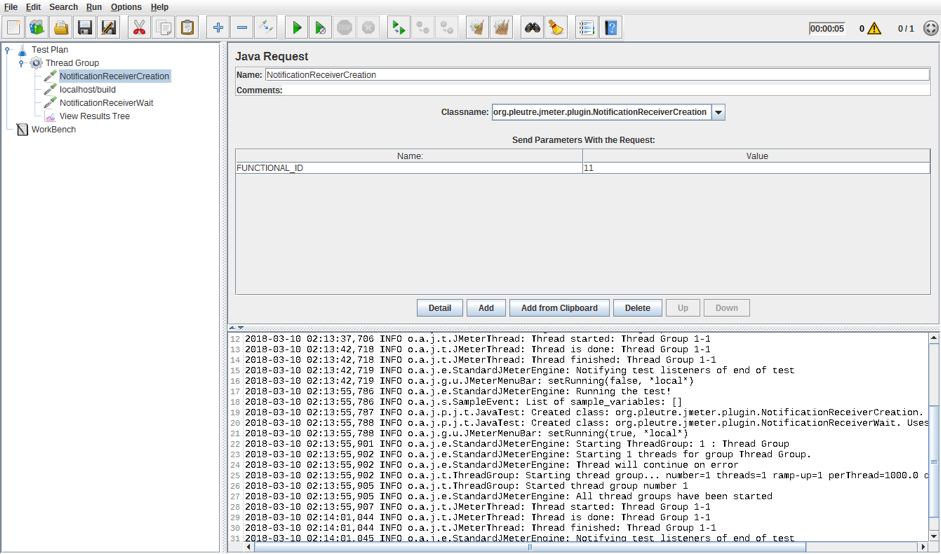
3. The structure of script for this case is shown in the screenshot below:

4. A GIF that demonstrates the work is presented below.
.gif)
Notes:
1. nanoHTTPD is deployed immediately when you select a sampler, and not when you run the test.
2. There will be only one server. These samplers will simply add messages to the waiting queue, but will not create a big amount of http servers.
3. If you see the following error, it means that you have something located on your 8080 port. The nano server tries to use this port and fails, so you either need to kill what's located on the specified port or change the line that is responsible for the port selecting in the HttpServer.java file (line 35).

That's it! You now know how to deal with async requests in JMeter. To learn more advanced JMeter usage, check out our free JMeter academy.
You can also scale your JMeter tests through BlazeMeter, and enjoy running your tests from multiple locations, security and advanced reporting. To try us out, request a demo, or put your URL in the box below and your test will start in minutes.
Published at DZone with permission of , DZone MVB. See the original article here.
Opinions expressed by DZone contributors are their own.

Comments