How To Benchmark the End-to-End Performance of Different I/O Solutions for Model Training
In this blog, we will demonstrate how to set up and benchmark the end-to-end performance of different I/O solutions for the model training process.
Join the DZone community and get the full member experience.
Join For FreeThis blog will demonstrate how to set up and benchmark the end-to-end performance of the training process.
Architecture
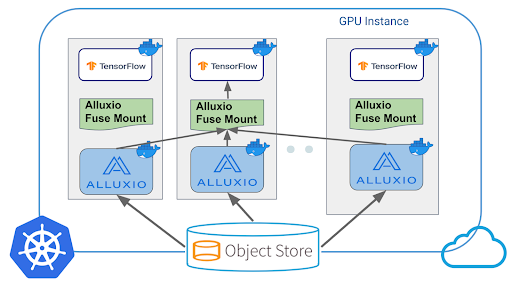
The typical process of using Alluxio to accelerate machine learning and deep learning training includes the following three steps:
- Deploy Alluxio to the training cluster.
- Mount Alluxio as a local folder to training jobs.
- Load data from local folders (backed by Alluxio) using a training script.

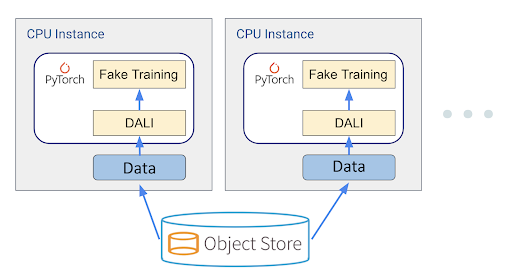
The benchmark is modeled after Imagenet training in PyTorch with the following architecture:

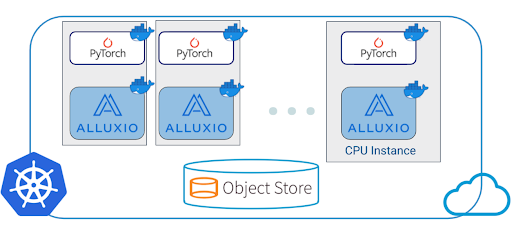
Training jobs and the Alluxio servers are deployed in the same Kubernetes cluster. An AWS EKS cluster is launched to deploy Alluxio or s3fuse in addition to PyTorch benchmark tasks to run training. An EKS client node is also launched for interacting with the EKS cluster.
The benchmark uses DALI (Nvidia Data Loading Library) as the workload generator, consisting of the following steps:
- Load data from object storage into the training cluster.
- Use DALI to load data from the local training machine and start data preprocessing.
- Start training based on data in DALI. To remove the noise in training and focus on measuring the I/O throughput, a fake operation that takes a constant amount of time(0.5 sec) is used as placeholders for actual training logic.

Benchmark Setup
Prerequisites
In this section, we assume some basic familiarity with Kubernetes and kubectl but no pre-existing deployment is required.
We also assume that readers are familiar with the typical Terraform plan/apply workflow, or read the getting started tutorial. Here are the prerequisites:
- Terraform CLI has been installed (0.12 or newer). Follow the Terraform quickstart guide.
- An AWS account with the IAM permissions listed on the EKS module documentation.
- AWS credentials for creating resources. Refer to AWS CLI credentials config.
Here are the specifications for the EKS cluster and client node:
EKS Cluster Specifications
| Instance Type | Master Instance Count | Worker Instance Count | Instance Volume | Instance Volume Size | Instance CPU | Instance Memory |
| r5.8xlarge | 1 | 4 | gp2 SSD | 256 | 32vCPU | 256GiB |
EKS Client Node Specifications
| Instance Type | Instance Count | Instance Volume | Instance Volume Size | Instance CPU | Instance Memory |
| m5.xlarge | 1 | gp2 SSD | 128 | 4vCPU | 16GiB |
Step 1: Prepare Dataset
Download Imagenet dataset from https://www.image-net.org/. The required datasets are ILSVRC2012_img_train.tar and ILSVRC2012_img_val.tar.
After downloading the full dataset, create an S3 bucket for hosting the imagenet dataset. Move the validation images to labeled subfolders following this script and upload the whole raw JPEGs dataset to your S3 bucket s3://${s3_imagenet_bucket}/.
After this step, the dataset on S3 looks like this:
s3://${s3_imagenet_bucket}/
  train/
    n01440764/
      n01440764_10026.JPEG
      …
    ...
 val/
    n01440764/
      ILSVRC2012_val_00000293.JPEG
      …
    ...
Step 2: Setup the Benchmark Environment
Launch the Cluster
Create clusters by running the commands locally. First, download the Terraform files:
wget https://alluxio-public.s3.amazonaws.com/ml-eks/create_eks_cluster.tar.gz
tar -zxf create_eks_cluster.tar.gz
cd create_eks_cluster
Initialize the Terraform working directory to download the necessary plugins to execute. You only need to run this once for the working directory.
terraform init
Launch the EKS cluster and an EC2 instance to be used as the EKS client node. Type “yes” to confirm resource creation.
terraform applyThis final command will take about 10 to 20 minutes to provision the EKS cluster and client node.
After the cluster is launched, the EKS cluster name, DNS names of master, workers, and client will be displayed on the console. Save all the output information to set up the EKS cluster and client node later.
Apply complete! Resources: 54 added, 0 changed, 0 destroyed.

Outputs:

client_public_dns = "ec2-54-208-163-100.compute-1.amazonaws.com"
eks_cluster_name = "alluxio-eks-1vwb"
master_private_dns = "ip-10-0-5-237.ec2.internal"
master_public_dns = "ec2-3-235-169-25.compute-1.amazonaws.com"
workers_private_dns = "ip-10-0-5-246.ec2.internal,ip-10-0-5-127.ec2.internal,ip-10-0-6-146.ec2.internal,ip-10-0-4-126.ec2.internal"
workers_public_dns = "ec2-34-236-244-247.compute-1.amazonaws.com,ec2-44-199-193-137.compute-1.amazonaws.com,ec2-18-232-250-113.compute-1.amazonaws.com,ec2-54-152-114-222.compute-1.amazonaws.com"
Keep the terminal to destroy resources once done with the experiment.
Access the Cluster
EKS clusters, by default, will use your OpenSSH public key stored at ~/.ssh/id_rsa.pub to generate temporary aws key pairs to allow SSH access. Replace the DNS names with their values shown as the result of Terraform apply.
ssh -o StrictHostKeyChecking=no ec2-user@${client_public_dns}For simplicity, we will use the SSH commands without giving a private key path in this tutorial. Indicate the path to your private key or key pair pem file if not using the default private key path at ~/.ssh/id_rsa.
ssh -o StrictHostKeyChecking=no -i ${ssh_private_key_file} ec2-user@${client_public_dns}
Setup the EKS Client Node
The EKS client node needs to be set up to connect to the created EKS cluster, to deploy and destroy services in the EKS cluster, and to run the Arena command to launch the distributed Pytorch benchmark.
The Arena is a CLI to run and monitor the machine learning jobs and easily check their results. It is used in this tutorial to launch the distributed PyTorch benchmark in the whole EKS cluster with one click. The following steps are used to install Arena with all its dependencies.
SSH into the client node:
ssh -o StrictHostKeyChecking=no ec2-user@${client_public_dns}Install eksctl, AWS IAM authenticator, helm, kubectl:
# install eksctl
curl --silent --location "https://github.com/weaveworks/eksctl/releases/latest/download/eksctl_$(uname -s)_amd64.tar.gz" | tar xz
sudo mv ./eksctl /usr/local/bin/eksctl
eksctl

# install aws iam authenticator
curl -o aws-iam-authenticator https://amazon-eks.s3.us-west-2.amazonaws.com/1.19.6/2021-01-05/bin/linux/amd64/aws-iam-authenticator
chmod +x ./aws-iam-authenticator
sudo mv ./aws-iam-authenticator /usr/local/bin/aws-iam-authenticator
aws-iam-authenticator help

# install helm
wget https://get.helm.sh/helm-v2.17.0-linux-amd64.tar.gz
tar -zxvf helm-v2.17.0-linux-amd64.tar.gz
sudo mv linux-amd64/helm /usr/local/bin/helm
sudo ln -s /usr/local/bin/helm /usr/local/bin/arena-helm
helm help
arena-helm help

# install kubectl
curl -LO "https://dl.k8s.io/release/$(curl -L -s https://dl.k8s.io/release/stable.txt)/bin/linux/amd64/kubectl"
sudo install -o root -g root -m 0755 kubectl /usr/local/bin/kubectl
kubectl version --client
Connecting the client node to the created EKS cluster, input the AWS access key and secret key that you used to launch the EKS cluster (stored in ~/.aws/credentials by default), get your EKS cluster name from the output of Terraform apply.
aws_access_key_id=<your aws_access_key_id>
aws_secret_access_key=<your aws_secret_access_key>
aws_region=us-east-1
eks_cluster_name=<eks_cluster_name from terraform output>
Connect to EKS cluster, install Kubeflow and arena:
# connect to eks cluster
aws --version
aws configure set aws_access_key_id ${aws_access_key_id}
aws configure set aws_secret_access_key ${aws_secret_access_key}
aws configure set default.region us-east-1
aws eks update-kubeconfig --name ${eks_cluster_name}

# install kubeflow
wget https://github.com/kubeflow/kfctl/releases/download/v1.2.0/kfctl_v1.2.0-0-gbc038f9_linux.tar.gz
tar -xvf kfctl_v1.2.0-0-gbc038f9_linux.tar.gz
sudo mv kfctl /usr/local/bin/kfctl
mkdir -p ${eks_cluster_name}
cd ${eks_cluster_name}
config_uri="https://raw.githubusercontent.com/kubeflow/manifests/v1.2-branch/kfdef/kfctl_aws.v1.2.0.yaml"
wget -O kfctl_aws.yaml ${config_uri}
kfctl apply -V -f kfctl_aws.yaml
kubectl -n kubeflow get all

# install arena
wget https://github.com/kubeflow/arena/releases/download/v0.6.0/arena-installer-0.6.0-e0c728b-linux-amd64.tar.gz
cp arena-installer-0.6.0-e0c728b-linux-amd64.tar.gz arena-installer.tar.gz
tar -xvf arena-installer.tar.gz -C .
sudo chmod -R 777 /usr/local/bin/
cd arena-installer
export KUBE_CONFIG=/home/ec2-user/.kube/config && ./install.sh
arena
Lastly, make sure you can connect to the EKS cluster by running:
[ec2-user@ip-172-31-43-58 arena-installer]$ kubectl get svc

NAME         TYPE        CLUSTER-IP   EXTERNAL-IP   PORT(S)   AGE
kubernetes   ClusterIP   172.20.0.1   <none>        443/TCP   20m
Label the EKS Master and Workers
Get the master and workers private DNS from the output of running Terraform apply:
master_private_dns=<master_private_dns from terraform output>
workers_private_dns=<workers_private_dns from terraform output>
From the EKS client node, label the nodes of the EKS cluster to separate master and worker nodes:
kubectl create namespace alluxio-namespace
kubectl label nodes ${master_private_dns} alluxio-master=true
for worker in $(echo ${workers_private_dns} | tr "," "\n"); do kubectl label nodes ${worker} alluxio-master=false;done
kubectl get nodes --show-labels
Only one node is labeled as the master node, all other nodes are labeled as worker nodes.
[ec2-user@ip-172-31-43-58 arena-installer]$ kubectl get nodes --show-labels
NAME                         STATUS   ROLES    AGE   VERSION               LABELS
ip-10-0-4-148.ec2.internal   Ready    <none>   14m   v1.17.17-eks-ac51f2   alluxio-master=false….
ip-10-0-4-194.ec2.internal   Ready    <none>   14m   v1.17.17-eks-ac51f2   alluxio-master=false...
ip-10-0-5-45.ec2.internal    Ready    <none>   14m   v1.17.17-eks-ac51f2   alluxio-master=false...
ip-10-0-5-76.ec2.internal    Ready    <none>   14m   v1.17.17-eks-ac51f2   alluxio-master=true...
ip-10-0-6-33.ec2.internal    Ready    <none>   14m   v1.17.17-eks-ac51f2   alluxio-master=false...
Step 3: Deploy Alluxio Cluster and FUSE
From the node launching the EKS cluster, open a new terminal window. In the new terminal, set the worker_public_dns environment variable with value copied from EKS cluster Terraform output.
workers_public_dns=<workers_public_dns from terraform output>Create the `/alluxio` folder for Alluxio worker storage and Alluxio mount points in each EKS cluster node:
for worker in $(echo ${workers_public_dns} | tr "," "\n"); do ssh  -o StrictHostKeyChecking=no ec2-user@$worker 'sudo sh -c "mkdir /alluxio"'; done
for worker in $(echo ${workers_public_dns} | tr "," "\n"); do ssh  -o StrictHostKeyChecking=no ec2-user@$worker 'sudo sh -c "chmod 777 /alluxio"'; done
Alluxio cluster is set up with:
- 160GB SSD only storage on each Alluxio worker.
s3://<your s3_imagenet_bucket>is mounted as Alluxio root UFS.- the Alluxio namespace is mounted to a local folder
/alluxio/alluxio-mountpoint/alluxio-fuse/on each worker node, where users can access this local folder to access data cached by Alluxio or stored in your S3 imagenet bucket.
SSH into the EKS client node:
ssh -o StrictHostKeyChecking=no ec2-user@${client_public_dns}Download the Alluxio Kubernetes deploy scripts:
wget https://alluxio-public.s3.amazonaws.com/ml-eks/create_alluxio_cluster.tar.gz
tar -zxf create_alluxio_cluster.tar.gz
cd create_alluxio_cluster
Modify Alluxio K8S scripts to connect to your S3 bucket:
s3_imagenet_bucket=<your bucket that stores the imagenet data>
aws_access_key_id=<your aws_access_key for accessing the imagenet bucket}
aws_secret_access_key=<your aws_secret_access_key for accessing the imagenet bucket}
Replace the S3 bucket and its credentials in the Alluxio Kubernetes script so that your s3 bucket which contains the imagenet dataset will be mounted to Alluxio as the root UFS.
sed -i "s=ALLUXIO_S3_ROOT_UFS_BUCKET=${s3_imagenet_bucket}=g" ./alluxio-configmap.yaml
sed -i "s/aws.accessKeyId=AWS_ACCESS_KEY/aws.accessKeyId=${aws_access_key_id}/g" ./alluxio-configmap.yaml
sed -i "s/aws.secretKey=AWS_SECRET_ACCESS_KEY/aws.secretKey=${aws_secret_access_key}/g" ./alluxio-configmap.yaml
Create the Alluxio cluster under the Kubernetes namespace alluxio-namespace
kubectl create -f alluxio-configmap.yaml -n alluxio-namespace
kubectl create -f master/ -n alluxio-namespace
kubectl create -f worker/ -n alluxio-namespace
This may take several minutes, you can check the status via:
kubectl get pods -o wide -n alluxio-namespace
When all nodes show `READY=2/2`, the Alluxio cluster is launched:
[ec2-user@ip-172-31-47-63 ML_K8S]$ kubectl get pods -o wide -n alluxio-namespace
NAME                   READY   STATUS    RESTARTS   AGE   IP           NODE                         NOMINATED NODE   READINESS GATES
alluxio-master-0       2/2     Running   0          32s   10.0.6.105   ip-10-0-6-78.ec2.internal    <none>           <none>
alluxio-worker-8fd28   2/2     Running   0          33s   10.0.6.67    ip-10-0-6-67.ec2.internal    <none>           <none>
alluxio-worker-fgmds   2/2     Running   0          33s   10.0.4.186   ip-10-0-4-186.ec2.internal   <none>           <none>
alluxio-worker-khv2v   2/2     Running   0          33s   10.0.6.197   ip-10-0-6-197.ec2.internal   <none>           <none>
alluxio-worker-lpnd7   2/2     Running   0          33s   10.0.5.221   ip-10-0-5-221.ec2.internal   <none>           <none>
[Optional] You can use one-click to load all the imagenet data from S3 into Alluxio and cache the data to speed up the benchmark I/O throughput. If your data is located in a subfolder of your S3 imagenet bucket, change from `distributedLoad /` to `distributedLoad /subfolder`
kubectl exec --stdin --tty alluxio-master-0 alluxio-master -n alluxio-namespace -- bash -c "bin/alluxio fs distributedLoad /"
The load step may take about 20 to 50 minutes.
The environment is ready for running the data loading benchmarking.
Step 4: Deploy S3 FUSE as a Baseline
In each of the worker nodes, run the following commands:
s3_imagenet_bucket=<your bucket that stores the imagenet data>
aws_access_key_id=<your aws_access_key for accessing the imagenet bucket}
aws_secret_access_key=<your aws_secret_access_key for accessing the imagenet bucket}
# prepare for mount
sudo amazon-linux-extras install -y epel
sudo yum install -y s3fs-fuse
echo ${aws_access_key_id}:${aws_secret_access_key} > ~/.passwd-s3fs
chmod 600 ~/.passwd-s3fs
# prepare the mount directory
sudo mkdir -p /s3/s3-fuse
sudo chown -R ec2-user:ec2-user /s3/s3-fuse
sudo chmod -R 777 /s3/s3-fuse
echo "user_allow_other" | sudo tee -a /etc/fuse.conf
s3fs ${s3_imagenet_bucket} /s3/s3-fuse -o passwd_file=/home/ec2-user/.passwd-s3fs -o kernel_cache -o allow_other -o max_background=10000 -o max_stat_cache_size=10000000 -o dbglevel=warn -o use_cache=/tmp/s3cache -o retries=10 -o connect_timeout=600 -o readwrite_timeout=600 -o list_object_max_keys=10000 -o stat_cache_interval_expire=172800
For s3fs-fuse, we enabled the metadata cache and data cache to improve the performance. Metadata cache size is larger than the test file number. Data cache location has enough space for hosting the test dataset.
Step 5: Run Benchmark
The benchmark code is modified from the NVIDIA DALI example script given by the DALI tutorial ImageNet Training in PyTorch. The original script supports reading from the imagenet original dataset, doing data loading from the local filesystem, data preprocessing, data iteration with DALI, and training the model with PyTorch Resnet models.
Our modifications include:
- Use sleep for 0.5 seconds to replace the actual Resnet training logics for better benchmarking the data loading speed.
- Change to load and process data with CPU only instead of using GPU or MIXED devices to reduce the benchmarking costs.
Our script supports running DALI data loader from multiple nodes with multiple processes and recording the image loading and processing throughput.
In the client node, run the following command to benchmark the data loading performance against Alluxio:
arena --loglevel info submit pytorch \
  --name=test-job \
  --gpus=0 \
  --workers=4 \
  --cpu 10 \
  --memory 32G \
  --selector alluxio-master=false \
  --image=nvcr.io/nvidia/pytorch:21.05-py3 \
  --data-dir=/alluxio/ \
  --sync-mode=git \
  --sync-source=https://github.com/LuQQiu/DALILoader.git \
  "python /root/code/DALILoader/main.py \
  --epochs 3 \
  --process 8 \
  --batch-size 256 \
  --print-freq 10 \
  /alluxio/alluxio-mountpoint/alluxio-fuse/dali"
[Optional] Run the following command to benchmark the data loading performance against Fuse mount points launched by s3fs-fuse:
arena --loglevel info submit pytorch \
  --name=test-job \
  --gpus=0 \
  --workers=4 \
  --cpu 10 \
  --memory 32G \
  --selector alluxio-master=false \
  --image=nvcr.io/nvidia/pytorch:21.05-py3 \
  --data-dir=/s3/ \
  --sync-mode=git \
  --sync-source=https://github.com/LuQQiu/DALILoader.git \
  "python /root/code/DALILoader/main.py \
  --epochs 3 \
  --process 8 \
  --batch-size 256 \
  --print-freq 10 \
  /s3/s3-fuse/dali"
Some important parameters include:
- “–workers=4”, the script will be launched in 4 nodes.
- “–epochs 3”, we will do three data loading, preprocessing, and mock training circles. In each epoch, the same data partition will be loaded again. During the epochs, the script will sleep for some time that the user can clear the buffer cache manually to prevent the system cache affects performance.
- “–process 8”, in each node, 8 processes will be launched doing the data loading, processing, and mocked training jobs, the whole dataset will be split evenly for each process in each node to read.
When reading from Alluxio, the benchmark may take up to 1 hour to finish. Whereas the benchmark reading from s3fs-fuse may take up to 24h in our experience. One can use the following commands to check the benchmark progress:
# See the test job is in Pending, Running, Succeed, or Failed status
arena list test-job
# Check the detailed test progress
kubectl logs -f test-job-master-0
After the test job succeeds, the end-to-end training throughput of each epoch shows in the node logs. Cluster throughput of each epoch can be calculated by summing up the node throughput of each epoch.
kubectl logs test-job-master-0
kubectl logs test-job-worker-0
kubectl logs test-job-worker-1
kubectl logs test-job-worker-2
Step 6: Cleanup
When the benchmark is complete, on the same terminal used to create the AWS resources, run terraform destroy to tear down the previously created AWS resources. Type yes to approve.
Congratulations, you’re done!
Benchmark Results
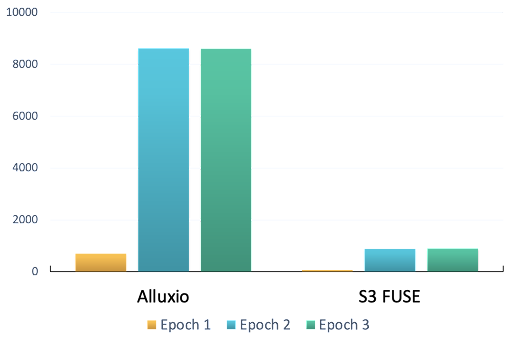
This section summarizes the benchmarking results as described above. We compare the performance of Alluxio with S3 FUSE (use s3fs-fuse as an example). Benchmark shows an average of 9 times improvement in end-to-end training throughput with Alluxio.
Two clusters are launched to test each case:
- Alluxio: benchmarking running against the Alluxio FUSE mount point. Data is not preloaded into Alluxio.
- S3 Fuse: benchmarking running against the s3fs-fuse mount point.
In each setup, the PyTorch script runs against either the Alluxio or S3 FUSE. The script launches in 4 nodes with 8 processes for each node. The whole dataset is split evenly for each process in each node to do the end-to-end training including data loading, data preprocessing, and fake training jobs.
Each process executes three epochs of the end-to-end training. To prevent the operating system cache from affecting the throughput results, the system buffer cache is cleared between epochs.
In each epoch of each process, two pieces of information are recorded, the total time duration of the end-to-end training and the total image number processed by this process. Dividing the total time duration by total image number generates the per-process per-epoch throughput (images/second). In each epoch, summing up the throughput of all processes generates the cluster per-epoch throughput which is shown in the figure below:

This figure compares the end-to-end training cluster throughput between Alluxio and S3 FUSE in three epochs. In the first epoch, both Alluxio and S3 FUSE need to load the remote S3 data and cache to speed up future access. In the following epochs, training scripts can directly load cached data from Alluxio or S3 FUSE which yields 11 times performance improvements compared to the first epoch. Alluxio outperformed S3 FUSE (9 times performance differences) in terms of the first epoch with remote data and the following epochs with cached data.
Note that the end-to-end training includes data loading, data preprocessing, and fake training so the actual throughput number is not the maximum read throughput Alluxio or S3 FUSE can achieve but a good indicator for comparing different data access solutions.
Result Analysis
Alluxio outperformed S3 FUSE in the end-to-end training including data loading, data preprocessing, and fake training. Data preprocessing and fake training are independent of the data access solutions and are expected to take a similar amount of time in different data access cases.
The data loading process is likely to contribute most to the performance differences. The following factors may contribute to the data loading performance differences:
- S3 FUSE targets POSIX compatibility while Alluxio FUSE fulfills the POSIX requirements in important workloads and focuses on achieving better training performance under high concurrent workloads.
- Alluxio is highly tunable and supports high concurrency. Alluxio can be tuned to meet the training challenges by providing more threads executing read, write, and file listing requests to maximize the usage of I/O bandwidth. In addition, Alluxio internally has improved the code concurrency to eliminate the training bottlenecks.
Note that this benchmark compares Alluxio and S3 FUSE without taking advantage of Alluxio’s unique benefits. Alluxio outperformed S3 FUSE in terms of the basic functionalities including accessing remote S3 data and caching data locally. If the following unique benefits of Alluxio are involved, Alluxio can yield more benefits:
- The training data size is larger than the single node caching ability.
- Training nodes or multiple training tasks share the same dataset.
- Advanced data management (e.g. data preloading) is desired.
Summary
This benchmark is designed to compare the data access speed between Alluxio and a popular S3 FUSE application (s3fs-fuse) even without taking advantage of further unique benefits Alluxio provides. Alluxio is 9 times faster than s3fs-fuse. Using Alluxio can significantly improve data access speed in millions of small file training sessions.
Published at DZone with permission of Bin Fan, DZone MVB. See the original article here.
Opinions expressed by DZone contributors are their own.

Comments